Configuring Grafana with GitHub OAuth SSO Access
In this tutorial we will show you how to configure identity-based access to a self-hosted Grafana instance using GitHub OAuth SSO, Teleport Enterprise and JWT tokens. In today’s technology landscape, with employees working remotely all across the globe, simple perimeter security is no longer good enough.
Article Contents
Configuring Grafana with GitHub OAuth SSO Access
In this tutorial we will show you how to configure identity-based access to a self-hosted Grafana instance using GitHub OAuth SSO, Teleport Enterprise and JWT tokens. In today’s technology landscape, with employees working remotely all across the globe, simple perimeter security is no longer good enough. Accessing infrastructure resources with long-lived credentials is a security nightmare waiting to happen. It’s not a question of if, but when, these credentials will eventually be leaked or stolen.
With GitHub and Teleport Enterprise, however, you can configure access to applications like Grafana based on strict identity-based RBAC access controls, so you know exactly who is accessing what on your network.
- How to host a Teleport-managed Grafana instance
- How to configure GitHub SSO for accessing Teleport
- How to map Teleport RBAC roles to GitHub teams
- Configure Teleport RBAC roles to adhere to the principle of least privilege
- Enable Passwordless access to your Grafana application
Grafana architecture
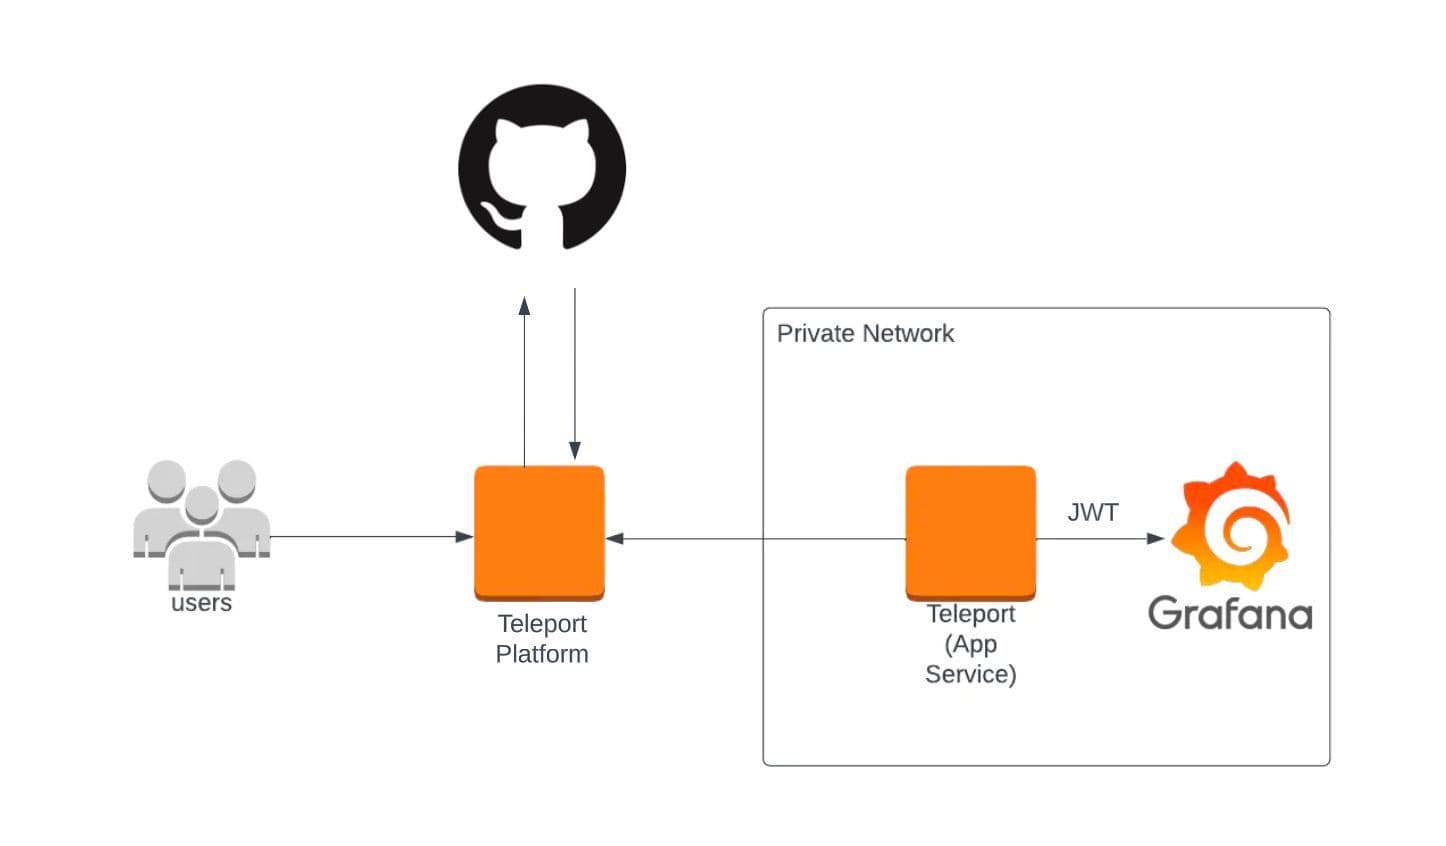
Above is a high-level diagram of the setup we’re going to be implementing. Instead of using a Grafana username and password to access our application, first users will authenticate with the Teleport platform using GitHub SSO. In this case Teleport will act as a gateway and a proxy, gating access to your Grafana application, enforcing RBAC roles, all the while ensuring that all traffic between your users and the private application are fully encrypted and audited.
The first step is to spin up a Grafana instance inside your Teleport cluster. You can follow the guide here in our docs to start up a containerized Grafana instance that will be managed by the Teleport cluster. As a prerequisite remember that this requires Teleport Enterprise edition.
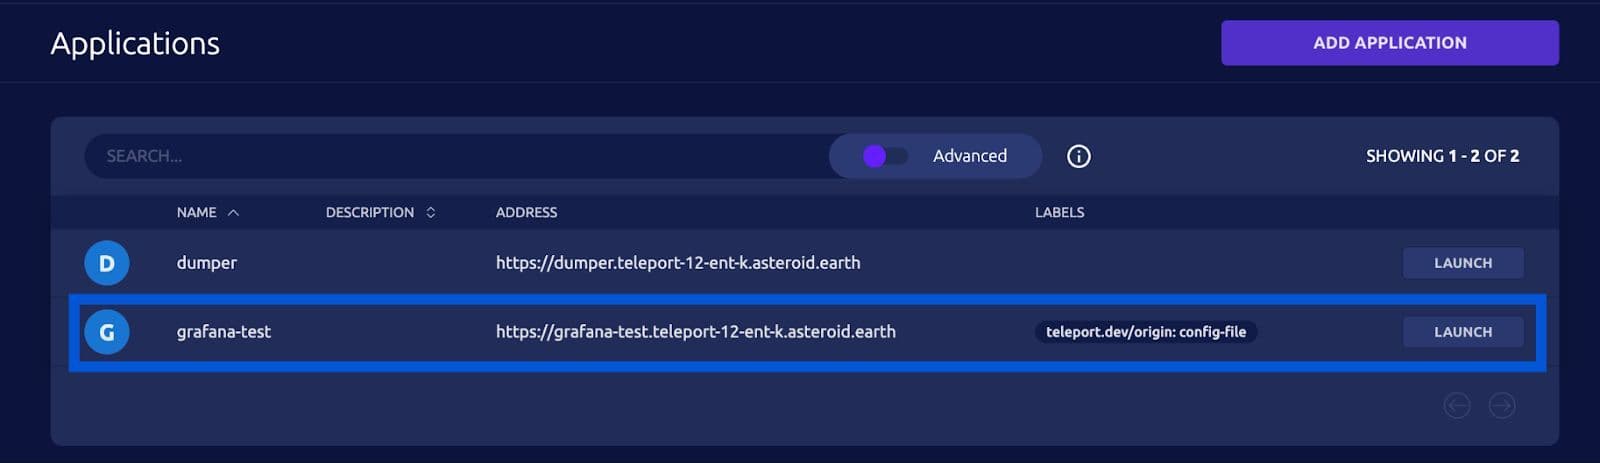
Once you have followed the steps listed in the docs, you should see your Grafana application listed here under the “Applications” Tab in your Teleport web UI. This will allow all users with the `access` role to access your Grafana application. We’re going to more finely tune these RBAC controls in the next sections.
Configuring GitHub OAuth app for Teleport and Grafana
Now that we have our Grafana instance managed by our Teleport cluster, we’re going to configure GitHub access for our cluster. We will also map our GitHub teams to our Teleport roles allowing us to maintain a chain of custody for our users tied to their identities in GitHub.
In order to configure GitHub SSO to integrate with our Teleport cluster we’ll create and register a GitHub OAuth App.
When creating our app, ensure that your OAuth App's "Authentication callback URL" is the following:
`https://PROXY_ADDRESS/v1/webapi/github/`
`PROXY_ADDRESS` must be the public address of the Teleport Proxy Service.
Here are the instructions for creating a GitHub OAuth app.
Creating the Teleport OIDC connector
- undefined
First update the auth_service field in your Teleport configuration file, which is located by default at `/etc/teleport.yaml`. We’re going to configure Teleport to use GitHub authentication as the default instead of the local user database.
```
auth_service:
authentication:
type: github
```
Then restart the Teleport daemon.
Once Teleport has been updated with the new GitHub authentication scheme, we’re going to add a GitHub connector Teleport resource.
Define a GitHub connector resource in a local file named `github-connector.yaml`
```
kind: github
version: v3
metadata:
# Connector name that will be used with `tsh --auth=github login`
name: github
spec:
# Client ID of your GitHub OAuth App
client_id: <client-id>
# Client secret of your GitHub OAuth App
client_secret: <client-secret>
# Connector display name that will be shown on the Web UI login screen
display: GitHub
# Callback URL that will be called after successful authentication
redirect_url: https://<proxy-address>/v1/webapi/github/callback
# Mapping of org/team memberships onto allowed roles
teams_to_roles:
- organization: octocats # example GitHub organization name
team: admins # GitHub admin team name
# Maps octocats/admins to the "editor" Teleport role
roles:
- editor
- organization: octocats
team: developers # GitHub Developer team name
# Maps octocats/developers to the "grafana-dev" Teleport role
roles:
- grafana-dev
```
The values of client_id, client_secret, and redirect_url come from the GitHub OAuth App you created earlier.
Teleport will request only the read:org OAuth scope. Read more about OAuth scopes in GitHub's documentation.
Make sure to replace <proxy-address> with the publicly accessible domain of your Teleport cluster. Also change the example GitHub organization name to your organization’s actual GitHub organization.
Notice the `roles` field. This is where we map the GitHub organization/team to our Teleport RBAC roles. For the `octocats/admins` GitHub org/team attribute, we map it to our Teleport `editor` role. This will allow users in this GitHub team to edit roles and resources in our Teleport cluster.
The `octocats/developers` team on the other hand only allows access to our Teleport `grafana-dev` role which we’ll create in the next section. This role will be more restrictive and only allow access to our Grafana dashboard.
Once you have defined this connector resource in the yaml file, create it using the `tctl` tool:
`$ tctl create github-connector.yaml`
Creating our grafana-dev Teleport role
- undefined
Next we’ll create our `grafana-dev` role to pull in external information from GitHub.
Teleport administrators can configure roles to allow or deny users' access to applications with specific labels using the `app_labels` property.
As an example, here is how you can configure your Grafana application with a “metrics” label.
```
apps:
- name: "grafana"
uri: "http://localhost:3000"
# Static labels.
labels:
group: "metrics"
commands:
- name: "arch"
command: ["uname", "-p"]
period: 1m0s
```
We’ll use this metrics label to assign our `grafana-dev` role access to applications in the `metrics` group.
Create the local file `grafana-dev-role.yaml`:
```
kind: role
version: v5
metadata:
name: grafana-dev
spec:
options:
max_session_ttl: 24h
allow:
logins: ['{{internal.logins}}', ubuntu ]
app_labels:
group: "metrics"
```
After a user authenticates, Teleport will add the user's GitHub username to their `internal.logins ` trait for their Teleport session. Our `grafana-dev` role has this trait variable configured to include the GitHub user as an authorized SSH login.
Use `tctl` to create this role in the Teleport Auth Service:
`$ tctl create dev.yaml`.
Configuring JWT authentication to Grafana
- undefined
Now that we have GitHub SSO as our identity provider — configured for our Teleport cluster — and now that we have successfully mapped our GitHub teams to Teleport roles, the final step is to pass the JWT token attributed to our user session to our Grafana application. This will allow a single sign-on flow for Teleport users accessing our Grafana instance.
In your `grafana.ini` configuration file, located on the node where you are hosting your Grafana application, overwrite the `[auth.basic]` section and the `[auth.jwt]` section with the following values:
```
[auth.basic]
enabled = false
[auth.jwt]
disable_login_form = true
enabled = true
header_name = Teleport-Jwt-Assertion
email_claim = sub
username_claim = sub
auto_sign_up = true
```
This will allow Grafana to receive the JWT token attributed to the user-section, allowing passwordless access into your Grafana application.
Secure and audited identity-based Grafana access
Now that we have successfully configured GitHub SSO authentication to our Teleport cluster, mapped our GitHub teams to our Teleport roles, and also configured JWT authentication for our Grafana instance, our users now are able to access Grafana based on the RBAC policies we have in place. This allows us to centralize all of our access to one location, cutting down on silos, reducing overhead and enforcing best security practices across the organization.
- For further reading on configuring JWT authentication for Grafana, please check out their documentation here.
- For further information and troubleshooting help for GitHub SSO authentication for Teleport, please check out our guide here.
Not a Teleport Enterprise user quite yet? Request a free Enterprise Cloud trial today and get started with identity-native, zero-trust, secure application access!