Teleport
Database Access with MongoDB Atlas
- Version 17.x
- Version 16.x
- Version 15.x
- Version 14.x
- Older Versions
Setting up Teleport Database Access with MongoDB Atlas
Length: 08:15
Teleport can provide secure access to MongoDB Atlas via the Teleport Database Service. This allows for fine-grained access control through Teleport's RBAC.
In this guide, you will:
- Configure your MongoDB Atlas database with either IAM or mutual TLS authentication.
- Add the database to your Teleport cluster.
- Connect to the database via Teleport
How it works
The Teleport Database Service communicates with MongoDB Atlas using mutual TLS. You configure MongoDB Atlas to trust the Teleport certificate authority for database clients, and Teleport to trust the Let's Encrypt CA, which signs certificates for MongoDB Atlas. When a user connects to MongoDB Atlas via Teleport, the Teleport Database Service authenticates using a certificate and forwards user traffic to MongoDB Atlas.
Prerequisites
-
A running Teleport cluster version 16.1.0 or above. If you want to get started with Teleport, sign up for a free trial or set up a demo environment.
-
The
tctladmin tool andtshclient tool.Visit Installation for instructions on downloading
tctlandtsh.
- MongoDB Atlas cluster.
- A host, e.g., an Amazon EC2 instance, where you will run the Teleport Database Service.
- To check that you can connect to your Teleport cluster, sign in with
tsh login, then verify that you can runtctlcommands using your current credentials.tctlis supported on macOS and Linux machines. For example:If you can connect to the cluster and run thetsh login --proxy=teleport.example.com --user=[email protected]tctl statusCluster teleport.example.com
Version 16.1.0
CA pin sha256:abdc1245efgh5678abdc1245efgh5678abdc1245efgh5678abdc1245efgh5678
tctl statuscommand, you can use your current credentials to run subsequenttctlcommands from your workstation. If you host your own Teleport cluster, you can also runtctlcommands on the computer that hosts the Teleport Auth Service for full permissions.
Step 1/4. Set up the Teleport Database Service
The Database Service requires a valid join token to join your Teleport cluster.
Run the following tctl command and save the token output in /tmp/token
on the server that will run the Database Service:
tctl tokens add --type=db --format=textabcd123-insecure-do-not-use-this
Install Teleport on the host where you will run the Teleport Database Service:
Install Teleport on your Linux server:
-
Assign edition to one of the following, depending on your Teleport edition:
Edition Value Teleport Enterprise Cloud cloudTeleport Enterprise (Self-Hosted) enterpriseTeleport Community Edition oss -
Get the version of Teleport to install. If you have automatic agent updates enabled in your cluster, query the latest Teleport version that is compatible with the updater:
TELEPORT_DOMAIN=example.teleport.comTELEPORT_VERSION="$(curl https://$TELEPORT_DOMAIN/v1/webapi/automaticupgrades/channel/default/version | sed 's/v//')"Otherwise, get the version of your Teleport cluster:
TELEPORT_DOMAIN=example.teleport.comTELEPORT_VERSION="$(curl https://$TELEPORT_DOMAIN/v1/webapi/ping | jq -r '.server_version')" -
Install Teleport on your Linux server:
curl https://goteleport.com/static/install.sh | bash -s ${TELEPORT_VERSION} editionThe installation script detects the package manager on your Linux server and uses it to install Teleport binaries. To customize your installation, learn about the Teleport package repositories in the installation guide.
Next, start the Database Service.
On the node where you will run the Database Service, start Teleport, pointing
the --auth-server flag at the address of your Teleport Proxy Service:
sudo teleport db start \ --token=/tmp/token \ --auth-server=example.teleport.sh:443 \ --name=mongodb-atlas \ --protocol=mongodb \ --uri=mongodb+srv://cluster0.abcde.mongodb.net \ --labels=env=dev
The --auth-server flag must point to the Teleport cluster's Proxy Service endpoint
because the Database Service always connects back to the cluster over a reverse
tunnel.
On the node where you will run the Teleport Database Service, add the following
in /etc/teleport.yaml:
version: v3
teleport:
  auth_token: "/tmp/token"
  proxy_server: example.teleport.sh:443

# disable services that are on by default
ssh_service: { enabled: no }
proxy_service: { enabled: no }
auth_service: { enabled: no }

db_service:
  enabled: "yes"
  databases:
  - name: "mongodb-atlas"
    protocol: "mongodb"
    uri: "mongodb+srv://cluster0.abcde.mongodb.net"
    static_labels:
      env: "dev"
Configure the Teleport Database Service to start automatically when the host boots up by creating a systemd service for it. The instructions depend on how you installed the Teleport Database Service.
On the host where you will run the Teleport Database Service, enable and start Teleport:
sudo systemctl enable teleportsudo systemctl start teleport
On the host where you will run the Teleport Database Service, create a systemd service configuration for Teleport, enable the Teleport service, and start Teleport:
sudo teleport install systemd -o /etc/systemd/system/teleport.servicesudo systemctl enable teleportsudo systemctl start teleport
You can check the status of the Teleport Database Service with systemctl status teleport
and view its logs with journalctl -fu teleport.
See the full YAML reference for details.
See below for details on how to configure the Teleport Database Service.
Connection endpoint
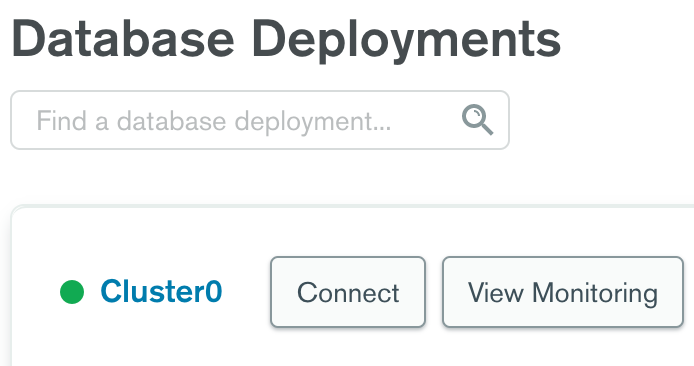
You will need to provide your Atlas cluster's connection endpoint for the db_service.databases[*].uri configuration option or --uri CLI flag. You can find this via the Connect dialog on the Database Deployments overview page:

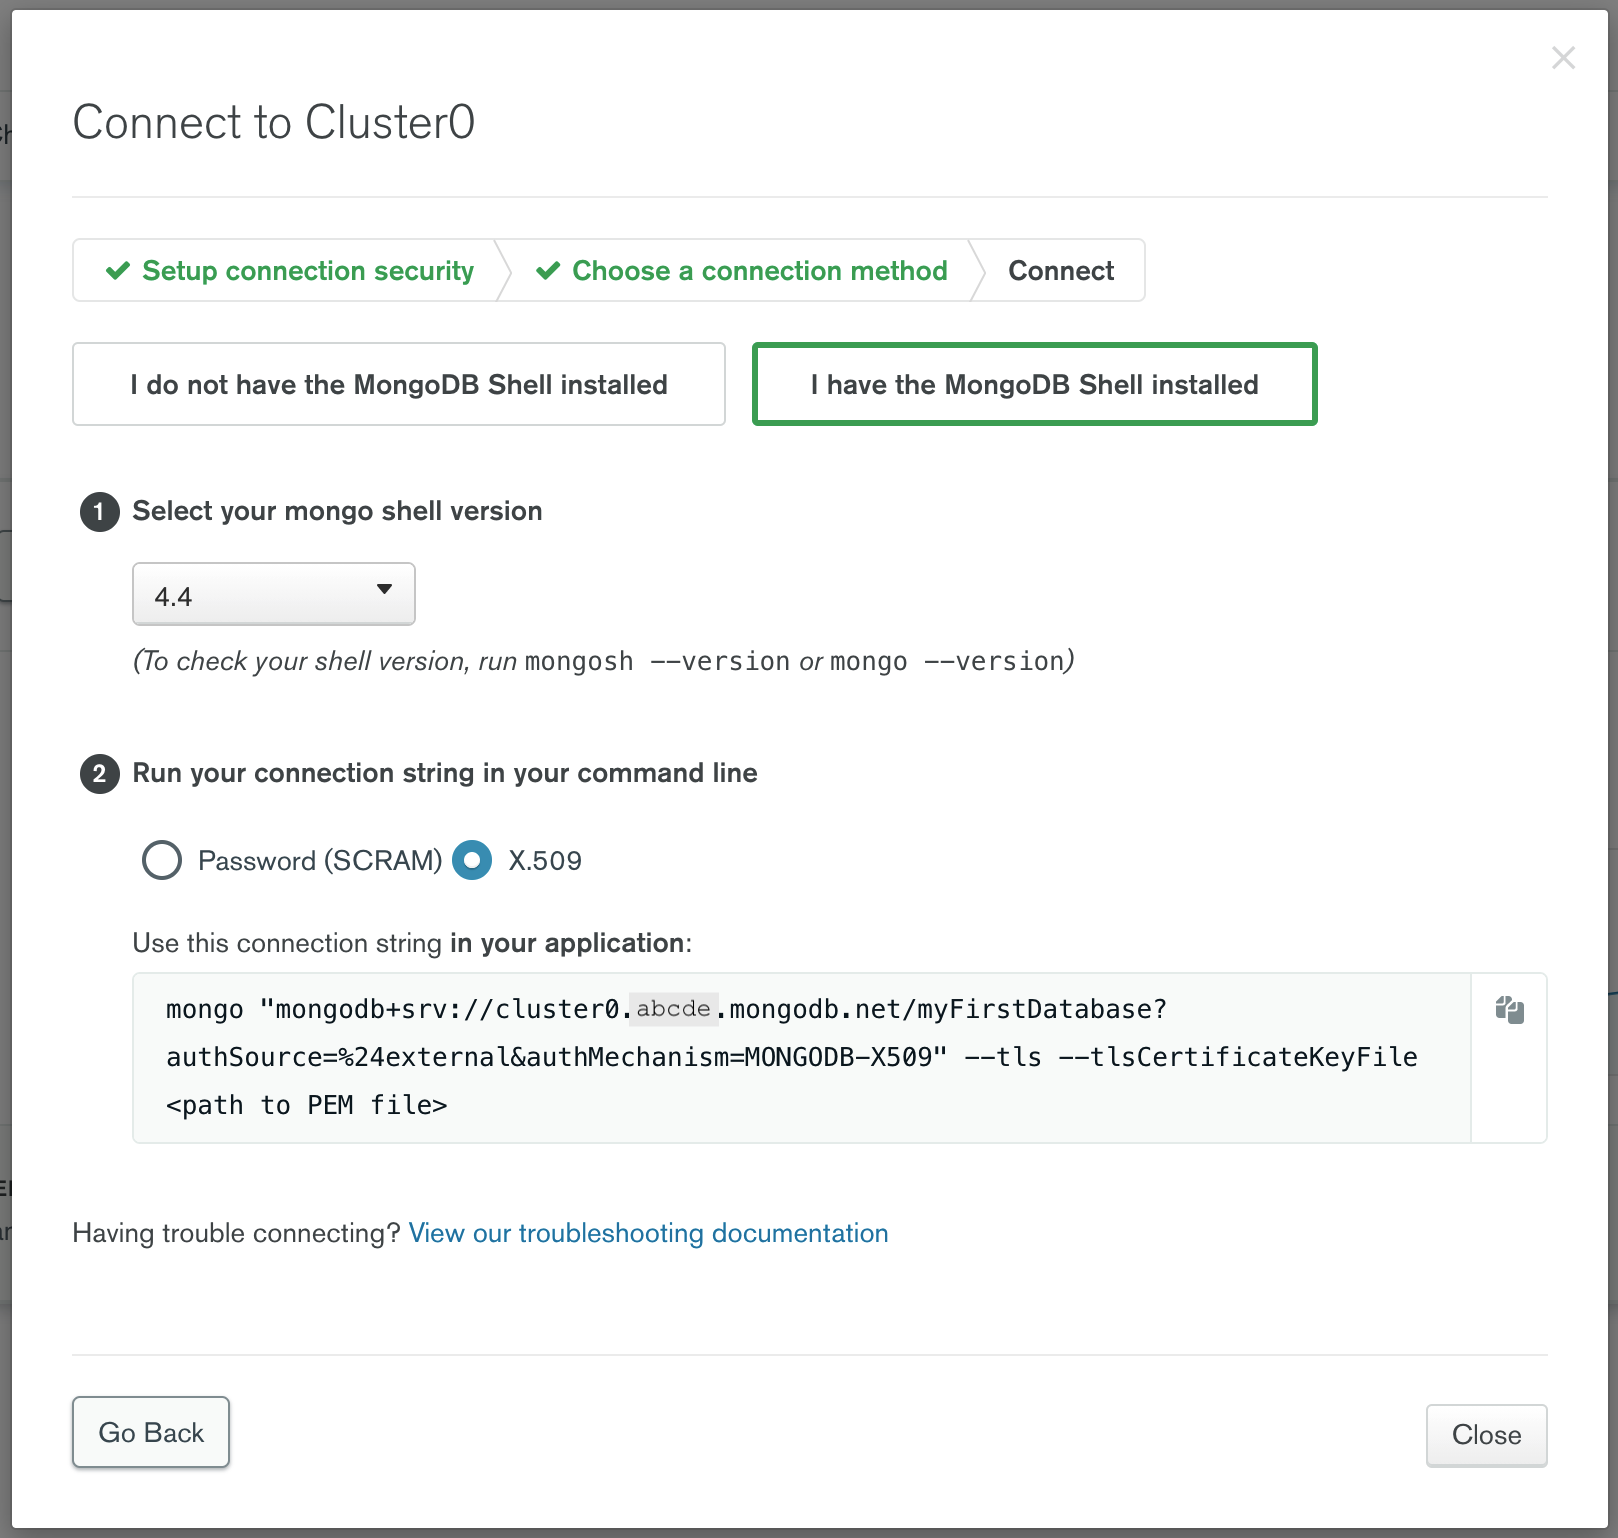
Go through the "Setup connection security" step and select "Connect with the MongoDB shell" to view the connection string:

Use only the scheme and hostname parts of the connection string in the URI:
--uri=mongodb+srv://cluster0.abcde.mongodb.net
Step 2/4. Create a Teleport user
To modify an existing user to provide access to the Database Service, see Database Access Access Controls
Create a local Teleport user with the built-in access role:
tctl users add \ --roles=access \ --db-users="*" \ --db-names="*" \ alice
Create a local Teleport user with the built-in access and requester roles:
tctl users add \ --roles=access,requester \ --db-users="*" \ --db-names="*" \ alice
| Flag | Description |
|---|---|
--roles | List of roles to assign to the user. The builtin access role allows them to connect to any database server registered with Teleport. |
--db-users | List of database usernames the user will be allowed to use when connecting to the databases. A wildcard allows any user. |
--db-names | List of logical databases (aka schemas) the user will be allowed to connect to within a database server. A wildcard allows any database. |
Database names are only enforced for PostgreSQL, MongoDB, and Cloud Spanner databases.
For more detailed information about database access controls and how to restrict access see RBAC documentation.
If you opt for a stricter selection of database names for your user, which
differs from the wildcard approach illustrated in this guide, it is essential
to include the admin database. This ensures MongoDB clients won't have
issues while connecting and executing operations such as retrieving server
information, listing databases, and aborting transactions.
Step 3/4. Configure Atlas
Teleport MongoDB Atlas integration supports two methods of authentication:
- Self-managed X.509: This method relies on certificates for authentication, with MongoDB Atlas trusting the Teleport certificates.
- AWS IAM: The authentication is done using AWS credentials fetched by Teleport.
First, obtain Teleport CA certificate by running the following tctl auth sign
command against your Teleport cluster:
tctl auth sign --format=mongodb --host=mongo --out=mongo
The --host and --ttl flag value doesn't matter in this case since you'll
only use the CA certificate which this command will output to mongo.cas file.
You can discard the other mongo.crt file.
Go to the Security / Advanced configuration section of your Atlas cluster and toggle "Self-managed X.509 Authentication" on:
Paste the contents of mongo.cas file in the Certificate Authority edit box and
click Save.
Create a MongoDB user
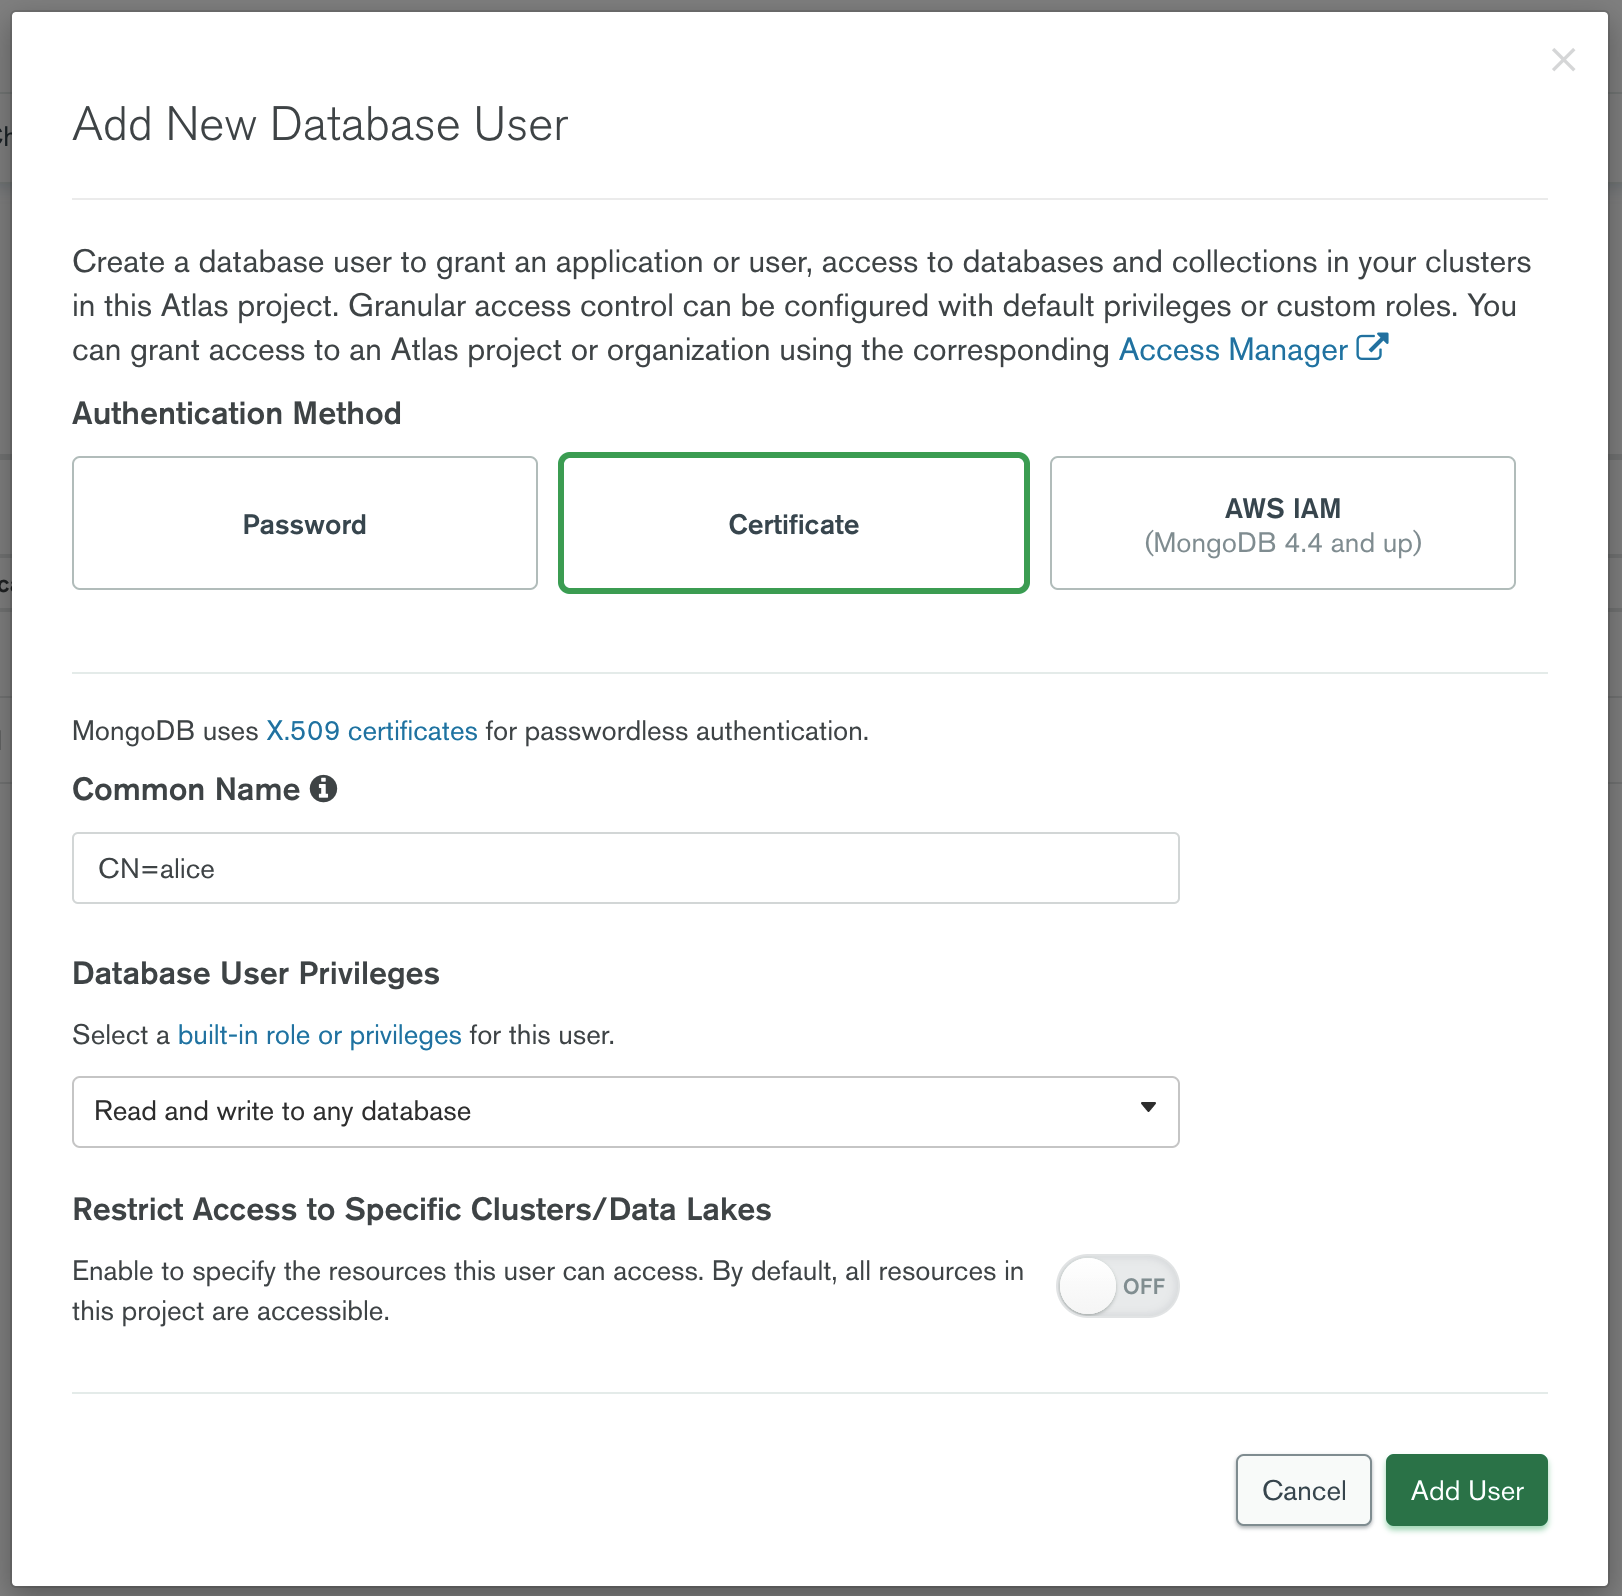
On the Security / Database Access page add a new database user with Certificate authentication method:

Make sure to specify the user as CN=<user> as shown above since MongoDB
treats the entire certificate subject as a username. When connecting to a
MongoDB cluster, say, as a user alice, Teleport will sign an ephemeral
certificate with CN=alice subject.
Case matters so make sure to specify Common Name in the username with capital
letters CN=.
You must provide the Teleport Database Service access to AWS credentials.
Grant the Database Service access to credentials that it can use to authenticate to AWS. If you are running the Database Service on an EC2 instance, you may use the EC2 Instance Metadata Service method. Otherwise, you must use environment variables:
Teleport will detect when it is running on an EC2 instance and use the Instance Metadata Service to fetch credentials.
The EC2 instance should be configured to use an EC2 instance profile. For more information, see: Using Instance Profiles.
Teleport's built-in AWS client reads credentials from the following environment variables:
AWS_ACCESS_KEY_IDAWS_SECRET_ACCESS_KEYAWS_DEFAULT_REGION
When you start the Database Service, the service reads environment variables from a
file at the path /etc/default/teleport. Obtain these credentials from your
organization. Ensure that /etc/default/teleport has the following content,
replacing the values of each variable:
AWS_ACCESS_KEY_ID=00000000000000000000
AWS_SECRET_ACCESS_KEY=0000000000000000000000000000000000000000
AWS_DEFAULT_REGION=<YOUR_REGION>
Teleport's AWS client loads credentials from different sources in the following order:
- Environment Variables
- Shared credentials file
- Shared configuration file (Teleport always enables shared configuration)
- EC2 Instance Metadata (credentials only)
While you can provide AWS credentials via a shared credentials file or shared
configuration file, you will need to run the Database Service with the AWS_PROFILE
environment variable assigned to the name of your profile of choice.
If you have a specific use case that the instructions above do not account for, consult the documentation for the AWS SDK for Go for a detailed description of credential loading behavior.
Create a MongoDB IAM role
Navigate to the AWS IAM console. In the navigation pane, choose Roles and then choose Create role. Next, select the "Custom trust policy" type. Edit the trust policy to allow the Teleport Database service IAM role to assume this role so that the Teleport can fetch the necessary credentials to authenticate to MongoDB:
{
    "Version": "2012-10-17",
    "Statement": [
        {
            "Sid": "Statement1",
            "Effect": "Allow",
            "Principal": {
                "AWS": "arn:aws:iam::111111111111:role/teleport-database-access",
                "Service": "ec2.amazonaws.com"
            },
            "Action": "sts:AssumeRole"
        }
    ]
}
Your role won’t require any permission, so you can leave it empty on the
Add Permissions step. Then, choose a name for it and create it. In this
guide, we will the name teleport-access.
Create a MongoDB User
On the Security / Database Access page add a new database user with AWS IAM authentication method, and choose "IAM Role" as the IAM User type. Then, fill in the AWS ARN field with the ARN of the newly created IAM role. In the Database User Privileges section, give the user sufficient privileges to access the desired database data.
Please note that Teleport does not support authentication using AWS IAM users; it exclusively supports authentication using AWS IAM roles.
Step 4/4. Connect
Log into your Teleport cluster and see available databases:
tsh login --proxy=teleport.example.com --user=alicetsh db lsName Description Labels
------------- ----------- --------
mongodb-atlas env=dev
tsh login --proxy=mytenant.teleport.sh --user=alicetsh db lsName Description Labels
------------- ----------- --------
mongodb-atlas env=dev
To retrieve credentials for a database and connect to it:
tsh db connect --db-user=alice --db-name dev mongodb-atlas
To retrieve credentials for a database and connect to it, you must provide the
database username in the role/<role-name> format:
tsh db connect --db-user=role/teleport-access --db-name dev mongodb-atlas
Alternatively, you provide the full ARN as the database username when connecting to the database instance:
tsh db connect --db-user=arn:aws:iam::111111111111:role/teleport-access --db-name dev mongodb-atlas
Either the mongosh or mongo command-line clients should be available in PATH in order to be
able to connect. The Database Service attempts to run mongosh first and, if mongosh is not in PATH, runs mongo.
To log out of the database and remove credentials:
Remove credentials for a particular database instance.
tsh db logout mongodb-atlasRemove credentials for all database instances.
tsh db logout
Next steps
- Learn how to restrict access to certain users and databases.
- View the High Availability (HA) guide.
- Take a look at the YAML configuration reference.
- See the full CLI reference.