Rotating SAML Signing Certificates
SAML signing certificates are used by the identity provider to sign SAML assertions, and Teleport verifies the signature to authenticate users. Certificates have a fixed validity period, after which they expire, and SSO will no longer work. The default lifetime for these certificates is set by the identity provider, for example Entra ID (3 years) or Okta (10 years).
When a signing certificate is expiring or expired, Teleport raises a cluster alert with details about the certificate that needs to be rotated.
How to update the certificate in Teleport
The entity_descriptor field on a SAML connector stores the metadata from the identity
provider, including any signing certificates.
For detailed steps on generating and activating certificates in your identity provider, including how to obtain the metadata XML or URL, see How to rotate a SAML certificate below.
There are two methods for updating the rotated certificate in Teleport:
Using the entity_descriptor_url (recommended)
The entity_descriptor_url field on a SAML connector stores the metadata URL from
the identity provider. When the SAML connector is saved with this field, the
entity_descriptor field will be automatically populated with data from the identity
provider at save time.
- Navigate to your identity provider and find the metadata URL; save it for later
- In the Teleport web UI, navigate to Zero Trust Access > Auth Connectors, find your SAML connector, and click Edit
- Observe that the connector has an
entity_descriptor_urlfield and anentity_descriptorfield populated with the identity provider metadata - Populate the
entity_descriptor_urlfield with the metadata URL from your identity provider and delete theentity_descriptorfield and its contents, then save the connector - Observe that the
entity_descriptorfield is repopulated with fresh metadata from the identity provider, including the rotated certificate - Return to your identity provider, activate the new certificate and remove the old one
Manually updating the entity_descriptor
In the absence of a populated entity_descriptor_url field, the entity_descriptor
field can be manually populated.
- Navigate to your identity provider and find the metadata XML file; save it for later
- In the Teleport web UI, navigate to Zero Trust Access > Auth Connectors, find your SAML connector, and click Edit
- Replace the contents of the
entity_descriptorfield with the contents of the metadata XML file saved in the first step, then save the connector - Return to your identity provider, activate the new certificate and remove the old one
How to rotate a SAML certificate
Rotating a certificate involves creating a new certificate in your identity provider, updating Teleport to trust it, then activating it in the identity provider and removing the old one.
You must update Teleport to trust the new certificate before activating it in the identity provider. Activating before updating Teleport will cause SSO to break. See How to update the certificate in Teleport.
Entra ID
In Entra ID, SAML signing certificates are managed in the Enterprise Application configuration.
Create the certificate
- Log in to Microsoft Entra admin center
- Navigate to Enterprise apps > All applications, and select the SAML app
- Go to Single sign-on and scroll to the SAML Certificates section, then click the Edit button under Token signing certificate
- Click the New Certificate button, then click the Save button
- Either copy the metadata URL or download the metadata XML, which will be needed to update
Teleport:
- Scroll to the SAML Certificates section of the Single sign-on page and copy the metadata URL from the App Federation Metadata Url field
- Select the Download federated certificate XML item for the new certificate entry to download the metadata XML
Activate the certificate
- Scroll to the SAML Certificates section of the Single sign-on page and click the Edit button under Token signing certificate
- Find your newly created certificate and select Make certificate active
- When you have confirmed SSO is working, remove the old certificate by selecting Delete Certificate
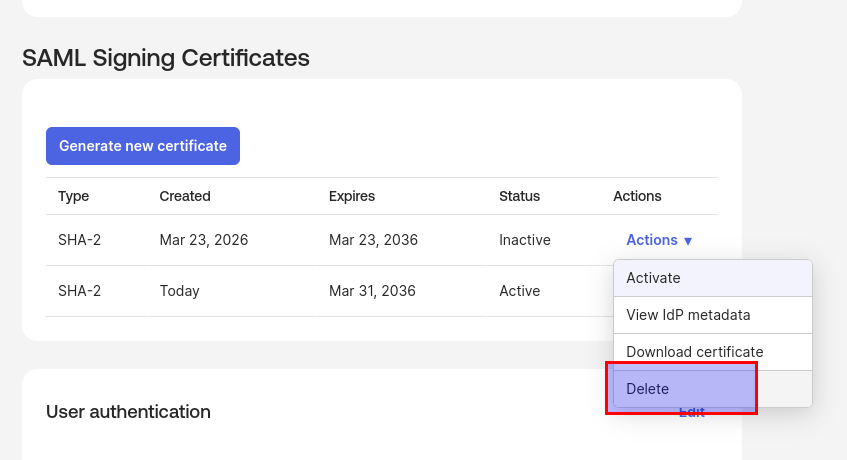
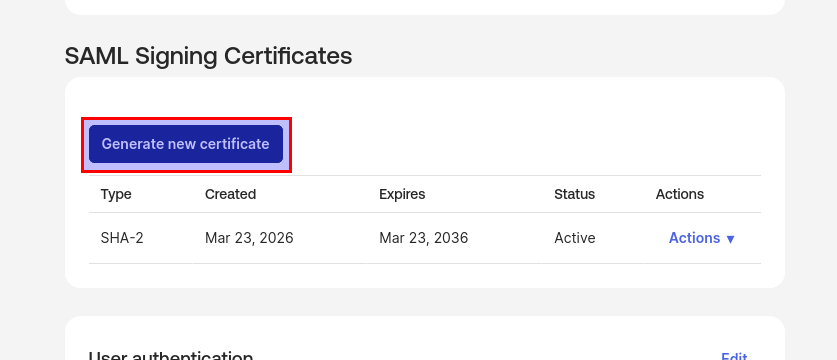
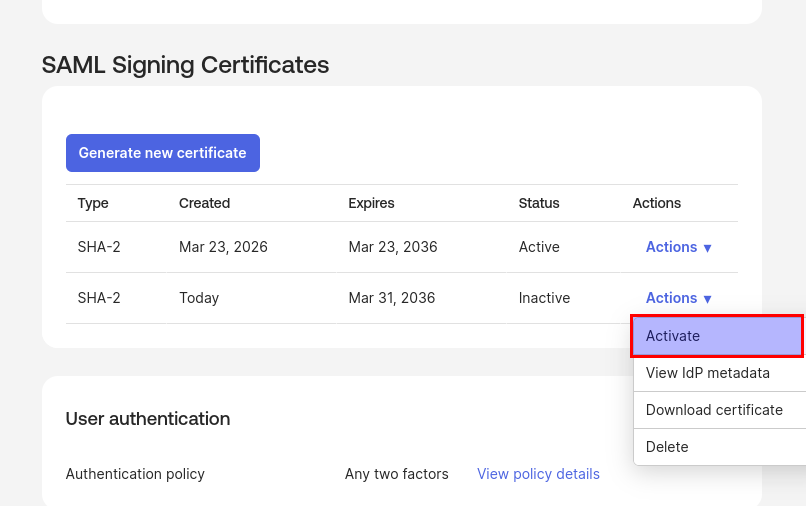
Okta
In Okta, SAML signing certificates are managed under the Sign On tab for the application.
Create the certificate
- Log in to the Okta Admin Console
- Navigate to Applications > Applications and select the SAML app
- Go to the Sign On tab, scroll to the SAML Signing Certificates section
and click the Generate New Certificate button
- Either copy the metadata URL or download the metadata XML, which will be needed to update
Teleport:
- Scroll to the Sign on methods section and copy the metadata URL from the SAML 2.0 section
- Scroll to the SAML Signing Certificates section and download the metadata XML from Actions > View IdP metadata
Activate the certificate
- Scroll to the SAML Signing Certificates section and find your newly created certificate
- Select Actions > Activate on the new certificate entry to activate the
certificate
- When you have confirmed SSO is working, remove the old certificate by selecting
Actions > Delete on the old certificate entry