How to Connect to Microsoft SQL Server Remotely Using Teleport
Support for Microsoft SQL Server was added in our Teleport 9 release, along with support for Redis and MariaDB. In this post, we'll specifically be looking at Microsoft SQL Server and will cover how to connect to it remotely using Teleport.
Before we get into the steps of accessing SQL Server with Teleport, let's briefly go over a few recommended security postures with SQL Server and how Teleport actually helps to implement them.
1. Windows authentication is recommended
SQL Server provides two options for authenticating users:
- Windows authentication - SQL Server uses the Windows principal token in the operating system to validate. SQL Server authentication is disabled.
- Mixed mode - enables both SQL Server authentication and Windows authentication.
Between the two, Windows authentication is recommended as it's more secure. This is because SQL Server itself doesn't perform any security validation or require any passwords with this option. It simply trusts the credentials provided by Windows. There is an sa account created, but it's disabled. On the other hand, there are situations where SQL Server must be used, and in this scenario, we recommend setting a complex password for the sa account, renaming it, or even disabling it if it's not needed.
Currently, Teleport requires Active Directory to connect to SQL Server, thus utilizing Windows authentication.
2. Limit public exposure
It's recommended that your instance of SQL Server not be exposed with a public IP address. Instead, it should be isolated behind a VPC or firewall, with access via a bastion host, so that you can restrict exactly who or what has access to it.
In general, the Teleport Proxy will be the only public-facing piece to a DB setup. This is because the database service talks, via a reverse tunnel, to the proxy and is by nature not accessible directly by the client so the database service and database can actually sit isolated without any public access.
3. Identity and audit
Auditing events in SQL Server is a fundamental security necessity, especially for potentially critical events like failed login attempts, and is actually required for compliance with PCI, HIPAA and other regulations. Auditing can, and should be, enabled on SQL Server on both the server and database levels.
Teleport comes with auditing included out of the box for session starts (successful and failed), session ends and SQL queries. These events can be drilled into providing further details like timestamps, db names, user names, etc., lessening inaccuracies that come from shared accounts or other bad practices that muddy effective auditing.
4. Defined access (RBAC)
When it comes to the principle of least privilege, SQL Server is no exception. Users should only be granted the bare minimum that they need in order to do their specific daily tasks and privileged access should be granted on a case-by-case basis and for an allotted time needed to get the work done. Using Windows authentication, administrators can make use of AD users and groups to define and delegate access to the server.
Teleport comes with an RBAC system that helps control granular access not only to your SQL Server instance, but of all your databases connected to Teleport. In addition, just-in-time access requests allow users to request additional roles for a short window of time to access capabilities beyond their own.
Connecting to Microsoft SQL Server with Teleport
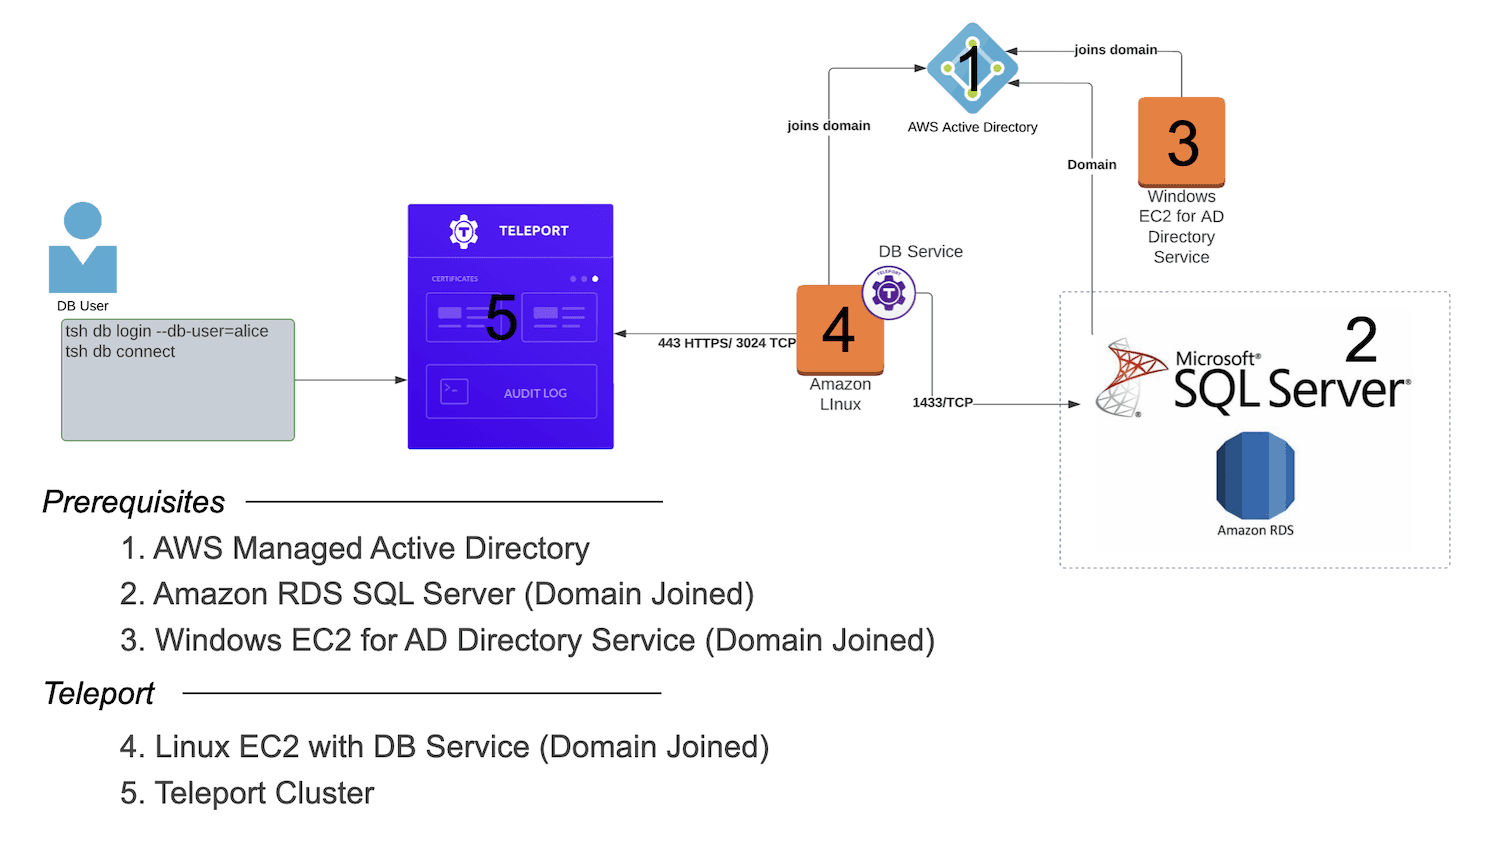
Now let's look at how to connect to Microsoft SQL Server remotely with Teleport. We'll be utilizing AWS resources for our demonstration. There are a handful of components that need to be in place prior to bringing in Teleport, many of which you may have deployed already in your environment. Let's work through these first, and then we'll move into setting up Teleport specifically. Overall, here's a look at what we'll be putting together:
Video tutorial
For those who prefer video format or have trouble at any point during the tutorial, here's a complete walkthrough of our demonstration.
1. AWS Managed Active Directory
Using AWS Directory Service, you can set up a managed AD in minutes. Simply choose AWS Managed Microsoft AD, the Standard Edition, and fill in the required info to follow along.
2. Amazon RDS SQL Server.
We'll need to set up an RDS Microsoft SQL Server instance. This will need to be joined with your Active Directory so be sure to enable it with your directory chosen.
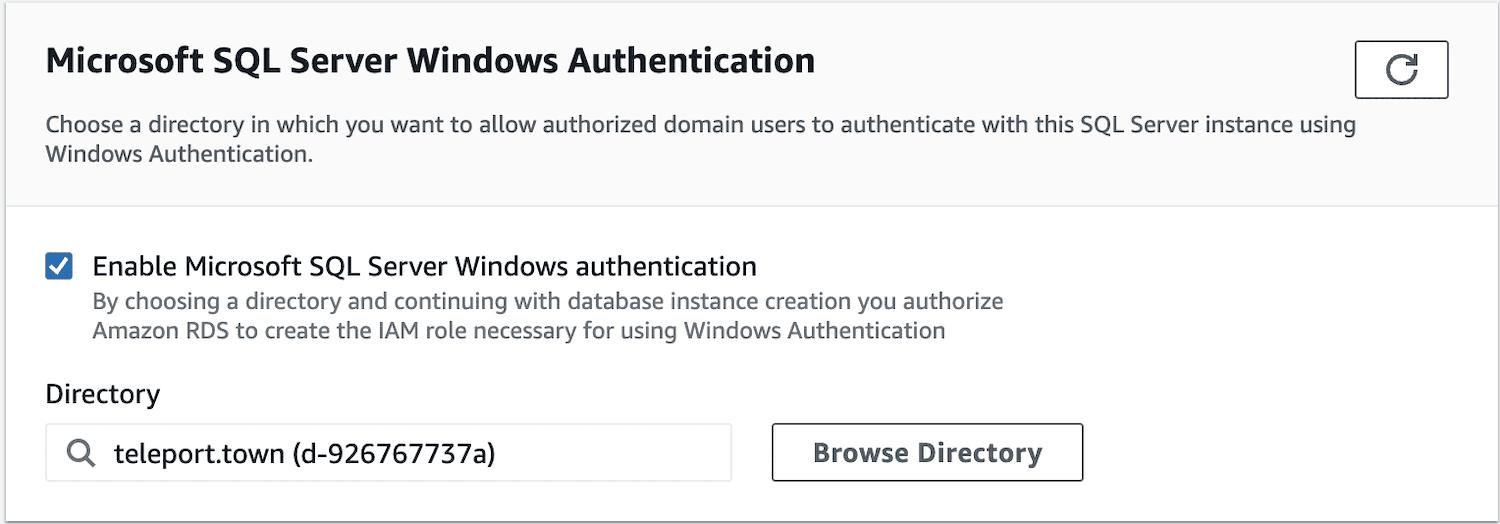
Also make sure it lands in the same VPC as your Active Directory. You can choose 'No' to public access as Teleport will handle the remote connection privately.
3. Windows EC2 for AD Directory Service
In order to manage your AD users, groups, etc. you will need a Windows EC2 instance, again in the same VPC as the above resources.
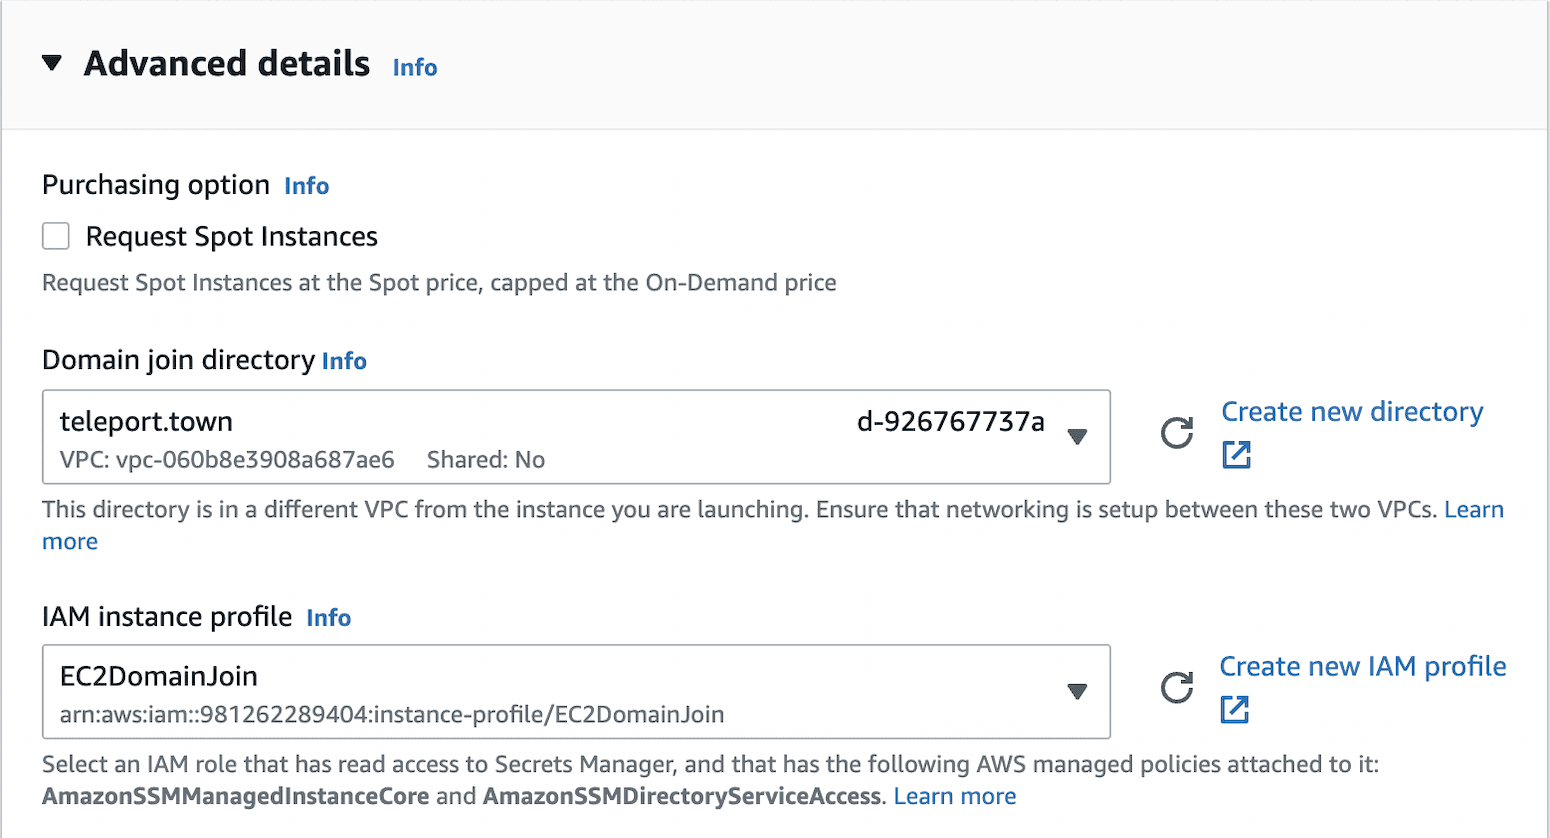
Be sure to expand the Advanced Details section on setup and choose your domain join directory. In addition, you'll need to create an IAM instance profile that has the AmazonSSMManagedInstanceCore and AmazonSSMDirectoryServiceAccess policies attached to it.
Next, you'll need to install the AD tools on the Windows instance for management. After doing so, go ahead and add a new AD user named alice which we'll be using later to access the database. If you need help with these two steps, the video in this post below will walk you through it step-by-step in more detail.
4. Linux EC2 with Teleport DB Service
Now that we have the prerequisites out of the way, we'll turn to our Teleport integration. Let's get an Amazon Linux EC2 instance set up, also domain-joined and in our VPC.
There are a couple of extra setup steps with this instance before starting the database service. Teleport requires a keytab file to obtain Kerberos service tickets from your Active Directory for authentication with SQL Server. This involves:
- Joining this Linux node to the Kerberos realm and
- Creating the keytab file.
Instructions for these steps can be found in our Teleport MSSQL database access guide.
Next, we'll need to install Teleport on the instance. Since it's an Amazon Linux 2 EC2 instance, we can install Teleport with the following commands:
source /etc/os-release
sudo yum-config-manager --add-repo $(rpm --eval "https://yum.releases.teleport.dev/$ID/$VERSION_ID/Teleport/%{_arch}/stable/v10/teleport.repo")
sudo yum install teleport
Installation instructions for other distros or platforms can be found on the Teleport installation page.
Now it's time to start the Teleport DB Service. The easiest way to do this is to grab the command directly from the Teleport web interface. If you don't have a Teleport cluster set up yet, you can follow our detailed documentation to get that up and running. Now go to the Databases tab, click Add Database, choose RDS SQL Server from the dropdown list of databases, and copy the provided teleport db start command with its parameters.
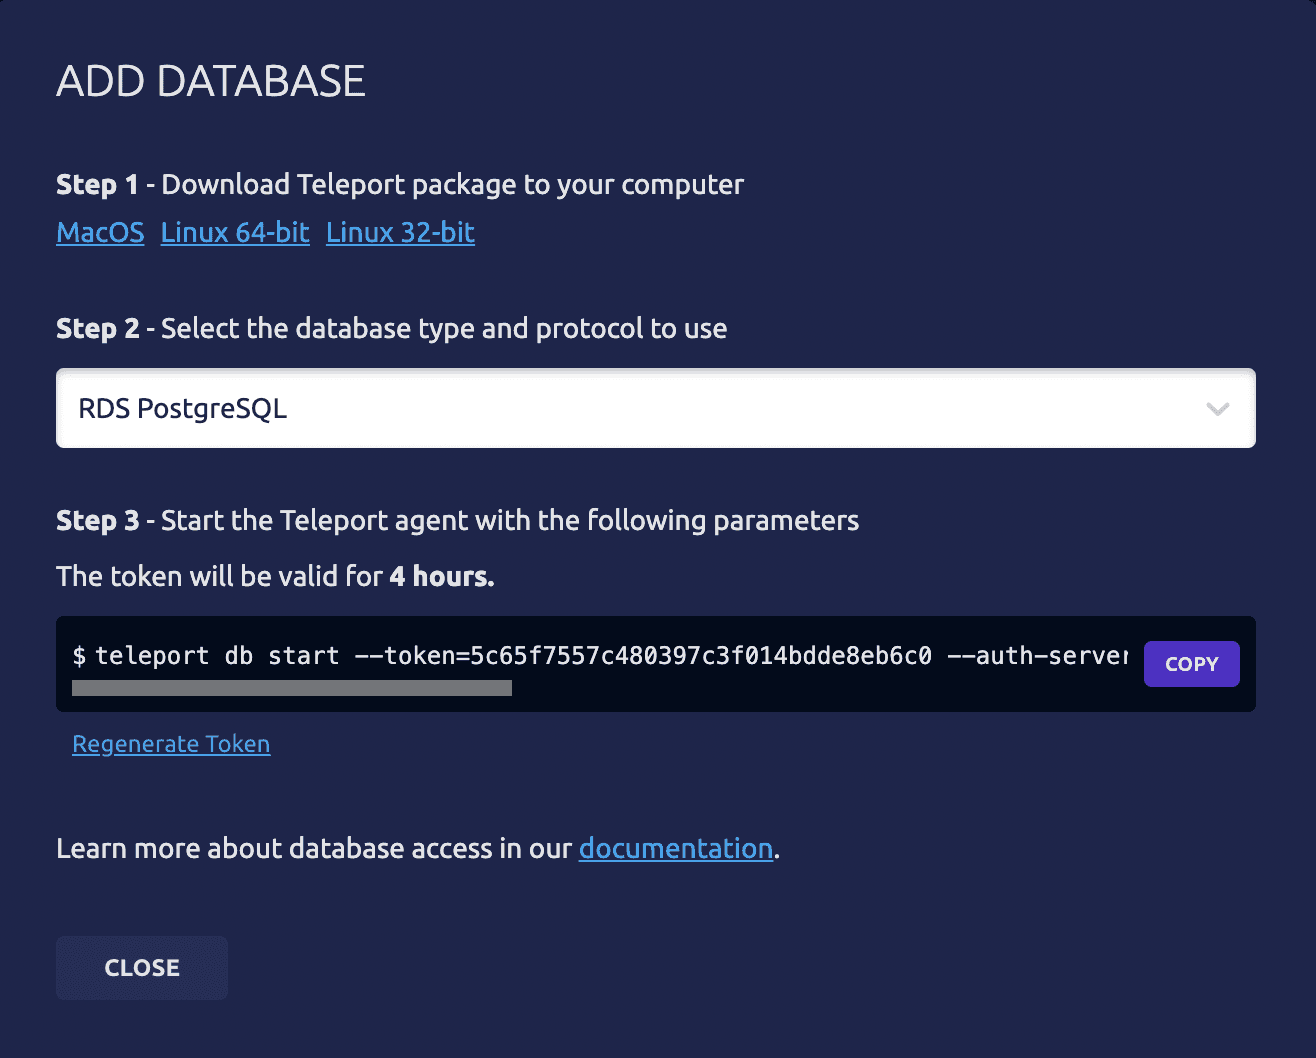
Now before we run this command, we'll need to update a few of the provided parameters:
| Parameter | Explanation |
|---|---|
| name | Name your database in Teleport |
| uri | SQL Server endpoint with :1433 added to the end |
| ad-keytab-file | Path to your keytab file |
| ad-domain | AD domain name |
| ad-spn | First part of SQL Server endpoint (before the first period).your full AD domain:1433 (ex mssql-db.myad.com:1433) |
| aws-region | AWS region |
The rest of the parameters should be set correctly already.
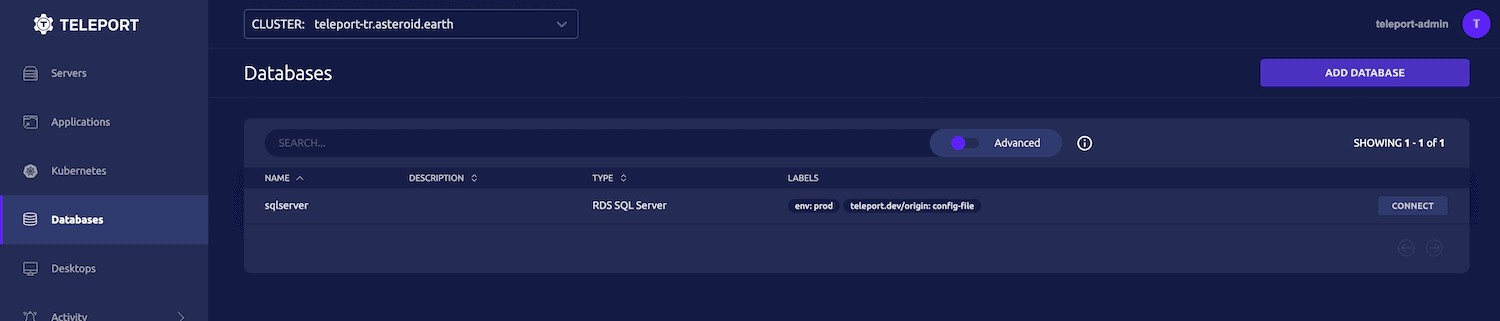
Now run the command to start the Teleport DB Service. After the service starts, the database should show in your Teleport web UI:
5. Install MSSQL-CLI
When you log into SQL Server from Teleport, it presents you with a mssql-cli command prompt through which you can interact with the database. You will need to install the mssql-cli for this access to work properly.
To install the mssql-cli, please choose your platform and follow the instructions on the GitHub page.
6. Create Microsoft SQL Server login
Finally, we need to create a login for our AD alice user in SQL Server. Remember, Teleport provides access to resources and even can control who has access to what (through RBAC), but we still need to create logins in SQL Server, grant access/permission to SQL Server databases, etc. If we try to log in without permissions set on SQL Server, we will be denied even though we have everything set up properly.
To create a SQL Server login, we first need to connect to it using our newly installed mssql-cli. Run the following command using our admin user to log in:
mssql-cli -S <instance address>,1433 -U admin
And at the prompt enter your password.
Now run the following command to create a SQL Server login for Alice. This will allow her to log into the server. Remember to replace YOURAD with the first part of your AD name.
CREATE LOGIN [YOURAD\admin] FROM WINDOWS WITH DEFAULT_DATABASE = [master];
Now Alice has access to SQL Server via her AD login.
We'll also need to create a user in Teleport for Alice. We can do this with tctl, Teleport's administrative CLI tool, and for now we'll go ahead and grant her access to all databases and users (to include alice). Run the following command in the terminal where your Teleport cluster is running to create the user.
tctl users add \
  --roles=access \
  --db-users=\* \
  --db-names=\* \
  alice
7. Log into SQL Server
Now that the correct permissions are granted, we can log in and check our remote access to SQL Server. In the Teleport web interface, click on the connect button by the database and follow the three steps in the prompt to connect and access the database via the mssql-cli.
When connected, you'll have a CLI prompt on the master database. Try running a query to get the service principals:
select * from master.sys.server_principals
8. Graphical user interfaces?
If you prefer to use an interface like Azure Data Studio, SSMS or Datagrip to connect to Microsoft SQL Server remotely, then you can start a local database proxy which will create an authenticated tunnel that you can use to connect to your database, locally.
More information on this can be found in our documentation.
How to think about RBAC
Now we mentioned previously that even though our database is now enrolled in Teleport, we still have to create the correct permissions in SQL Server. You may be wondering, "What then is the benefit of Teleport if I have to do this anyways?"
Well, one of the many benefits of Teleport is that it allows you to control access to not only this SQL Server instance but many other DB instances, Servers, Apps and Kubernetes clusters, all in one place using a built-in RBAC system.
With Teleport, you can think on a larger scale with tens, hundreds or thousands of resources, and access to each being controlled securely in one central location.
With Teleport's database access role-based access control, you can create and manage roles that can be assigned to users for granular access control.
In the case of Alice, when we created her account in Teleport we gave her access to all database users. This includes the alice user as well as others that are added to AD. We can tighten this up by only giving her access to the alice user. Or let's say she is only supposed to have access to databases with the dev label. We could create a new role called developers-dev, assign it to her, and then restrict the role to access only databases with the dev label. Teleport also provides template variables to help scale these controls.
Auditing
Finally, Teleport comes with built-in auditing which will track events regarding session start, session end and any queries that are made to our SQL Server, capturing information such as Teleport user, DB user, DB name, the timestamp and more. No more wondering exactly who used the admin login again and mixed everything up.
Try Teleport Database Access for Microsoft SQL
In this post, we've discussed SQL Server security and some of Teleport's features that help achieve this. We've also worked, step-by-step, through connecting to Microsoft SQL Server remotely via Teleport with AD authentication as well as touching on GUI access and granular RBAC controls. Teleport Database Access for Microsoft SQL is available in both Teleport Enterprise and Teleport Community Edition.
Table Of Contents
Teleport Newsletter
Stay up-to-date with the newest Teleport releases by subscribing to our monthly updates.
Tags
Tags
Teleport Newsletter
Stay up-to-date with the newest Teleport releases by subscribing to our monthly updates.