
Teleport
Jamf Pro Integration
- Version 17.x
- Version 16.x
- Version 15.x
- Version 14.x
- Older Versions
Device Trust Jamf Pro integration lets you automatically sync your Jamf Pro computer inventory into Teleport.
The Teleport Jamf Pro service is a distinct teleport process that periodically
reads your computer inventory from Jamf Pro and syncs it to Teleport. It performs
both incremental (called "partial") and full syncs, as well as removals from
Teleport if a computer is removed from Jamf Pro.
Syncing devices from Jamf Pro is an inventory management step, equivalent to
automatically running the corresponding tctl devices add commands.
See the Device Trust guide for fundamental Device Trust concepts and behavior.
In Teleport Enterprise Cloud, Teleport manages the Jamf Pro integration for you, and you can enroll the Jamf Pro integration from the Teleport Web UI.
Visit the Teleport Web UI and click Access Management on the menu bar at the top of the screen.
On the left sidebar, click Enroll New Integration to visit the "Enroll New Integration" page:
On the "Select Integration Type" menu, click the tile for your integration. You will see a page with instructions to set up the integration, as well as a form that you can use to configure the integration.
Prerequisites
-
A running Teleport cluster. If you want to get started with Teleport, sign up for a free trial.
-
The
tctladmin tool andtshclient tool version >= 16.1.0.Visit Installation for instructions on downloading
tctlandtsh.
- To enroll a macOS device, you need:
- A signed and notarized
tshbinary, v12.0.0 or newer. Download the macOS tsh installer.
- A signed and notarized
- To enroll a Windows device, you need:
- A device with TPM 2.0.
- A user with administrator privileges. This is only required during enrollment.
tshv13.1.2 or newer. Download the Windows tsh installer.
- To enroll a Linux device, you need:
- A device with TPM 2.0.
- A user with permissions to use the /dev/tpmrm0 device (typically done by
assigning the
tssgroup to the user). tshv15.0.0 or newer. Install tsh for Linux.
- To authenticate a Web UI session you need Teleport Connect
Step 1/4. Create Jamf API credentials
Teleport versions v16.0.0 or lower don't support Jamf API credentials. Follow the instructions under Using Jamf user and password authentication instead.
Follow the instructions at Jamf API Roles and Clients to create a role and an API client. We recommend creating a role and API client specific for Teleport.
Make sure that your Jamf role has the "Read Computers" privilege.
You can test your client credentials using the following Jamf query:
URL='https://yourtenant.jamfcloud.com'CLIENT_ID='your-client-id'CLIENT_SECRET='your-client-secret'# Acquire access token from Jamf.
TOKEN_RESP="$(curl -X POST "$URL/api/oauth/token" \ -H 'Content-Type: application/x-www-form-urlencoded' \ --data-urlencode 'grant_type=client_credentials' \ --data-urlencode "client_id=$CLIENT_ID" \ --data-urlencode "client_secret=$CLIENT_SECRET" -s)"echo "$TOKEN_RESP"ACCESS_TOKEN="$(echo "$TOKEN_RESP" | jq -r .access_token)"# Test access token privileges.
curl -H "Authorization: Bearer $ACCESS_TOKEN" "$URL/api/v1/computers-inventory?page-size=1"
The query above should print an inventory entry from Jamf. If you get permission errors (401 or 403), double check your client credentials, role privileges and try to recreate your API client.
Step 2/4. Configure Jamf service
Teleport Cloud users can quickly get started with Jamf integration by using the hosted Jamf plugin in the Web UI.
Select the Jamf plugin:
Fill in the required information and click "Connect Jamf" button:
Jamf inventory sync is performed by a separate teleport process, configured
using the jamf_service key. It is recommended to run the service isolated from
other Teleport processes, as it requires the Jamf credentials created in the
step above.
Save the following file as /var/lib/teleport.yaml and edit as needed:
version: v3
teleport:
  # Necessary to write devices back to Teleport.
  proxy_server: teleport.example.com:443 # CHANGEME
  join_params:
    token_name: "/tmp/token"

jamf_service:
  enabled: true
  name: jamf
  api_endpoint: https://yourtenant.jamfcloud.com #CHANGEME
  client_id:    your-client-id #CHANGEME
  client_secret_file: /var/lib/teleport/jamf_client_secret.txt

auth_service:
  enabled: false

proxy_service:
  enabled: false

ssh_service:
  enabled: false
Change the following settings, as appropriate:
- teleport.proxy_server
- jamf_service.api_endpoint
- jamf_service.client_id
Finally, write your Jamf client secret to the
/var/lib/teleport/jamf_client_secret file:
sudo nano /var/lib/teleport/jamf_client_secret # or use your favorite editorOnly the OS user that runs `teleport` should have access to the secret file.
sudo chmod 400 /var/lib/teleport/jamf_client_secretsudo chown teleport /var/lib/teleport/jamf_client_secret
Step 3/4. Create a join token
Jamf service requires an MDM token to write devices to Teleport. On your local workstation, create the token as shown below:
tctl tokens add --type=mdmThe invite token: efgh456-insecure-do-not-use-thisThis token will expire in 30 minutes.
From the Jamf service host, use this token to add an MDM service to Teleport.
> teleport start \   --token=efgh456-insecure-do-not-use-this \   --ca-pin=sha256:abdc1245efgh5678abdc1245efgh5678abdc1245efgh5678abdc1245efgh5678\   --config=/path/to/teleport.yaml
On the Jamf service host, write the token to a file called /tmp/token.
Step 4/4. Start Jamf service
Using the token created above, start the service:
Configure your Teleport instance to start automatically when the host boots up by creating a systemd service for it. The instructions depend on how you installed your Teleport instance.
On the host where you will run your Teleport instance, enable and start Teleport:
sudo systemctl enable teleportsudo systemctl start teleport
On the host where you will run your Teleport instance, create a systemd service configuration for Teleport, enable the Teleport service, and start Teleport:
sudo teleport install systemd -o /etc/systemd/system/teleport.servicesudo systemctl enable teleportsudo systemctl start teleport
You can check the status of your Teleport instance with systemctl status teleport
and view its logs with journalctl -fu teleport.
The initial sync should happen in a few minutes. You can confirm from the Teleport service logs:
2023-06-21T17:26:40-03:00 INFO [JAMF:1]    Jamf service successfully started pid:25757.1 service/service.go:228
2023-06-21T17:26:40-03:00 INFO [JAMF:1]    Starting sync CutTime:0001-01-01 00:00:00 +0000 UTC FilterRSQL: Mode:1 OnMissing:DELETE pid:25757.1 service/service.go:261
2023-06-21T17:26:40-03:00 INFO [JAMF:1]    Device sync report, page #0 deletes:0 failures:0 pid:25757.1 upserts:1 service/service.go:666
2023-06-21T17:26:40-03:00 INFO [JAMF:1]    Sync complete pid:25757.1 service/service.go:277
Using the default configuration, the service will sync devices from Jamf every few hours. Once a day a full inventory sync is performed, enumerating all devices from Jamf and reflecting any additions or removals on Teleport.
After the initial sync happens, you may verify the synced devices using tctl devices ls:
tctl devices lsAsset Tag OS Enroll Status Device ID------------ ------- ------------- ------------------------------------CXXXXXXXXX17 macOS not enrolled 20ec6373-9e8e-46e0-8f1c-47ad6b06a768CXXXXXXXXX2T macOS not enrolled 79755778-7cbe-4e2c-83ec-7eaa3d4d7e36CXXXXXXXXX3T macOS not enrolled 665e59d5-393a-4894-841d-edad06329717CXXXXXXXXX4T macOS not enrolled dd032e90-bfb0-47d5-bce5-e57545f6788fCXXXXXXXXX5T macOS not enrolled bf189863-a94a-40dc-9013-d96f8dada2f1(...)
Optional: Customize the sync schedule
When using the minimal configuration, described in the steps above, Jamf service utilizes a default sync schedule. It is possible to customize sync intervals, as well as the set of devices synced from Jamf, by applying RSQL filters provided by the Jamf Pro API. Jamf recommends a full sync no more than once every 24 hours.
The default "inventory" configuration is roughly equivalent to the one below:
jamf_service:
  enabled: true
  # ...
  inventory:
  - sync_period_partial: 6h
    sync_period_full: 24h
    on_missing: DELETE
    filter_rsql: general.remoteManagement.managed==true
Unpacking the configuration, we have the following keys:
sync_period_*
sync_period_partial: period for partial syncs. A partial sync attempts to fetch new and modified devices, but won't scan the entire Jamf inventory.sync_period_full: period for full syncs. A full sync scans the entire Jamf inventory, processing new/modified devices and removals from Jamf.
Both sync periods may be disabled by setting the period to 0 or -1. It is
recommended to do a full sync with some regularity, so Teleport has the chance
to fully synchronize both inventories.
on_missing
The on_missing key determines what to do with devices deleted from Jamf, but
present in Teleport. The possible actions are:
DELETE: devices removed from Jamf are eventually removed from Teleport. (Requires a full sync.)NOOP: devices removed from Jamf are allowed to remain in the Teleport inventory.
Only devices synced by Jamf are susceptible to deletion in this manner. Devices
written manually via tctl devices add or written by other sources won't be
deleted.
For immediate removal of unwanted devices first lock the device on Teleport, then remove it from Jamf:
tctl devices lock --asset-tag=SERIAL_NUMBER --message='reason for locking'Created a lock with name "a2f1491c-4a3e-4daf-9c83-2fe931668076".
Manual removal via tctl devices rm is possible, but note that if the device is
still in the Jamf inventory, it'll be recreated during the next sync.
filter_rsql
The filter_rsql key applies a Jamf Pro API filter when querying for devices.
Refer to
https://developer.jamf.com/jamf-pro/reference/get_v1-computers-inventory for the
possible filter values.
Optional: Sync multiple sources
When syncing inventory, Jamf service claims ownership of all synced devices.
This can be verified by inspecting a device's source field:
# tctl get device/mydevice
kind: device
metadata:
  name: 20ec6373-9e8e-46e0-8f1c-47ad6b06a768
spec:
  asset_tag: mydevice
  os_type: macos
  # ...
  source:         # Set during inventory sync
    name: jamf    # Copied from jamf_service.name
    origin: jamf  # Always "jamf" for Jamf service
  update_time: "2023-06-21T19:44:40.40601Z"
version: v1
Device ownership is important in a few situations, but it is particularly important when running "on_missing=DELETE" syncs, as only the devices owned by the sync source are considered for deletion.
If you want to run multiple Jamf sources you can simply run multiple Jamf services, each with its configuration and credentials. Just make sure that each service has a different "jamf_service.name". For example:
teleport.yaml - Service #1:
version: v3
teleport:
  proxy_server: teleport.example.com:443

jamf_service:
  enabled: true
+ name: jamf1
+ api_endpoint: https://tenant1.jamfcloud.com
+ client_id: tenant1-id
+ client_secret_file: /var/lib/teleport/jamf1_client_secret.txt

auth_service:
  enabled: false

proxy_service:
  enabled: false

ssh_service:
  enabled: false
teleport.yaml - Service #2:
version: v3
teleport:
  proxy_server: teleport.example.com:443

jamf_service:
  enabled: true
+ name: jamf2
+ api_endpoint: https://tenant2.jamfcloud.com
+ client_id: tenant2-id
+ client_secret_file: /var/lib/teleport/jamf2_client_secret.txt

auth_service:
  enabled: false

proxy_service:
  enabled: false

ssh_service:
  enabled: false
Optional: Using Jamf user and password authentication
Teleport versions v16.1.0 and higher support Jamf API credentials. Prefer using API credentials instead of username and password authentication.
Create a readonly Jamf user for inventory sync.
-
Access
https://yourtenant.jamfcloud.com/accounts.html, replacingyourtenantwith your Jamf Pro account. -
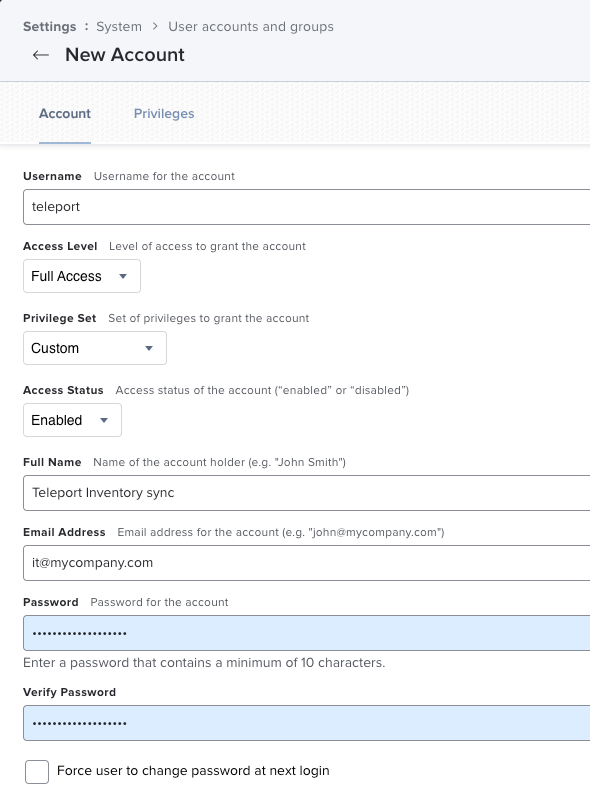
Create a new Standard Account with the following settings:
- Username: teleport (change as desired)
- Access Level: Full Access
- Privilege Set: Custom
- Access Status: Enabled
- Password: (a strong password of your choice)
- Privileges:
- Advanced Computer Searches: Read
- Computers: Read
Take note of the user and password.
User account setup:
Privileges setup:
Next steps
Automatically enroll synced devices on user login with auto-enrollment.