Securely Managing Your Audit Logs with Teleport and Snowflake
One of the most important features Teleport has to offer is that it centralizes all of your infrastructure’s audit logging into one central place, mapping every query, every command and every session to an individual user's identity. As you hire more engineers and resources scale, it can become increasingly difficult to manage all of this log data. Luckily Teleport’s extensibility makes this log data extremely easy to format, export and monitor all in a secure, event-driven way.
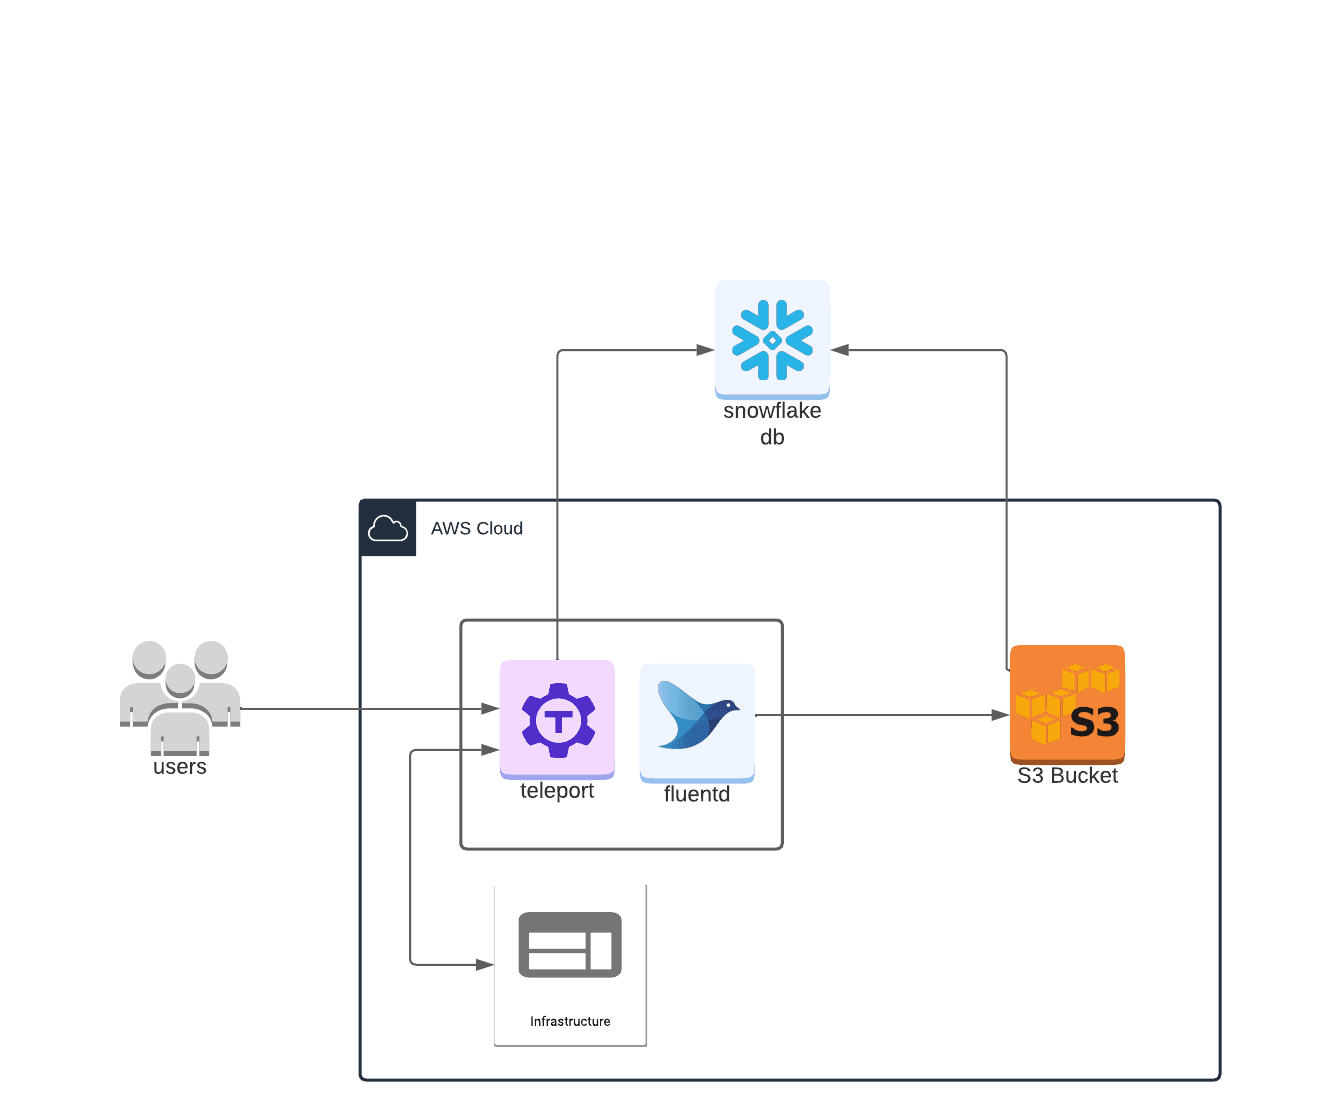
One way we can manage these pesky logs is by ingesting them into a Snowflake database using Fluentd as a data collector, S3 cloud storage as a storage intermediary and Snowpipe to ingest the S3 data.
Why Snowflake?
Snowflake is a great choice for data aggregation for a security information and event management system (SIEM) context for a few reasons. The first is that with Snowpipe, data ingestion is secure and easy. Once an ingestion pipe is set up to point at your S3 bucket, log data is seamlessly streamed into your database, in a fully configurable manner.
The second reason is that Snowflake formats and organizes your data in a secure, easily searchable manner. It’s one thing to aggregate raw data. It’s an entirely other thing to actually have that data stored in a usable, extensible format. Snowflake offers just that. It securely hosts your data, while at the same time offering an easy endpoint to query and filter granular event data. It’s more than just a data lake — it’s a fully fleshed out database that you can configure to fit within whatever schema your team needs.
For these two reasons alone, Snowflake is a huge upgrade from tailing local logs, or hosting your log data in S3. While these options may be secure, it can be very difficult to sift through all of that log data, if it’s not formatted and organized. Snowflake offers both secure data storage AND organization, all without sacrificing low latency between event time and data ingestion.
For more information on Snowflake’s security ethos, check out this interview with Omer Singer, head of cybersecurity strategy at Snowflake.
Let’s dive in!
Prerequisites
- A Teleport cluster running Teleport 10.x
- An AWS account
- A Snowflake account
What will this deployment look like?
Configuring Fluentd
The first step in this workflow is to configure Teleport’s event handler plugin to forward all of the Teleport log events to Fluentd. This plugin runs alongside the Fluentd forwarder, receiving and passing along events from the Teleport events API.
In order to configure Teleport’s event handler to talk to Fluentd please follow the Teleport docs on setting up Fluent.
While following the docs, there are a few things to look out for that are potentially tricky:
- Depending on your version of Teleport the generated
teleport-event-handler-role.yamlfile may have the user and role reversed. If this is the case, simply swap the user and role order definition in the yaml file. TheroleMUST be defined before theuserin the file. Otherwise the create command will fail, as the role must be created before the user like so:

- If you are getting an error relating to “start-time” delete the
storagedirectory that is created every time the command is run. - If you are getting an invalid identity error, that is because the identity file we created earlier has expired. In the meantime, run the command:
tctl auth sign --user=teleport-event-handler --out=identityagain to regenerate a valid identity file.
Once you have configured the Teleport events handler to forward all the logs to Fluentd, next you have to forward those logs to S3.
Forwarding events from Fluentd to S3
Building a custom Fluentd image
While it’s great right now that our Fluentd agent is dumping all of our logs to standardOut, it’s not the most useful thing in the world. For the next step we’ll be configuring our Fluentd agent to forward all of our events to S3. From there they will be ingested into our Snowflake database.
First things first: we’re going to have to tweak the Fluentd docker image to include the Fluentd S3 plugin. To do this we’ll create a new Dockerfile based on the example one provided on the Fluentd docker image GitHub page.
All we need to do is add the nokogiri gem and fluent-plugin-s3 gem:
FROM fluent/fluentd:v1.15-1
# Use root account to use apk
USER root
RUN apk add --no-cache --update --virtual .build-deps \
        sudo build-base ruby-dev \
# Added because the s3 plugin depends on nokogiri
 && sudo gem install nokogiri \
# The fluentD s3 plugin
 && sudo gem install fluent-plugin-s3 \
 && sudo gem sources --clear-all \
 && apk del .build-deps \
 && rm -rf /tmp/* /var/tmp/* /usr/lib/ruby/gems/*/cache/*.gem
COPY fluent.conf /fluentd/etc/
COPY entrypoint.sh /bin/
We’ll also need to grab the entrypoint here and copy it into a file called entrypoint.sh
Then make it executable by running chmod +x entrypoint.sh.
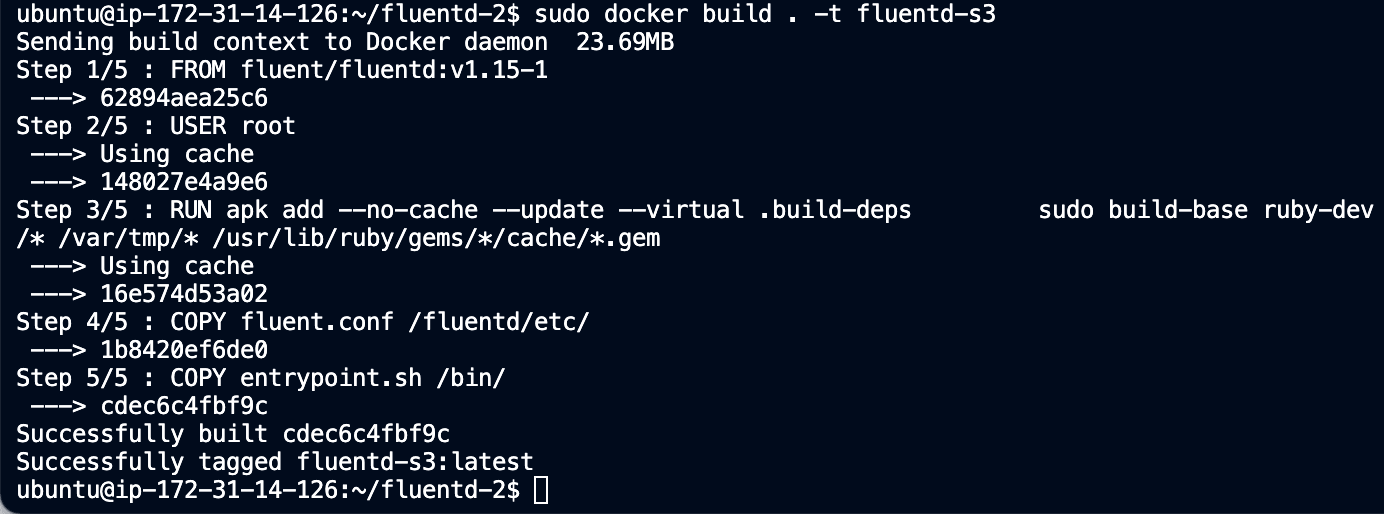
Once you have the Dockerfile and entrypoint.sh we’re ready to build our very own Fluentd docker image!
For this example, I called the image fluentd-s3 but you can name it whatever you want.
To build our image, run the command:
sudo docker build . -t fluentd-s3
You should then see output like this:
Creating S3 bucket
Now that we have our Fluentd agent configured to be able to integrate with S3, next we’ll actually create the S3 bucket that we’ll be storing our logs in.
Return to your AWS management console and navigate to the S3 service. Create a new bucket that will be used to store our Teleport logs.
For the purposes of this demo, I created a bucket called fluentd-snowflake-demo with a folder inside it called logs.
Creating AWS S3 user
Before being able to upload anything to S3, we’ll need to create an AWS user with credentials that will allow Fluentd to access our bucket.
To do this, open your AWS console and navigate to the IAM service. Then create a user and give it permissions to access your S3 service. For the purpose of this tutorial, I created a user called fluentd-snowflake-log-forwarder and assigned it a permission policy that gave it write-only access to the s3 bucket where we’re storing our logs.
After the user is created, AWS will give you the user’s secret access key and the access key id. Make sure to store these somewhere safe because we’ll need them in the next step.
Configuring Fluentd with our user credentials
Now that we have the user and bucket, we have to configure our Fluentd with the credentials necessary to access it. We can find an example fluent configuration file for S3 here on the Fluentd website. Go back to our Teleport host, open the fluent.conf file and add the s3 configuration in accordance with the example config file using the bucket name and user credentials created in the last steps. It should look something like this:
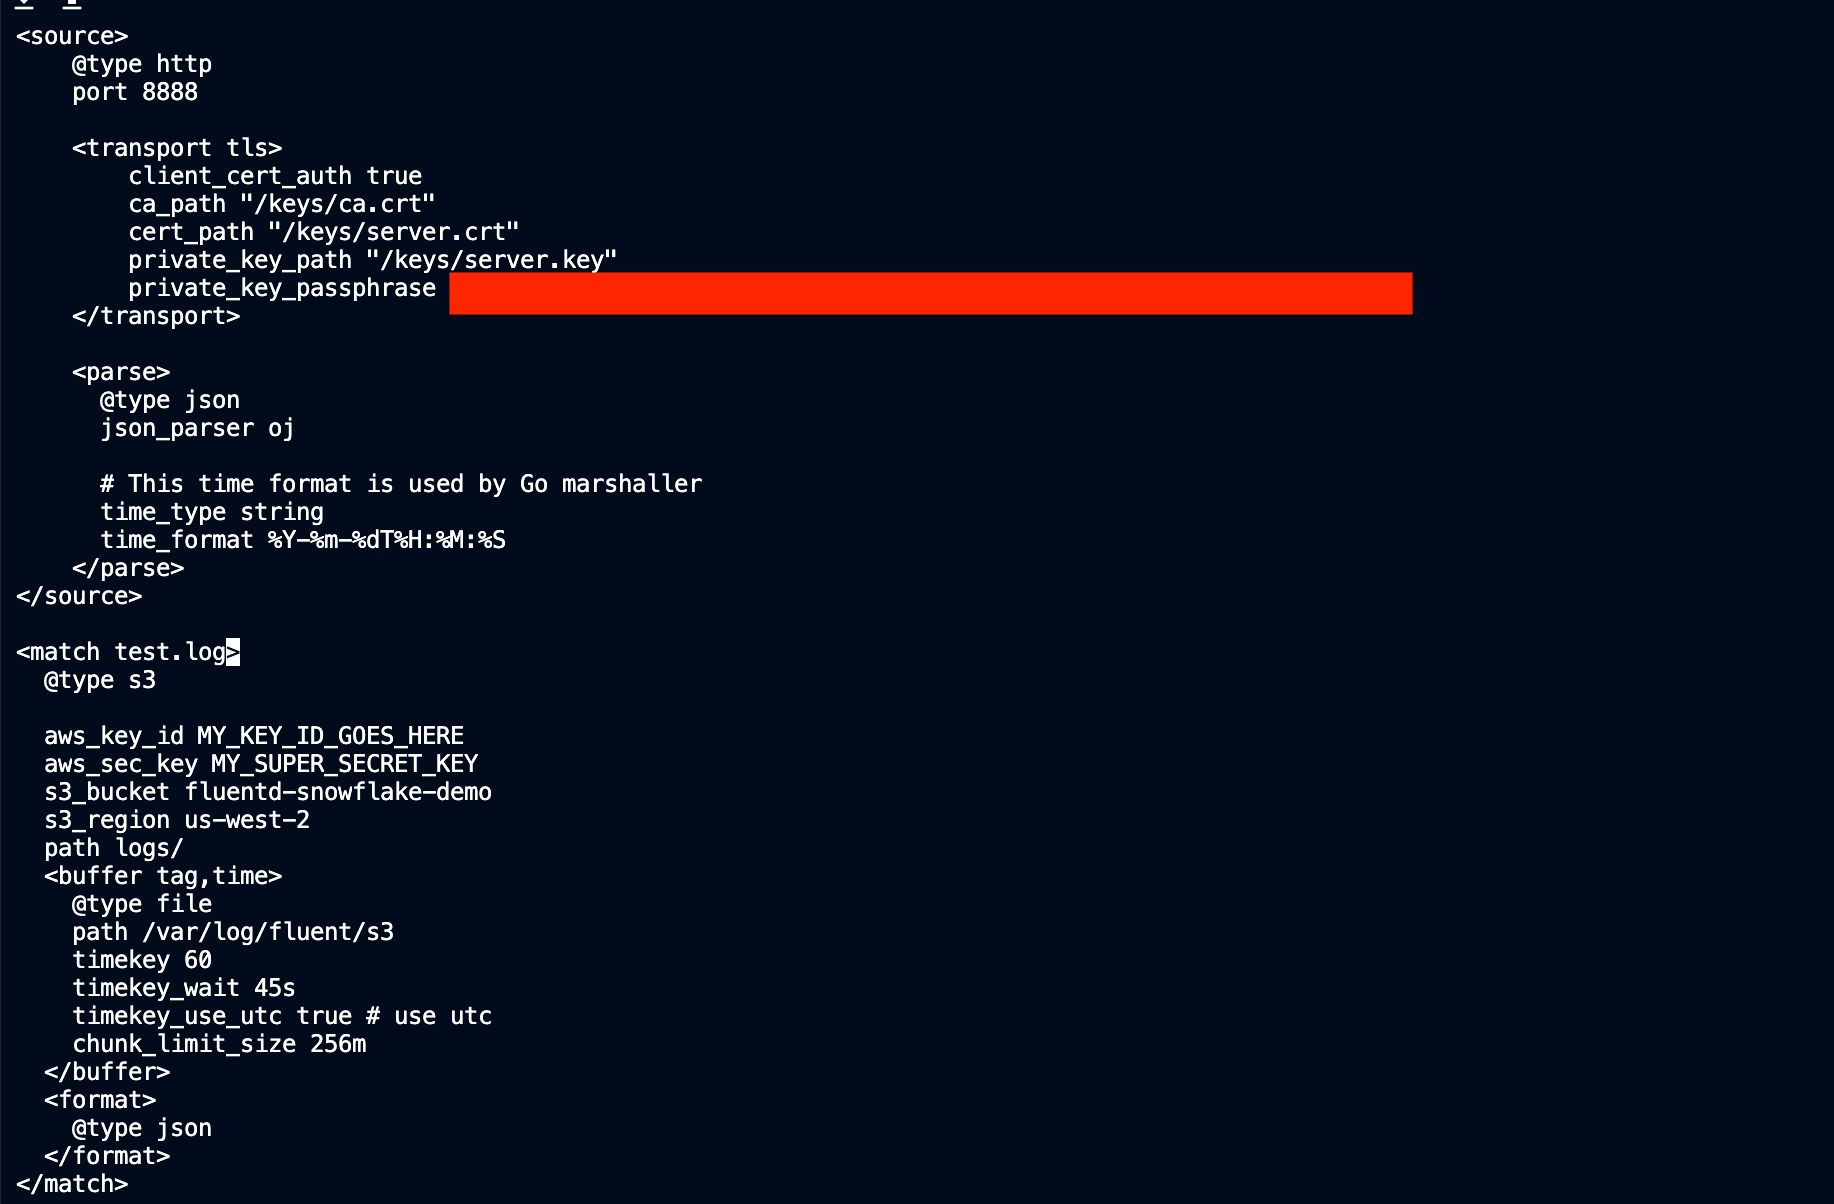
Notice that test.log is now of type s3 instead of stdout. Another field to call out is the timekey. This is the cadence at which Fluentd will forward data to our S3 bucket in seconds.
Now that we have our custom Fluentd image, and our new configuration file with our AWS credentials, this is all we need to start uploading to S3! In the next steps we’ll ingest our S3 data into Snowflake using Snowpipe.
Configuring Snowflake role/policy
Fluentd can now talk to AWS, and now we need Snowflake to be able to talk to AWS so we can forward those log files to our Snowflake database.
First, in your AWS management console navigate back to the IAM service. Go to Policies and create a new one. Once in the creation screen, select the JSON tab to enter in the policy permissions:
{
    "Version": "2012-10-17",
    "Statement": [
        {
            "Effect": "Allow",
            "Action": [
                "s3:PutObject",
                "s3:GetObject",
                "s3:GetObjectVersion",
                "s3:DeleteObject",
                "s3:DeleteObjectVersion"
            ],
            "Resource": "arn:aws:s3:::<YOUR_BUCKET_NAME>/<YOUR_DATA_FOLDER_NAME>/*"
        },
        {
            "Effect": "Allow",
            "Action": [
                "s3:ListBucket",
                "s3:GetBucketLocation"
            ],
            "Resource": "arn:aws:s3:::<YOUR_BUCKET_NAME>"
        }
    ]
}
Next we’ll create a role that we can assign this policy to. In the AWS IAM service, navigate to the Roles section. Create a new role with the entity type AWS account. Select the Another AWS account option and copy and paste your own account ID into the Account ID box. This is just a placeholder which we’ll eventually substitute for the Snowflake account ID. In the Options section, select Require External ID and enter in a placeholder ID (I just put 0000 for now but we’ll change this later).
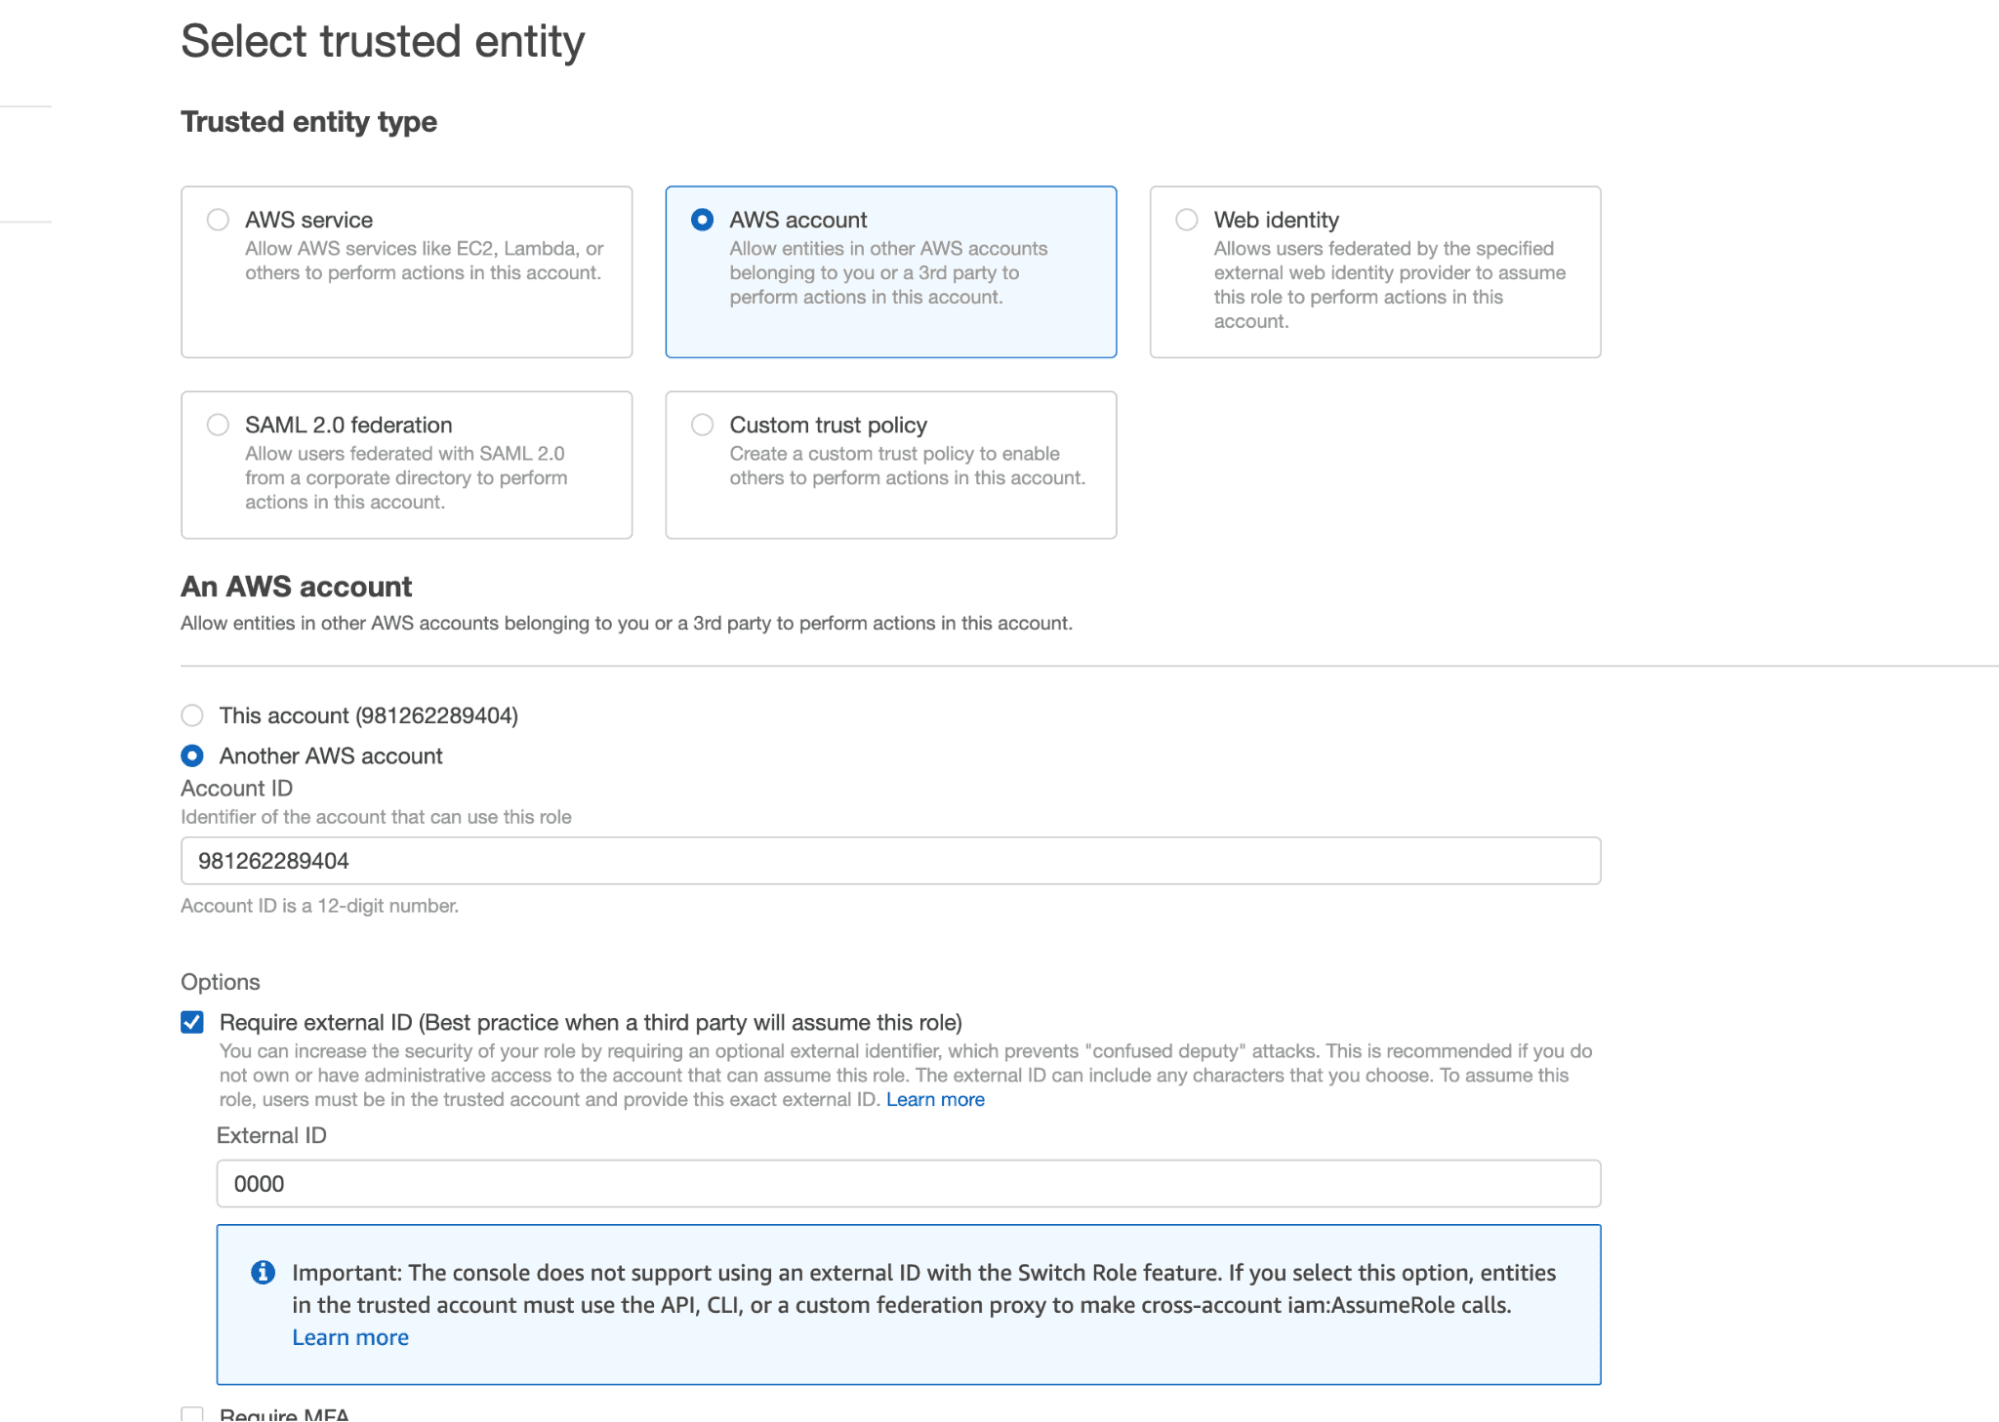
Click Next and then select the policy that we created in the last step.
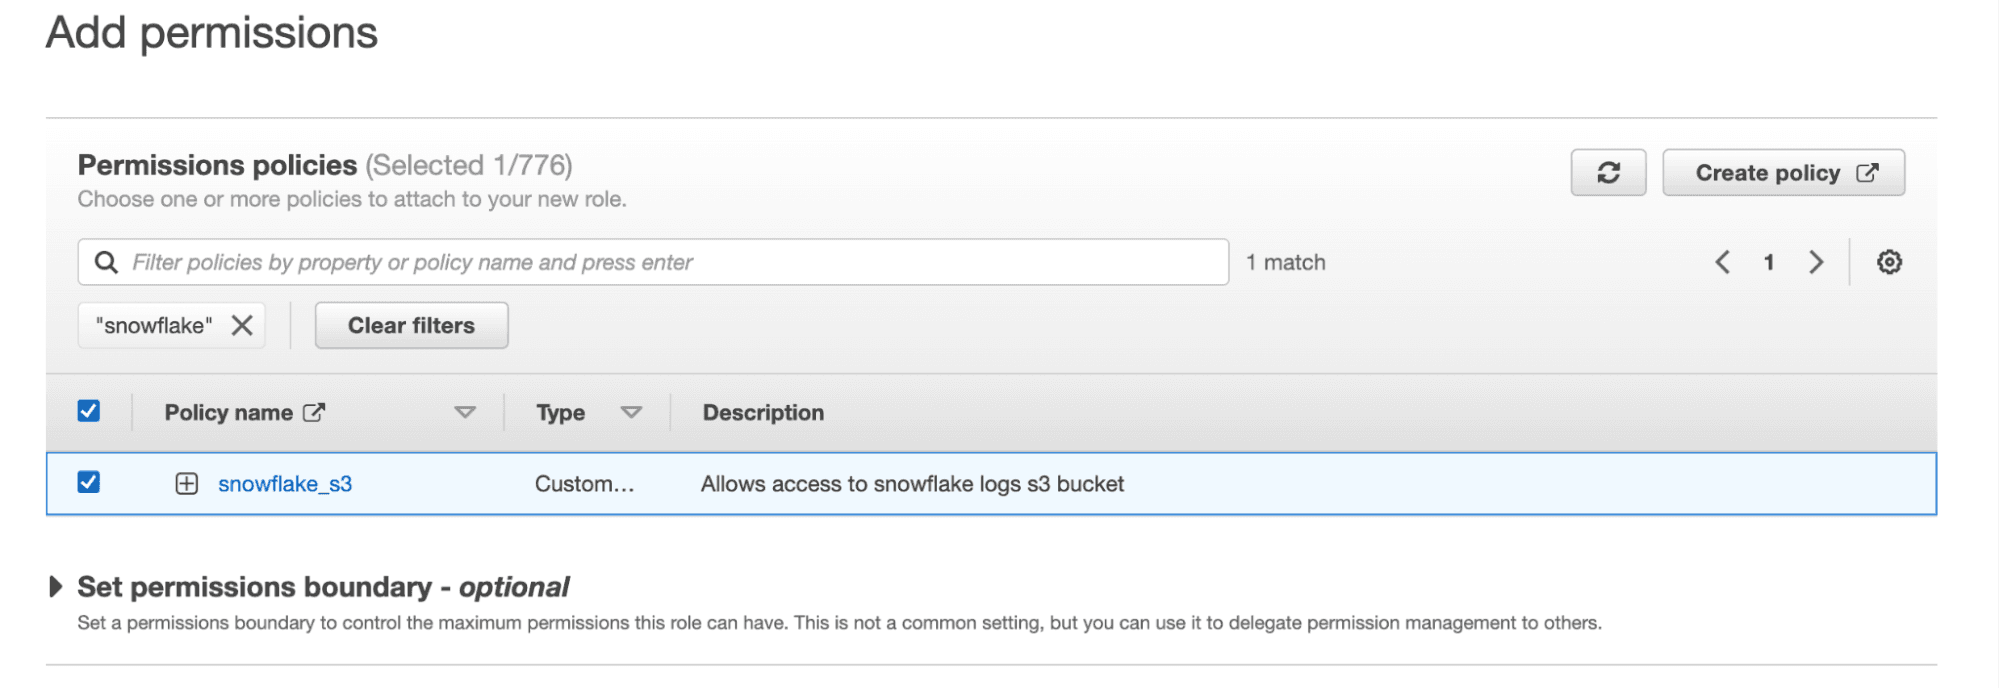
Finally enter in a role name and description on the next page and then you’re done! Once this role is created, copy down the ARN as we’ll need it in the next step.
Configuring Snowflake to work with AWS
We’re in the home stretch! The last piece of the puzzle we need is to wire up Snowflake to this new role, and start sending it ingestion alerts.
Create a Cloud Storage Integration in Snowflake
The first thing we need to do is create something called a [Cloud Storage Integration](https://docs.snowflake.com/en/sql-reference/sql/create-storage-integration.html) in Snowflake. This is a Snowflake object that will store a generated identity and access management (IAM) entity for our cloud provider, in this case AWS.
Open up your Snowflake database console either in a browser window or in a terminal.
Then run the query:
CREATE OR REPLACE STORAGE INTEGRATION S3_TELEPORT_INTEGRTN
    TYPE = external_stage
    STORAGE_PROVIDER = s3
    ENABLED = true
    STORAGE_AWS_ROLE_ARN = '<YOUR_ROLE_ARN>'
    STORAGE_ALLOWED_LOCATIONS = ('s3://<YOUR_BUCKET_NAME>/<YOUR_LOG_DATA_FOLDER>/')`
S3_TELEPORT_INTEGRTN is what I named my integration but you can name it whatever you’d like.
In creating a new storage integration, this command will generate an AWS IAM User that Snowflake will use to interact with S3. To see the user’s credentials, run the Snowflake query:
DESC INTEGRATION S3_TELEPORT_INTEGRTN
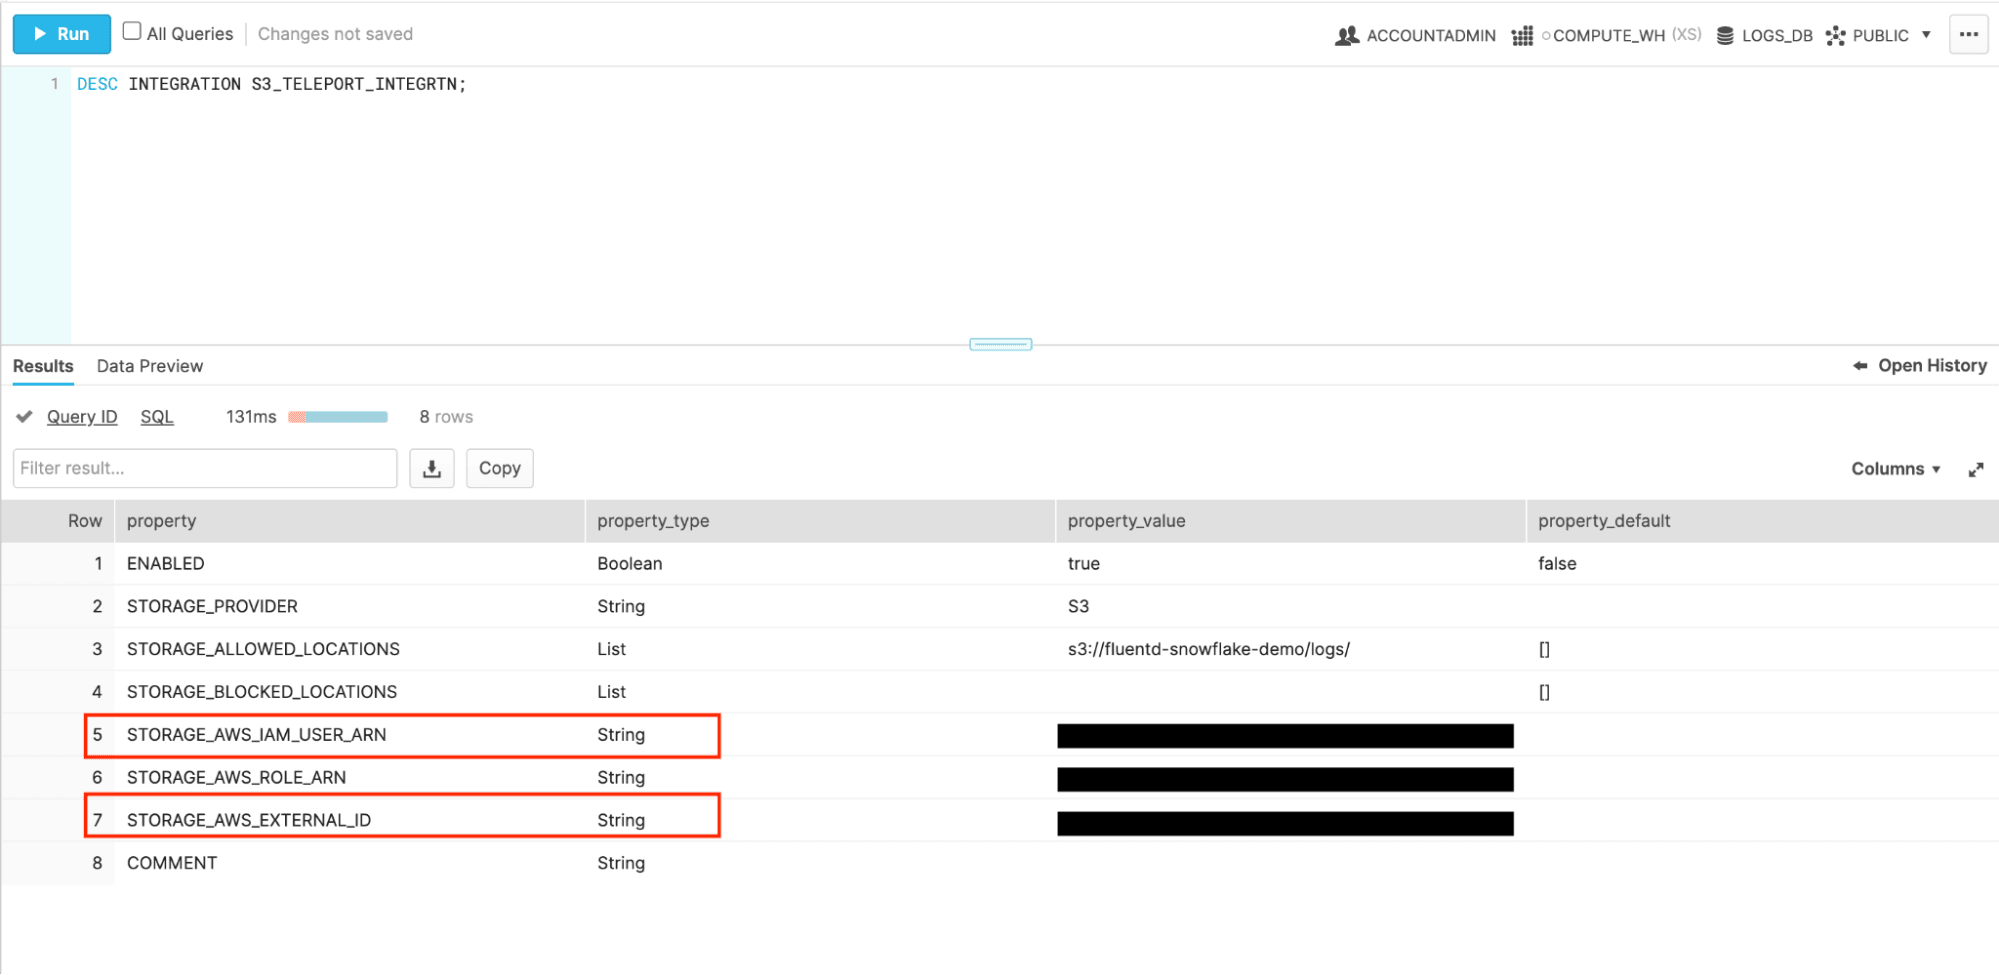
The credentials we’re interested in here are the STORAGE_AWS_IAM_USER_ARN and the STORAGE_AWS_EXTERNAL_ID. My credentials have been redacted here, but unless something is horribly wrong with your computer, you should see text instead of those black boxes on the right.
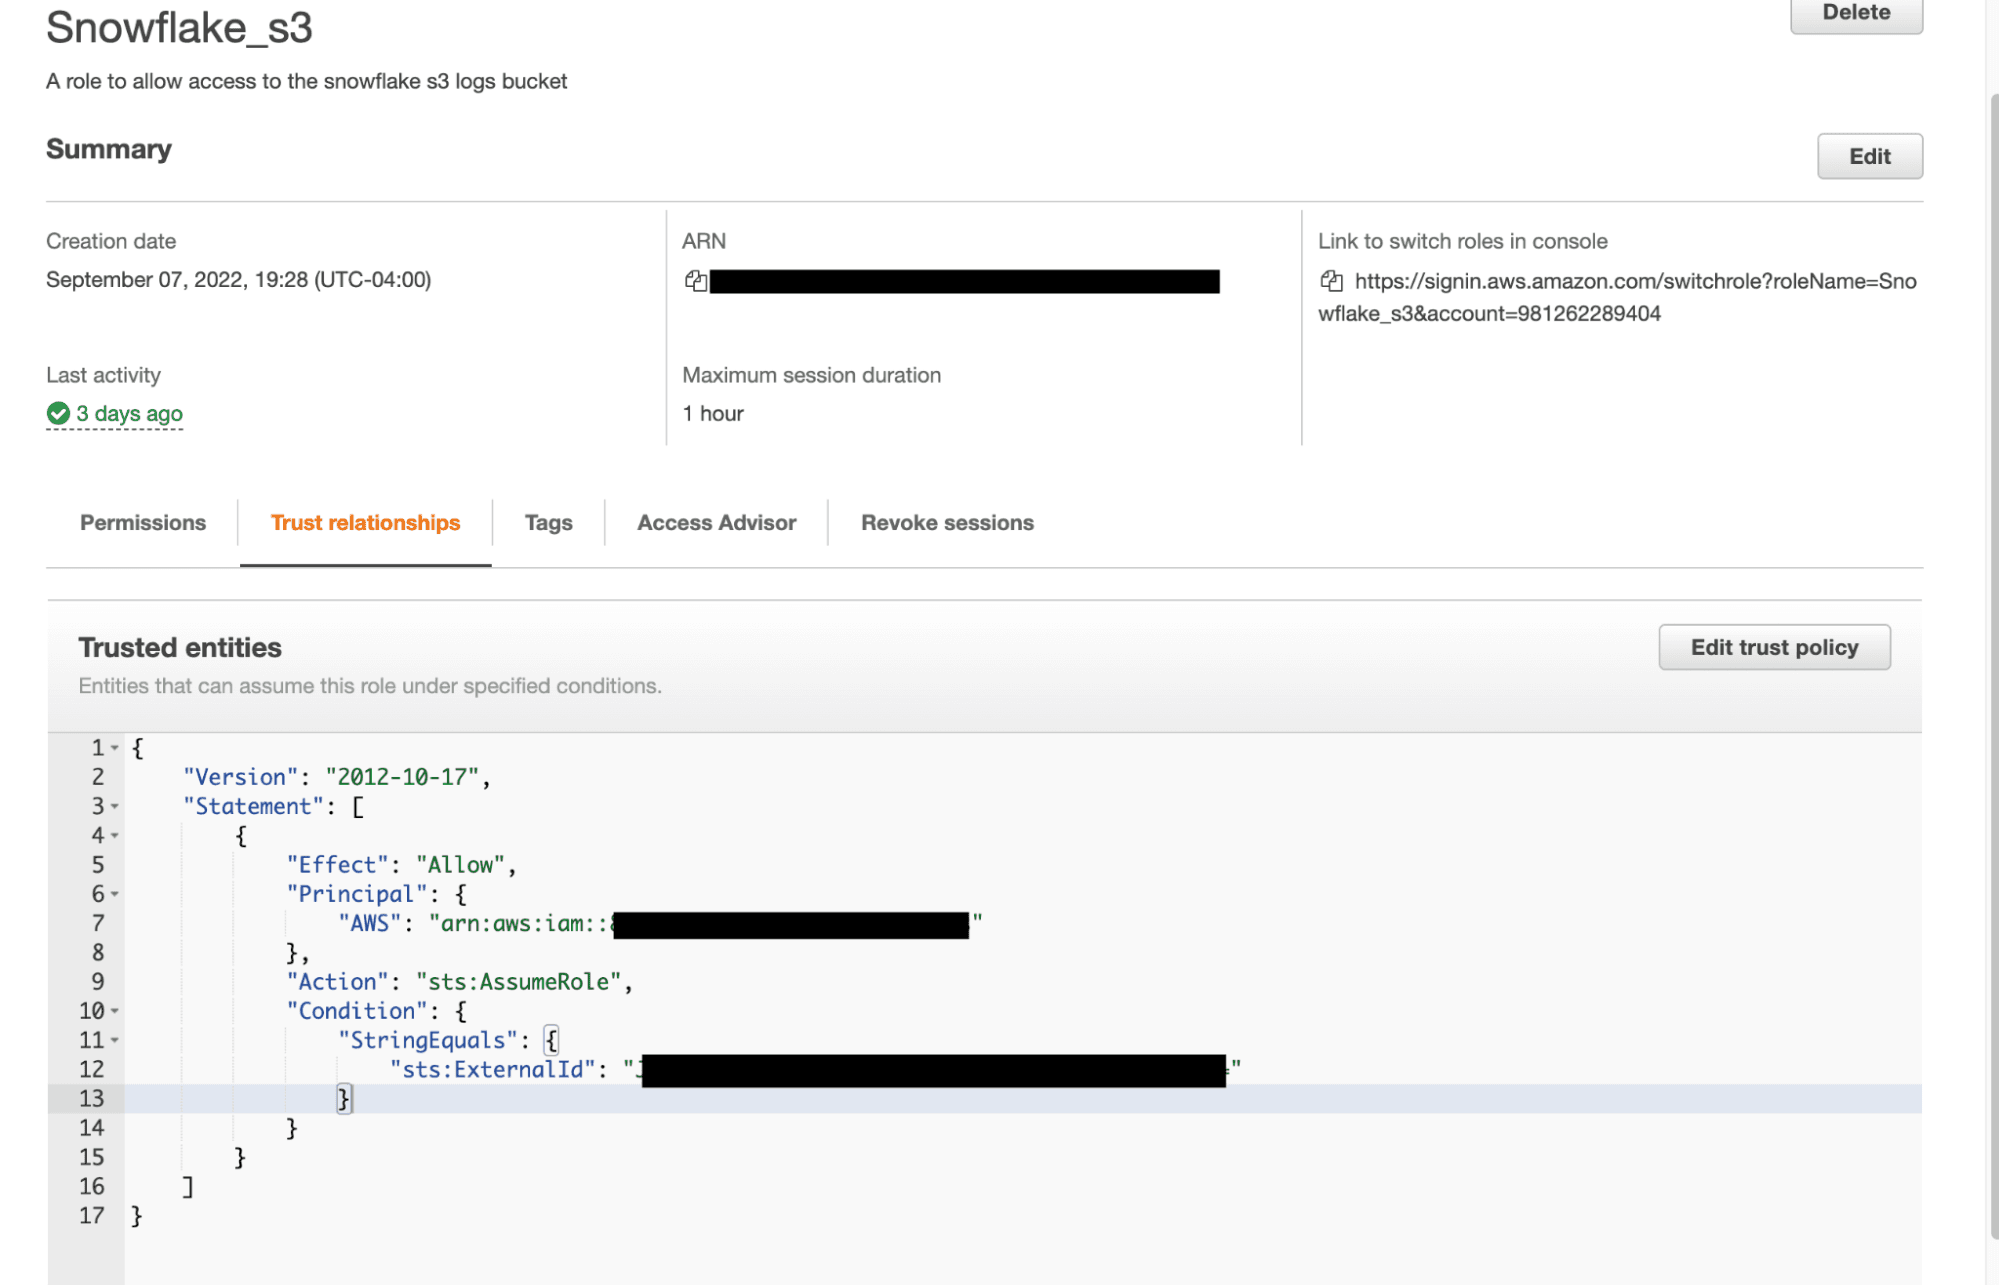
Copy these two values down, return to the AWS management console, and open up the Snowflake Role we created earlier in the tutorial.
Navigate to Trust Relationships then replace the dummy values we entered before with the corresponding values that we got from the Snowflake storage integration object.
Create Snowflake Stage
Next we’ll create a Snowflake Stage which is an object that we’ll use to load data from the log files we get from S3 into our Snowflake table.
To create this stage, run the query substituting the values for your own integration and s3 url:
CREATE STAGE
CREATE OR REPLACE STAGE TELEPORT_LANDING_STAGE
    STORAGE_INTEGRATION = S3_TELEPORT_INTEGRTN
    URL = 's3://<YOUR_BUCKET_NAME>/<YOUR_LOG_DATA_FOLDER_NAME>/'
To see if this worked you can upload some files to your S3 bucket and then run: LIST @TELEPORT_LANDING_STAGE;.
If everything is configured correctly, you should see all of the files currently in that bucket!

Creating Snowflake database to store our logs
Next, we’ll create a Snowflake database to store all of our log data: create Database LOGS_DB;
Then a table: create Table PARSEJSON_RAW(raw_data Variant);
And a file format telling Snowflake what format our data is in:
create or Replace File Format JSON_FORMAT
    type = JSON
    strip_outer_array = TRUE ;
The strip_outer_array field tells Snowflake to strip the outer brackets off of our JSON objects.
Create Snowpipe
The last Snowflake object we need is a pipe to get data from the landing stage and parse it into our database. This leverages everything we’ve built so far and ties it all together.
To create a pipe run the query:
create PIPE LOGS_DB.Public.AUTOINGST_PARSEJSON
        AUTO_INGEST = TRUE
AS
    Copy INTO LOGS_DB.Public.PARSEJSON_RAW
    From @LOGS_DB.Public.TELEPORT_LANDING_STAGE
    File_Format = (Format_Name = JSON_FORMAT)
;
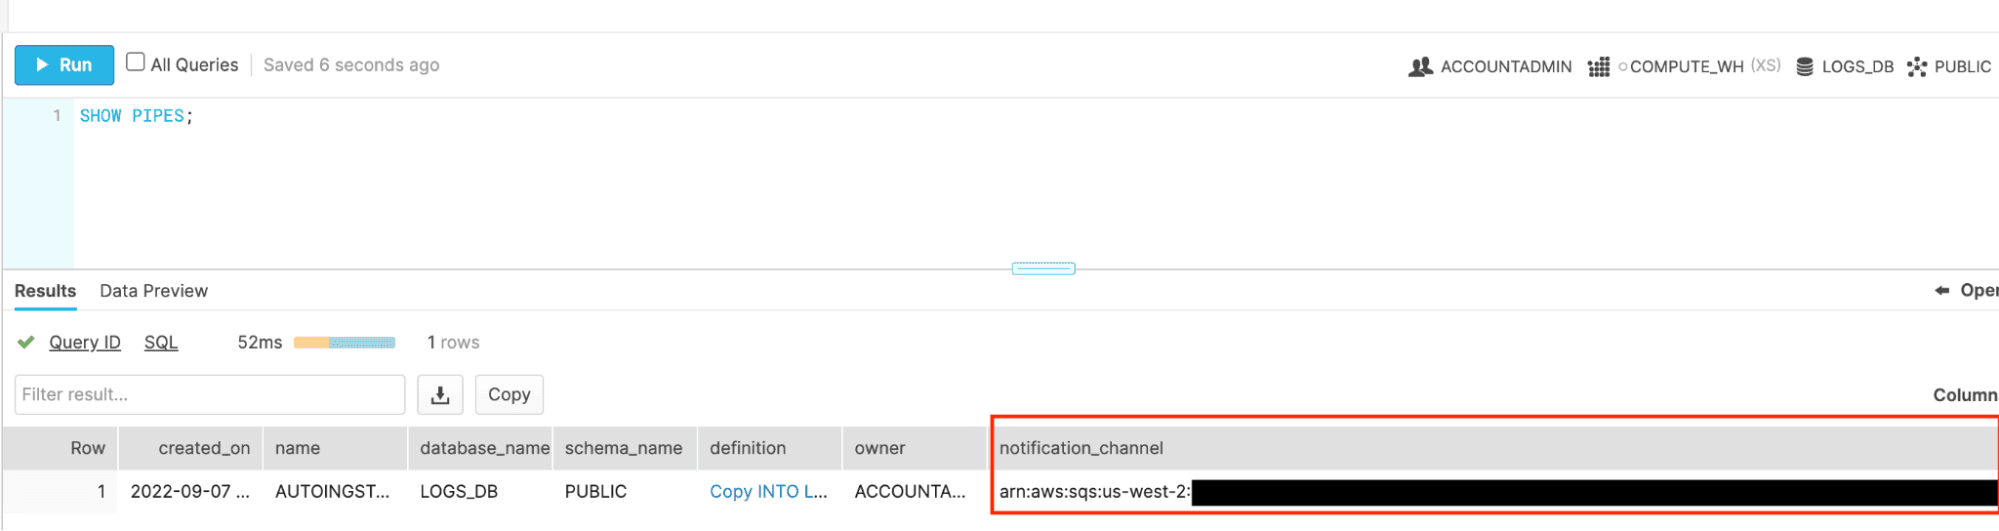
For the next step we’ll need the notification_channel_arn of the pipe. Grab this by running the query SHOW PIPES; And copy and paste this value.
THE LAST STEP I PROMISE: Setup SQS Queue
The very last thing we need to do is to alert our Snowpipe when there is new data to be ingested from the S3 bucket. In order to do this, we have to set up what’s called an SQS notification.
In the AWS management console, navigate back to your storage bucket that we created earlier and go to Properties then scroll to Event notifications.
Create a new event notification called Auto-Ingest-Snowflake or some other informative name and set the prefix to your log data folder name.
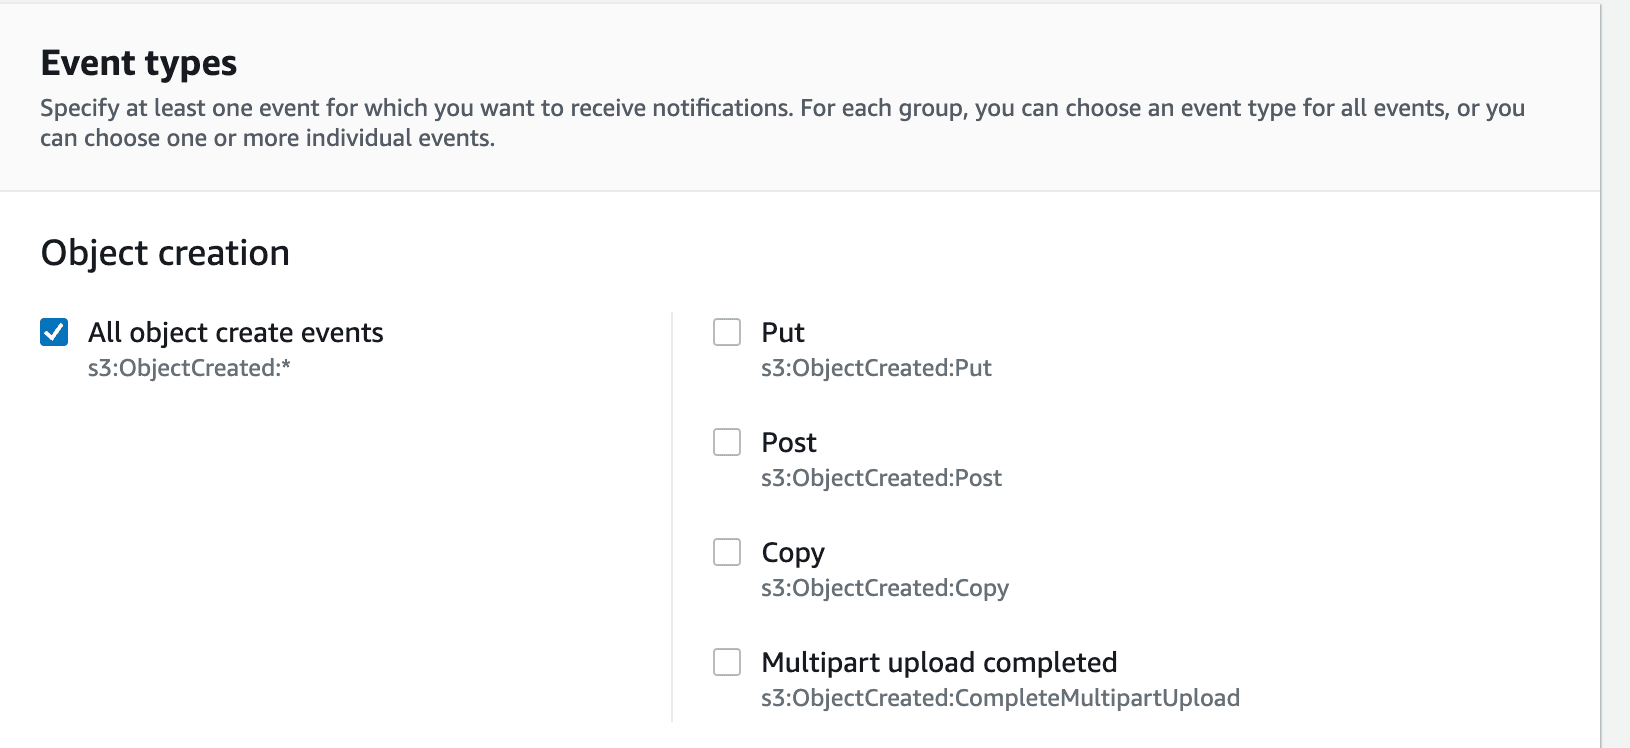
Scroll down and select “All object create events” under “Event Types”.
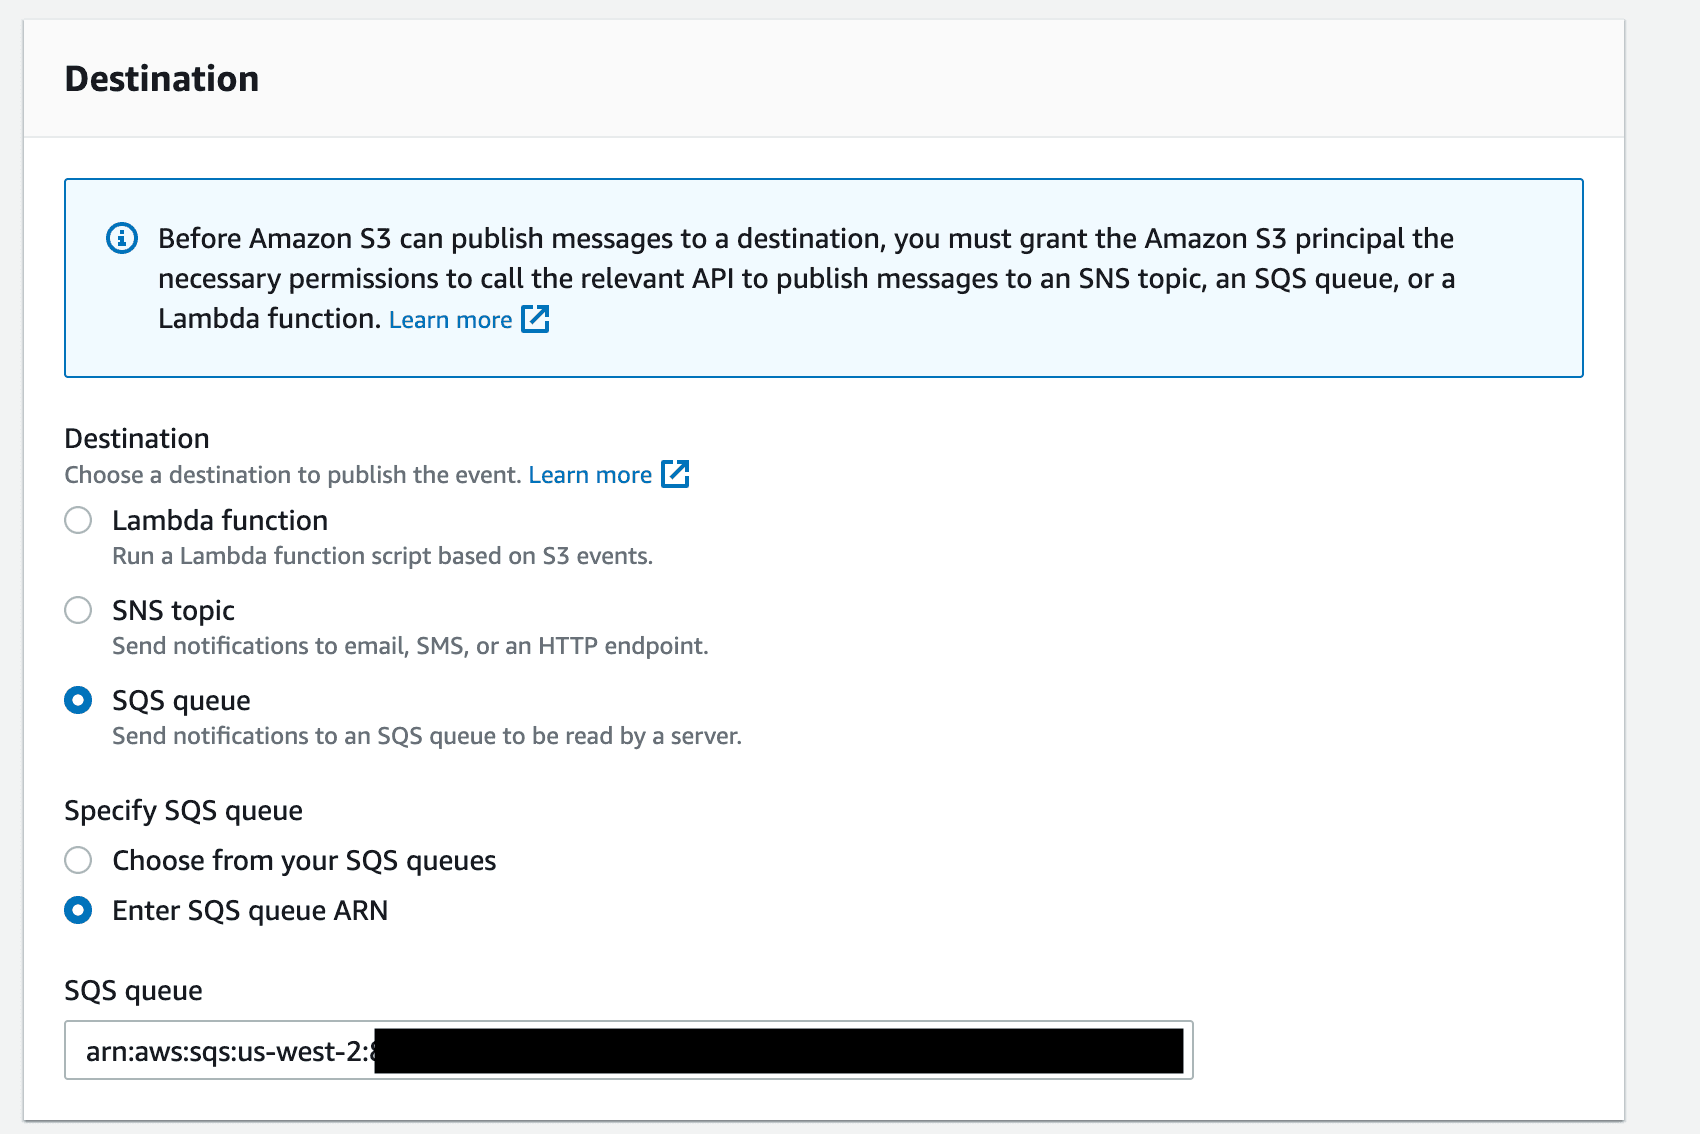
Then for the destination, select SQS queue and Specify the SQS queue ARN as the notification_channel_arn we got from our Snowpipe command earlier.
Start INGESTING!!!
We did it! Everything should be all wired up now, and your logs are finally ready to be ingested into our Snowflake database.
All that’s left to do is to start up our Fluentd agent and the Teleport event handler.
In different terminals from your Teleport cluster, run the commands:
docker run -u root -p 8888:8888 -v $(pwd):/keys -v $(pwd)/fluent.conf:/fluentd/etc/fluent.conf teleport-fluentd
and
./teleport-event-handler start --config teleport-event-handler.toml
Depending on the timekey value you set in the Fluentd configuration script you should see the log data populating in a few minutes into your Snowflake database.
The final result you should end up with is something like this:
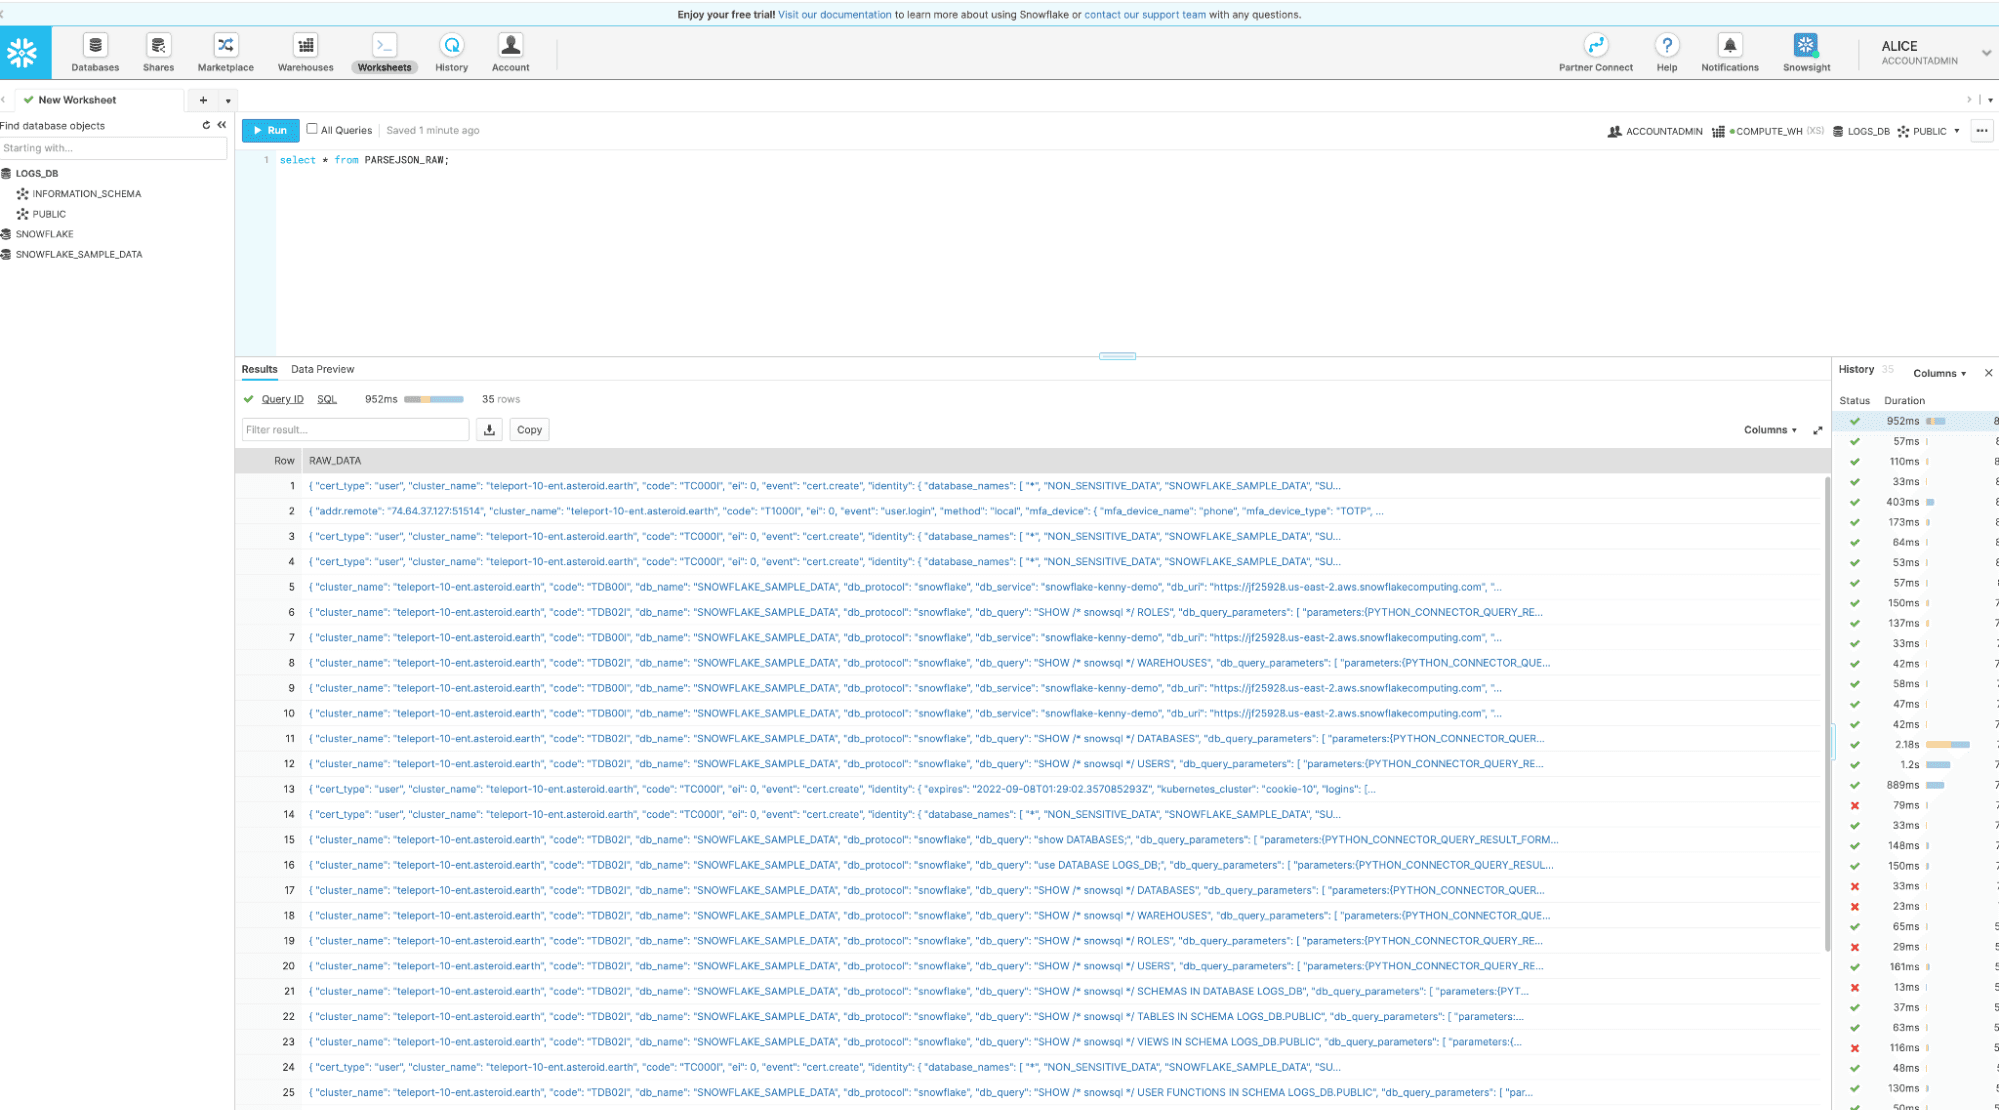
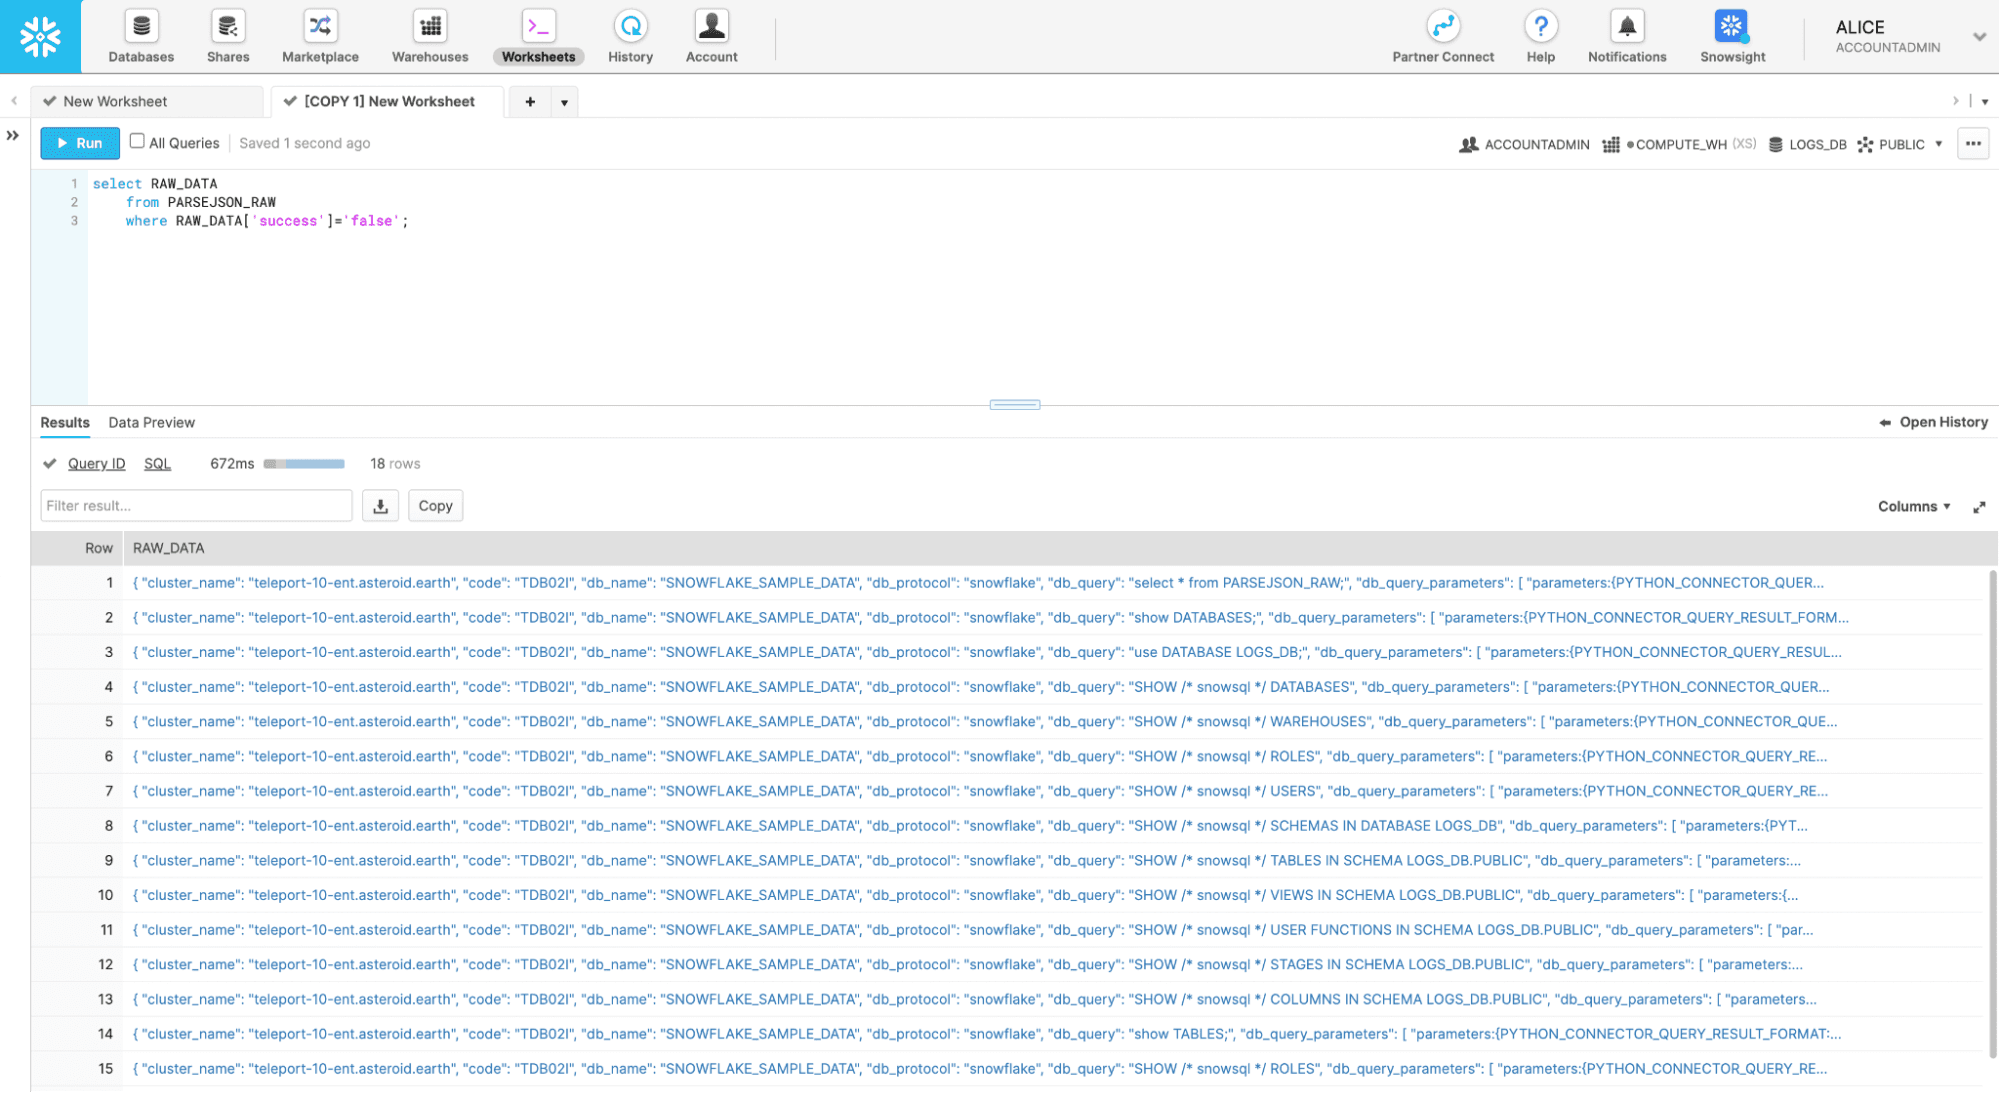
As just one example of a query you could run to help out with your event monitoring check this out. Say you wanted to know if queries were failing. Without any other plugins, or any extra data formatting, you can query the raw JSON table for any events that failed with this simple query:
select RAW_DATA
    from PARSEJSON_RAW
    where RAW_DATA['success']='false';
Now that all of your log data is being sent to Snowflake in real-time in a formatted organized way, the sky’s the limit. You can easily implement monitoring tools, cataloging strategies and more.
To try out other Teleport use cases right from your browser, check out our interactive labs page!
Table Of Contents
Teleport Newsletter
Stay up-to-date with the newest Teleport releases by subscribing to our monthly updates.