Securing Your MongoDB Database
Hardening MongoDB
Securing databases is a significant aspect of an organization’s infrastructure and security practices. This article explores the methodologies and steps for securing MongoDB Database, a popular non-relational, flexible, and document-oriented database.
Before starting, you should understand the difference between self-hosted MongoDB and MongoDB Atlas. The former describes the idea of using an external platform to host your MongoDB Database, whereas MongoDB Atlas is a hosting service set up by the people who built MongoDB. While self-hosting can reduce costs, Atlas is more extensive and manageable.
Securing MongoDB
You’re going to learn about securing MongoDB on three security levels:
- Network security ensures that your database is only accessible to specified and trusted hosts and not throughout the entire network.
- Transport-level security encrypts all the network traffic so only trusted clients can read it, which involves the use of TLS/SSL.
- Database security defines the set of privileges and actions available to the user in terms of accessing the database and its activities.
Network-Level security for MongoDB
This section provides some best practices for hardening MongoDB on a network level.
Firewalls
Firewalls are the security blocks between the network traffic and the system; they ensure that only trusted traffic reaches the host and system.
iptables
iptables is the interface that allows you to filter network traffic that can access the hosts by utilizing the Linux netfilter firewall. We can control this traffic based on hosts, as well as IP addresses.
The following commands will block all ports except 27017 (or the port MongoDB is listening to) using iptables:
# Blocking access from all other ports except 27017 (or the port MongoDB is listening to)
sudo iptables -A INPUT -p tcp --dport 27017 -j ACCEPT
# Drop any input or output connections
iptables -P INPUT DROP
iptables -P OUTPUT DROP
# To not let the settings change to default upon restart
service iptables save
However, suppose you want iptables to only accept the inbound connections from a certain IP address or subnets to the port MongoDB is listening to. In that case, you need to make the following changes to the commands:
# Allowing only the specified IP address to access the port MongoDB is listening to
iptables -A INPUT -s <ip address> -p tcp --destination-port <MongoDB port> -m state --state NEW,ESTABLISHED -j ACCEPT
iptables -A OUTPUT -d <ip address> -p tcp --source-port <MongoDB port> -m state --state ESTABLISHED -j ACCEPT
# Drop any input or output connections
iptables -P INPUT DROP
iptables -P OUTPUT DROP
# To not let the settings change to default upon restart
service iptables save
# If you want a pool of IP addresses to connect to the port MongoDB is listening to
iptables -A INPUT -s <ip address>/24 -p tcp --destination-port <MongoDB port> -m state --state NEW,ESTABLISHED -j ACCEPT
# Another way of writing the same command
iptables -A INPUT -s <ip address>/255.255.255.0 -p tcp --destination-port <MongoDB port> -m state --state NEW,ESTABLISHED -j ACCEPT
netsh
netsh provides access to the Windows firewall to manage the secure access of network traffic to the hosts. It limits open access to all the traffic, reducing the element of risk.
Here’s how you can set up the firewall using netsh:
# Rule to allow all traffic to the port your DB is running on, allowing the app server to connect to the instance of exe
netsh advfirewall firewall add rule name="Open mongod port <MongoDB port>" dir=in action=allow protocol=TCP localport=<MongoDB port>
Note: you can apply the firewall rules on exe, which is the build of mongod for Windows.
There’s MongoDB documentation to help you learn more about exe.
Reverse tunneling
Reverse tunneling (also known as SSH tunneling) is a practical approach to direct your traffic to the remote server from the local host with the bastion host in between. The bastion host is an interface that filters the incoming traffic to reduce security risks.
You can utilize the following command for this purpose (applicable on Linux or Mac):
# Using SSH tunneling to direct the traffic of the local port to the remote server via an encrypted connection
ssh <Username>@<Bastion Hosts Address> -L <Desired Local MongoDBs port>:<MongoDBs server address>:<MongoDB port> -N
IP Binding
IP binding specifies the IP addresses that MongoDB will listen to, restricting its exposure in the network and safeguarding it against security breaches. Essentially, IP binding removes traffic from all IP addresses save for those specified.
mongod and mongos are bound to the localhost by default. But if you want to make an additional binding of an IP address to MongoDB, IP binding is the option.
To bind an IP address, navigate to the config file of mongod and add the following:
# Updated config file for MongoDB /etc/mongod.conf
# Binding an IP address to MongoDB using bindIp
net:
  port: <port number>
  bindIp: <ip address>
You can also utilize the following command:
# --bind-ip to listen to a specific interface
mongod --dbpath <path of DB> --bind_ip <ip address> --port <port number>
Transport-level security for MongoDB
This section explains how you can use transport-level security to encrypt network traffic and ensure only trusted clients have access to your MongoDB.
TLS/SSL
TLS and SSL are the encryption protocols that utilize signed certificates for the encryption and security of network traffic. The certificate can be self-signed or signed by a third party.
To set this up, you need to include the following in the MongoDB config file:
# Config details for enabling TLS/SSL connection and client certificate validation
net:
   tls:
  	mode: requireTLS
	  certificateKeyFile: <path to mongodb.pem file>
  	CAFile: <path to cafile.pem>
Now that we've added the cert paths in our config we need to have the db service pick up these changes. At the time of connection, the client must mention the path of the certificate key file for access, which can be done using the following command:
# Command for the client to access the mongod instance with certificate validation
mongo --tls --tlsCAFile /path/to/server-ca.crt ...
If you would like to learn more, we recommend our post on Securing MongoDB.
FIPS
The Federal Information Processing Standard, or FIPS, is a security standard developed by the National Institute of Standards and Technology (NIST). FIPS has many applications, including setting security standards that govern TLS/SSL.
This section explains the configuration of the database with the FIPS 140-2 certified library for OpenSSL. FIPS 140-2 defines the security standards for cryptography modules, ensuring secure environments.
To enable FIPS for MongoDB, follow the steps below:
# Step 01: Setup the TLS/SSL configurations as described in the previous section
# Step 02: Add this in the config file (Note: it’s applicable for MongoDB version 4.2+. For earlier versions, tls is replaced by ssl)
net:
   tls:
  	FIPSMode: true
# Step 03: Start the instance of MongoDB with the particular config file
mongod --config <path to config file>
# Step 04: Confirm the setup of FIPS in the server log file by looking for this statement
FIPS 140-2 mode activated
FIPS mode ensures that the OpenSSL library used by the database is FIPS 140-2 certified. Note: This method is for Linux; follow the linked tutorial for enabling FIPS for MongoDB on Windows and macOS.
Database-level security for MongoDB
This section details best practices for using database-level security to define the privileges and actions available to a user when accessing the database and its activities.
Authentication
Authentication is an essential step of database security. The purpose of authentication is to validate the user’s identity so that only trusted users can access the database’s resources.
User authentication can be set up during and after the connection. You can use the following steps for setting up authentication during connection:
# Step 01: Setup the user connection and authenticate
mongosh --port <MongoDB port>  --authenticationDatabase \ "<DB name>" -u "<username>" -p
# Step 02: Enter the user’s password when prompted
# Step 03: Define roles of the user (We are using the SCRAM method here)
use <db1 name>
db.createUser(
  {
    user: "<username>",
    pwd:  passwordPrompt(),
# User is allowed to read in db1 and read and write in db2
    roles: [ { role: "read", db: "<db1 name>" },
         	{ role: "readWrite", db: "<db2 name>" } ]
  }
)
# Step 04: Connect to mongosh as the user you created to verify the roles
mongosh --port <port number> -u <username> \ --authenticationDatabase <authentication database name> -p
# Step 05: Verify the recently assigned privileges
To set up the authentication of the user after the connection, you need to make the following changes:
# Step 01: Connect to the database
mongosh --port 27017
#Switch to the authentication database to authenticate the user
use <name of authentication database>
db.auth("<username>", passwordPrompt())
# Step 02 and Step 03 are the same as that of authentication during connection
# Step 04: Connect to mongosh as the user you created to verify the roles
mongosh --port <port number>
use <database name>
db.auth("<username>", passwordPrompt())
# Step 05: Verify the recently assigned privileges
Authorization
Authorization occurs if authentication has been successful. Once you’ve verified the user’s identity, the next step is to determine their privileges regarding access to resources.
You can set up role-based authorization for the users using the following steps:
# Step 01: Establish the connection with the privileges to create roles
mongosh --port <port number> -u <username> -p '<password>' --authenticationDatabase '<db name>'
# Step 02: Create a role as per required privileges
use <db name>
db.createRole(
   {
 	role: "<role name>",
 	privileges: [
   	{ resource: { cluster: true }, actions: [ "dropConnections", "killop" ] },
   	{ resource: { db: <db name>, collection: <collection name> }, actions: [ "revokeRole" ] }
 	],
 	roles: []
   }
)
These settings allow the user to drop the connections and kill their own operations at the cluster level. The user can remove the role of any user from the specified database at the DB level.
Check out the documentation to learn more about MongoDB users and roles.
Auditing
Auditing tracks and keeps you updated on system activities at the deployment level. You can view the audits in the command line and store them in a JSON file. There are two ways to do this:
# Option 01: The command to view audits in the command line and store it in a JSON file
mongod --dbpath <db path> --auditDestination file --auditFormat JSON --auditPath <path of json file>
# Option 02: Setting up the audits by specifying them in the config file
auditLog:
   destination: file
   format: JSON
   path: <path of json file>
Enterprise-only features
MongoDB Enterprise is a commercial edition with some advanced security add-ons. This section covers two of the most significant enterprise-only features of MongoDB: LDAP proxy and encryption at rest.
LDAP Proxy
Lightweight distributed access protocol, or LDAP, is an industry standard for accessing and maintaining distributed directory information services over an Internet Protocol network.
For a simple understanding, you can utilize the following command to authenticate the database server running with the LDAP authentication and authorization:
mongosh --username test@dba.example.com --password --authenticationDatabase '$external' --authenticationMechanism "PLAIN" --host "mongodb.example.com" --port <port number>
To learn more, see the documentation on LDAP proxy authentication.
Encryption at rest
While you’ve seen the encryption of the network traffic in the form of TLS/SSL, encryption at rest defines the encryption of stored data. Database keys are utilized for this purpose.
The following are the steps for setting up encryption at rest for MongoDB with the key file (that is, the file containing your keys):
# Step 1: Create a base 64 encrypted key file
openssl rand -base64 32 > mongodb-keyfile
# Step 2: Update the file permissions (600 specify only the owner can read and write the file)
chmod 600 mongodb-keyfile
# Step 3: Utilize the keyfile to enable encryption
mongod --enableEncryption --encryptionKeyFile  <path to keyfile>
# Step 4: Verify the successful execution by looking for this in the logs
[initandlisten] Encryption key manager initialized with key file: <path to keyfile>
MongoDB Atlas security considerations
This section covers some of the security features you can utilize in MongoDB Atlas.
API Key Access
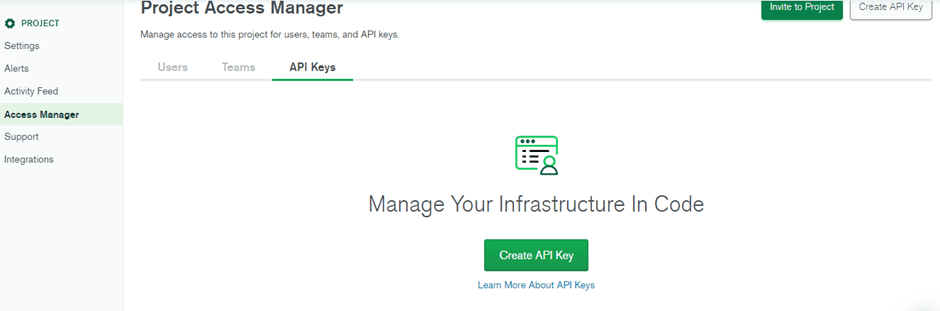
With an API key you can configure various permission levels determining who can access your data. To create and configure an API key follow these steps:
- Navigate to the API Keys in the Access Manager.
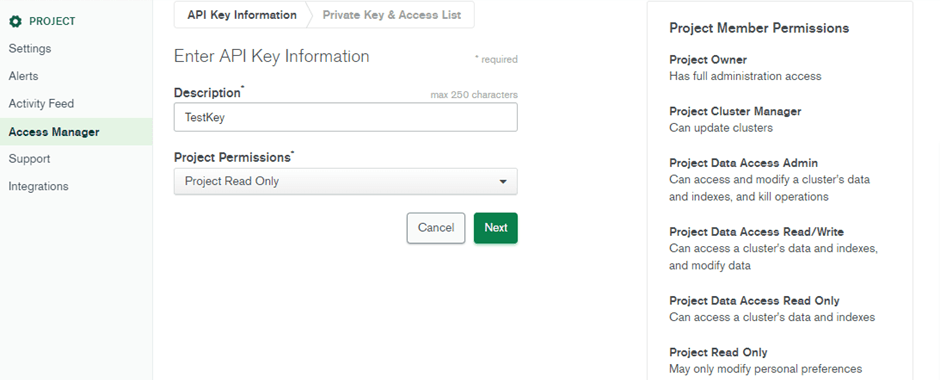
- Enter the key name and set the desired permission level under Project Permissions.
- The Public Key and Private Key will be generated. Note the private key will disappear once you leave the page, so copy and save it somewhere in the system.
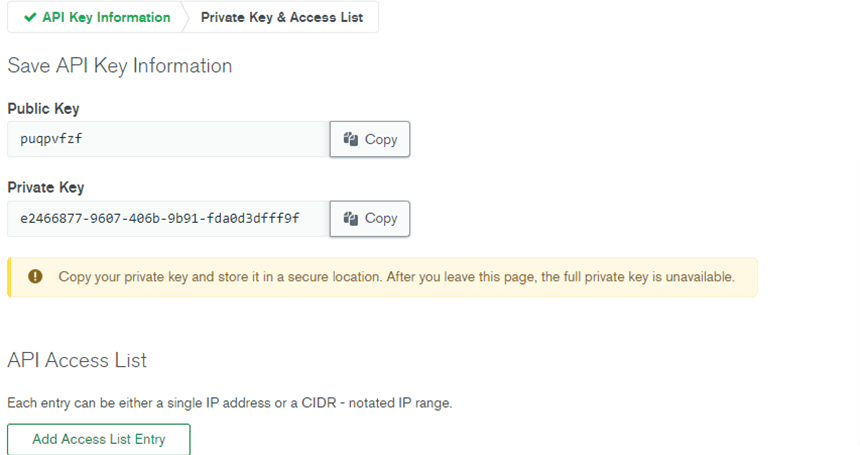
- By clicking Add Access List Entry, you can specify the IP addresses you want to access the project.
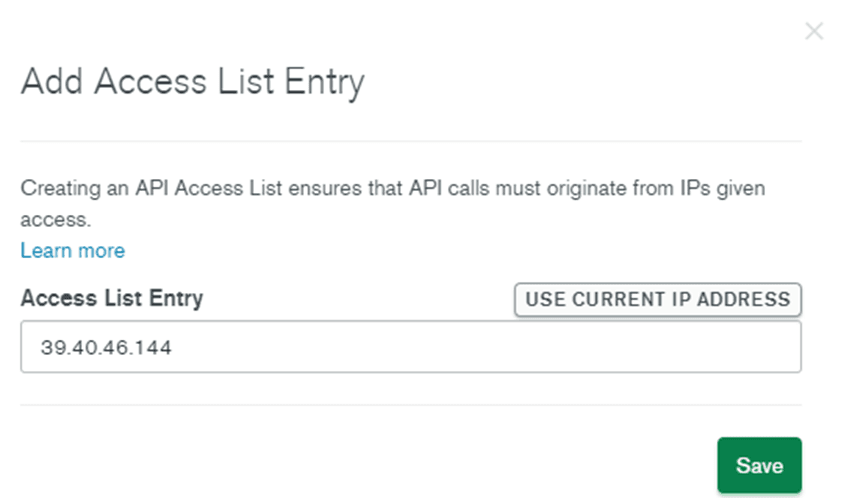
- This creates your API Key with the required details.

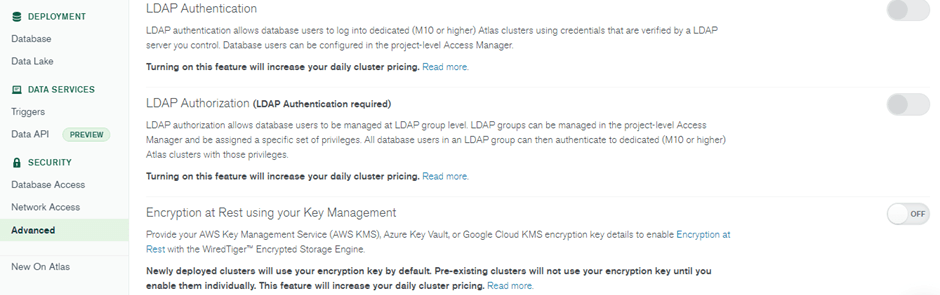
Securing access
You can enable further security features like LDAP Authentication, LDAP Authorization, Encryption at Rest using your Key Management, Database Auditing, and Self-managed X.509 Authentication from the Advanced option under Security.

Secure access to MongoDB using Teleport Database Access
Teleport Database Access is an ideal solution for making your databases secure. This open-source project provides you with secure access to many popular databases, including MongoDB, MySQL, PostgreSQL and more. Teleport has some great features that can help improve your organization’s MongoDB security. It can:
- Improve access control and visibility throughout the organization.
- Certificate authority (CA) management that makes it simple to use TLS auth.
- Remove regular authentication credentials. Instead, the user can access the database using a single sign-on flow and database certificates.
- Improve security measures through implementing custom access request workflows.
- Secure your database with powerful role-based access control configurations.
- Record all database events via a detailed audit log.
If any of these features align with the requirements of your organization, you can get started with these simple steps:
- Watch the Teleport Database Access Webinar.
- Check out the Teleport documentation for a step-by-step guide to MongoDB Atlas and self-hosted MongoDB.
- Explore Teleport code on GitHub.
Conclusion
Security is an essential component of every system, which requires that data is secure and encrypted. Databases are integral components of software architecture as they often house private data. This makes them a target for hackers and cybercriminals. Therefore, the security of your databases is pivotal to your company’s success.
This article described methods of protecting MongoDB on three levels of security: network, transport and database. You can make all these security measures consistent and efficient by utilizing Teleport, an identity-aware, multi-protocol access proxy.
If you would like to learn more about securing MongoDB, we recommend our post on Securing MongoDB.
Table Of Contents
Teleport Newsletter
Stay up-to-date with the newest Teleport releases by subscribing to our monthly updates.
Tags
Tags
Teleport Newsletter
Stay up-to-date with the newest Teleport releases by subscribing to our monthly updates.