SSH configuration: ssh_config
This blog post covers some of my favorite settings for configuring the behavior of an ssh client (i.e. what is in the man pages for ssh_config). Whether you are looking to add some additional security constraints, minimize failures, or prevent carpal tunnel, ssh_config is an often underutilized, yet powerful tool.
While the examples in this article focus on ssh configurations on unix based systems like linux and macOS, running an ssh server on windows is supported using openSSH. If you’re following along on a windows machine I recommend checking out this tutorial first. The filepaths to the config files will look a little different but the general principles are the same.
This article will take a look at a few useful ways to modify your ssh_config file to achieve a greater degree of security and control, making it even easier to connect to remote machines around the world. This post is not about server-side configuration via sshd_config, which deserves its own separate article.
What is ssh_config?
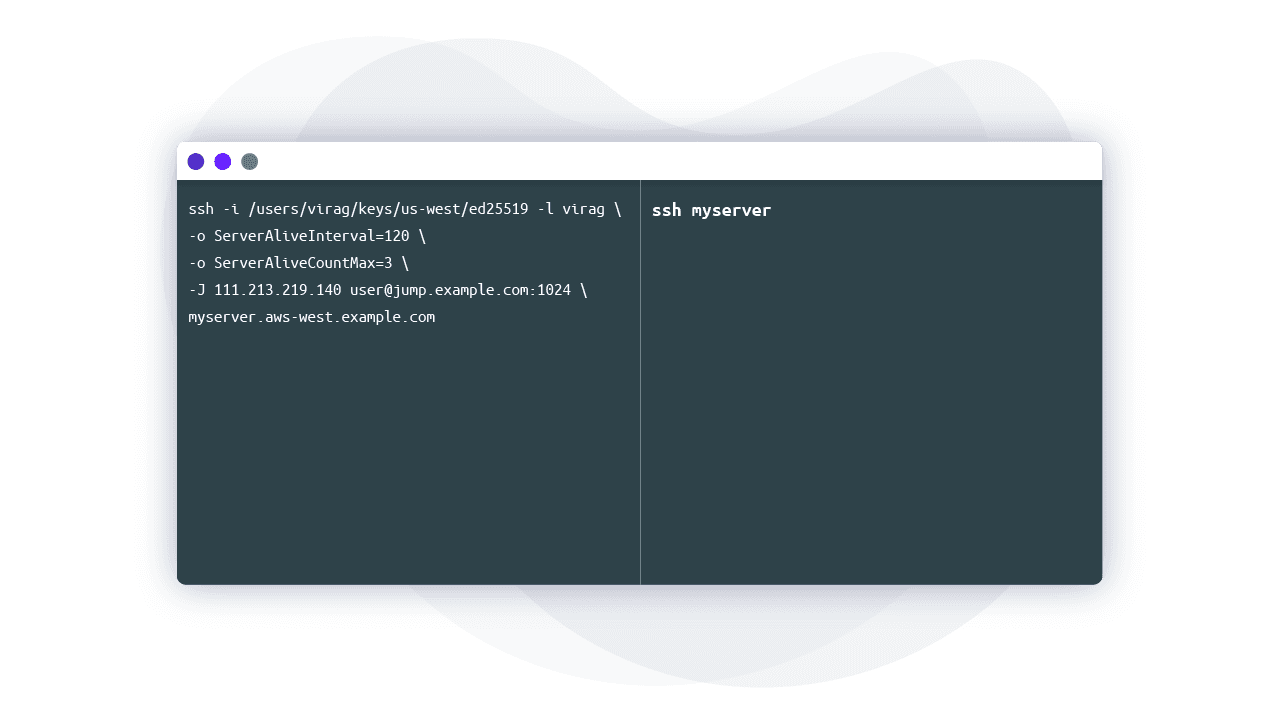
Some engineers may be surprised by how much of ssh client behavior can be configurable via a configuration file. Without a config file, specifying command-line arguments to ssh becomes cumbersome quickly:
ssh -i /users/virag/keys/us-west/ed25519 -p 1024 -l virag \ myserver.aws-west.example.com
That’s too long to type once, let alone multiple times a day. If you’re managing multiple servers and VMs, creating a customized ~/.ssh/ssh_config is a great way to prune commonly used ssh commands.
We can shorten the example above to ssh myserver by editing the ssh_config to read:
Host myserver
	Hostname myserver.aws-west.example.com
	User virag
	Port 1024
	IdentityFile /users/virag/keys/us-west/ed25519
Elegant and simple. Now that we have the basics, let’s see what’s actually going on here. My choice of ed25519 is explained in Comparing SSH Keys - RSA, DSA, ECDSA, or EdDSA?
How ssh_config Works
The ssh client reads configuration from three places in the following order:
- System wide in
/etc/ssh/ssh_config - User-specific in your home directory
~/.ssh/ssh_config - Command line flags supplied to
sshdirectly
This means that command line options (#1) can override user-specific config (#2), which can override global config (#3)
When connection parameters are repeatedly used, it is often easier to define them in ssh_config, which are automatically applied upon connection. Though they are often created when a user runs ssh for the first time, the directory and file can be manually created by:
touch ~/.ssh/ssh_config
Going back to the example above, you may notice that ssh_config is organized into stanzas starting with a host header:
Host [alias]
	Option1 [Value]
	Option2 [Value]
	Option3 [Value]
While not technically necessary, this indented format is easily readable by humans. The ssh client, however, does not care about this formatting. Instead, it will take configuration parameters by matching the ssh argument entered in the command line with any and all host headers. Wildcards can be used as part of the host header as well. Consider:
Host myserver2
	Hostname myserver2.aws-west.example.com
Host myserver*
	Hostname myserver1.aws-west.example.com
	User virag
	Port 1024
Using the myserver1 alias, we get what we expect from the second stanza.
Hostname myserver1.aws-west.example.com
User virag
Port 1024
But myserver2 also has a similar list of options.
Hostname myserver2.aws-west.example.com
User virag
Port 1024
The ssh client obtains this information by pattern matching and locking in values as it reads sequentially down the file. Because myserver2 matches both, myserver2 and myserver*, it will first take the Hostname value from myserver2. Then, as it comes to the second pattern match, the User and Port values are used, but the Hostname field is already filled. Let me repeat this, ssh accepts the first value for each option.
Common SSH Configuration Options
There are close to 100 options for ssh_config in man 5 ssh_config. I’ve compiled a list that I have personally found myself using, many of which will be used later in the article.
Port- The port on which a remotesshdaemon is running. If the daemon is running on the default port 22, this option does not need to be defined. It is considered good practice to run ansshdaemon on a different port, as it reduces the amount of dumb bot probes.Hostname- The real hostname used to establish a connection such as a DNS or IP address. This can be useful to shorten hostnames. For example, you can have a convenientssh mongotake you tomongo-12.staging.example.com.ProxyJump- This option simplifies tunneling through connected servers to a single flag,-J, that names intermediary hosts (hosts between a local client and the final destination) with an alias. This is only available to newer clients (OpenSSH 7.3+). I will cover this one in more detail below.ForwardAgent&AddKeysToAgent- Hopping between hosts (when you typesshagain inside of anothersshsession) requires repeated authentication. For this to work,sshcredentials must be stored on intermediary servers, but this is not a safe practice. These two options allow another process usually calledssh-agentto automatically load your localsshcredentials into memory and serve them to the intermediate machine’s ssh client via a securely forwarded UNIX socket.ForwardAgentenables this forwarding behavior whileAddKeysToAgentautomates the process of loading keys to memory. I will provide more detail on this below.IdentityFile- This option specifies the path to a key the ssh client should try for authentication. This does not preclude the ssh client from trying keys in~/.sshor the ssh-agent. Commonly used when keys are not stored in the default location for whatever reason.IdentitiesOnly- Often used withIdentityFile, this option tells the ssh client exactly which key to present and forgo any keys in~/.sshor the ssh-agent. Becausesshwill throw an authentication error if too many invalid keys are tried, this option helps the client precisely identify what key to present. Even ifIdentitiesOnlyis enabled inssh_config, any identities entered into the command line will also be tried.CertificateFile- Given that keys are largely antiquated, this option can be used in conjunction withIdentityFileto specify which certificate to present. This is not always necessary. When certificate authority signs a key to create a certificate,-cert.pubwill automatically be appended to the key’s filename. The ssh client will first try to load a certificate from the provided filename using the expected naming convention before loading a key. However, if the key and certificate file names do not follow this pattern, thenCertificateFilemust be used or the cert will not be located. Read more on why you should use certs.SetEnv&SendEnv- These options allow an ssh client to send local environment variables to a specified host. The host server must be configured to accept these environment variables by settingAcceptEnvto Yes in/etc/ssh/sshd_config.ServerAliveInterval&ServerAliveCountMax-An ssh client will request a response from the host server if it has not received any data in a specified time interval. This can prevent load balancers and servers from dropping connections due to inactivity.HostKeyAlias- The ssh client is directed to use a key alias from~/.ssh/known_hostsinstead ofHostName. This is useful for hosts with dynamically changing IP addresses or multiple servers running on one host.PreferredAuthentication- This option dictates the order in which authentication methods should be tried. The default isgssapi-with-mic,hostbased,publickey,keyboard-interactive, andpassword
Organizing your SSH configuration
Expanding on what we learned in the two prior sections, let’s see how we can organize ssh_config when we have a modest fleet. Take the following scenario:
- Virag works with six environments: Dev, Test, and Prod on both east and west coast AWS regions
- Virag has regular user access to both Dev and Prod environments, but is root on Test
- Prod environments have stricter security controls
Instead of remembering several ssh command combinations, I’ve edited my local config file.
Host east-prod
	HostName east-prod.prod.example.com
Host *-prod
	HostName west-prod.prod.example.com
	User virag
	PasswordAuthentication no
	PubKeyAuthentication yes
	IdentityFile /users/virag/keys/production/ed25519
	Host east-test
	HostName east-test.test.example.com
Host *-test
	HostName west-test.test.example.com
	User root
Host east-dev
	HostName east-dev.east.example.com
Host *-dev
	HostName west-dev.west.example.com
	User virag
Host * !prod
	PreferredAuthentications publickey
Host *
	HostName bastion.example.com
	User Default
	ServerAliveInternal 120
	ServerAliveCountMax 5
If we were to run ssh east-test, our full list of options would read:
HostName east-test.test.example.com
User root
PreferredAuthentications publickey
ServerAliveInternal 30
ServerAliveCountMax 5
The client picked up the intended option values by matching with east-test, *-test, * !prod, and *. You may notice the Host * stanza will apply to any ssh argument. In other words, Host * defines the global setting for all users. This is particularly useful for applying security controls available to the client. Above, we used just two, but there are several keywords that will tighten up security, such as CheckHostIP, HashKnownHosts, StrictHostKeyChecking, and many more hidden gems.
A word of caution: Because the ssh client interprets options sequentially, generic configurations should be placed towards the bottom of the file. If placed at the top, option values will be fixed before the client can read host-specific options further below. In the case above, putting Host * at the beginning of the file would result in the user being Default.
If one-off cases arise, always remember that options entered into the command line will override those in ssh_config: ssh -o "User=root" dev.
Using the SSH Agent
An ssh jump server is a proxy standing between clients and the rest of the ssh fleet. Jump hosts minimize threats by forcing all ssh traffic to go through a single hardened location and minimizing an individual node’s ssh endpoints to the outside world.
One way to configure a multi-hop setup is by storing a private key for the destination server on our jump server. Do not do this. A jump server is usually a multi-user environment, meaning any single party with elevated privileges can compromise any private key. A solution to this security threat is enabling agent forwarding, which we briefly touched on with AddKeysToAgent and ForwardAgent. Given how common this method is, it may surprise you when I suggest not doing this either. To understand why, let’s dig a bit deeper.
How Does Agent Forwarding Work?
ssh-agent is a key manager that exists as a separate program from SSH. It holds private keys and certificates used for authentication in memory. It does not write to disk or export keys. Instead, the agent’s forwarding feature allows our local agent to reach through an existing ssh connection and authenticate on a remote server through an environment variable. Basically, as client-side ssh receives key challenges, the agent will forward these challenges upstream to our local machine, where the challenge response will be constructed via a locally stored private key and forwarded back downstream to the destination server for authentication. I personally found this visual explanation helpful while researching.
Behind the scenes, ssh-agent binds to a unix-domain socket to communicate with other programs ( $SSH_AUTH_SOCK environment variable). The problem is that anyone with the root permissions anywhere in the chain can use the created socket to hijack our local ssh-agent. Even though socket files are well protected by the OS, a root user can impersonate another user and point the ssh client to their own malicious agent. In essence, forwarding using an agent is the same as sharing a private key with anyone that has root on a machine throughout the chain. (Read more in depth about the pitfalls of using ssh-agent)
In fact, the man page regarding ForwardAgent reads:
“Agent forwarding should be enabled with caution. Users with the ability to bypass file permissions on the remote host (for the agent's Unix-domain socket) can access the local agent through the forwarded connection. An attacker cannot obtain key material from the agent, however they can perform operations on the keys that enable them to authenticate using the identities loaded into the agent.”
Use ProxyJump Instead
To navigate through jump servers, we actually don’t need agent forwarding. A modern approach is to use ProxyJump or its command line equivalent -J.
Host myserver
	HostName myserver.example.com
	User virag
	IdentityFile /users/virag/keys/ed25519
	ProxyJump jump
Host jump
	HostName jump.example.com
	User default
Instead of forwarding the key-challenge response via agent, ProxyJump forwards the stdin and stdout of our local client to the destination host. This way, we do not run ssh on jump.example.com. sshd connects directly to myserver.example.com and gives control of that connection to our local client. As an added benefit, the jump server cannot see any traffic traveling through it due to it being encrypted within the ssh tunnel. The ability to set up jump servers without letting direct ssh access onto it is an essential component of safe and proper ssh setup.
Teleport cybersecurity blog posts and tech news
Every other week we'll send a newsletter with the latest cybersecurity news and Teleport updates.
ProxyJump for Multiple Hops
Let’s simulate a more complicated scenario. We are attempting to access a critical resource deep in our corporate network from home. We must first pass through an external bastion host with a dynamic IP, an internal jump host, and finally to the resource. Each server must authenticate against a unique local key on our machine.
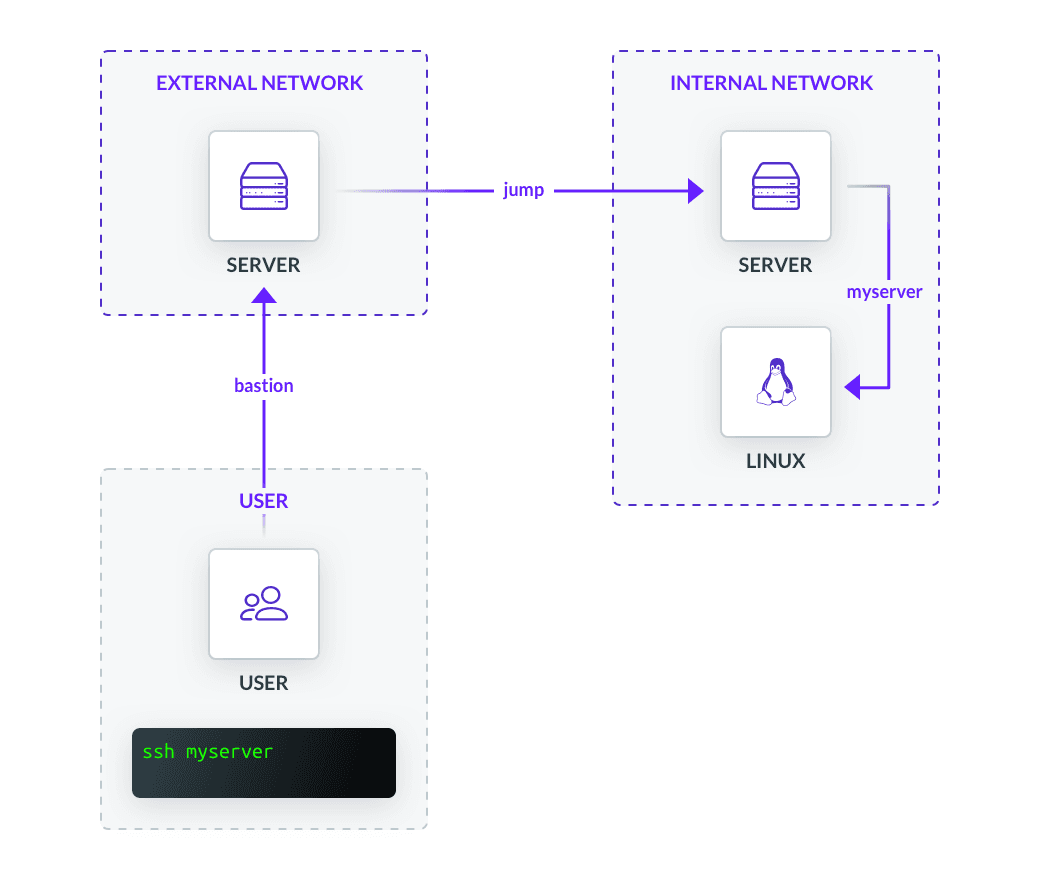
Once again, our local config file will contain everything we need to execute ssh myserver.
Host myserver
	HostName myserver.example.com
	User virag
	IdentityFile /users/virag/keys/myserver-cert.pub
	ProxyJump jump
Host bastion
	#Used because HostName is unreliable as IP address changes frequently
	HostKeyAlias bastion.example
	User external
Host jump
	HostName jump.example.com
	User internal
	IdentityFile /users/virag/keys/jump-cert.pub
	ProxyJump bastion
Now imagine we have to manage a couple hundred environments across multiple cloud providers all over the country with OpenSSH configured in-house. (You may scoff, but we’ve heard these stories!) It is impossible to rely solely on runtime commands while claiming to uphold a credible degree of security. At this scale, effectively managing a fleet requires a conscious architecting of subnetworks, DNS, proxy chains, keys, file structures, etc. that follow predictable patterns and can be transcribed into ~/.ssh/ssh_config.
Conclusion
The broader take away from this article is to make life simple. This can be accomplished with even the simplest of configuration options used in clever ways. These allow us to stay committed to strong security and minimize human error.
If you want to learn more about best practices for ssh access, you may consider the following articles:
Table Of Contents
Teleport Newsletter
Stay up-to-date with the newest Teleport releases by subscribing to our monthly updates.
Tags
Tags
Teleport Newsletter
Stay up-to-date with the newest Teleport releases by subscribing to our monthly updates.