How OIDC Authentication Works
Introduction
Did you know that in the United States, the Social Security Number was never intended to become the defacto method for physical identification? On its surface, this may come as a shock given how ubiquitously SSNs are used for this exact reason, but looking beneath the surface, we find that SSNs are terrible forms of identification. Ignoring the security concerns of a nine digit numeric code, an SSN is not for universal identification. Rather, it represents an impersonal abstraction of a person that is intended for a narrow use-case.
OpenID Connect (OIDC) is an authentication layer built on the OAuth protocol, extending OAuth's authorization abilities to include authentication. OIDC issues an "ID token," a JSON Web Token (JWT) containing user information, akin to an ID card. These ID tokens are proof of authentication, unlike access tokens which can be acquired multiple ways and are not directly tied to user authentication. OIDC standardizes scopes, defining a protected resource that contains common user information. The protocol issues an ID token alongside an access token when the 'openid' scope is requested, easing the process of accessing basic user data.
However, the convenience of a universally accepted method of identification was too great to pass up, and we now find ourselves stuck in a troublesome place: How do we let institutions authenticate our identities without relying on a unique identifier that can be easily compromised? While we do not yet have a universally secure authentication method for our physical identities, we have come to solve this problem in the digital world.
In this article, we will explore this same conundrum for our online identities in the form of the authentication layer, OIDC, built on the authorization protocol, OAuth. After a brief introduction to the topic of authentication and authorization, we will compare two common authentication methods (OIDC and SAML), discuss how OIDC works in relation to OAuth, and run through a brief case study.
What is OIDC?
OIDC stands for "OpenID Connect". It is an authentication protocol which allows to verify user identity when a user is trying to access a protected HTTPs end point. OIDC is an evolutionary development of ideas implemented earlier in OAuth and OpenID.
To begin learning how OIDC works, let's consider the basic concepts used later in the article.
Listen to this blog post
Federated Identity
We are searching for a concept called "federated identity." This is the ability to link a user’s digital identity across separate security domains. In other words, when two applications are “federated,” a user can use one application by authenticating their identity with the other, without needing to create separate usernames/passwords for both. The application responsible for performing this authentication is known as the identity provider (IDP). If you work for enterprise companies, you are likely familiar with IDPs like Okta, Microsoft Active Directory, or Auth0. Common OSS alternatives include Keycloak and Gluu.
You have probably seen a login prompt like this before:
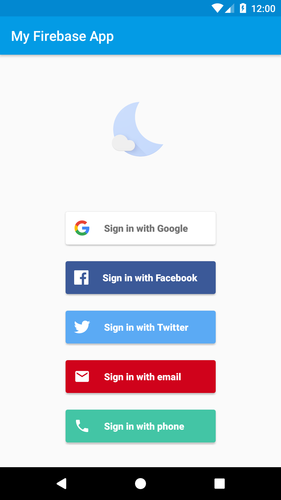
When you sign in with your Google account (IDP), Firebase does not create a new account using the traditional username/password authentication pattern. In fact, if you create an account through Google and separately attempt to log in using that very same Gmail address, Firebase will not be able to locate your account. This is because Firebase and Google are federated - to gain access to Firebase, you have to authenticate your identity through Google, not directly with Firebase.
Federated identity is a powerful tool for workplace management. Just ask anyone who works in Business Operations for a company of 20 employees or more. It provides a variety of benefits, not limited to:
- Single Sign-On (SSO)
- A scalable way to access shared resources
- The ability to secure private credentials in one hardened location
Authentication, & Authorization
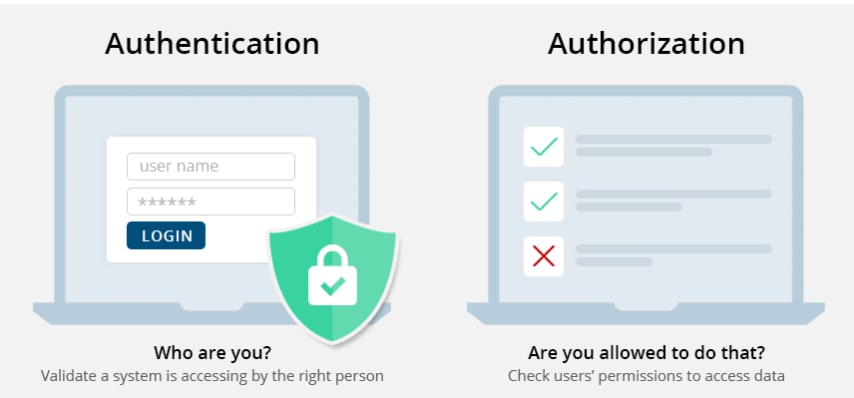
To fully grasp OIDC, we must first understand what the terms “authentication” and “authorization” mean and why they are important.
- Authentication - Process of verifying who a user is
- Authorization - Process of verifying what a user has access to
You can think of these two processes in the context of presenting a passport. When traveling from Country A to Country B, a customs agent performs two tasks:
- (Authentication) The agent verifies your passport, issued by Country A
- (Authorization) The agent verifies you are allowed to enter Country B based on the rules Country B has set up for Country A
While this distinction may seem like splitting hairs, understanding how authentication and authorization work together is fundamental to designing secure online systems. For example, given the current public health crisis, imagine if a customs agent trusted your word on your country of origin to allow entrance or if a customs agent only verified your passport without checking any related travel restrictions. Chaos would ensue and safe travel could not be ensured. Intelligent design means verifying the identity of a user to enforce the narrowest access policies.
OIDC vs SAML
| Authentication | Authorization |
|---|---|
| SAML & OIDC | SAML & OAuth 2.0 |
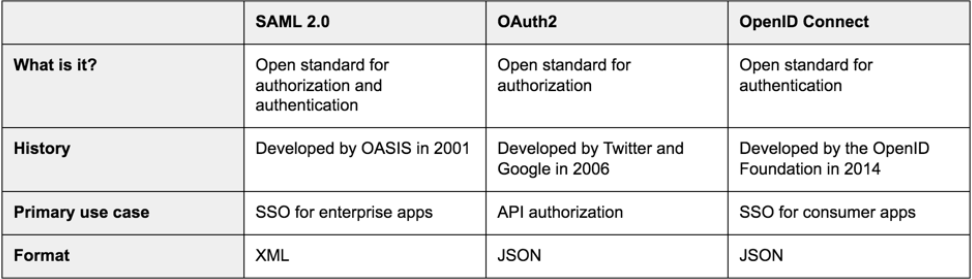
To discuss federated identity without mentioning SAML would be disingenuous. Recall that federated identity is the ability to use the same digital identity across multiple domains, meaning we are primarily concerned with the act of authentication, which involves proving who you are. There are two main protocols for authentication over networks: OIDC (OpenID Connect) and SAML (Security Assertion Markup Language). We will take a brief pitstop to better understand their differences and unique use cases before continuing to learn more about OIDC.
OIDC is an authentication layer built on top of an authorization protocol (more on this in the next section), whereas SAML is its own self-contained authentication and authorization protocol. While these two protocols differ (enough to warrant its own blog post), there are two important differences. One, SAML uses XML-based federation while OIDC uses JSON/REST. Two, SAML requires individual actors within the SAML architecture to be pre-configured. By keeping a tight leash on who is part of the system, SAML identity providers can tightly control who accesses data. This is often used for enterprise-grade security, which you can read more about in this article, How SAML Authentication Works. Conversely, applications using OIDC work with any identity provider that supports the protocol. This form of authentication is more popular with consumer and native mobile applications, like gaming or productivity apps. Exporting identity management to companies like Google, Amazon, and Microsoft, these app developers can significantly reduce the friction of user sign-up. It is important to note that OIDC is extensible and can be configured to meet the security demands that enterprises require.
Further Reading: https://blog.aspiresys.pl/technology/oauth-vs-oidc-vs-saml-security-battle-royale/
How Does OIDC Work?
We’ve touched on the fact that OIDC is an authentication layer built on top of the authorization protocol, OAuth. But…what does that mean?
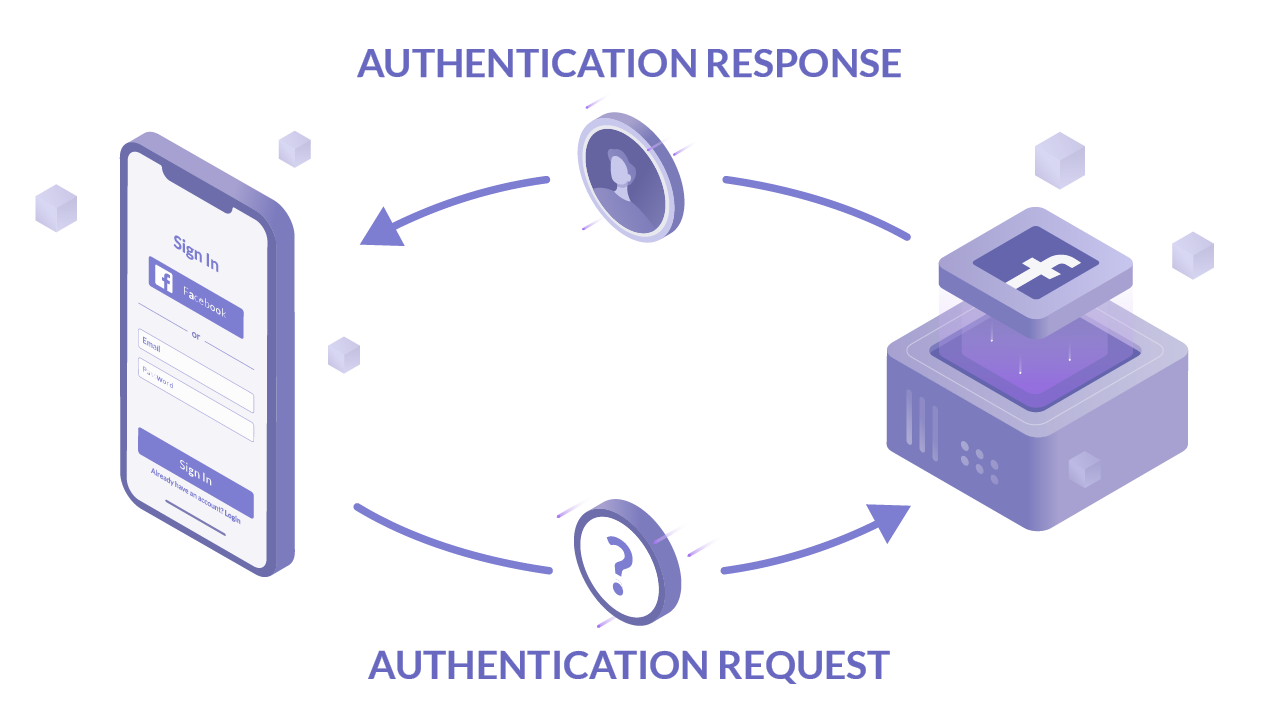
It means that OIDC uses the same components and architecture as OAuth, but to authenticate. OAuth was originally dreamt up as a solution to something known as “delegated access,” or allowing applications to talk to one another and share information on the user’s behalf (see figure 4).
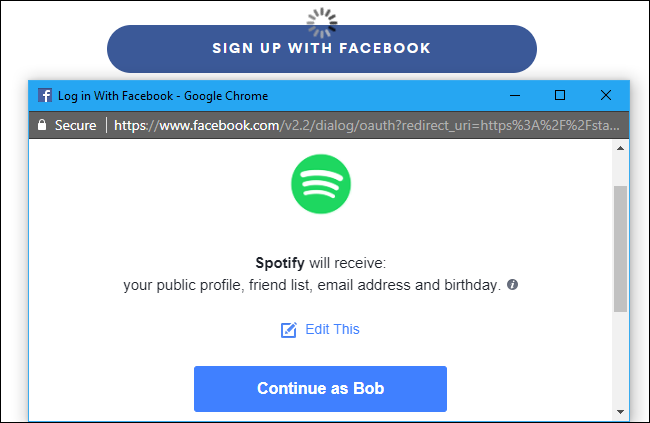
This problem necessitated a solution that would standardize how two unrelated applications share personal user data. While OAuth handles this, it transmits no identifiable information about who is requesting privileges. There is a profound difference between granting Spotify access to your Facebook account data and letting Spotify make a post as you. OIDC adds the authentication feature to OAuth’s powerful authorization utility.
Before we peek under the hood on OIDC, I am going to cheat and request that you familiarize yourself with the material in my other blog post: How OAuth Authentication Works. In it, we dive into the conceptual design of OAuth and a practical case study with Github SSO.
ID Tokens
OIDC extends the authentication capabilities of OAuth by including components such as an “ID token” issued as a JSON Web Token (JWT). ID tokens are conceptually analogous to ID cards, in that they contain a set of claims about the user, like name and email. This is different from an access token, which does not include any identifiable information and instead exists to authorize access to resource servers with limited scope.
{
  "access_token":"IEZKr6ePPtxZBEd",
  "token_type":"bearer",
  "scope":"read:org",
  "expires_in":3600
}
Access Tokens do not include any user information
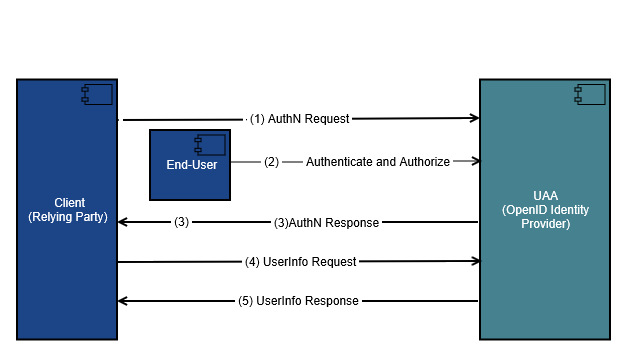
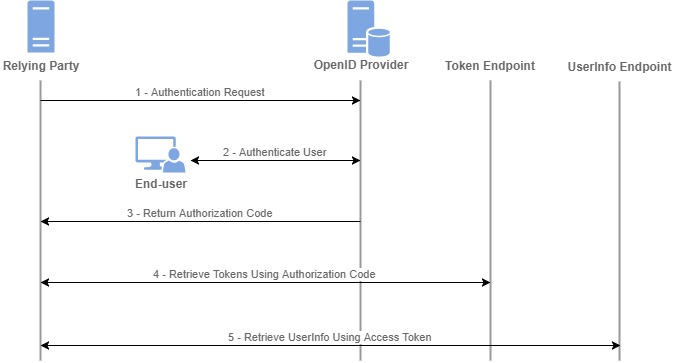
The procedure to receive an ID token is the same as obtaining an access token in a strictly OAuth flow. When the client queries the IDP, the end-user (us) is redirected to an authorization prompt. If the IDP is compatible with OIDC, this prompt also becomes the point of authentication, after which the ID token is issued in the same step as the access token (Figure 5, Step 2). In other words, the possession of an ID token is proof of authentication. At first glance, this is not intuitive. The process of authentication is meant to verify who the user is. So if this step happens in the same fell swoop as authorization, then isn’t the access token proof of authentication?
This is a very clever question and gets to the heart of OIDC. Possession of the access token is not proof of authentication because access tokens can be acquired in multiple ways. Consider refresh tokens, which a client can exchange for another access token when the original is invalidated. This process occurs automatically between machines and does not involve the human user in any way, so the access token is not a proxy for authentication. ID tokens can only be obtained when the human user explicitly gives a client access to whatever information it requires. In other words, the user must go through the process of “Sign[ing] in with Google,” which only the account holder is capable of doing,assuming credentials have not been compromised.
We will dig further into ID tokens in our case study at the end of this post.
Standardized Scopes
Reviewing our understanding of scopes, we learn:
Scopes and tokens are how OAuth implements granular access controls. Together they represent a "permission to do something." The token is the "permission" part and the scope defines what the "do something" is. Think of a movie ticket: the scope is the name of the movie you are authorized to watch and the ticket itself is the token, which only a theater employee can validate as authentic. How OAuth Authentication Works
For OAuth, these scopes are not standardized in any way. It is left up to the resource applications (Slack, Github, Google, etc.) to define which scopes a third party application can request. While this gives resources a greater degree of control over how they communicate user data to external parties, there is no commonly accepted standard set of scopes. Practically, this means building an application that collects basic user data from three different social media platforms and requires reading documentation and defining three different scopes. No thanks.
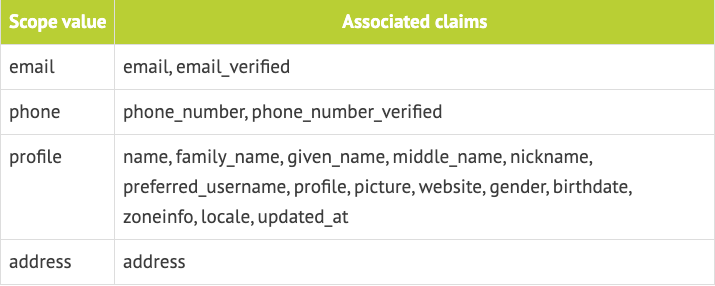
OIDC defines a protected resource, called the UserInfo Endpoint, that contains common information about the user that can be requested through the use of standardized scopes and other OAuth scopes. The only mandatory scope when using OIDC is the openid. This is the parameter that signals an OIDC-compatible IDP to issue an ID token along with the access token. This ID token, just like the access token, is a JWT. Within the token are several user claims that will be returned. These include:
sub= Subjectiss= Issueraud= Audienceiat= Issue timeexp= Expirytime
Requesting any further user information is optional and not part of the authentication process, but gives applications basic functional data without jumping through hoops. It should be noted that OIDC scopes are not separate from OAuth scopes. Clients can use both families of scopes at the same time. OIDC associated scopes and OAuth associated scopes can be used in the same request.
Grants and Flows
While most of this material is covered in How OAuth Authentication Works, grants and flows merit a quick comment. Namely that much of the existing literature regarding OIDC grants are outdated. For OAuth (and by extension OIDC), the Implicit Flow has become deprecated due to security concerns and has been replaced with the PKCE extension for the Authorization Code Grant.
You can read more about Implicit Flow vs PCKE in Christian Lüdemann's fantastic blog post. For the following case study, we will be using the Authorization Code Grant.
Case Study: Teleport SSO with Okta
Now that we’ve gathered the necessary concepts and design elements to see OIDC in action, we will run through a case study with our secure remote access tool, Teleport. In the OAuth article, we demonstrated how the OSS Community version of Teleport supports Github SSO throughout OAuth to issue SSH certificates. In this article, we’ll go the enterprise route and demonstrate how Teleport can use issue certificates using any IDP that supports OIDC. This example closely parallels the example in the OAuth article to help highlight how OIDC and OAuth are different.
As mentioned above, this case study uses the Authorization Code Grant flow. Teleport is not hosted, so we can assume we’ve installed it correctly within our infrastructure. If this weren’t the case, the PKCE extension would be used.
Step 1
Teleport prompts the user to log in via their organization’s SSO provider. In this case, let us use Okta as our IDP.
Step 2
The Teleport user clicks “LogIn” and is redirected to Okta’s authorization API endpoint with the following parameters included in the HTTPS request:
authorization_server
client_id
redirect_uri
scope
state
What do these parameters mean?
authorization_serveris the URL that Okta is exposed to. All IDPs will provide a URL to redirect to, usually an API. For Okta, this ishttps://${yourOktaDomain}/oauth2/default/v1/authorizeresponse_type=codewill let the Okta know that Teleport expects an authorization codeclient_idprovides a string to Okta, which can check against a registry of authorized clients. IDPs like Okta will require clients to be registered to help identify them. Let’s use12345as Teleport’s registered ID.redirect_uriinforms Okta which pre-configured URL to direct the Teleport user back to with all the variables that Teleport needs. For this example, we can take the sample redirect URL provided in the documentation ashttps://proxy.example.com:3080/v1/webapi/oidc/callbackscopedefines the limitations in accessing resources. For OAuth, these scopes are internally defined by the resource application. But recall that OIDC was created to standardize the way to get rudimentary identity information. At minimum, we must use the standard claimopenidand perhaps an additional standard claim,email, from Figure 6.stateis a string randomly generated by Teleport and passed back and forth with the Okta. By passing this string, both Teleport and Okta know they are speaking to the same device between communications. For this example, let’s say the state string issyl(my dog’s name).
Putting together all these parameters, the URI a Teleport user is directed to after accepting the login prompt will look like:
https://${yourOktaDomain}/oauth2/default/v1/authorize?response_type=code&client_id=12345&redirect_uri=https://proxy.example.com:3080/v1/webapi/oidc/callback&scope=openid,email&state=syl
Step 3
Once Okta receives the query, it will verify the client_id against an internal registry for the Teleport application. Knowing Teleport is expecting an authorization code, Okta will send the user back to the redirect URL with the code and the state parameter that was passed. Our next stop is:
https://proxy.example.com:3080/v1/webapi/oidc/callback?code=pkzdZumQi1&state=syl
Step 4
After receiving the code, Teleport will automatically query the Okta token endpoint to exchange the code for a token with the code, redirect_uri, and client_id parameters included. Two additional parameters are present:
grant_type=authorization_codeinforms Okta the flow isauthorization_codeclient_secretcomes from Okta during the client registration process. This string should be a secret and not publicly accessible. Because Teleport is hosted on our own infrastructure, which we know to be safe, we feel comfortable passing this parameter. Otherwise, we would use the PKCE extension and hash a generated string. In this case, our secret isgravitational
This exchange happens through a post request that will look something like:
POST https://${yourOktaDomain}/oauth2/default/v1/token
grant_type=authorization_code&
code=pkzdZumQi1&
redirect_uri=https://proxy.example.com:3080/v1/webapi/oidc/callback
client_id=12345&
client_secret=gravitational
Using the client_secret and code, Okta is able to verify the Teleport client’s request and issues a JSON payload encoded with the bearer token, an expiry time, and perhaps a refresh token. A successful response may look like:
{
"id_token":"FW6AlBeyalZtDIRXxA0u5XBbZkLzjYzKUQBloxQXSSGPFmRS8eSfDu0A4nS4GF1aQP9PRxQk7gIh9bjaX99aa4vDSzP1E2ajsgIomlNGhNxBqEDV5Exp0xISE9bZ4HUzM91pbzPPj7Bq5ZQUWcSuSVD0NAfkAoG6qDpbQfxPjWRyfthz3pUEXwZe8Cz4eOXOM45UKB4Q0VnVSChVF84MWkeBFKzhrRNXd2dFv0HTlkQr6vXGlYsocMxR06wo38HvGiKjkUmL2YUyPOjZaoUN4ovfwlwdGdjNR2GVcRsXzjxCPszJ9dTXztoL5wo2ycEpuxkkNp57BuZ9YRexoNnRHahFKH76XrFsTvdvAYk3fBVUqrO5vvyxHAFrAIKpV0FvaMiBwKNfaE84oRC6aBXnzS3q4uVyGcHveHQMJB1temgB599rfVH3pBqurUmQCd0tVexRZj4PUkrDocf8Z0QKkCD0eonH0Q1bRpQPY5vATiLkpF8RArU7wyB2FxhB3egtQBvwDgsVjyix7u8Cx4P9oy3IJje6SZfc6Lz61uEQttpVhyqfzgFYUqVoQacw6rocCn3u61dM0moB"
"access_token":"IEZKr6ePPtxZBEd",
"token_type":"bearer",
"scope":"read:org",
"expires_in":3600
}
The id_token is issued as a JWT and must be decoded. Given our chosen scopes of openid and email, we can expect the JSON payload to read as:
{
"sub":"virag",
"iss":"https://${yourOktaDomain}/oauth2/",
"aud":"client_12345",
"iat":"1595977376",
"exp":"1595980976",
"email":"virag@goteleport.com",
"email_verified":"true"
}
Step 5
Now that we have obtained the access token, all that is left is to make an API request on behalf of the Teleport user and receive the resources desired. We do this by passing the access token as a Bearer credential in the HTTPS authorization header.
In this scenario, we did not request any additional OAuth scopes, but we did in the Github SSO for OAuth article.
Teleport cybersecurity blog posts and tech news
Every other week we'll send a newsletter with the latest cybersecurity news and Teleport updates.
Conclusion
Phew! That’s a lot to cover. There is a simplistic beauty to how OIDC works on top of OAuth, given the scale of the problem it solves. Developers must be extremely careful when designing applications that are compatible with OIDC as it deals with sensitive and private user information. I hope this article has given you the necessary knowledge to start exploring OIDC on your own.
Table Of Contents
Teleport Newsletter
Stay up-to-date with the newest Teleport releases by subscribing to our monthly updates.
Tags
Tags
Teleport Newsletter
Stay up-to-date with the newest Teleport releases by subscribing to our monthly updates.