How OAuth 2.0 Works
The modern human likely has profiles on dozens of applications. Whether it’s social media applications, music/video streaming, or workspace resources, each of us must manage accounts that contain personal information. Over time, these siloed applications have become increasingly connected. Twitter allows news sites to directly tweet, Discord searches Facebook for suggested friends, and Jira creates user accounts using Github profiles. This trend of allowing applications to talk to each other on your behalf is called “Delegated Access” and has become a necessary part of our online lives.
However, because of the way these applications protect their data, developers run into a challenge: How do we delegate access? Almost every application is protected by a basic username/password schema. To allow Application A to access the data it needed from Application B would require constantly logging into Application B on behalf of Application A - how unwieldy! The workaround was to give Application A the username and password credentials to log in to Application B, which was problematic for few reasons:
- Application A stored credentials as cleartext
- Application A was given broad, unfettered access to Application B
- Users could not easily revoke access for Application A
- A compromised Application A puts Application B at risk
OAuth was formed as a solution to this Catch-22 situation: How to provide delegated access without putting the end user’s data at risk.
OAuth Terminology
It helps to understand the common jargon around the protocol. Note: for the purposes of this article, OAuth refers to OAuth 2.0, the most recent iteration since 2012.
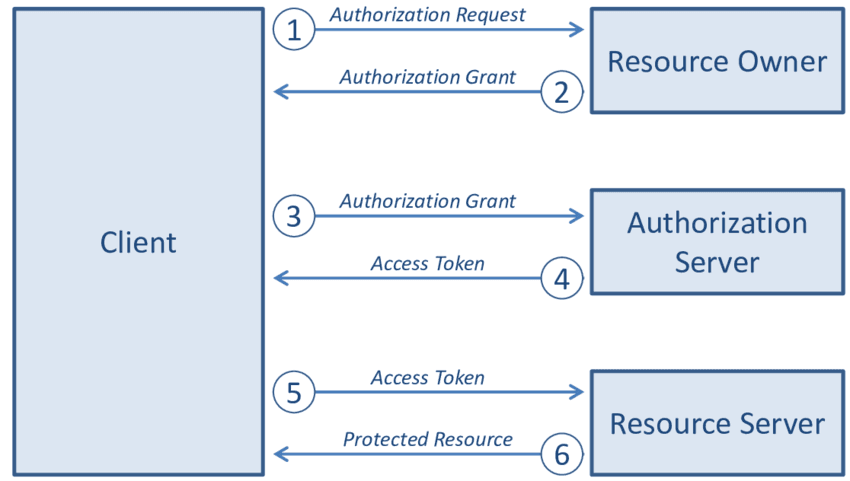
- Resource Owner: Entity that is capable of granting access to protected resources (Us)
- Resource Server: Server that hosts the protected resources and handles requests for access
- Client: Application that wants to access the Resource Server and perform actions on behalf of the Resource Owner
- Authorization Server: Server that knows the Resource Owner and can authorize the Client to access the Resource Server
What Does OAuth Do?
Boiling down to its core purpose, OAuth exists to provide third party applications limited access to secure resources without compromising the user’s data. Consider that Teslas have a “Valet Mode” for which you need a valet keycard. This keycard informs the vehicle that it is to operate with limited functionality, restricting the max speed and acceleration and locking the trunk. This technique is conceptually identical to how OAuth operates. The Tesla Owner gives the valet limited access to his/her Tesla without needing to provide the main vehicle key.
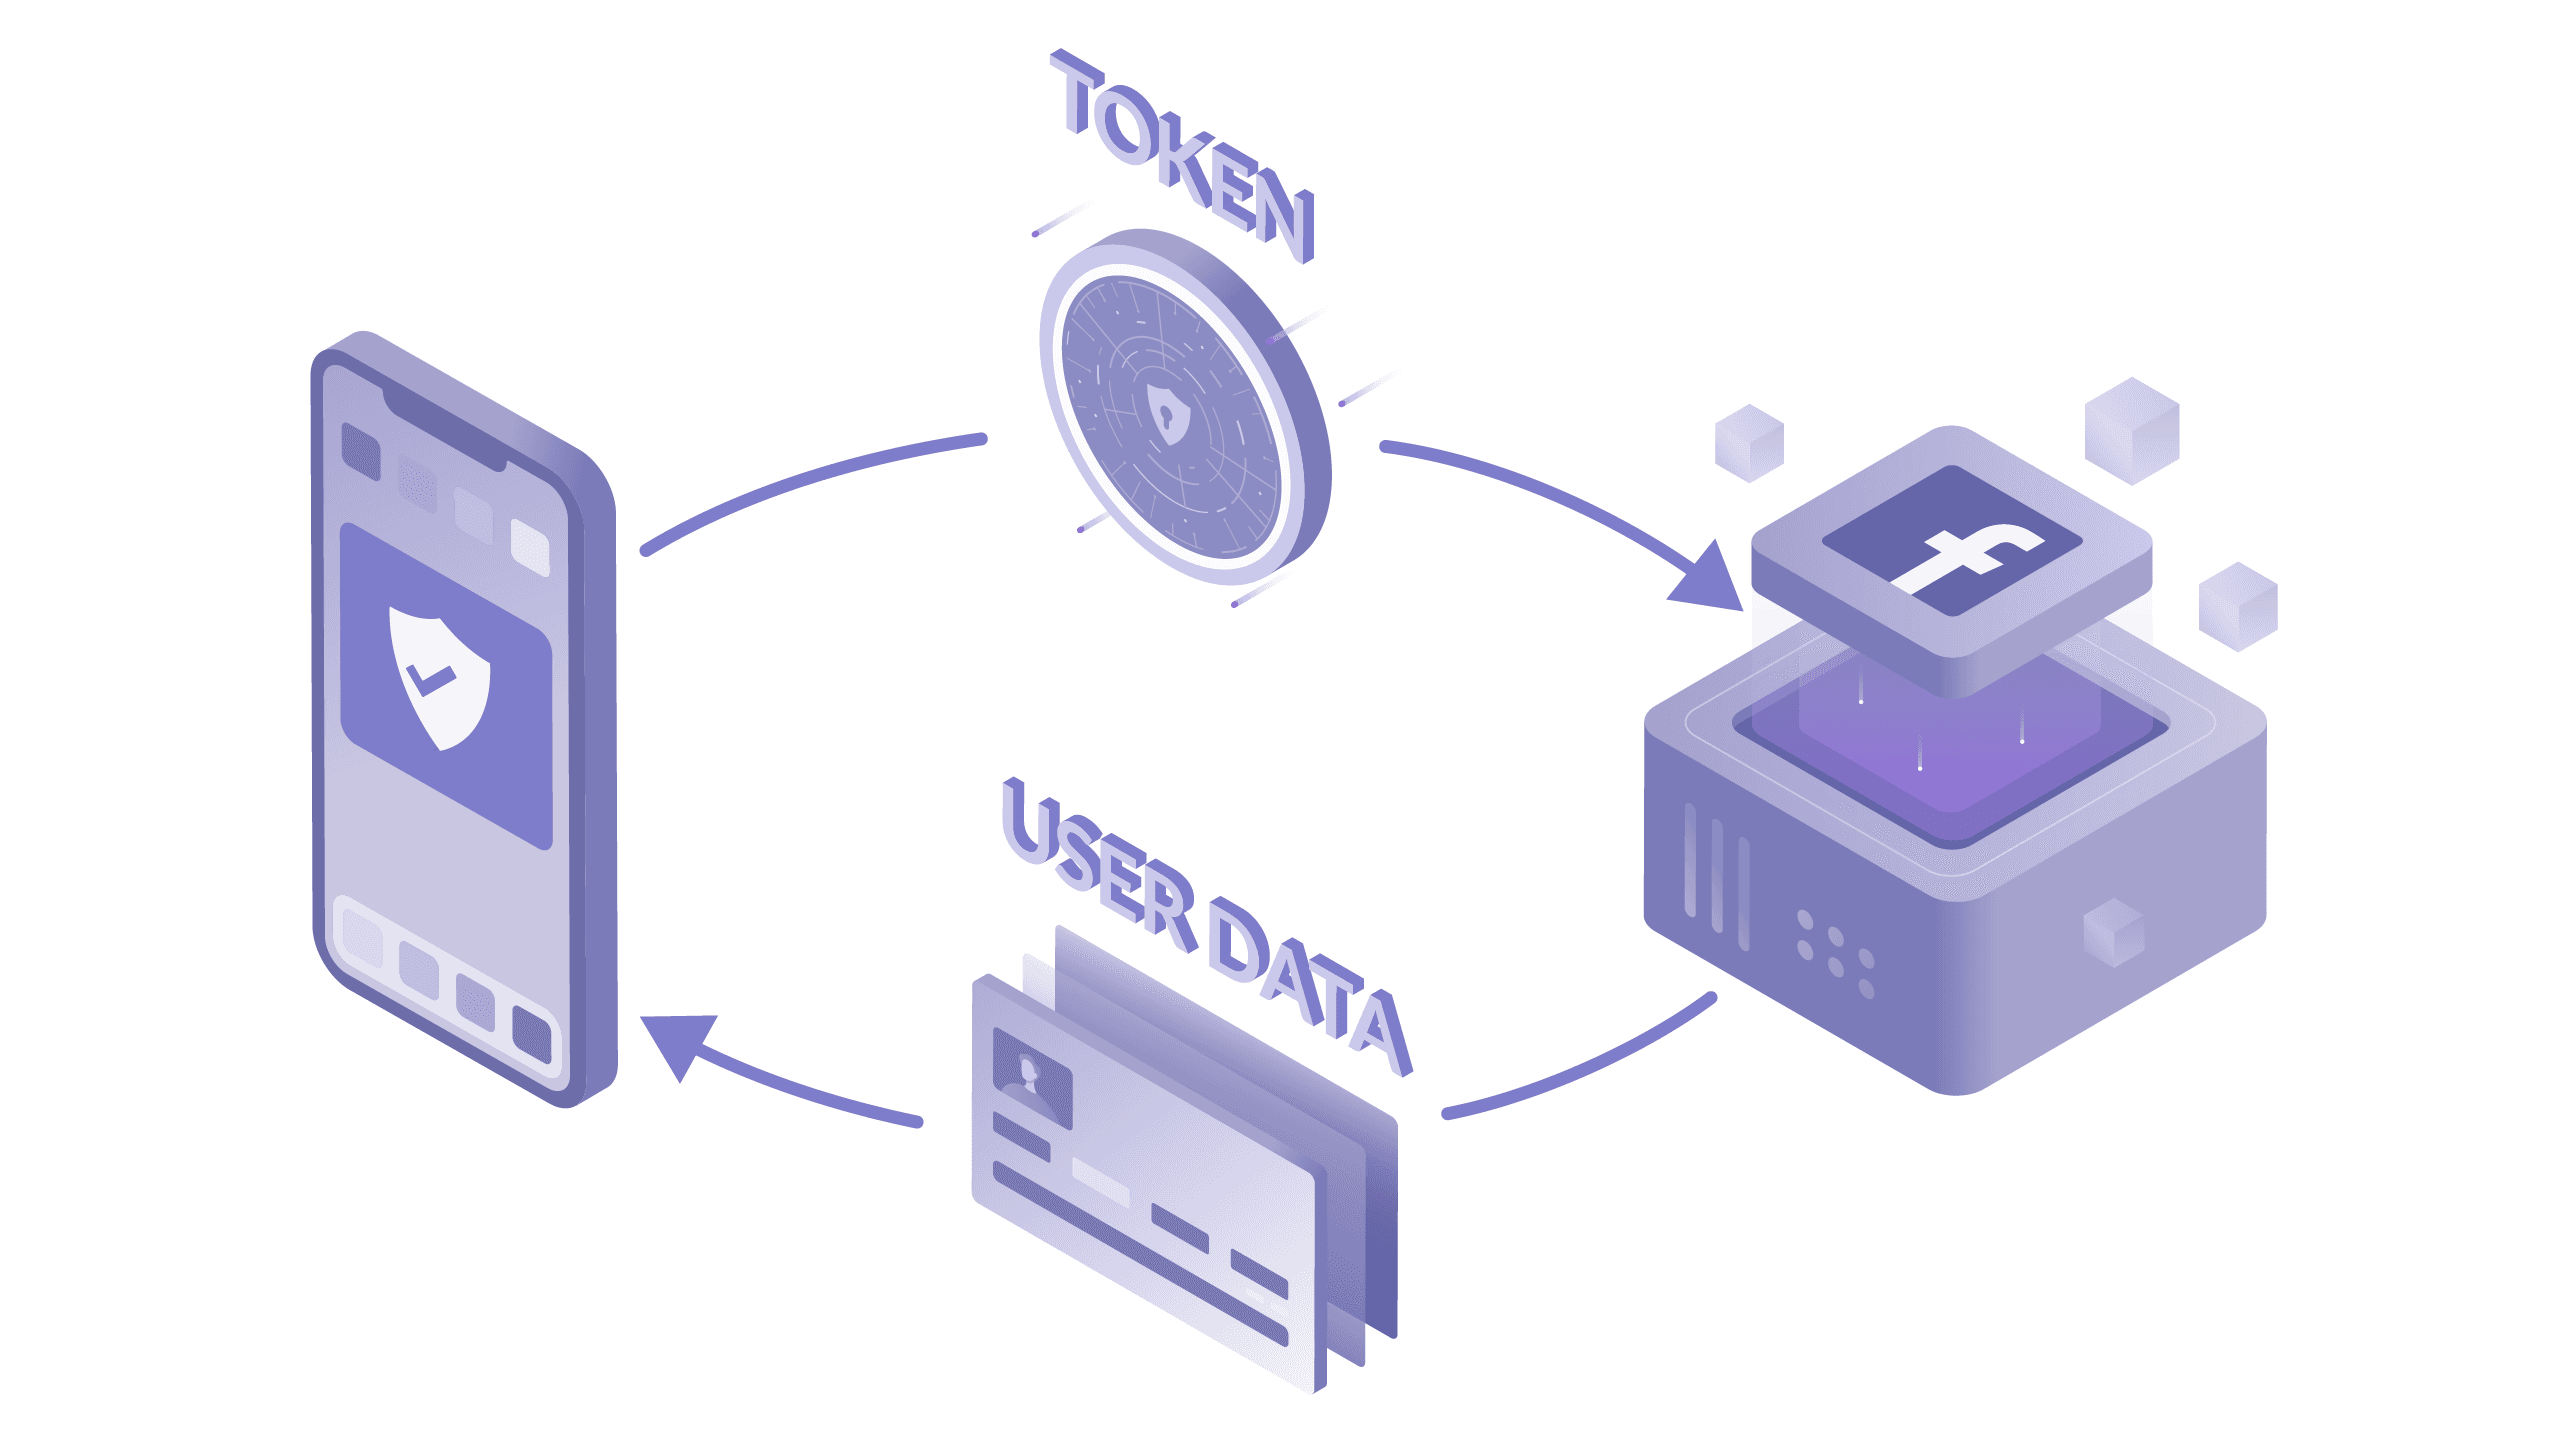
OAuth is quite popular for social media apps. You are likely familiar with requests like these:
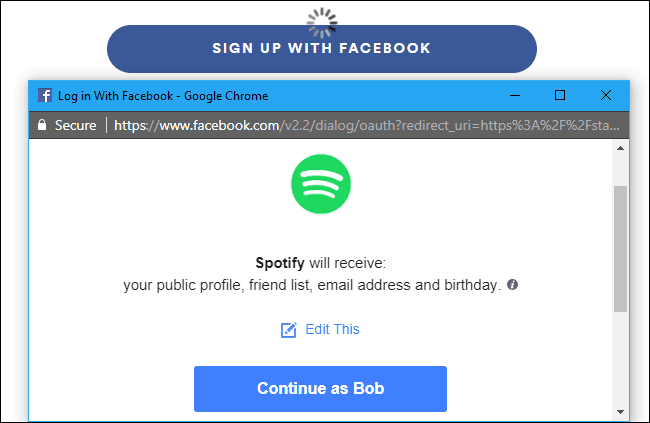
When receiving a pop-up like this, the OAuth protocol operates in the background as follows:
- Spotify (the client) sends a message to Bob's Facebook account (the Resource Owner) requesting the rights to access his public profile, friend list, email and birthday.
- Bob provides Spotify with a grant to collect said data.
- Spotify sends the grant to a Facebook API.
- Facebook API verifies grant and sends an access token for Spotify to access protected resources.
- Spotify sends the access token to another Facebook API given by the authorization server.
- Facebook API sends the requested data to Spotify.
Through the usage of grants and tokens, which we will discuss next, Spotify is given Bob’s valet card to his Facebook account.
How Does OAuth Work?
The section above gave the 50,000 foot view of how OAuth works. Now let’s look under the hood and see the parts that enable the protocol to function.
In the previous section, we discussed the abstracted design of OAuth - clients, resource owner, authorization/resource server. Within this system, there are also:
- Scopes and Tokens
- Grants and Flows
Let’s explore in detail.
Scopes and Tokens
Scopes and tokens are how OAuth implements granular access controls. Together they represent a “permission to do something.” The token is the “permission” part and the scope defines what the “do something” is. Think of a movie ticket: the scope is the name of the movie you are authorized to watch and the ticket itself is the token, which only a theater employee can validate as authentic. From our Tesla example, the scope is what vehicle functions are enabled when started with the valet key. The access token is the valet key itself, which the Tesla vehicle can recognize only if the key was issued by the Tesla dealership.
Going back to Figure 2, we can see that the authorization server has a different API than the resource server. Functionally, the authorization server exists to validate and authorize the client whereas the resource server hosts the resources being requested. For the resource server to know whether or not to honor a query for information, it must know if the requestor has been authorized. This is where the access token comes in; it exists to inform the resource server that the requestor has been vetted by the authorization server and has permission to make the query. By using tokens as a proxy, the need for providing credentials is abstracted. Access tokens are commonly issued as JWT Bearer Token. These tokens are cryptographically signed to be meaningless to the client, but when decoded by the resource server, they contain important information. One of the variables included within the access token is its scope.
Because scopes limit what can be done, they must inherently be defined by the resource, such as Facebook. Conventionally, there are four types of scopes:
- Read Access
- Write Access
- Read and Write Access
- No Access
Scopes can either get something, do something, do both, or neither. The Facebook and Spotify example above is an instance of read access, whereas Reuters requesting to tweet an article is write access. Defining scope is an incredibly powerful tool for specifying how third parties are allowed to access user data. To understand how scopes can be used, try reading the documentation of companies like Slack and Google which all demonstrate different permutations of a scope’s parameters.
There is another type of token called refresh tokens. They are not “keys” to access resources, but are used to automatically obtain new access tokens when they are no longer functional (eg. Expired). Applications like Facebook can enforce a greater degree of security by periodically verifying authorization through the enforced usage of optional refresh tokens to obtain new access tokens. Refresh tokens have an important feature: they can be revoked by invalidating them and walking back client access to privileged resources.
Grants and Flows
Grants dictate the order of operations for a client to obtain an access token. These unique orderings are called flows. Going back to our movie theater analogy, there are two ways to be granted a ticket: (1) Purchase in the theater (2) Purchase online. The method you’ve chosen dictates what you will do to obtain the ticket. Purchasing in theater may look like:
- Navigate to theater location
- Enter theater
- Walk to front counter
- Select showtime
- Provide credit card to theater employee
- Sign receipt
- Obtain physical ticket
Whereas purchasing online could follow these steps:
- Navigate to theater webpage
- Select showtime
- Check out cart
- Enter payment information
- Obtain digital ticket through email
As you can see, grants are not material things in the same way a token is, but instead indicate which flow is to be used. We’ve already covered one type of grant - refresh tokens (see Figure 3). Differing grants are optimized for specific use cases and will affect how end-users interact with client applications and which security measures apply. Understanding the different parameters that make up each grant type is important but would turn this article into a short novella. Instead, in the Github study below, we will focus on the most common grant type: Authorization Code Grant.
Recall that OAuth works over HTTPS. All communication between the resource owner, client, and authorization server happens by way of URIs. These URIs are queries with parameters included as part of the string. Contained within these parameters is the information an authorization server needs to understand which flow to follow. At this point, it’s important to note that there are two types of clients: Confidential and Public. Confidential clients can be trusted to securely hold the token, which is necessary for accessing resources. Such clients may include server-side applications. Public clients cannot be trusted to store client credentials. These types of clients include mobile or Javascript browser applications.
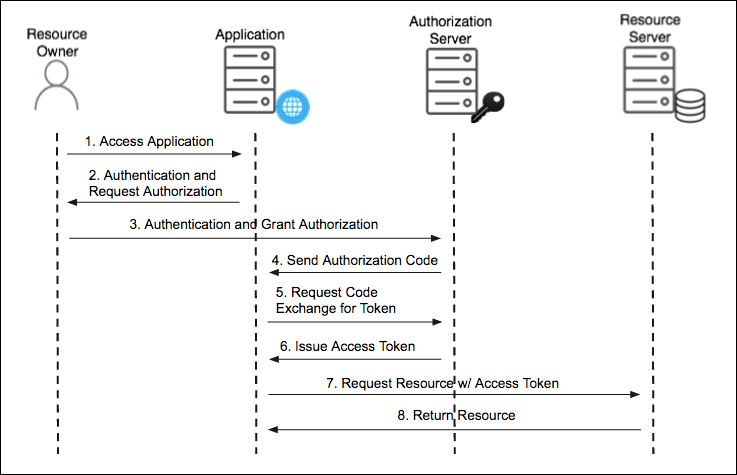
Authorization Code Grant_ _- Authorization code grants are perhaps the most common grant type (see Figure 4). In essence, the client receives a unique code issued by the authorization server, which is then exchanged for a token. By breaking up the steps required to receive the token into two distinct queries, the authorization server is able to verify important information about the client before issuing the token.
Read more for the Authorization Code Grant
Authorization Code Grant with PKCE Extension - This variant of the authorization code grant is used for public clients that cannot be trusted to store credentials. Using the PKCE extension (Public Key for Code Exchange), the client and servers transfer a hash to verify that communications are not intercepted.
Read more for the Authorization Code Grant with PKCE extension
Client Credentials - In some cases, clients are requesting access for themselves, not for resource owners. These instances take place between machines, such as any back-end services that need to access cloud storage. In this case, the client will make a request that will include parameters ‘client_id’ and ‘client_secret’, which the authorization server can verify to issue access tokens. This type of grant should only be used with confidential clients and must be registered first.
Read more for the Client Credentials Grant (under Application access)
Device Code - This grant extension works for internet-connected devices that do not have browsers or have a terrible keyboard experience, like signing into a gaming console using a controller and virtual keyboard. You may have already used this flow if you’ve connected a smart TV to your video streaming account.
Read more for the Device Control Grant
Case Study: Github Single Sign On (SSO) with OAuth
Putting all these concepts together, we can run through a case study. Teleport, an open-source remote access tool, allows users to log in through Github single sign-on (SSO) using OAuth. Let’s see how!
First, let’s correctly define the vocabulary here:
- Client: Teleport
- Resource Owner: Teleport user
- Authorization Server: Github Authorization Server (GAS)
- Resource Server: Github Resource Server (GRS)
We’re ready to start! As covered above, we will follow the Authorization Code Grant. This is because the token owner is a user and the client is a server-side application. Teleport is not hosted, so let's assume we’ve installed it safely within your infrastructure. If not, the PKCE extension should be used.
The flow is as follows:
Step 1
Teleport user accesses Teleport application
Step 2
Teleport prompts Teleport user to log in via Github SSO
Step 3
Teleport user clicks “Log In,” and is redirected with the following parameters included in the HTTPS GET request:
authorization_serverresponse_type=codeclient_idredirect_uriscopestate
What do these parameters mean?
authorization_serveris the URL that GAS is exposed to. All resource applications will provide a URL to redirect to, usually an API. For Github, this is https://github.com/login/oauth/authorizeresponse_type=codewill let the GAS know that Teleport expects an authorization codeclient_idprovides a string to the GAS, which it can check against a registry of authorized clients. Applications like Github will require clients to be registered to help identify them. Let’s use12345as the ID.redirect_uriinforms the GAS which URL to direct the Teleport user back to with all the variables that Teleport needs. For this example, we can take the sample redirect URL provided in the Teleport documentation as https://teleport.example.com:3080/v1/webapi/github/callbackscopedefines the limitations in accessing resources. These scopes are internally defined by the resource application. We can see Github’s scopes here. When looking at Teleport’s repo, we find that the only scope require isread:orgwhich lets Teleport read organization membership, team membership, and organization projectsstateis a string randomly generated by Teleport and passed back and forth with the authorization server. By passing this string, both the client and authorization server know they are speaking to the same device between communications. For this example, let’s say the state string is Syl (my dog’s name).
Putting together all these parameters, the URI a Teleport user is directed to after accepting the login prompt will look like:
Step 4
Once the GAS receives the query, it will verify the client_id against a registry for Teleport. Knowing Teleport is expecting an authorization code, the GAS will send the user back to the redirect URL with the code and the state parameter that was passed. Our next stop is:
https://teleport.example.com:3080/v1/webapi/github/callback?code=pkzdZumQi1&state=syl
Step 5
After receiving the code, Teleport will automatically query the GAS to exchange the code for a token with the code, redirect_uri, and client_id parameters included. Two additional parameters are present:
grant_type=authorization_codeinforms the GAS the flow isauthorization_codeclient_secretcomes from Github during the client registration process. This string should be a secret and not publicly accessible. Because Teleport is hosted on our own infrastructure, which we know to be safe, we feel comfortable passing this parameter. Otherwise, we would use the PKCE extension and hash a generated string. In this case, our secret isteleport
Recall that exchanging a code for a token requires a POST request. Putting this together, Teleport is now sending a query:
POST https://github.com/login/oauth/access_token
grant_type=authorization_code&
code=pkzdZumQi1&
redirect_uri=https://teleport.example.com:3080/v1/webapi/github/callback&
client_id=12345&
client_secret=teleport
Step 6
Using the client_secret and code the authorization server is able to verify the Teleport client’s request and issues a JWT bearer token that is self encoded with a scope and expiry time (a refresh token can be included). Such a token may look like:
{
   “access_token”:“IEZKr6ePPtxZBEd”,
   “token_type”:”bearer”
   “scope”:“read:org”,
   “expires_in”:3600
}
Step 7
Now that we have obtained the access token, all that is left is to make an API request on behalf of the Teleport user and receive the resources desired. We do this by passing the access token as a Bearer credential in the HTTPS authorization header. Recall our scope was read:org meaning we have very few methods we can successfully call. With that in mind, our header may look something like:
GET /users/org
Host: api.github.com
Authorization: Bearer IEZKr6ePPtxZBEd
…
Step 8
The Github API sends the Teleport user’s organizational membership information to Teleport.
Teleport cybersecurity blog posts and tech news
Every other week we'll send a newsletter with the latest cybersecurity news and Teleport updates.
OpenID Connect (OIDC) vs. OAuth 2.0
The major difference between OIDC and OAuth 2.0 is that OAuth 2.0 is designed to facilitate authorization (delegated access) while OIDC is designed to facilitate federated authentication. The purpose of OIDC is similar to SAML.
Conclusion
Success! If you have made it this far, Congratulations! Despite providing an often overlooked convenience, OAuth is a complex protocol that will take time to implement. The example we just went through is one of a hundred permutations of what an OAuth flow may look like. At this point, I hope you have a comprehensive and sufficient conceptual understanding to feel comfortable exploring the protocol by yourself.
OIDC based SSO for infrastructure access using Teleport
Teleport, an open source access platform, supports OIDC and SAML based SSO for SSH, RDP, Kubernetes clusters, web applications multiples databases such as PostgreSQL, MySQL, Redis, MongoDB, CockroachDB and many more. Learn how Teleport works and get started with Teleport today.
Table Of Contents
Teleport Newsletter
Stay up-to-date with the newest Teleport releases by subscribing to our monthly updates.
Tags
Tags
Teleport Newsletter
Stay up-to-date with the newest Teleport releases by subscribing to our monthly updates.