SSH into AWS using Github for RBAC
In this case study we will cover:
- How to configure AWS Console to use Github credentials for your organization.
- How to map AWS IAM roles to Github teams, i.e. how to implement role-based access control (RBAC).
- How to map SSH credentials of your AWS instances to Github teams.
Effectively, this makes Github a "single source of truth" for who has access to the AWS infrastructure used in your organization. Under this scheme, an engineer only has to login into Github once and after that:
- They automatically get access to AWS, but only to resources their Github Team allows.
- They automatically get auto-expiring SSH credentials to AWS instances, but only to instances with
tags that their Github Team specifies and only as a specific OS login (for example, as
opsbut notroot). - Their SSH sessions are recorded and logged for audit purposes.
Here's a quick video showing the result.
Now, let's learn how to set this up.
Tools and Protocols
The integration is based on SAML 2.0 protocol and we'll be using Auth0 as an authentication hub which connect Github, AWS and SSH together.
To integrate RBAC based on Github Teams into SSH rules, we will be using Auth0 and Teleport Enterprise, the commercial version of Teleport Community, our open sourced SSH server.
Overview
Here's an overview of the steps we are going to take:

Auth0 will be the primary authentication endpoint providing the single sign-on (SSO) with Github via SAML 2.0 and we will use Auth0 Rules to:
- Fetch Github Teams membership information for a user.
- Map Github Team membership to AWS IAM Roles.
- Map Github Team membership to SSH access rules.
- Teleport Enterprise will then use this information to grant and restrict SSH access to individual AWS instances based on which Github team the user is a member of.
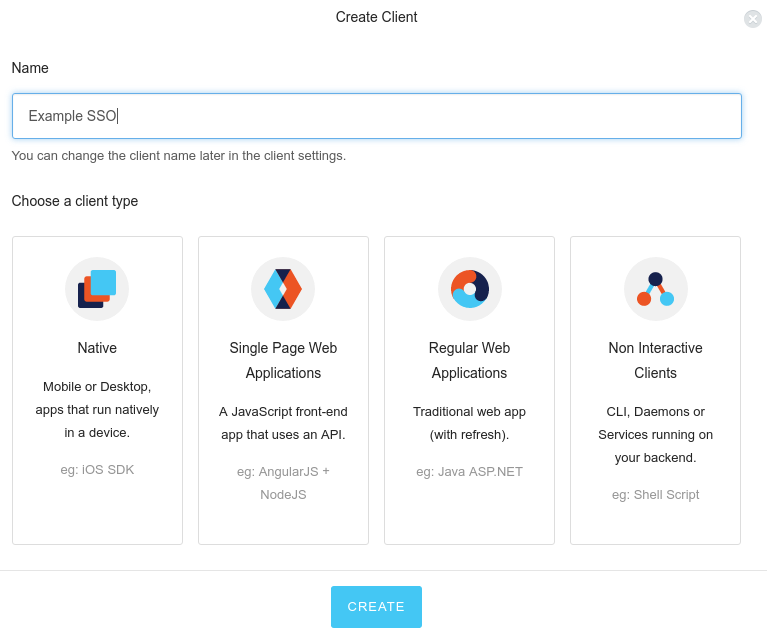
Setting up Auth0
First, we need to connect the source of user identities (Github in this case) with Auth0, the authentication hub we're using to glue everything together.
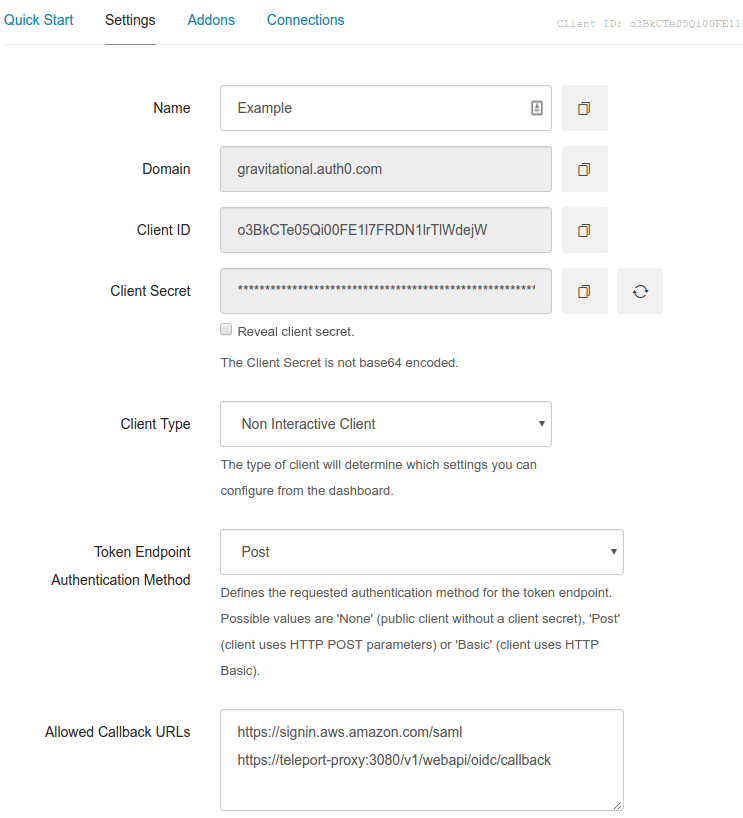
Auth0 client allows us to use Auth0 for authentication and connect to other services like Github or AWS. Let's create a simple "Non Interactive Client" in Auth0:
Configuring Github
Now we create a new application in Github:
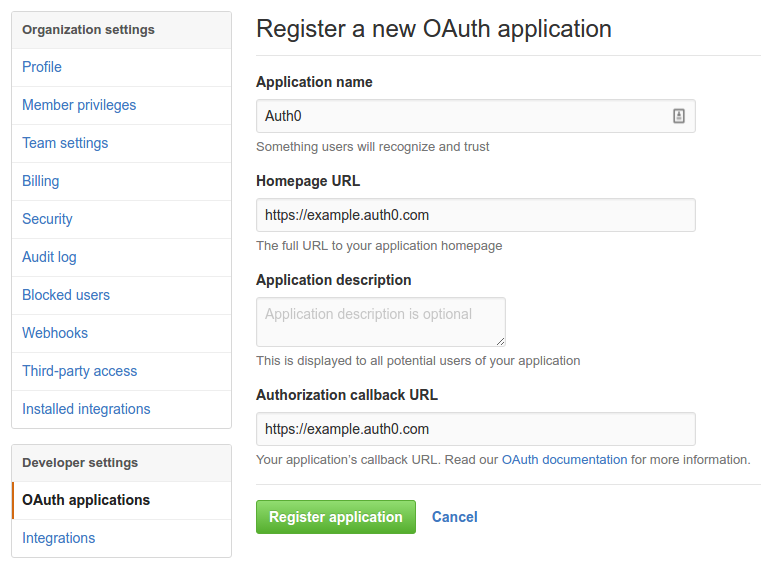
Note: Remember the application name, in this case it's Auth0. We will need it later for the Github API.
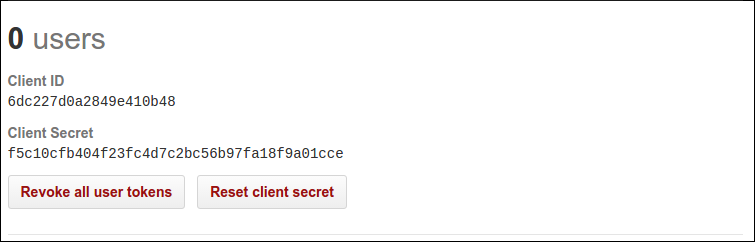
You will need add the client ID and client secret from Github to Auth0:
Next, turn on a Social Connection in Auth0:
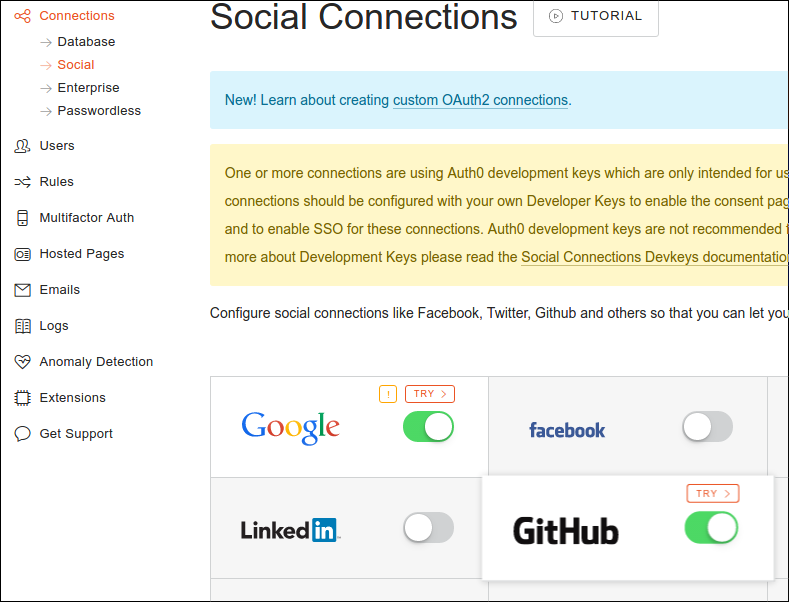
Make sure to turn on read:org access so Auth0 can read the teams your user
belongs to, and paste the Client ID and Client Secret taken from Github
page.
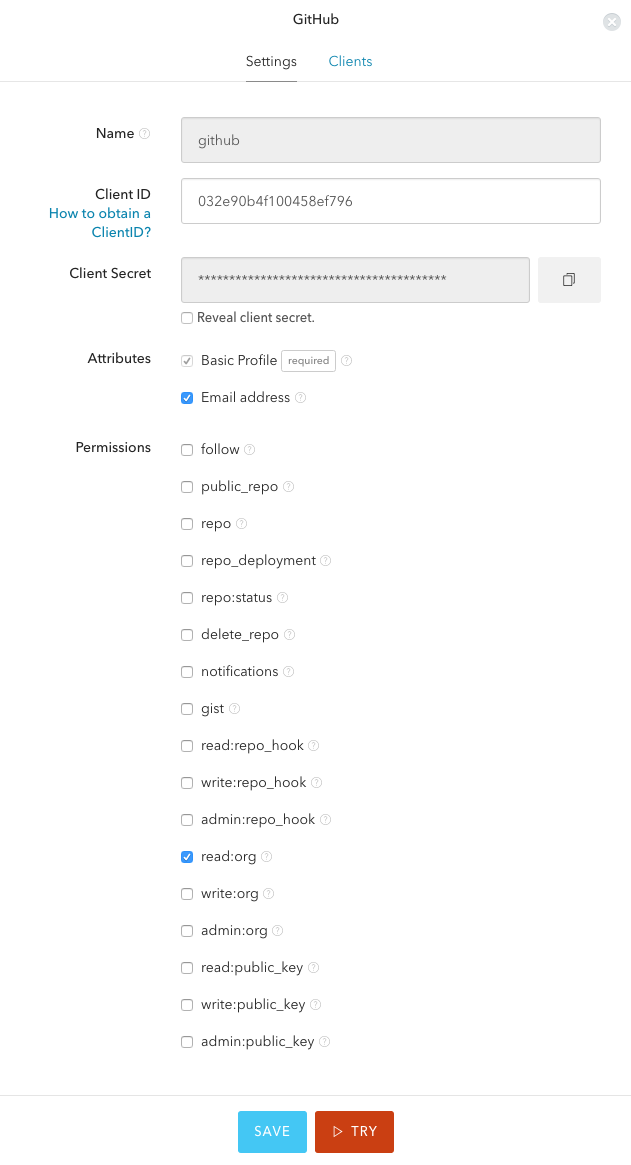
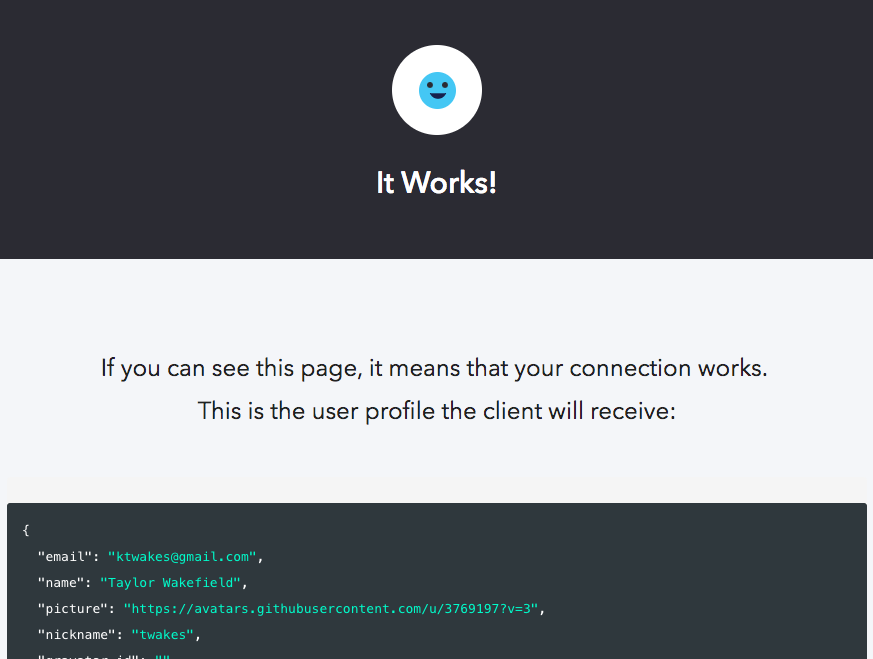
Finally, save and test your connection to make sure it works by using the handy
try button on the connection details. You should see a page similar to this:
Fetching Team Membership
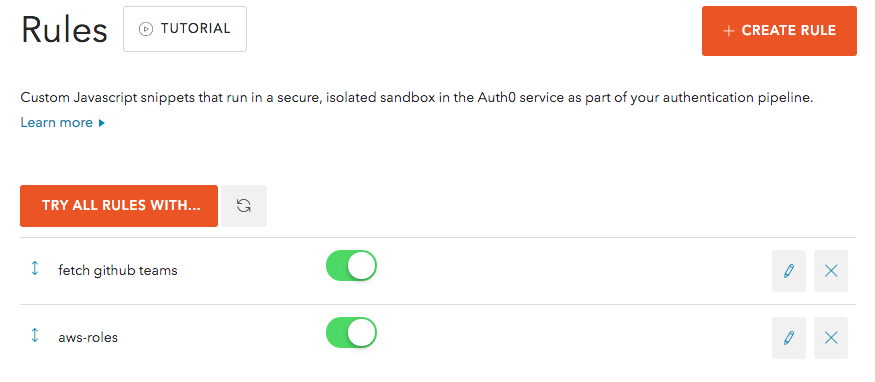
We are almost done with Github. The last step is to create an "empty rule" in Auth0 that will fetch a list of the teams your user belongs to and update the user's metadata. We need this to expose Github Team membership information to AWS, SSH (and other) clients.
Here's the function callback to add to the Auth0 empty rule:
function (user, context, callback) {
  // access token to talk to github API
  var github = user.identities.filter(function (id){
     return id.provider === 'github';
  })[0];
  var access_token = github.access_token;
  request.get({
      url: "https://api.github.com/user/teams",
      headers: {
        // use token authorization to talk to github API
        "Authorization": "token "+access_token,
        // Remember the Application name registered in github?
        // use it to set User-Agent or request will fail
        "User-Agent": "Auth0",
      }
    }, function(err, res, data){
        user.err = err;
        if(data){
          // extract github team names to array
          var github_teams = JSON.parse(data).map(function(team){
            return team.organization.login + "/" + team.slug;
          });
          // add teams to the application metadata
          user.app_metadata = user.app_metadata || {};
          // update the app_metadata that will be part of the response
          user.app_metadata.roles = github_teams;

          // persist the app_metadata update
          auth0.users.updateAppMetadata(user.user_id, user.app_metadata)
          .then(function(){
              callback(null, user, context);
          })
          .catch(function(err){
              callback(err);
          });
        }
    });
 }
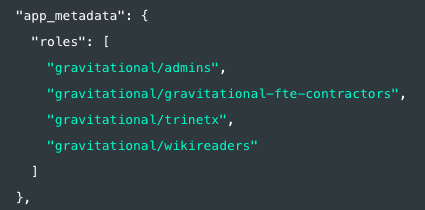
You can try your Github connection in Auth0 again to make sure the user's
application metadata was populated with teams. In this example, the team name
consists of the organization name and the team name to avoid naming collisions.
Your authentication profile should now show the team memberships under the app_metadata.
Set up AWS to login via Auth0
You can start with these AWS integration instructions provided by Auth0.
However, we are going to make a couple of modifications. We are going to create
two IAM SAML roles, one for admins and one for developers and called them
auth0-admin and auth0-developer, respectively. We are also going to change
the SAML mappings to map Github team names directly to AWS IAM roles.
Below is the code that goes in the Auth0 empty rule to achieve this.
Note: be sure to substitute the role with your Github organization name and
team names and the user.awsRole with the correct Role ARN and Provider ARN fields from your AWS IAM Manager.
function (user, context, callback) {
  user.app_metadata.roles.forEach(function(role) {
    if (role === 'example/admins') {
      user.awsRole = 'arn:aws:iam::<account-id>:role/auth0-admin,arn:aws:iam::<account-id>:saml-provider/auth0';
    }
    // to make sure we don't override admins if user is member of both roles
    if (role === 'example/developers' && !('awsRole' in user)){
      user.awsRole = 'arn:aws:iam::<account-id>:role/auth0-developer,arn:aws:iam::<account-id>:saml-provider/auth0';
    }
  });
  // map github nickname to session
  if (user.awsRole) {
     // map github nickname to session
     user.awsRoleSession = user.nickname;
     context.samlConfiguration.mappings = {
       'https://aws.amazon.com/SAML/Attributes/Role': 'awsRole',
       'https://aws.amazon.com/SAML/Attributes/RoleSessionName': 'awsRoleSession'
     };
     callback(null, user, context);
  } else {
     callback(new UnauthorizedError('Access denied: check with admin'));
  }
}
IMPORTANT: Make sure this rule goes after the Github rule we created earlier in Auth0, otherwise mapping won't work!
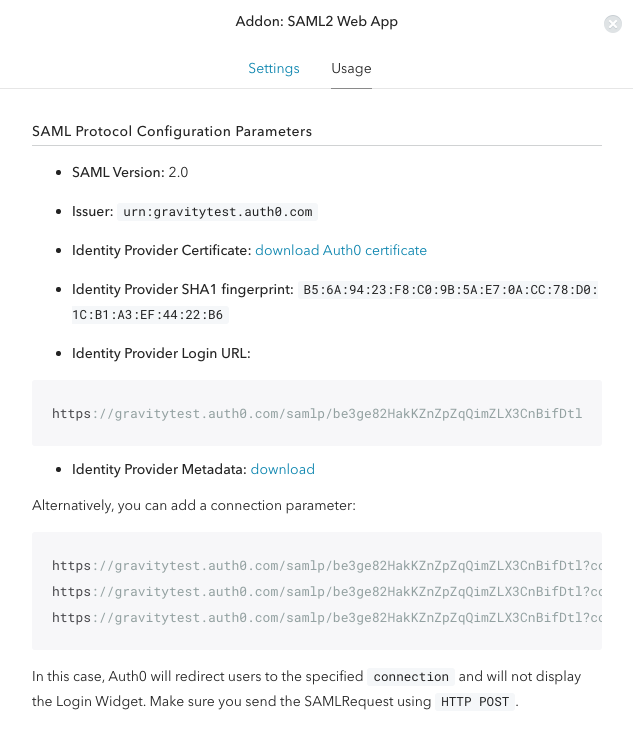
If everything goes well, you should be able to log into your AWS console via SSO by clicking on the Identity Provider Login URL in Auth0 below:
Configure SSH via Auth0
First, we are going to set up Auth0 to be the OpenID Connect identity provider for SSH access via Teleport.
Note the Client ID and Client Secret from Auth0 Client's page. You will need them for the Teleport configuration.
Also, make sure Teleport proxy address is added to the list of allowed callbacks:
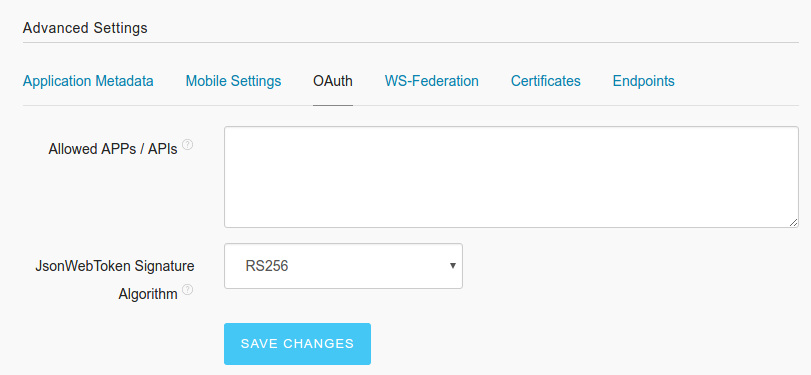
In the advanced settings, change the signature type to RS256, as this is the one supported by Teleport:
Configuring Teleport
Now, we are going to configure Teleport to use Auth0 as an OpenID provider.
Here's an example Teleport configuration file (usually stored in /etc/teleport.yaml):
# Simple config file with just a few customizations (with comments)
teleport:
  nodename: localhost
  # auth token allows easy adding of other nodes. pass this value
  # as --token when starting nxoodes.
  auth_token: <provisioning-token>
  log:
    output: stderr
    severity: DEBUG
auth_service:
  enabled: yes
  cluster_name: teleport.local
  tokens:
    - "node:<provisioning-token>"
  oidc_connectors:
    - id: auth0
      redirect_url: https://<teleport-proxy>:3080/v1/webapi/oidc/callback
      client_id: <client-id>
      client_secret: <client-secret>
      # notice the trailing / at the end, it's important to have it there
      issuer_url: https://example.auth0.com/
      # notice that here we request additional scopes from OIDC
      scope: [roles]
      ## we are going to map github groups memberships to teleport roles
      claims_to_roles:
        - { claim: "roles", value: "example/admins", roles: ["admin"] }
        - { claim: "roles", value: "example/developers", roles: ["user"] }
ssh_service:
  enabled: yes
Notice that we have requested additional scope roles that is provided by Auth0.
Auth0 will return Github teams in claim roles and the returned claims will be mapped to Teleport roles.
Teleport cybersecurity blog posts and tech news
Every other week we'll send a newsletter with the latest cybersecurity news and Teleport updates.
Creating SSH Roles
Now you need to create SSH access restrictions for different Github Teams. Teleport Enterprise includes role-based access control, so you need to create a Teleport Role for every Github Team (which will be returned as an OpenID claim).
Assuming the Teleport is running on your machines, define two Teleport roles:
user and admin in YAML files as shown below.
The difference between regular users and admins in this case is two permissions:
- The permission to access production servers. Notice
node_labelsTeleport setting: it restricts SSH access only to nodes that have specific Teleport label. - The second permission is to login as
root. Notice theloginssetting:
# user.yaml
kind: role
version: v1
metadata:
  description: ""
  name: user
  namespace: default
spec:
  # users cannot SSH as root, they can only SSH as 'user' OS login:
  logins: [user]
  # users receive SSH keys that auto-expire after 1 hour
  max_session_ttl: 1h0m0s
  # users can only SSH into instances running on staging environment
  node_labels:
    "env": "staging"
# admin.yaml
kind: role
version: v1
metadata:
  description: ""
  name: admin
  namespace: default
spec:
  # admins can SSH as root into machines:
  logins: [root]
  # admins receive SSH keys that auto-expire after 12 hours
  max_session_ttl: 12h0m0s
  # admins can SSH into any instance:
  node_labels:
    "*": "*"
Add these roles to Teleport:
$ tctl create -f user.yaml
$ tctl create -f admin.yaml
... and you're done!
Now you can access your team's AWS infrastructure based on your Github identity.
If you want to give Teleport a try, you can get the open source version or you can reach out to us for a trial version of Teleport Enterprise: [email protected]
Teleport Newsletter
Stay up-to-date with the newest Teleport releases by subscribing to our monthly updates.