Secure Redis Authentication Using Teleport Database Access

Table Of Contents
As part of our Teleport 9 release, we added support for three more databases: Redis, MariaDB, and Microsoft SQL Server. In this post we’ll cover the steps needed to protect your Redis instance using Teleport Database Access. Teleport Database Access allows you to easily secure your databases using security best practices such as identity-based SSO, short-lived certificates for engineers or service accounts, multi-factor authentication, RBAC, and audit of all access and queries. This post is a summary of our documentation Database Access with Redis.
1. Don’t expose Redis to the Internet
By default Redis will start in ‘protected mode’; this will mean it’ll only reply to queries from the loopback address, but we recommend adding a firewall to block all inbound TCP/UDP traffic from 0.0.0.0/0 in case protected mode is later turned off. If possible, we recommend putting Redis in a Private VPC Subnet.
2. Create dedicated Redis user with a strong password
As a best practice, we recommend disabling the default Redis User, and instead creating dedicated users with ACLs. Redis 6 added ACLs or Access Control Lists to limit both commands and keys that can be accessed. The default user has administrator privileges and by default doesn't require a password.
ACLs can be set using the Redis CLI or redis.conf. For this blog post, we’ll focus on using redis.conf. If you’re using requirepass, this means you're using an older version of Redis and should review the latest one.
To start, we’ll create a strong password for our new user, sre-team.
$ openssl rand -hex 32
// c9fd0c650dba8c8ccc4e2e9fc2f538c981434d2c1bd72475fc76e1d2a210442b
echo -n c9fd0c650dba8c8ccc4e2e9fc2f538c981434d2c1bd72475fc76e1d2a210442b | sha256sum
// 8b718cb097b94af3cbf1e9c561981929b48008e305e63102f175bba1c5d4d986  -
By default, /etc/users.acl stores passwords in clear text. We strongly recommend using an SHA256 hash instead of plaintext passwords.
# /etc/users.acl
user default off
user sre-team on #8b718cb097b94af3cbf1e9c561981929b48008e305e63102f175bba1c5d4d986 allcommands allkeys
3. Set up Teleport Database Service
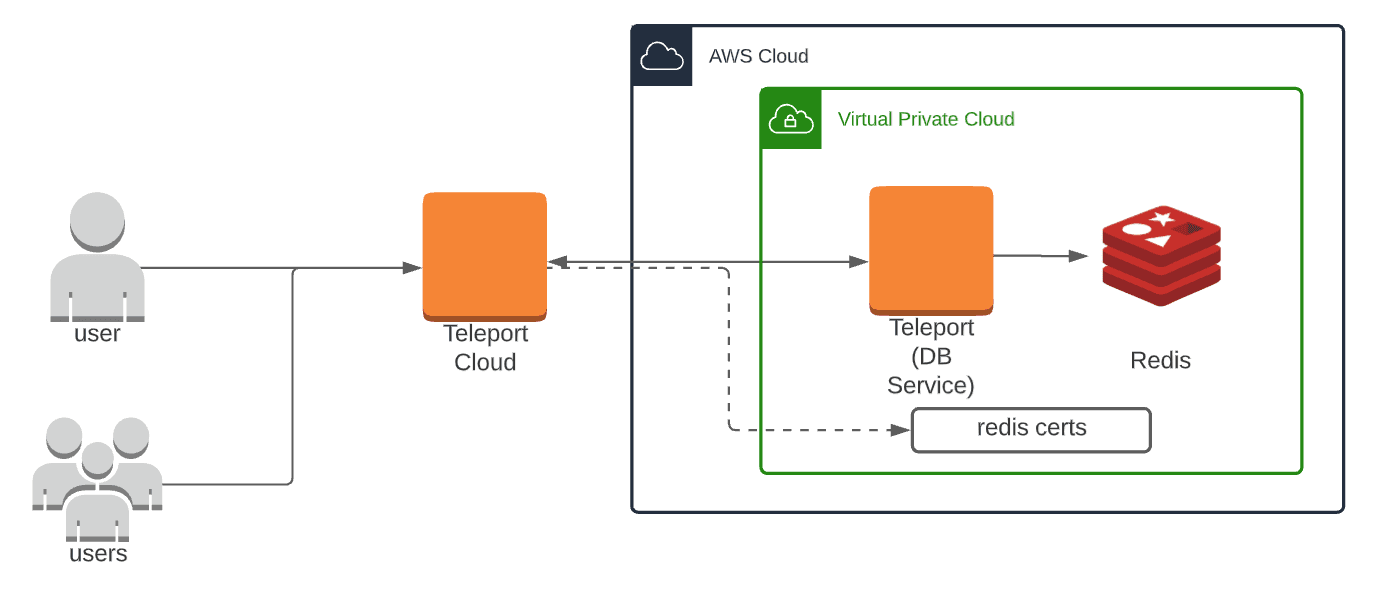
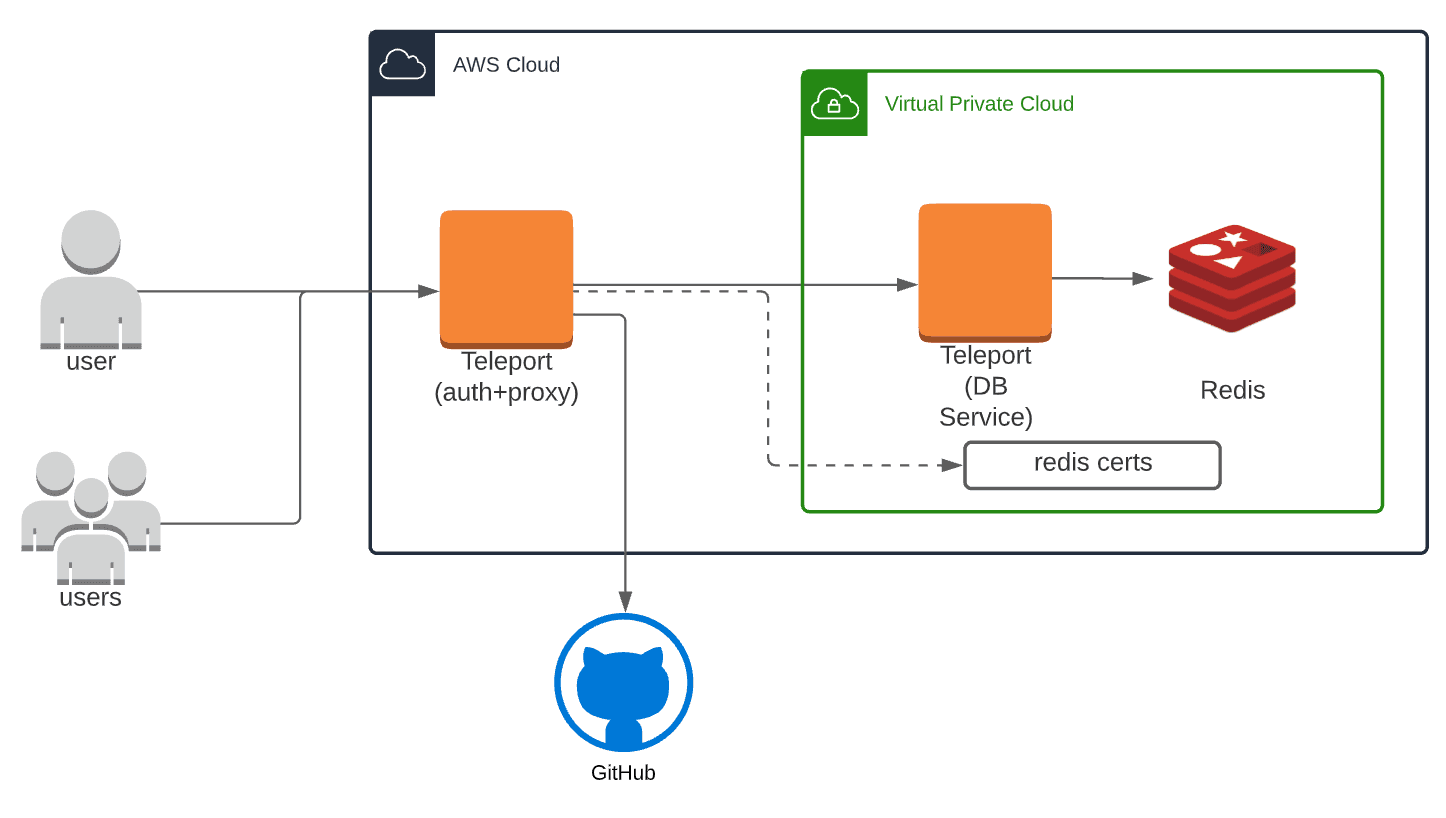
Next, we’ll need to configure Teleport. The setup will be the same for both self-hosted and cloud hosted versions. We recommend creating a Teleport Database Service . This can be on the same host as Redis, or as a sidecar within the same VPC.
Step 3a: Install Redis
Teleport Database Access requires Redis Server 6+. When performing the Redis installation make sure your using Redis 6, as sudo apt install redis-server -y defaults to Redis 5.
Step 3b: Install Teleport on Teleport DB Service
Step 3b: Create teleport.yaml for Teleport. If running on the same host, you can use the example config below which will listen on localhost:6379.
# Example /etc/teleport.yaml
teleport:
    auth_token: AUTH_TOKEN_CHANGE_ME
    auth_servers:
        - "https://example.teleport.sh:443"
auth_service:
    enabled: false
proxy_service:
    enabled: false
ssh_service:
    enabled: "yes"
    labels:
      db-debug: redis
db_service:
    enabled: "yes"
    databases:
    - name: "redis"
      protocol: "redis"
      uri: "localhost:6379"
      static_labels:
        env: redis
        engine: 🟥
Step 4: Export Teleport CA
Teleport uses mutual TLS authentication with self-hosted databases. These databases must be configured with Teleport's certificate authority to be able to verify client certificates. They also need a certificate/key pair that Teleport can verify.
We will show you how to use tctl auth sign below.
When connecting to standalone Redis, sign the certificate for the hostname over which Teleport will be connecting to it.
For example, if your Redis server is accessible at localhost, run:
# If using self-hosted with local loopback, creates a 90 day cert.
tctl auth sign --format=redis --host=localhost --out=server --ttl=2190h
# If using a redis server that has a FQDN, use an example like below.
# tctl auth sign --format=redis --host=redis.example.com --out=server --ttl=2190h
The command will create three files:
- server.cas with Teleport's certificate authority
- server.key with a generated private key
- server.crt with a generated user certificate
You will need these files to enable mutual TLS on your Redis server. We’ll do that next.
5. Set up TLS config
Use the generated secrets to enable mutual TLS in your redis.conf configuration file and restart the database:
# redis.conf
tls-port 6379
port 0
aclfile /path/to/users.acl
tls-ca-cert-file /path/to/server.cas
tls-cert-file /path/to/server.crt
tls-key-file /path/to/server.key
tls-protocols "TLSv1.2 TLSv1.3"
Once mutual TLS has been enabled, you will no longer be able to connect to the cluster without providing a valid client certificate. You can use the tls-auth-clients optional setting to allow connections from clients that do not present a certificate. See TLS Support in the Redis documentation for more details.
Restart the Redis Server, for systemctl restart redis.
6. Access Redis server using Teleport Database Access
tsh login --proxy=teleport.example.com --user=alice
tsh db ls
Name Description Labels
------------- --------------- --------
example-redis Example Redis env=dev
Login using sre-team user.
tsh db login --db-user=sre-team example-redis
Connect to Redis Instance:
tsh db connect redis
localhost:62243>
After you first connect, you might get this error message.
localhost:62243> PING
(error) NOAUTH Authentication required.
This is because we’ve turned off the default user and need to Auth using the sre-team password that we set up earlier.
localhost:62243> AUTH sre-team 530f08ef455f4e6430c6cad30226b1cf0a999fdf9a5f87ad347ab1819a202749
"OK"
You are now connected to the Redis server via Teleport Database Access. Try PING and INFO to confirm access.
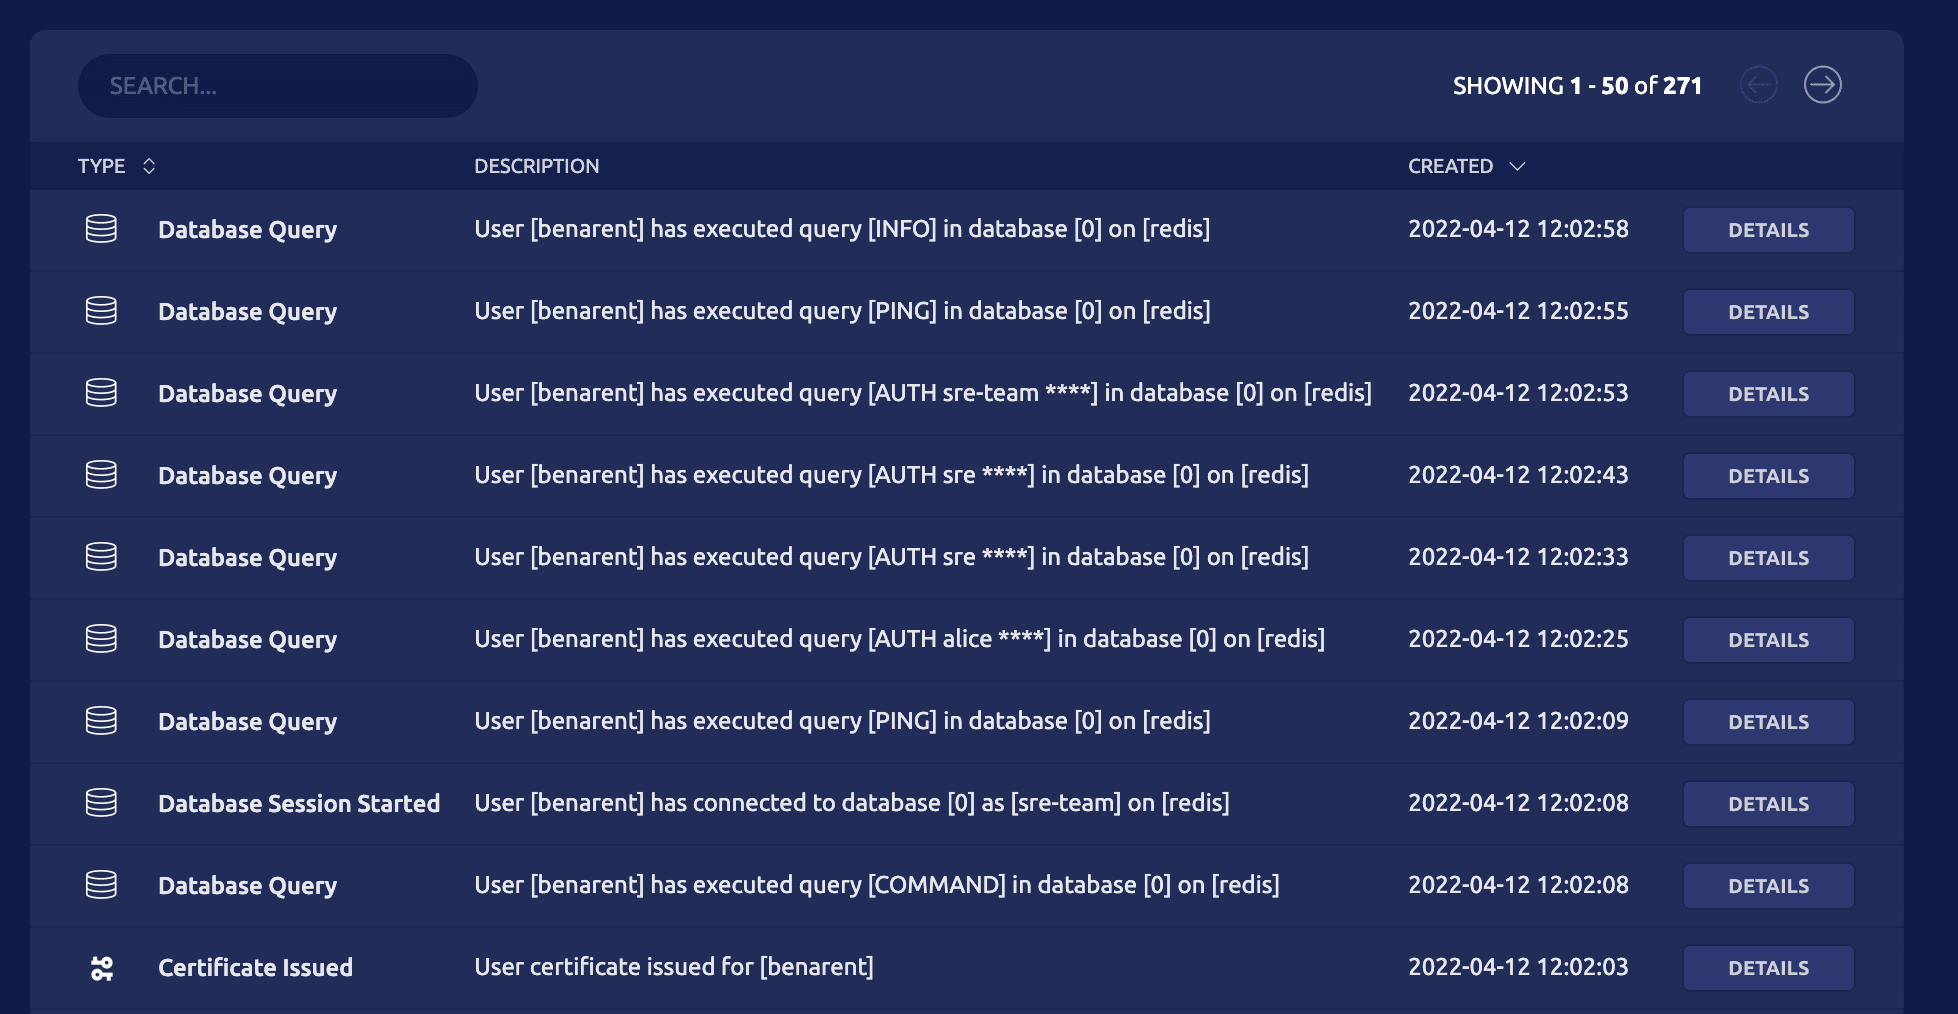
7. Audit Redis access
Just so you know who ran that FLUSHALL command, Teleport Database Access for Redis provides a full audit log of connections and queries run against the database.
Try Teleport Database Access for Redis
In this blog post we’ve shown you how to connect a Redis instance to Teleport, while greatly improving security by using dedicated users and turning off the default user. Teleport Database Access for Redis is available in both Teleport Enterprise and Teleport Community Edition. Follow our Docs for more information.
Table Of Contents
Teleport Newsletter
Stay up-to-date with the newest Teleport releases by subscribing to our monthly updates.
Tags
Tags
Teleport Newsletter
Stay up-to-date with the newest Teleport releases by subscribing to our monthly updates.