How to Configure Single Sign-On (SSO) for Amazon RDS Access
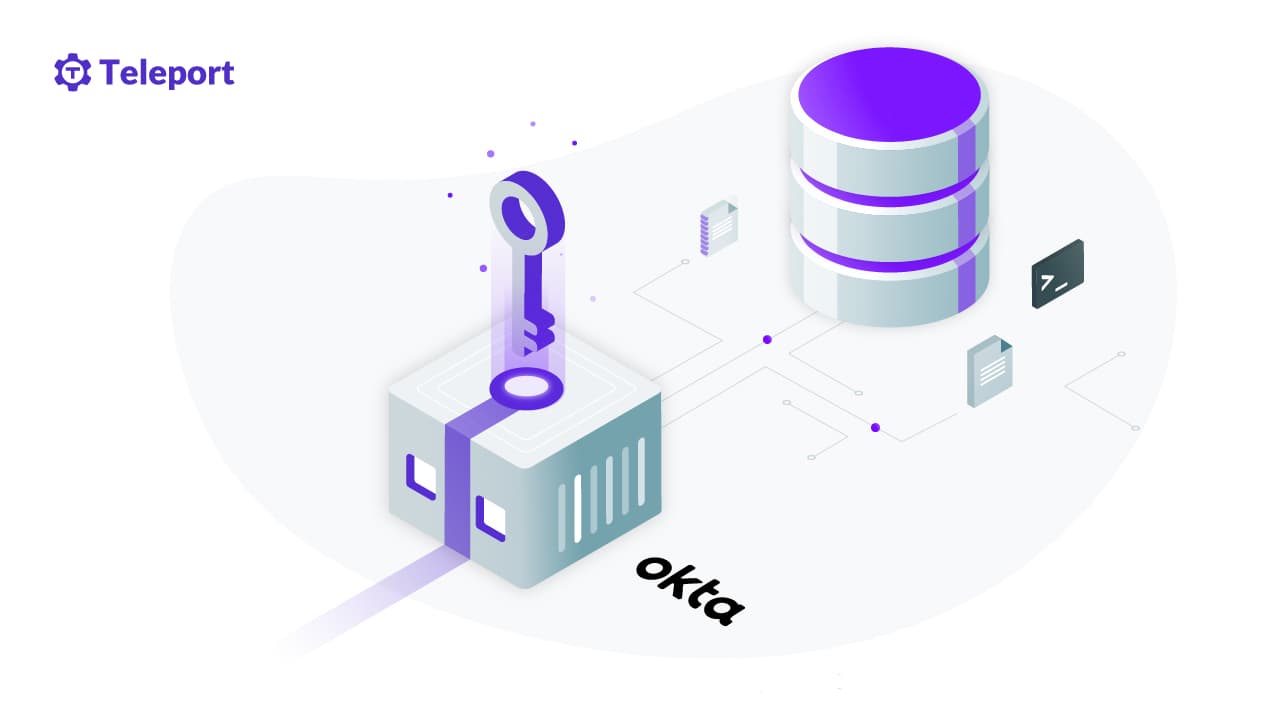
Table Of Contents
This blog is part two of a series about identity-aware access for Amazon RDS. In Part I, we covered how to use OSS Teleport to access Amazon RDS instances running in private subnets. In Part II, we will guide you through the steps to configure single sign-On (SSO) for Amazon RDS with Okta, SAML and Teleport.
Single sign-on (SSO) for Amazon RDS with Okta, SAML, and Teleport
Enterprises are adopting single sign-on (SSO) solutions to centralize their identity management tasks. SSO adds security, increases efficiency and delivers a better user experience to employees. While SSO offers many benefits, the challenge remains in mapping the organization's role (e.g., marketing, sales, developer) with infrastructure roles (e.g., Linux user roles, database roles, Kubernetes cluster roles).
Teleport is a unique platform that enables enterprise IT to extend SSO through role-based access control (RBAC) to define fine-grained access policies. With Teleport's SAML connector for SSO, customers can easily map the users and groups managed by an SSO provider such as Okta with the cloud-based infrastructure resources such as Amazon EC2 instances and Amazon RDS databases. This is helpful for both internal IT teams and managed service providers handling multiple AWS accounts to manage fine-grained access for all AWS resources in one place.
This tutorial builds on the previous guide where we configured the Teleport proxy, auth server, and DB agent running in Amazon EC2 instances, as well as an Amazon RDS instance based on the PostgreSQL engine. We will extend the scenario to support authenticating against Okta and implementing role-based access control (RBAC) to permit or deny access to a specific database based on the user's group membership.
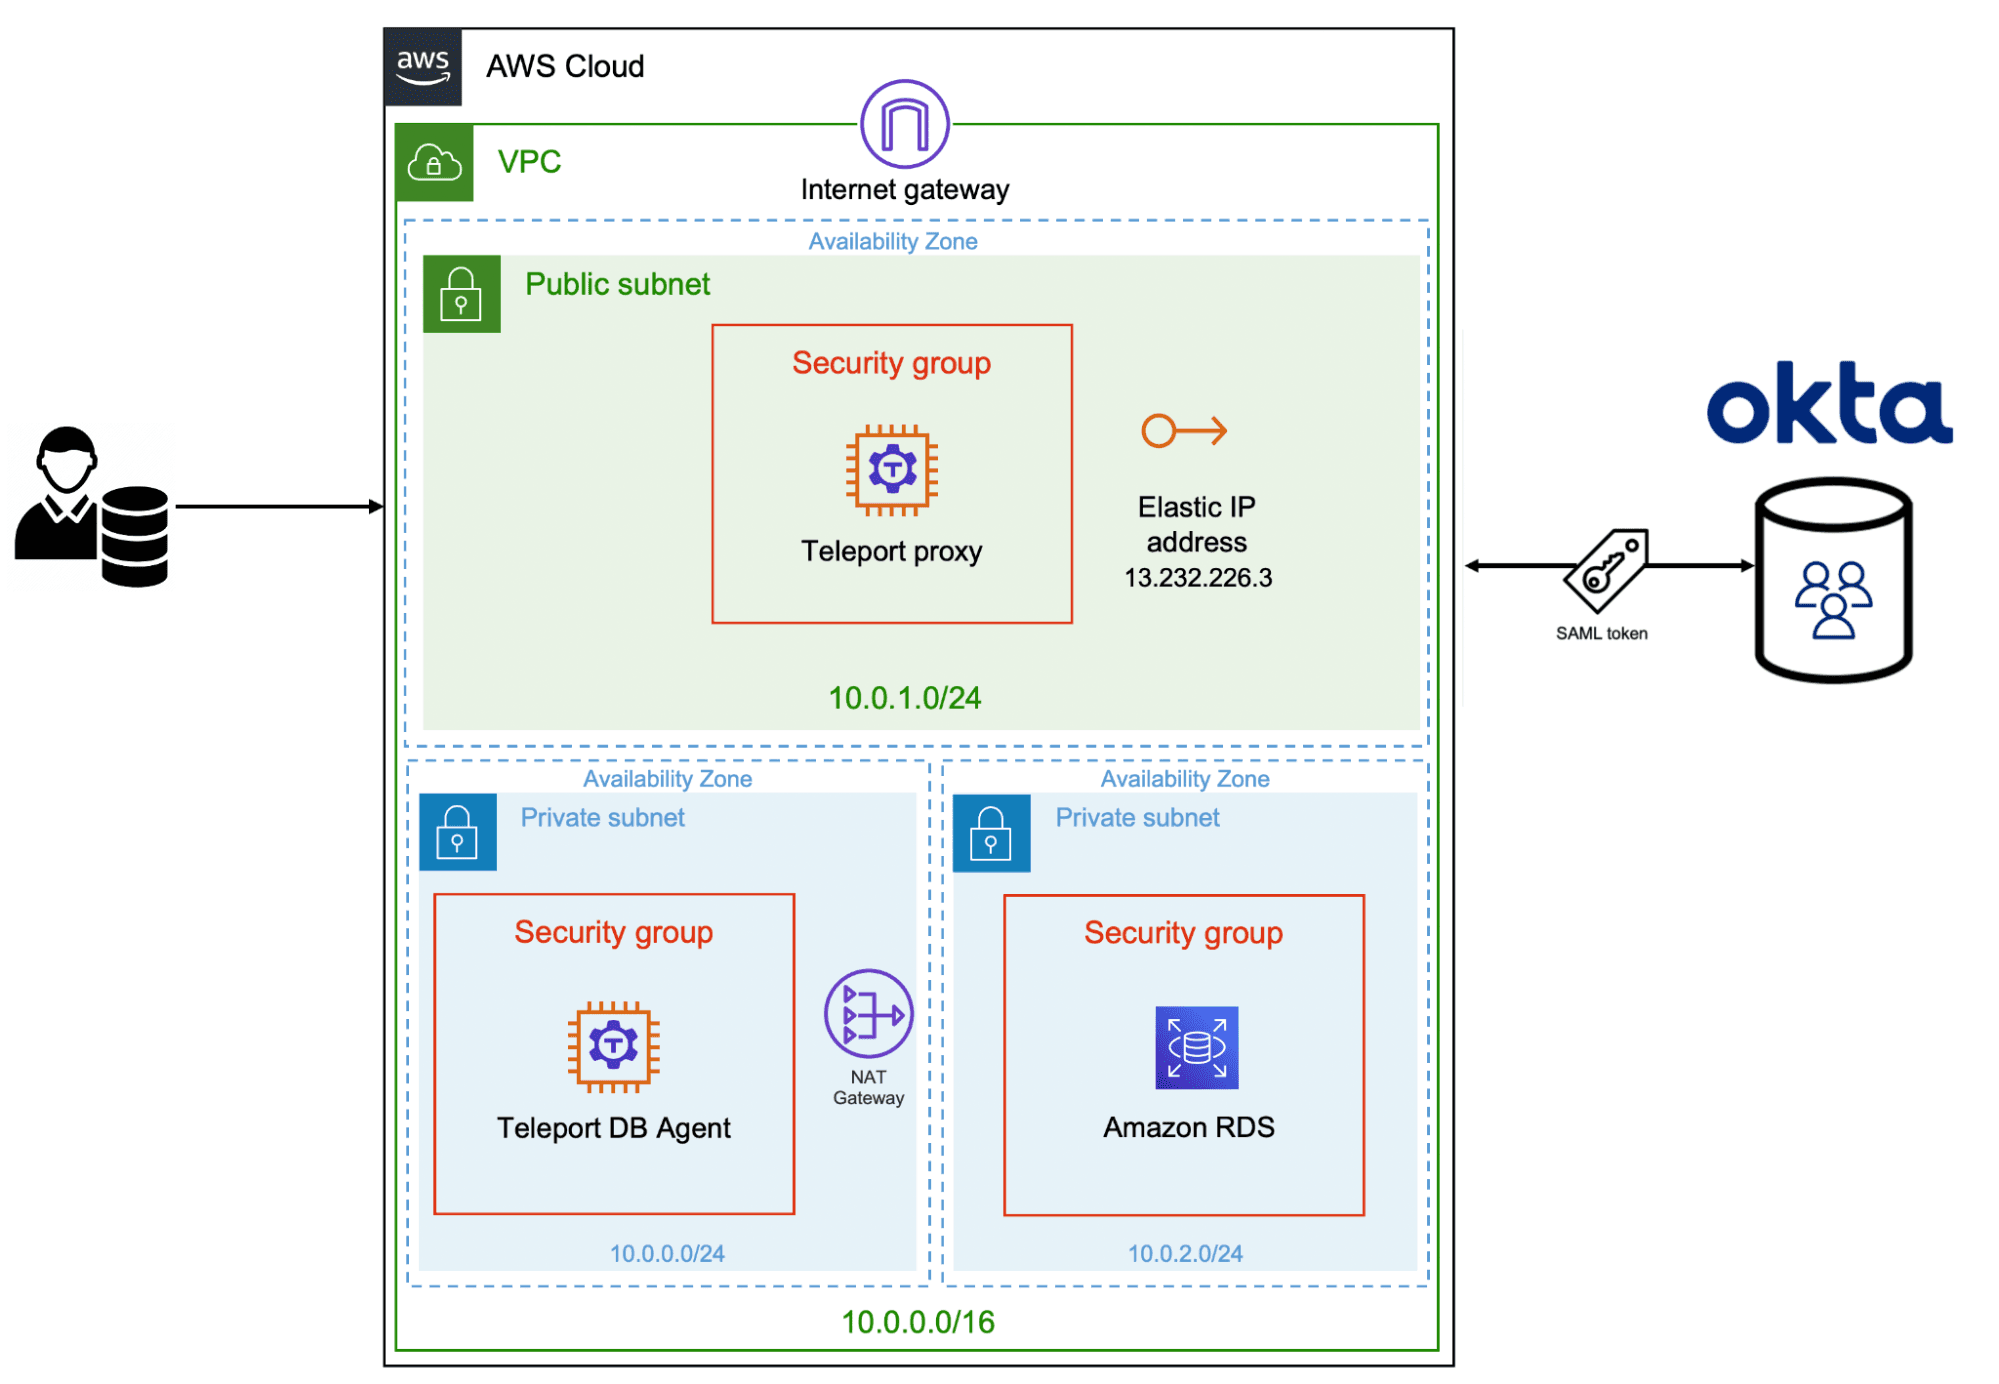
In this scenario, the Amazon RDS instance has two databases — inventory and forecast. The inventory database is often accessed by developers to write queries and the stored procedures. The forecast database contains sensitive data that should be restricted to a special group of users. Our goal is to map the Okta groups to Teleport roles and then implement RBAC to restrict developers from accessing the forecast database. Only Okta users belonging to the DBA group should have access to all the databases including the forecast database available in Amazon RDS.
Step 1 - Preparing the Amazon RDS database
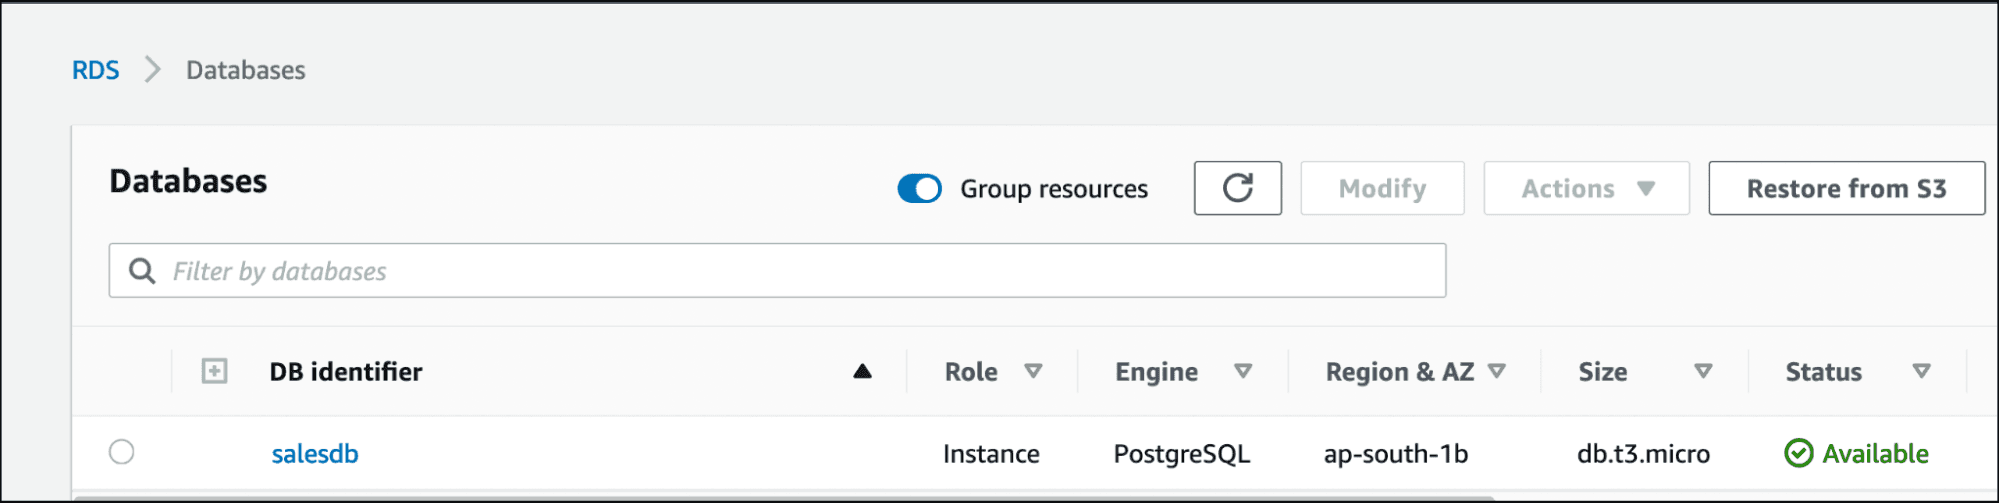
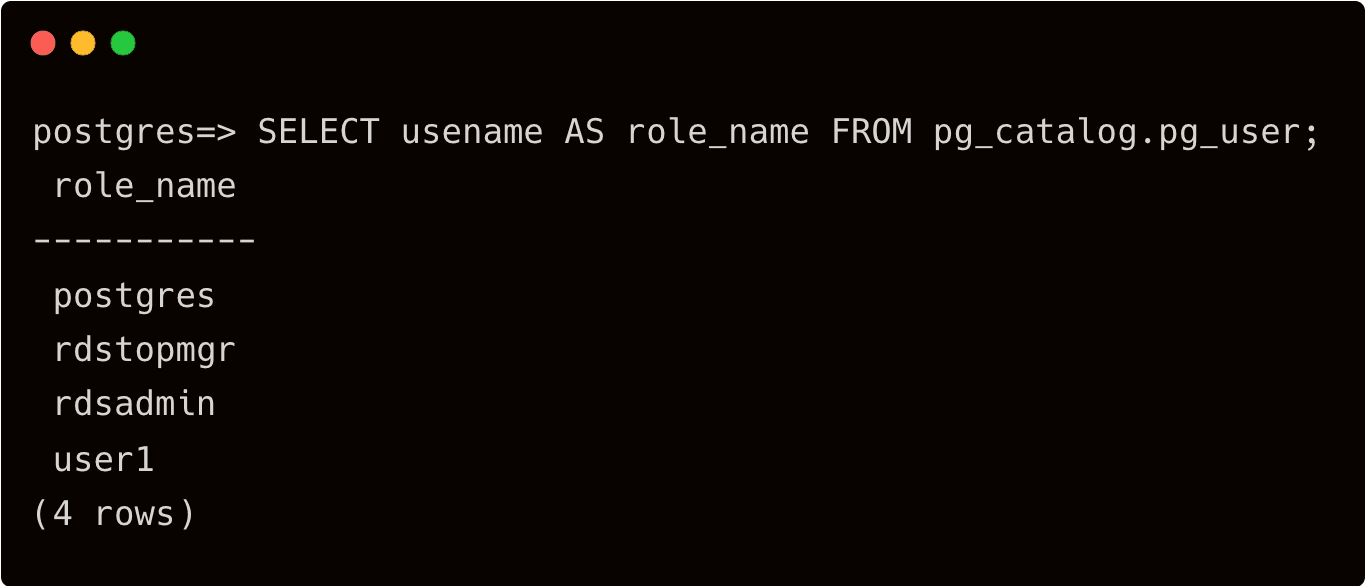
This step assumes that you have an Amazon RDS database named salesdb based on the PostgreSQL engine.
Connect to Amazon RDS and create the databases:
> CREATE DATABASE inventory;
> CREATE DATABASE forecast;
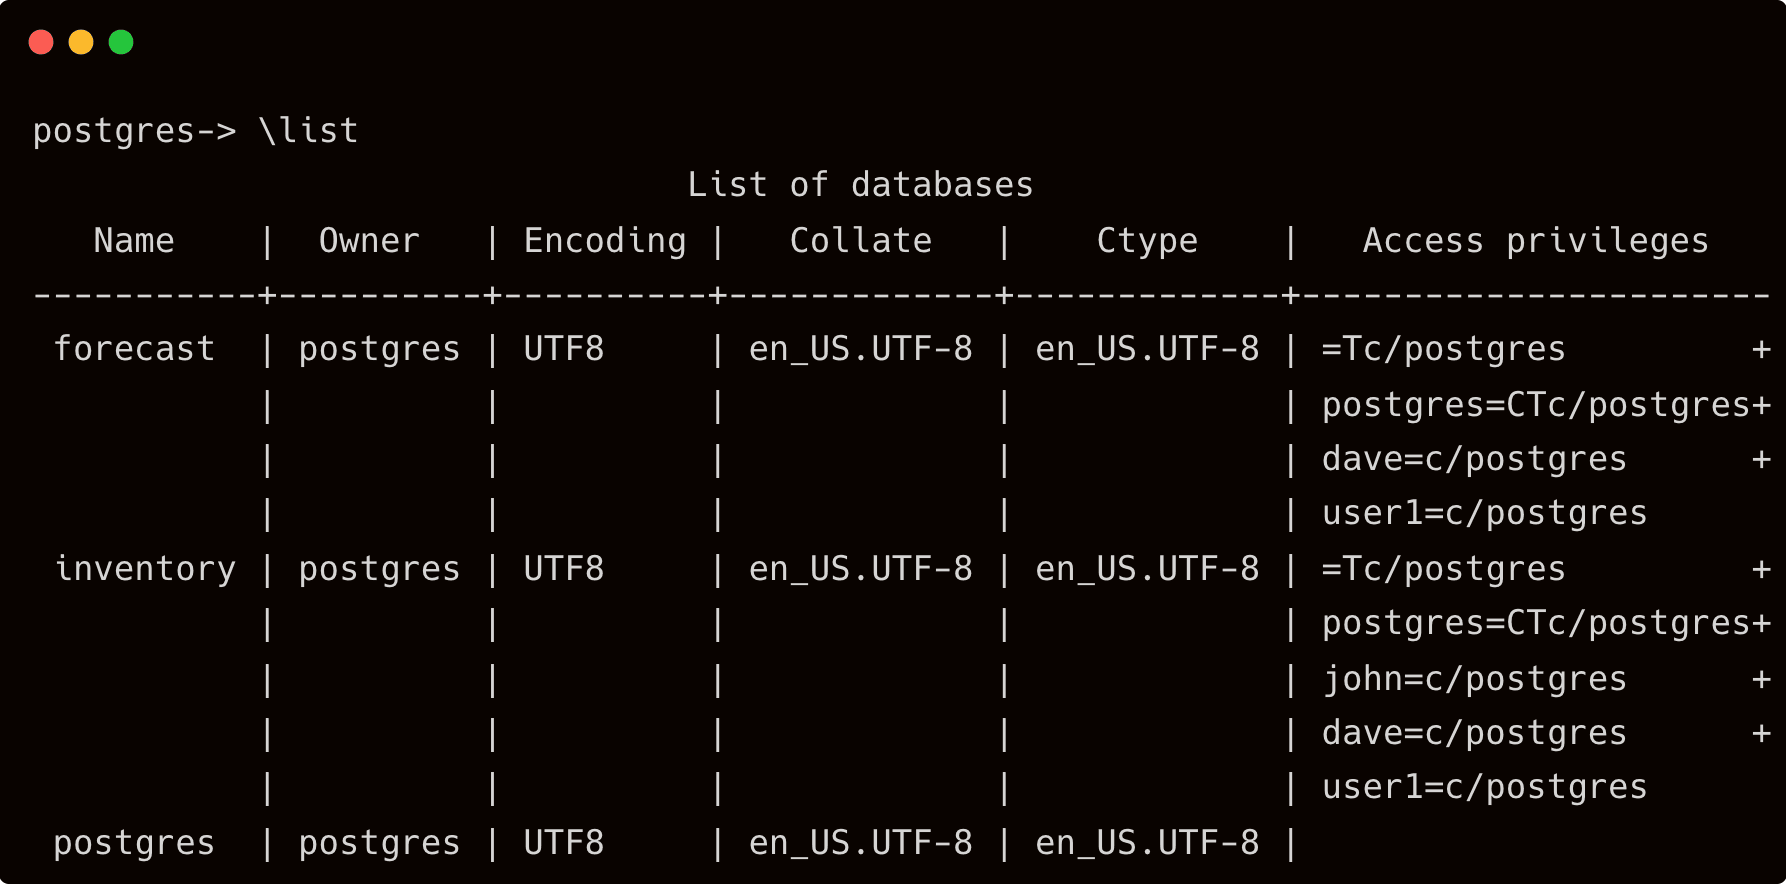
Next, create a PostgreSQL user that has access to both databases.
> CREATE USER user1;
GRANT CONNECT ON DATABASE inventory TO user1;
GRANT CONNECT ON DATABASE forecast TO user1;
Enable the user for AWS IAM-based authentication.
GRANT rds_iam TO user1;
Though "user1" has access to both the databases, we will demonstrate how to leverage Teleport RBAC to restrict access based on Okta groups.
Step 2 - Configuring Okta as an identity provider for Teleport and Amazon RDS
Visit the admin dashboard in Okta to create users and groups.
Create three users: Admin, Developer and DBA with an associated email address.
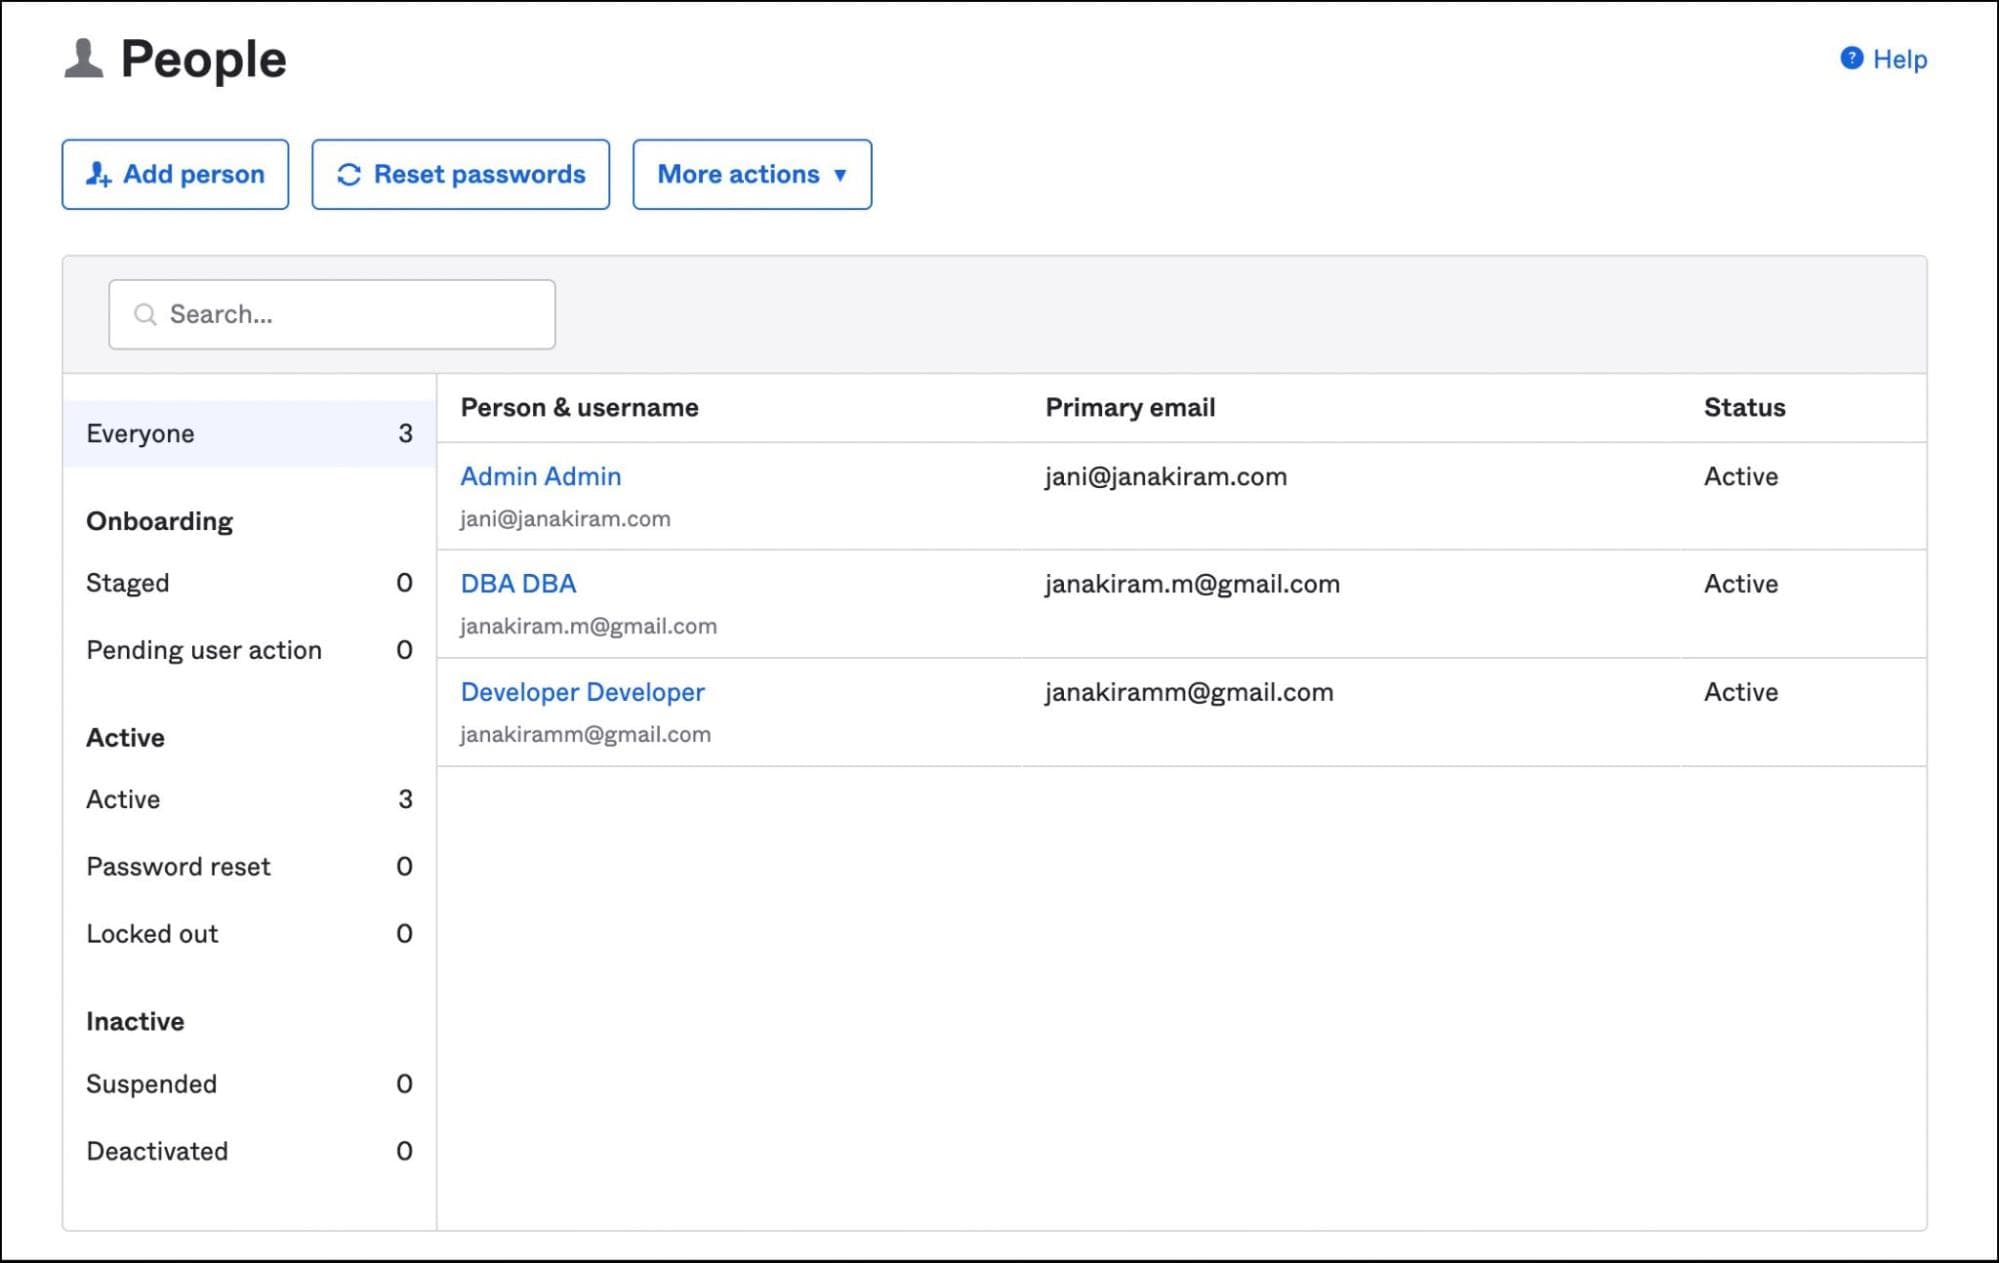
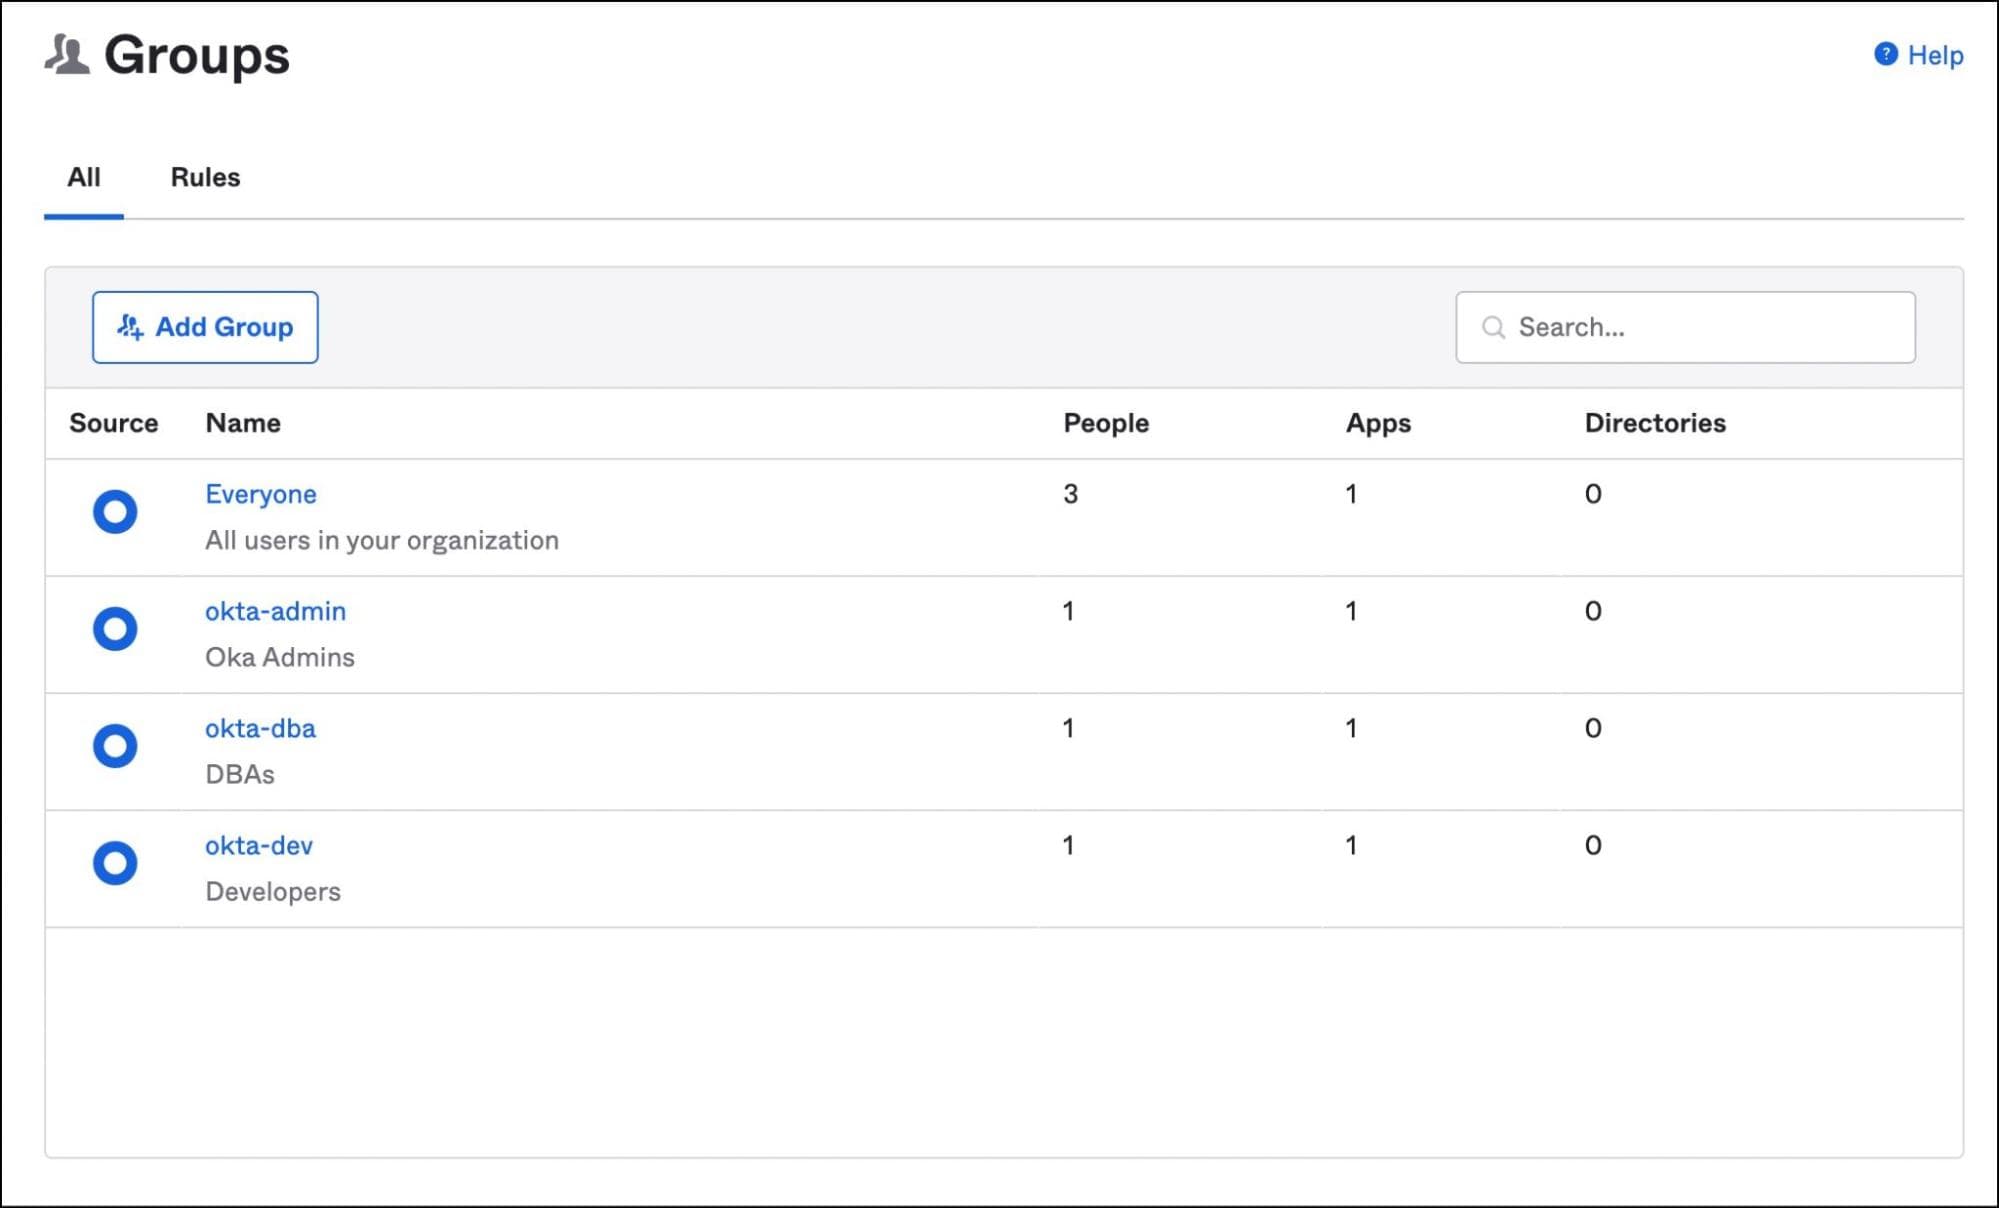
Create three groups: okta-admin, okta-developer and okta-dba. Add the users created above to each of these groups.
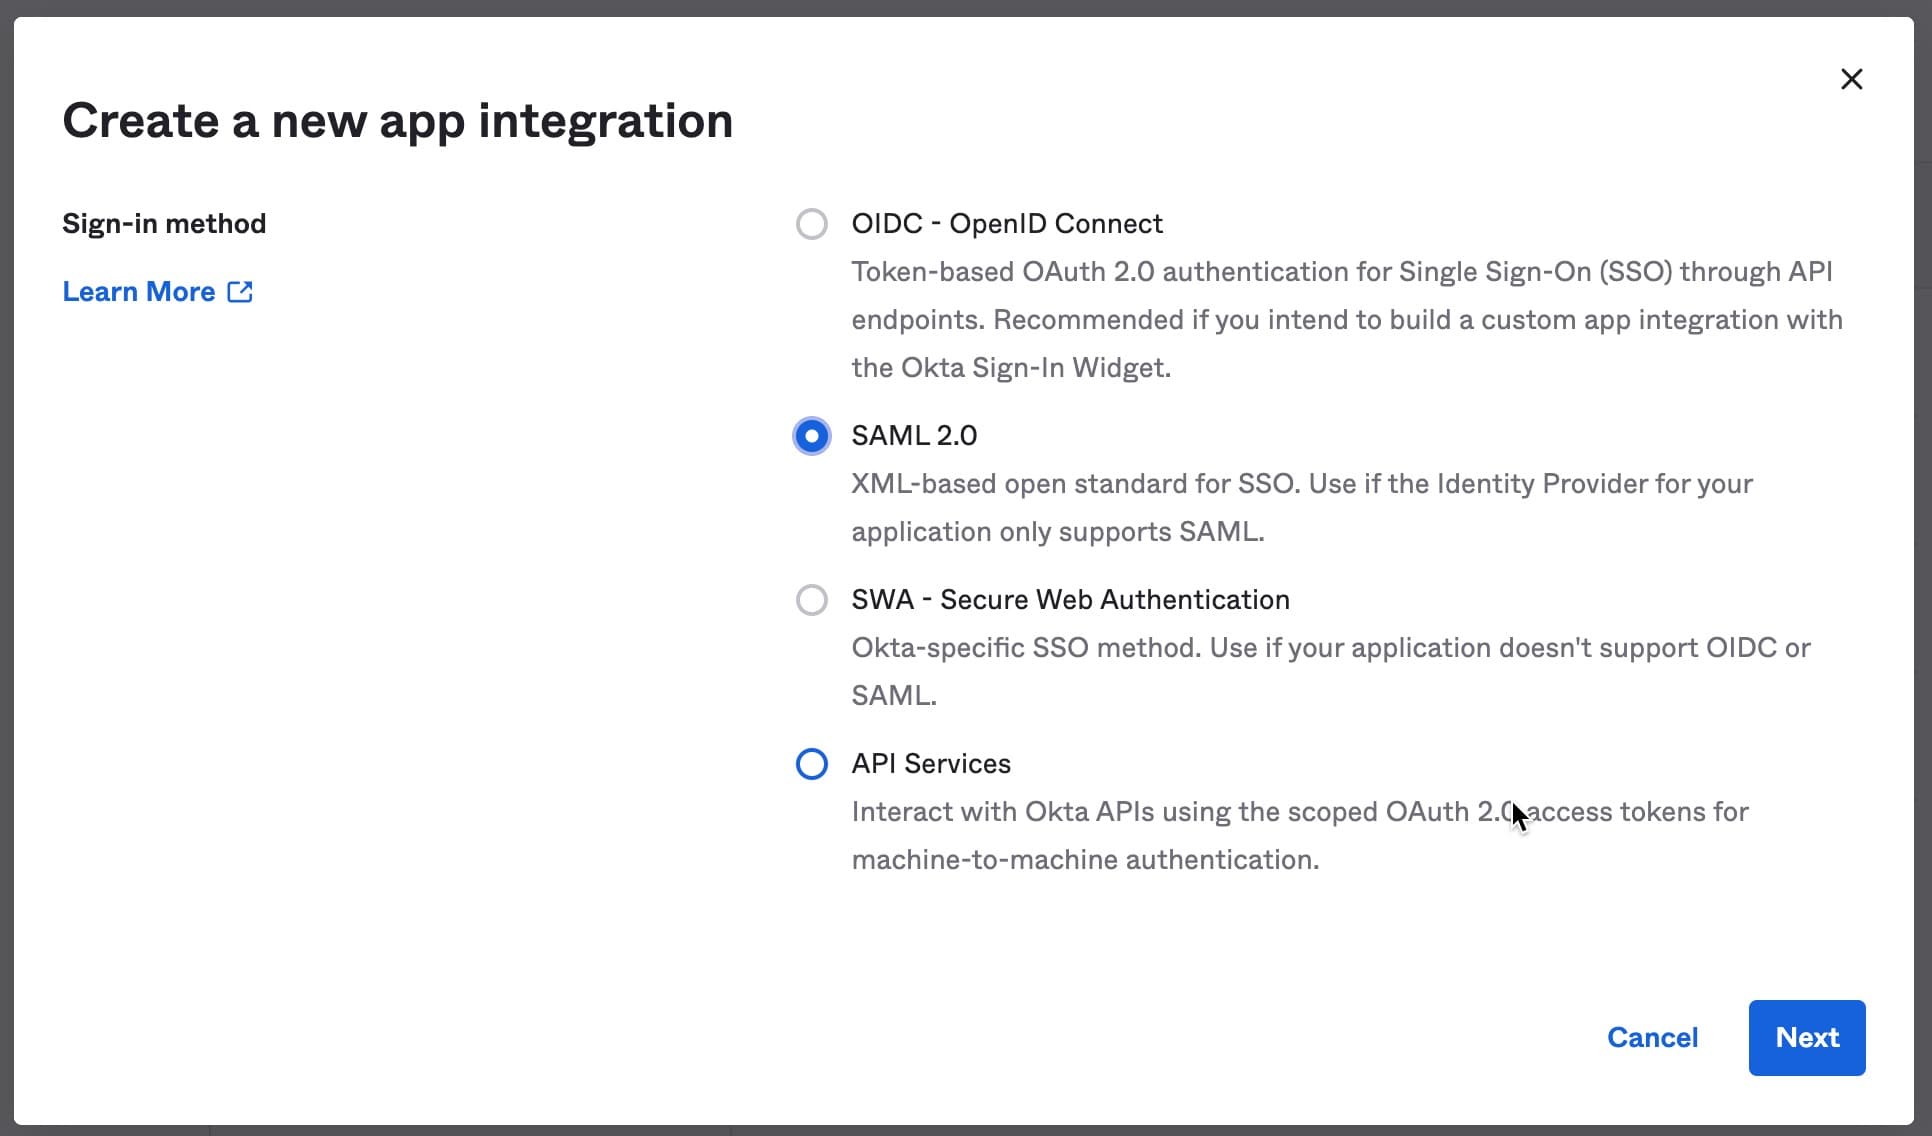
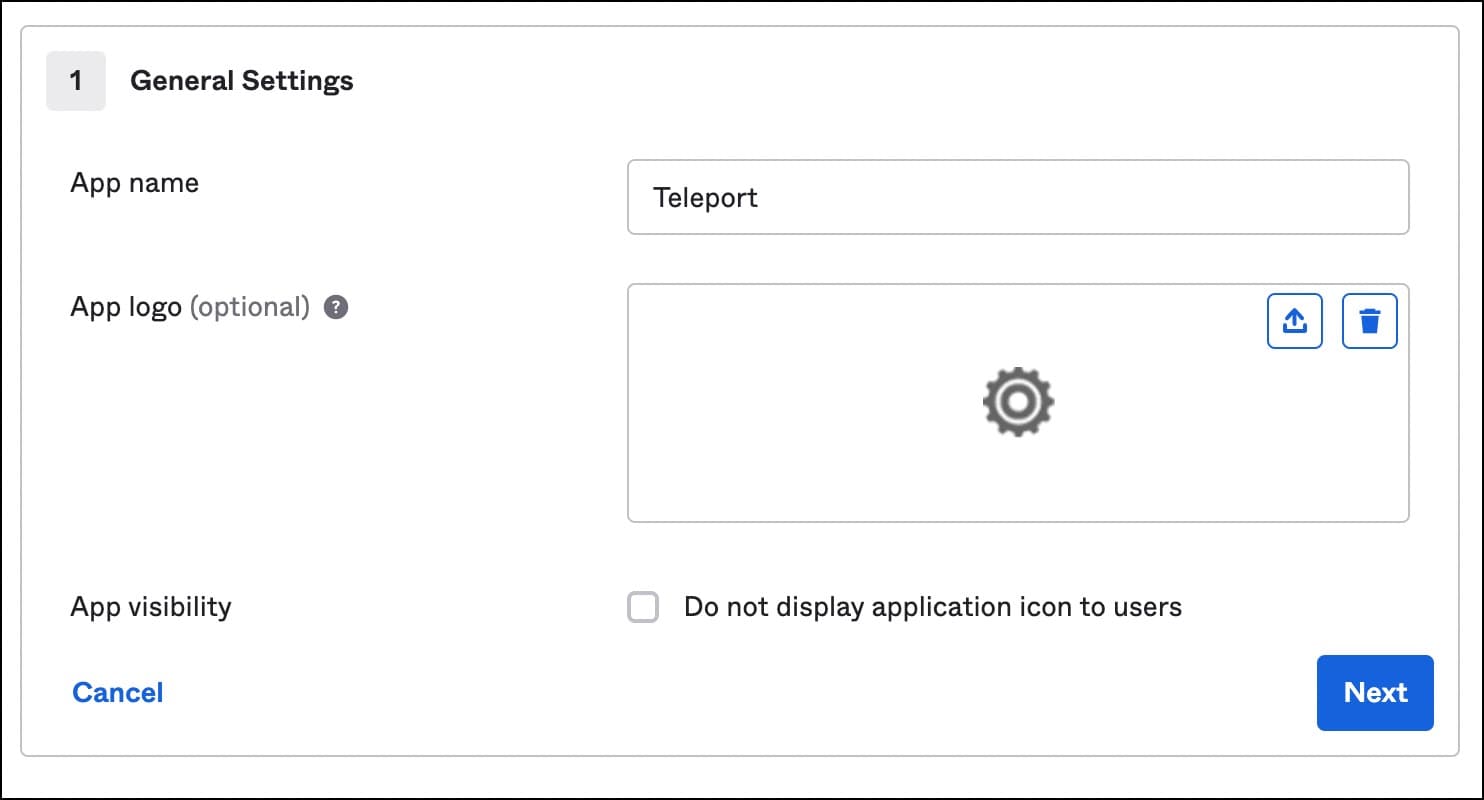
Under applications, click on app integration and choose SAML 2.0.
Give a name to the app and click next.
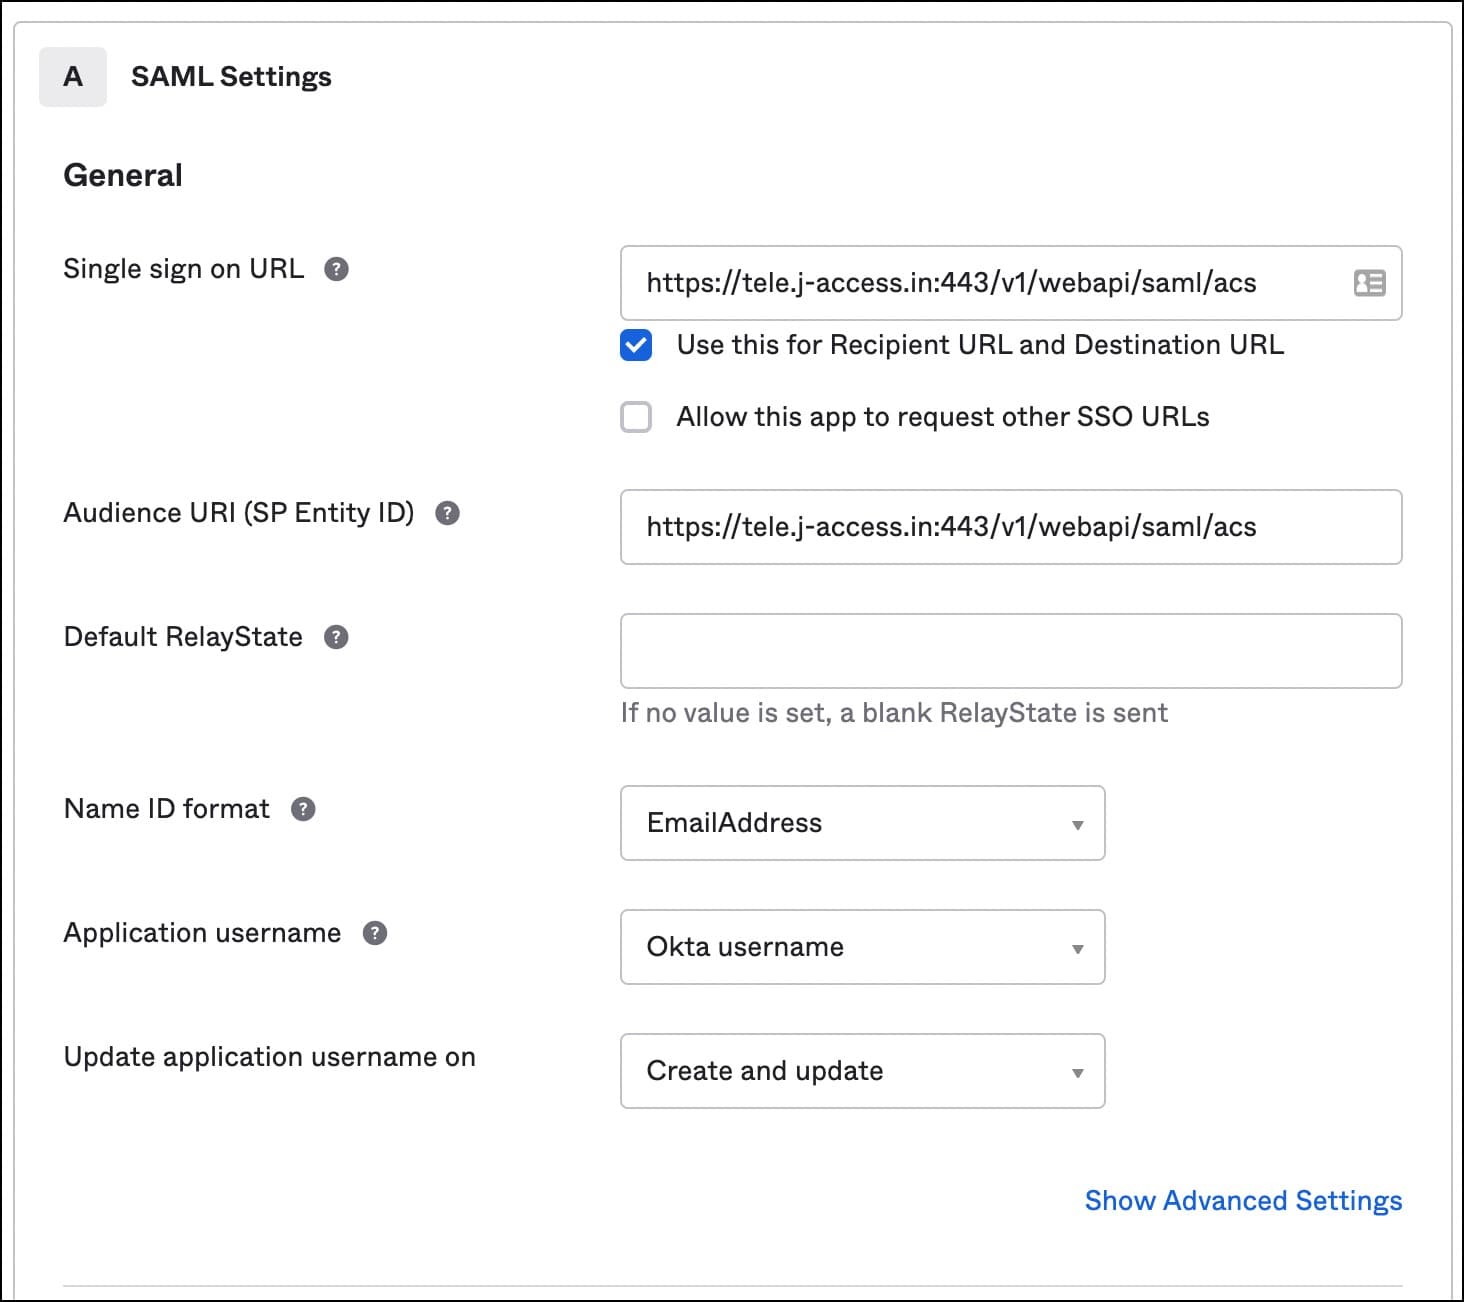
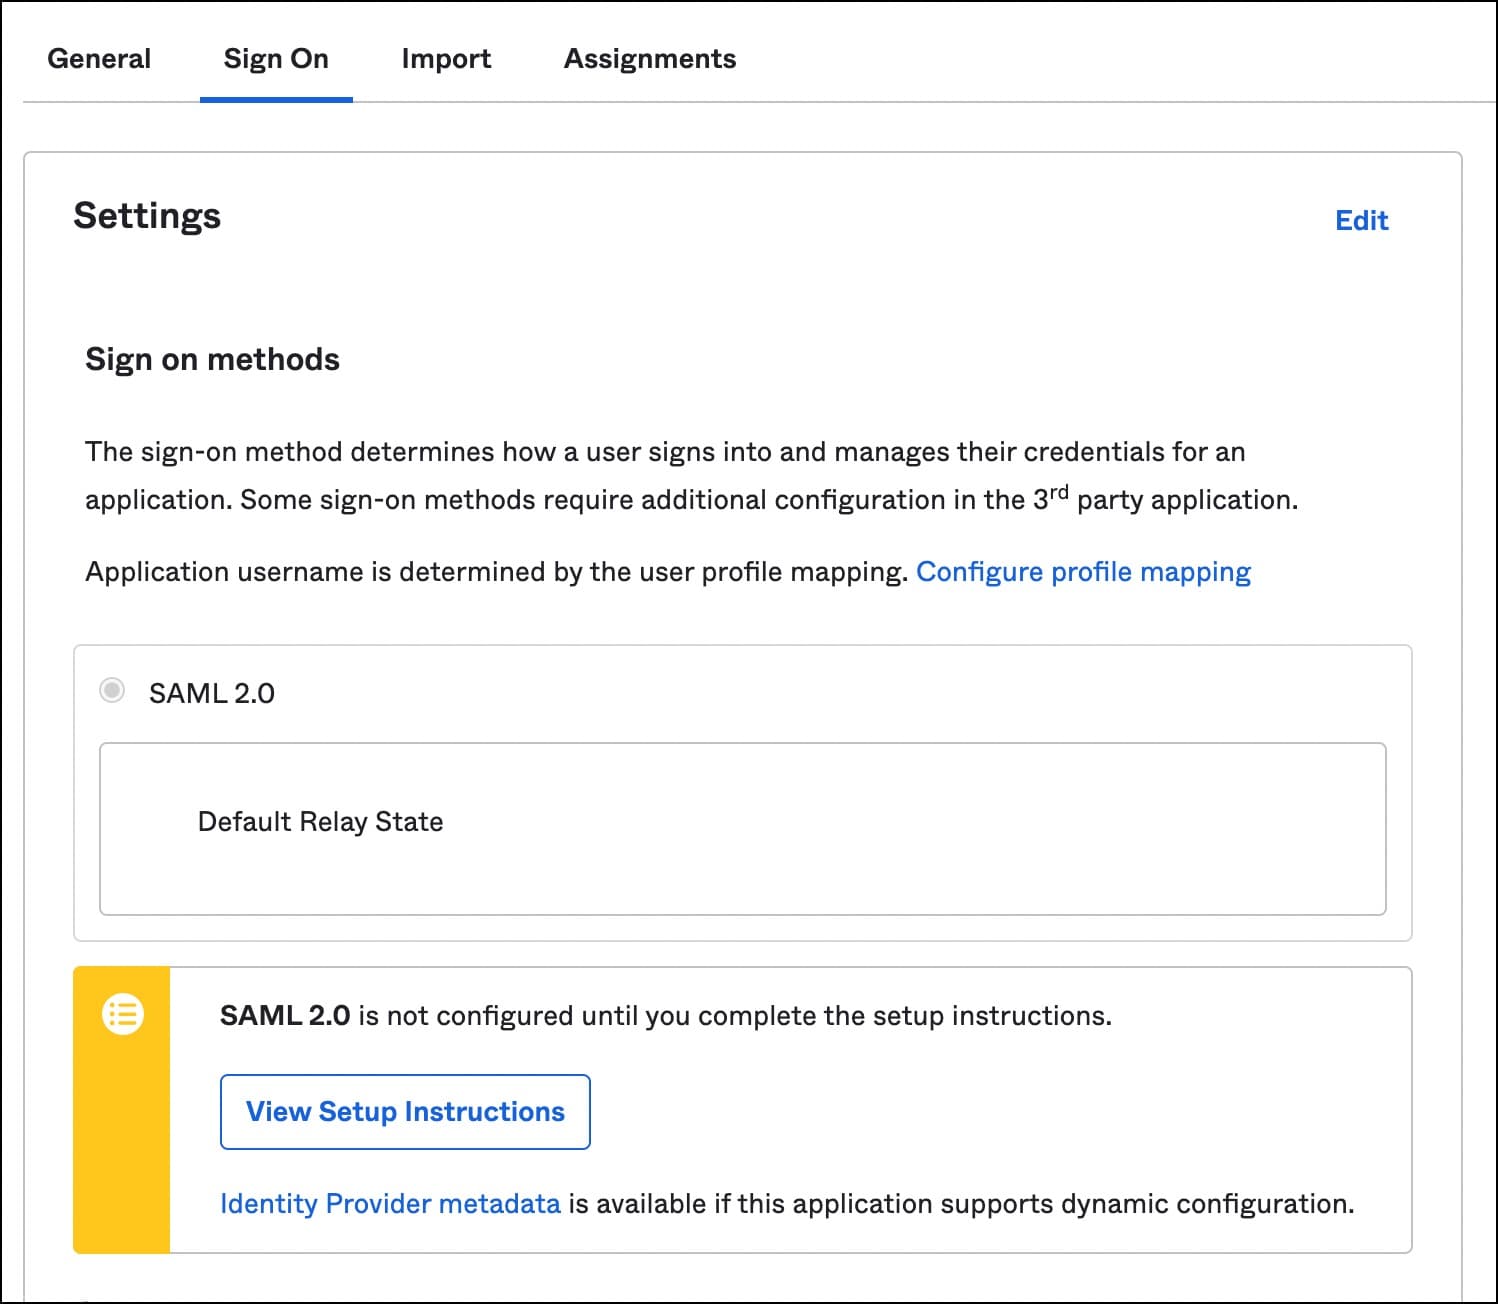
Use the below values for SAML settings:
- Single sign on URL:
https://tele.j-access.in:443/v1/webapi/saml/acs - Audience URI:
https://tele.j-access.in:443/v1/webapi/saml/acs - Name ID format: EmailAddress
- Application username: Okta username
For the attribute statements, provide the below values:
For Single Attribute Statements -
- Name: username
- Name format: Unspecified
- Value: user.login
For Group Attribute Statements -
- Name: groups
- Name format: Unspecified
- Filter: Matches regex | .*
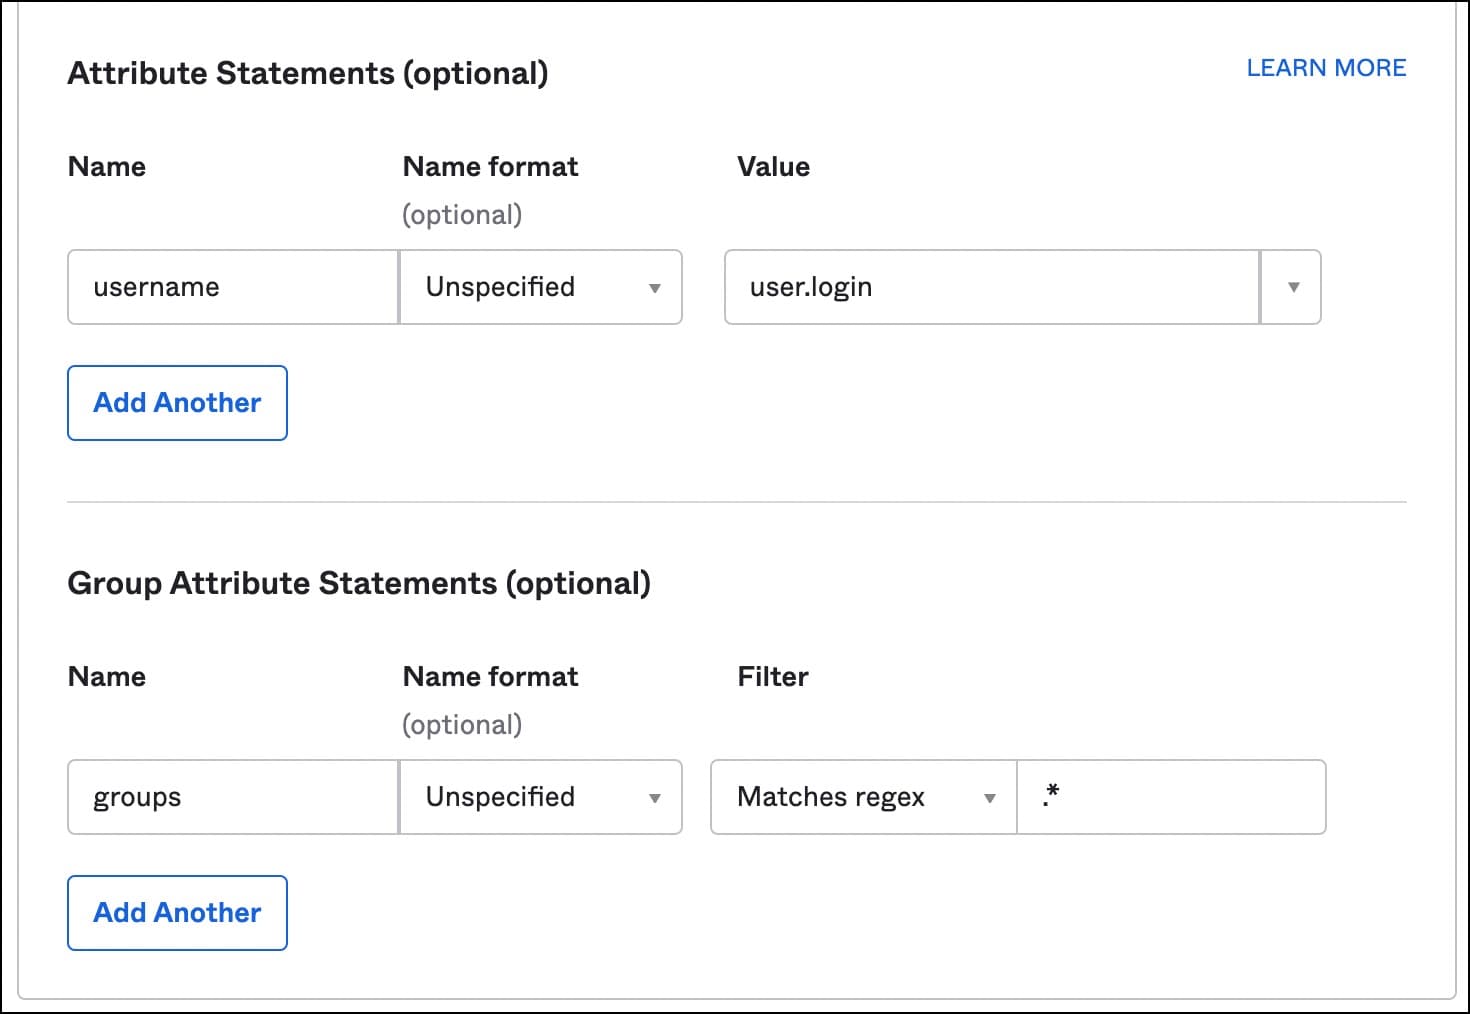
Make sure you have exactly the same values shown in the above screenshot before going further. These settings are critical for Teleport’s SAML integration with Okta.
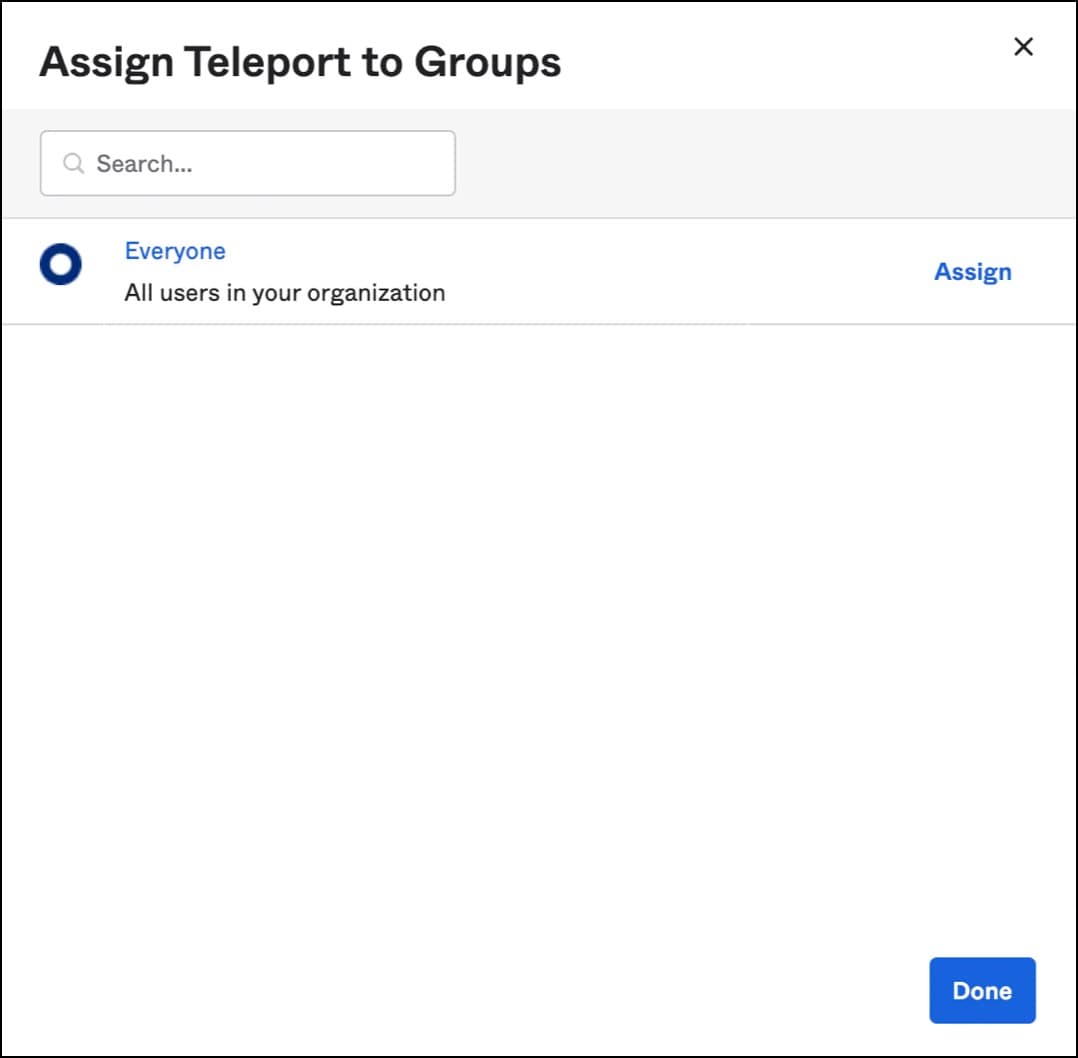
Now, it’s time to assign the application to groups and people.
Finally, download the identity provider metadata, an XML document under the sign on tab. This will be used to configure the Teleport SAML connector.
It’s interesting to see that Okta has the knowledge neither of Teleport nor Linux security context. It’s a generic identity provider with SSO capabilities. When we configure the SAML connector in the next step, we will connect the dots across these three contexts — Okta, Teleport and Amazon RDS.
Step 3 - Create Teleport SAML connector and roles
Create the below YAML file by replacing the XML string with the contents of the metadata file downloaded from Okta. Ensure that the formatting is correct by adding 4 spaces to the XML content.
kind: saml
version: v2
metadata:
  name: okta
spec:
  display: Okta
  acs: https://tele.j-access.in:443/v1/webapi/saml/acs
  attributes_to_roles:
    - {name: "groups", value: "okta-admin", roles: ["admin"]}
    - {name: "groups", value: "okta-dev", roles: ["dev"]}
    - {name: "groups", value: "okta-dba", roles: ["dba"]}
  entity_descriptor: |
      <XML String>
This is the most important step where we map Okta groups to Teleport roles. Before applying the configuration, login to the Teleport proxy from your workstation as a local user tele-admin that we created earlier.
$ tsh login --proxy=tele.j-access.in --user=tele-admin --auth=local
Apply the connector configuration with the below command:
$ tctl create okta-connector.yaml
Now, let’s create the dev and dba roles within Teleport which will map SAML user attributes to Teleport login roles.
kind: role
version: v5
metadata:
  name: dev
spec:
  allow:
    db_labels:
      '*': '*'
    db_users: ["user1"]
    db_names: ["inventory"]

kind: role
version: v5
metadata:
  name: dba
spec:
  allow:
    db_labels:
      '*': '*'
    db_users: ["*"]
    db_names: ["*"]
$ tctl create dev.yaml
$ tctl create dba.yaml
Notice how an external Okta user is mapped to the PostgreSQL user. The DBA role explicitly allows access to any database while the developer role allows access only to the inventory database. This is a simple yet powerful mechanism for defining RBAC in Teleport.
Finally, we will switch the authentication mode of the Teleport proxy on the bastion to use SAML.
Edit the file, /etc/teleport.yaml, to add the below lines under the auth_service section:
auth_service:
  authentication:
    type: saml
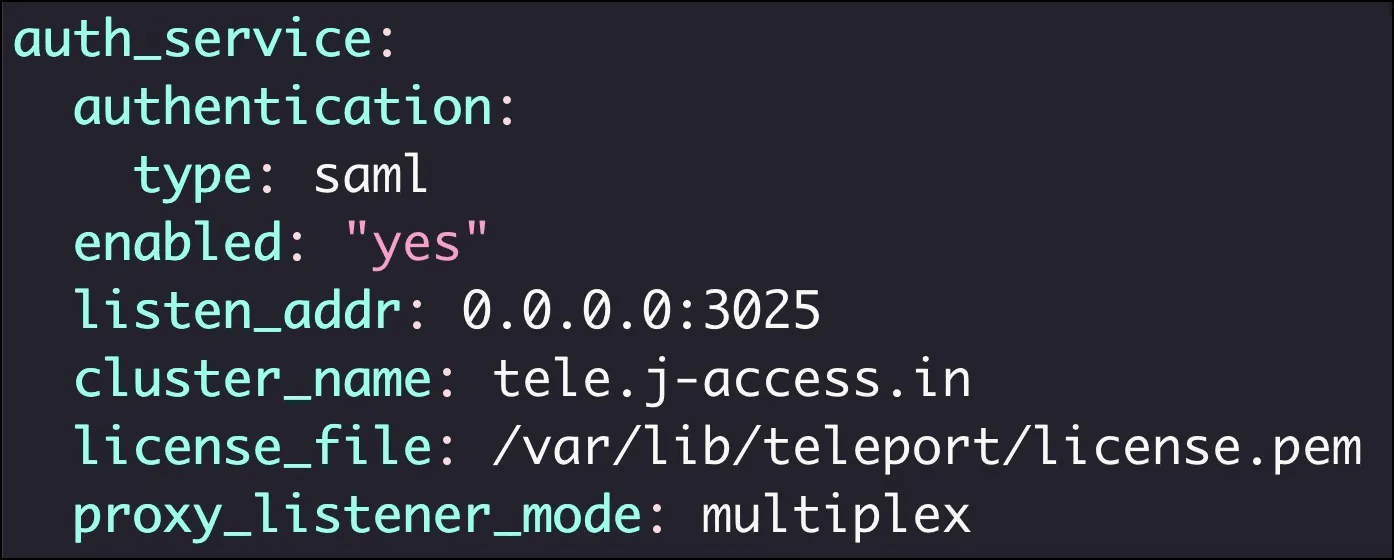
Restart the Teleport daemon on the bastion for the changes to take effect.
If you are using Teleport Cloud, create a file called cap.yaml:
kind: cluster_auth_preference
metadata:
  name: cluster-auth-preference
spec:
  authentication:
    type: saml
version: v2
Create a resource by running the below command:
$ tctl create -f cap.yaml
The above step configures Teleport Cloud to use SAML authentication as the default instead of the local user database.
Step 4 - Verifying Database access with SSO and RBAC
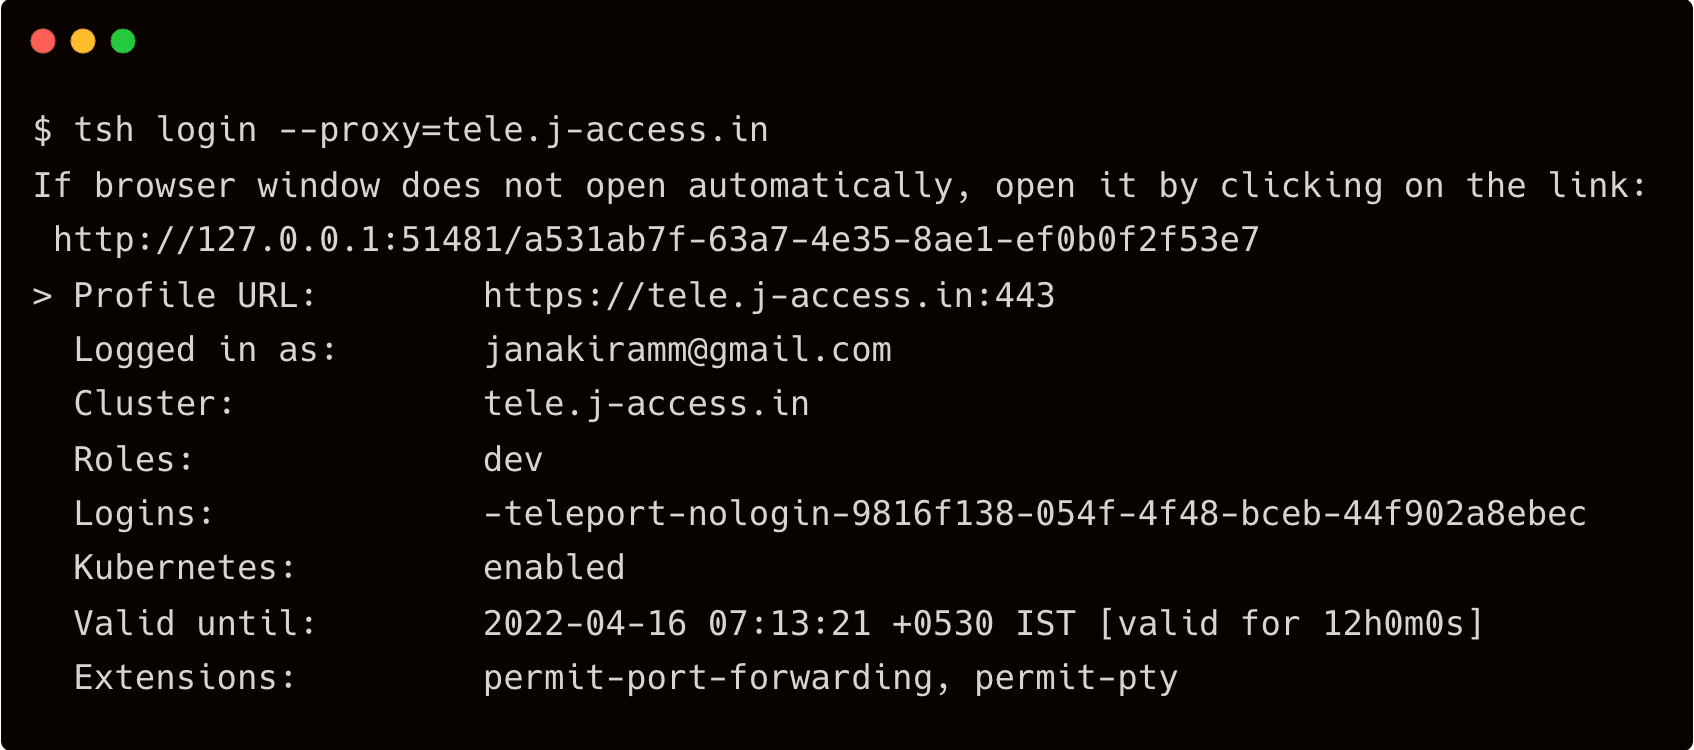
On the workstation, try to login to Teleport without mentioning the user or authentication type.
$ tsh login --proxy=tele.j-access.in
This opens the browser prompting the credentials of Okta user. Once signed in, the browser confirms that the login is successful.
Sign in as an Okta user belonging to the developer group.
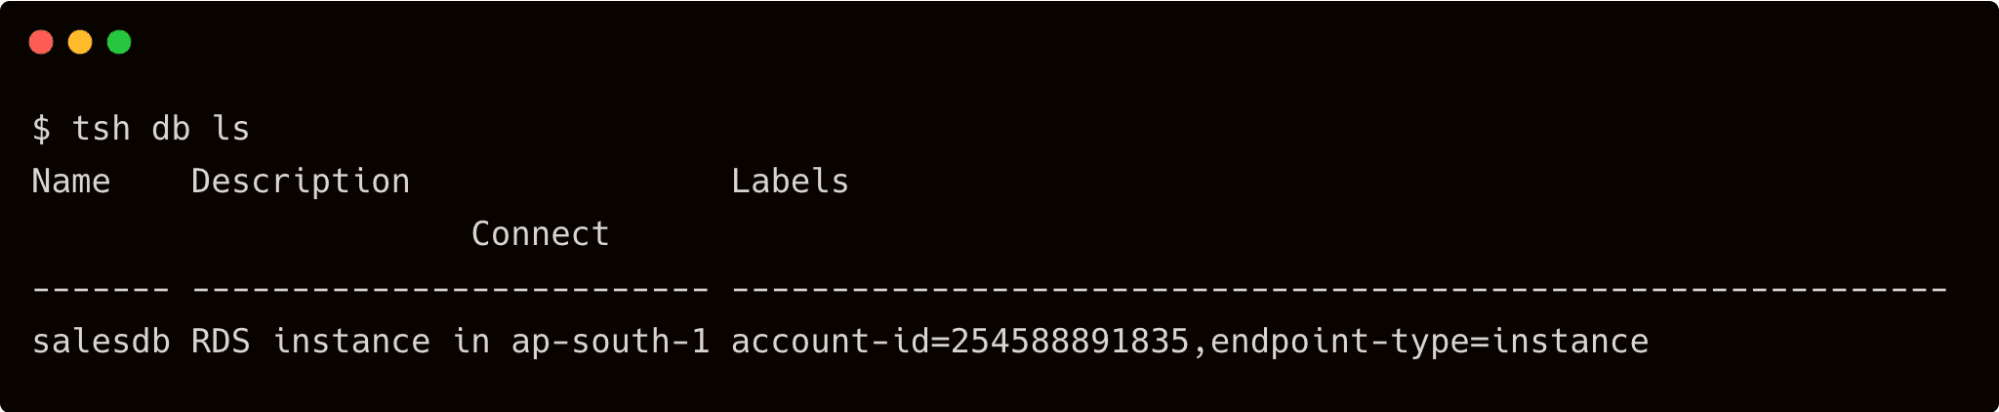
List the databases to see to check the visibility.
$ tsh db ls
Then, perform a login to view the connect command.
$ tsh db login salesdb

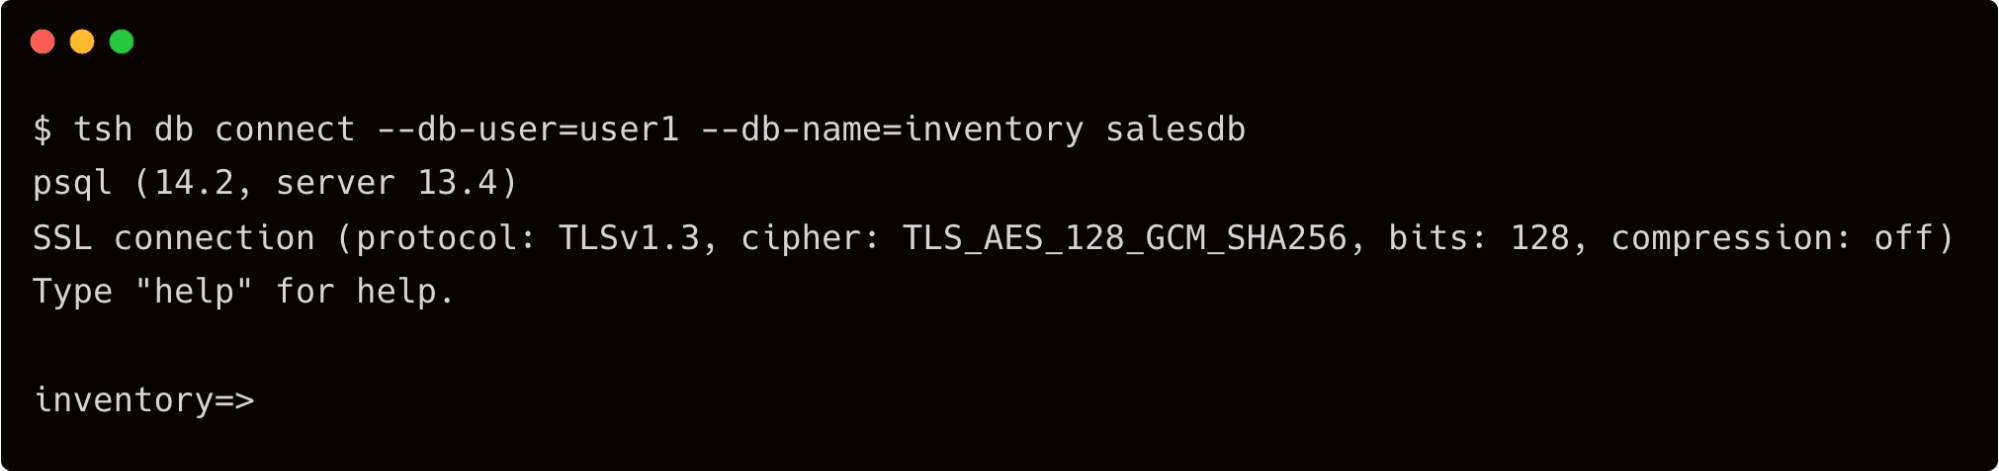
Let’s try to access the inventory database.
$ tsh db connect --db-user=user1 --db-name=inventory salesdb
Now, check if the user has access to the forecast database.
$ tsh db connect --db-user=user1 --db-name=forecast salesdb
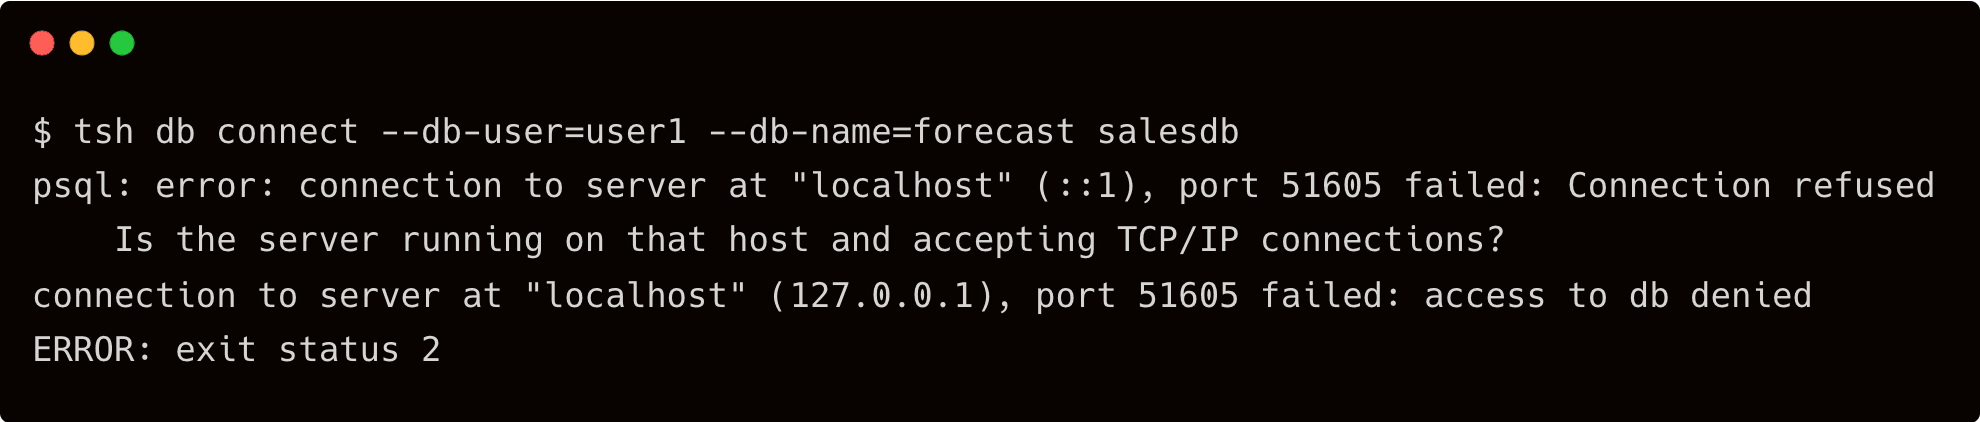
Since the RBAC policy prevents the user from the developer group from accessing the database, we get an error.
Repeat the steps by logging in as an Okta user from the DBA group. You should be able to access both databases.
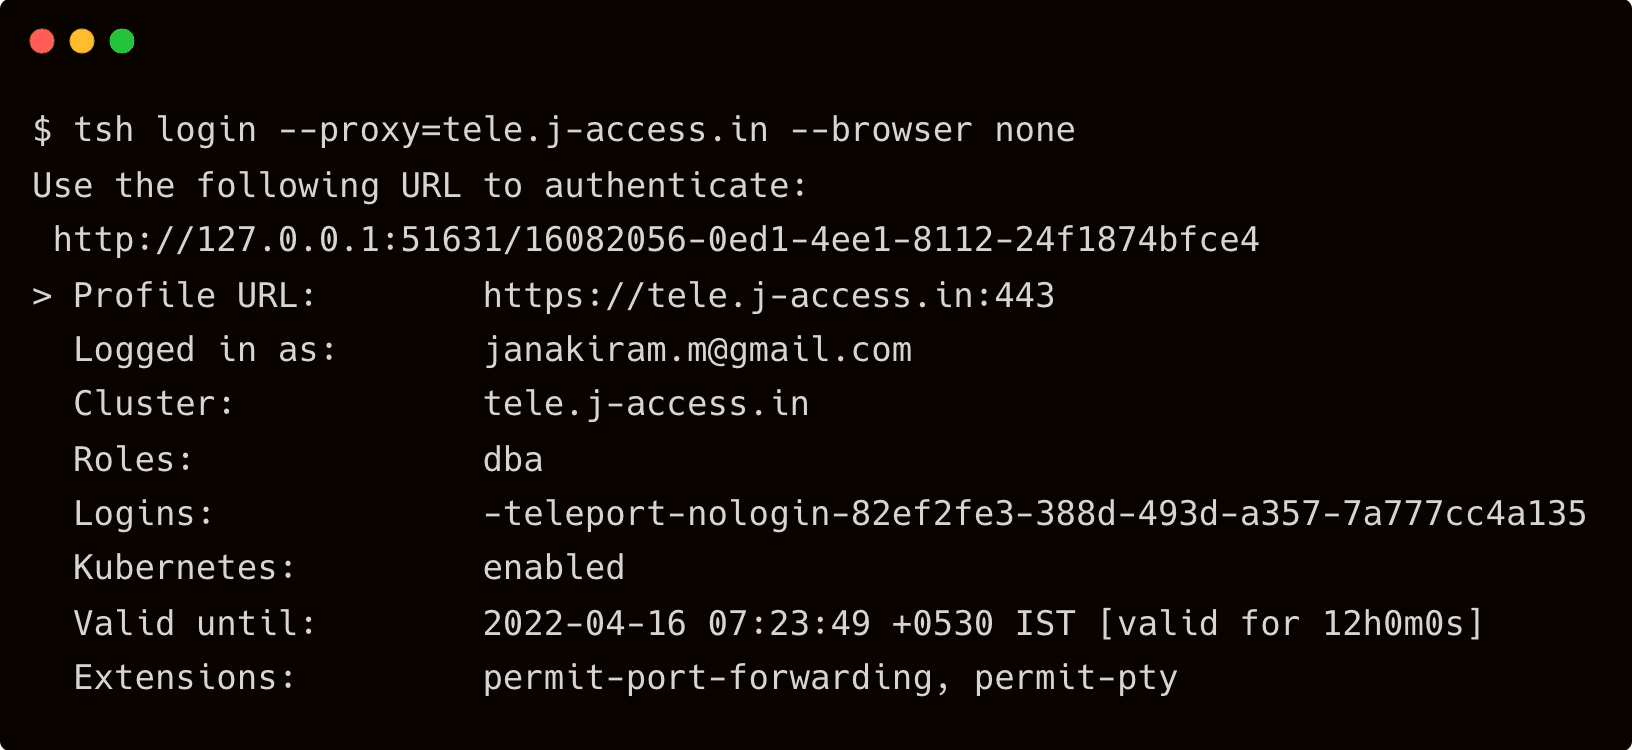
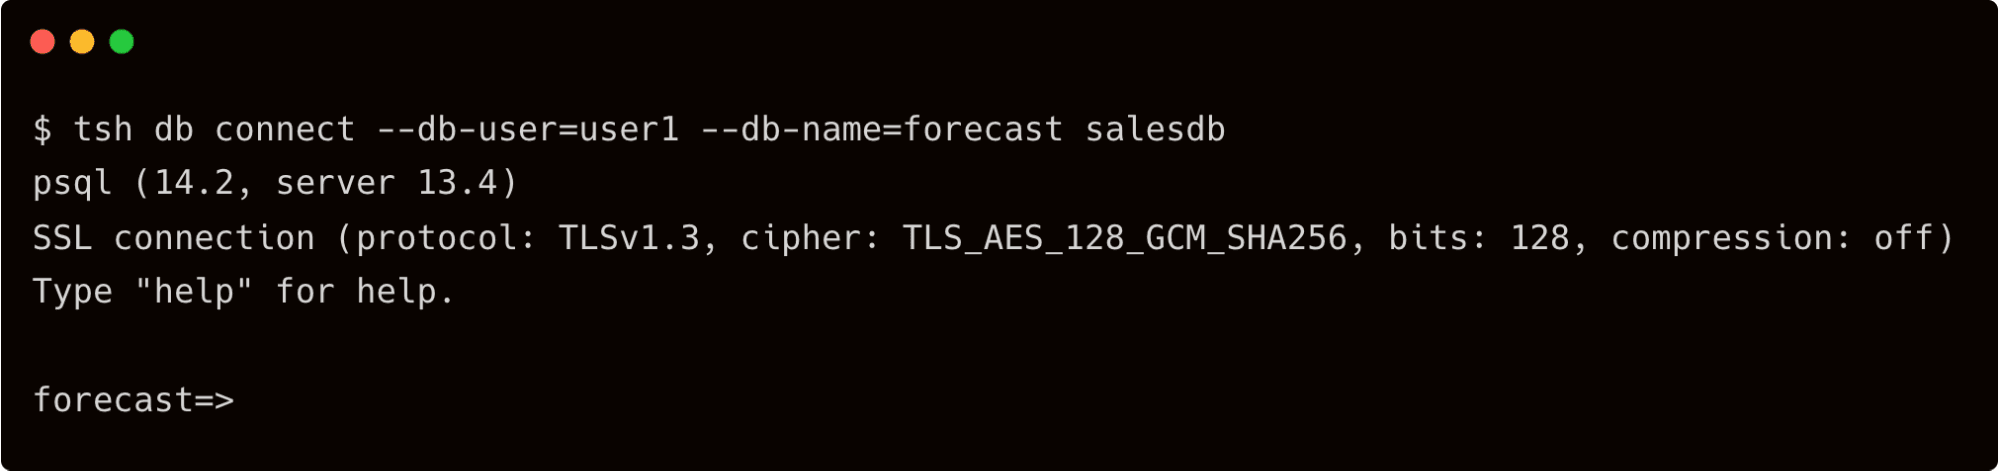
As we can see, the DBA Okta group mapped to the Teleport DBA role has access to all the databases with no restrictions.
Conclusion
This tutorial demonstrated how to leverage an SSO provider such as Okta to define fine-grained access policies through Teleport's RBAC. In this case, Okta works as an external identity provider (or user's identity source) for Teleport. With this setup, Okta users can be mapped with Teleport roles to access both as a one-to-one user and application mapping or with group membership in Okta. This mapping provides the ability to selectively provide access to specific databases available in Amazon RDS.
Sign up for Teleport Cloud today!
Teleport Cloud offers a fully managed Teleport cluster so that you can get started quickly. Join our Slack channel if you have any questions related to Teleport.
Table Of Contents
Teleport Newsletter
Stay up-to-date with the newest Teleport releases by subscribing to our monthly updates.
Tags
Tags
Teleport Newsletter
Stay up-to-date with the newest Teleport releases by subscribing to our monthly updates.