How to Configure SSO for AWS Resources with Okta and SAML

Table Of Contents
- Part 2: AWS single sign-on (SSO) with Okta, SAML, and Teleport
- Step 1 - Launching Amazon EC2 instances in VPC and installing Teleport Enterprise
- Step 2 - Configuring Okta as an identity provider for Teleport and AWS SSO
- Step 3 - Create Teleport SAML connector and roles
- Step 4 - Verifying SSH access with SSO and RBAC
- Conclusion
This blog is part of a series on how to provide identity-based access to AWS resources. In the first tutorial, we saw how to set up an identity-aware AWS bastion host using the OSS solution, Teleport. In this blog, we will expand the scenario to use a single-sign-on (SSO) authentication mechanism to issue certificates to specific groups of users to access AWS resources. This post will focus on SSO-based SSH access for AWS EC2 instances for demonstration purposes, but you can do the same things for many other AWS resource types like RDS instances, EKS clusters, Jenkins pipelines and even the AWS Console itself.
Single sign-on (SSO) makes both the administrator's and user's life easier with a single identity to access resources across business applications and infrastructure. The challenge, however, remains in mapping the organization's role (e.g., marketing, sales, developer) with infrastructure roles (e.g., Linux user roles, database roles, Kubernetes cluster roles). This blog post will show how to use Teleport to map an organizational identity and role in Okta to specific AWS resources, allowing fine-grained access policies. With Teleport's SAML connector for SSO, we can map the users and groups managed by an SSO provider such as Okta with the infrastructure resources; for example, an actual Linux user to allow or restrict SSH sessions of one or more EC2 instances. Because Teleport supports access controls for AWS services such as EC2, RDS, Redshift, Aurora and EKS, you can manage fine-grained access for all your AWS resources in one place, even if you use multiple AWS accounts.
Part 2: AWS single sign-on (SSO) with Okta, SAML, and Teleport
Let’s take a look at the real-world scenario — an AWS customer runs their production deployment in a VPC where everything except the public-facing instances are provisioned within a private subnet.
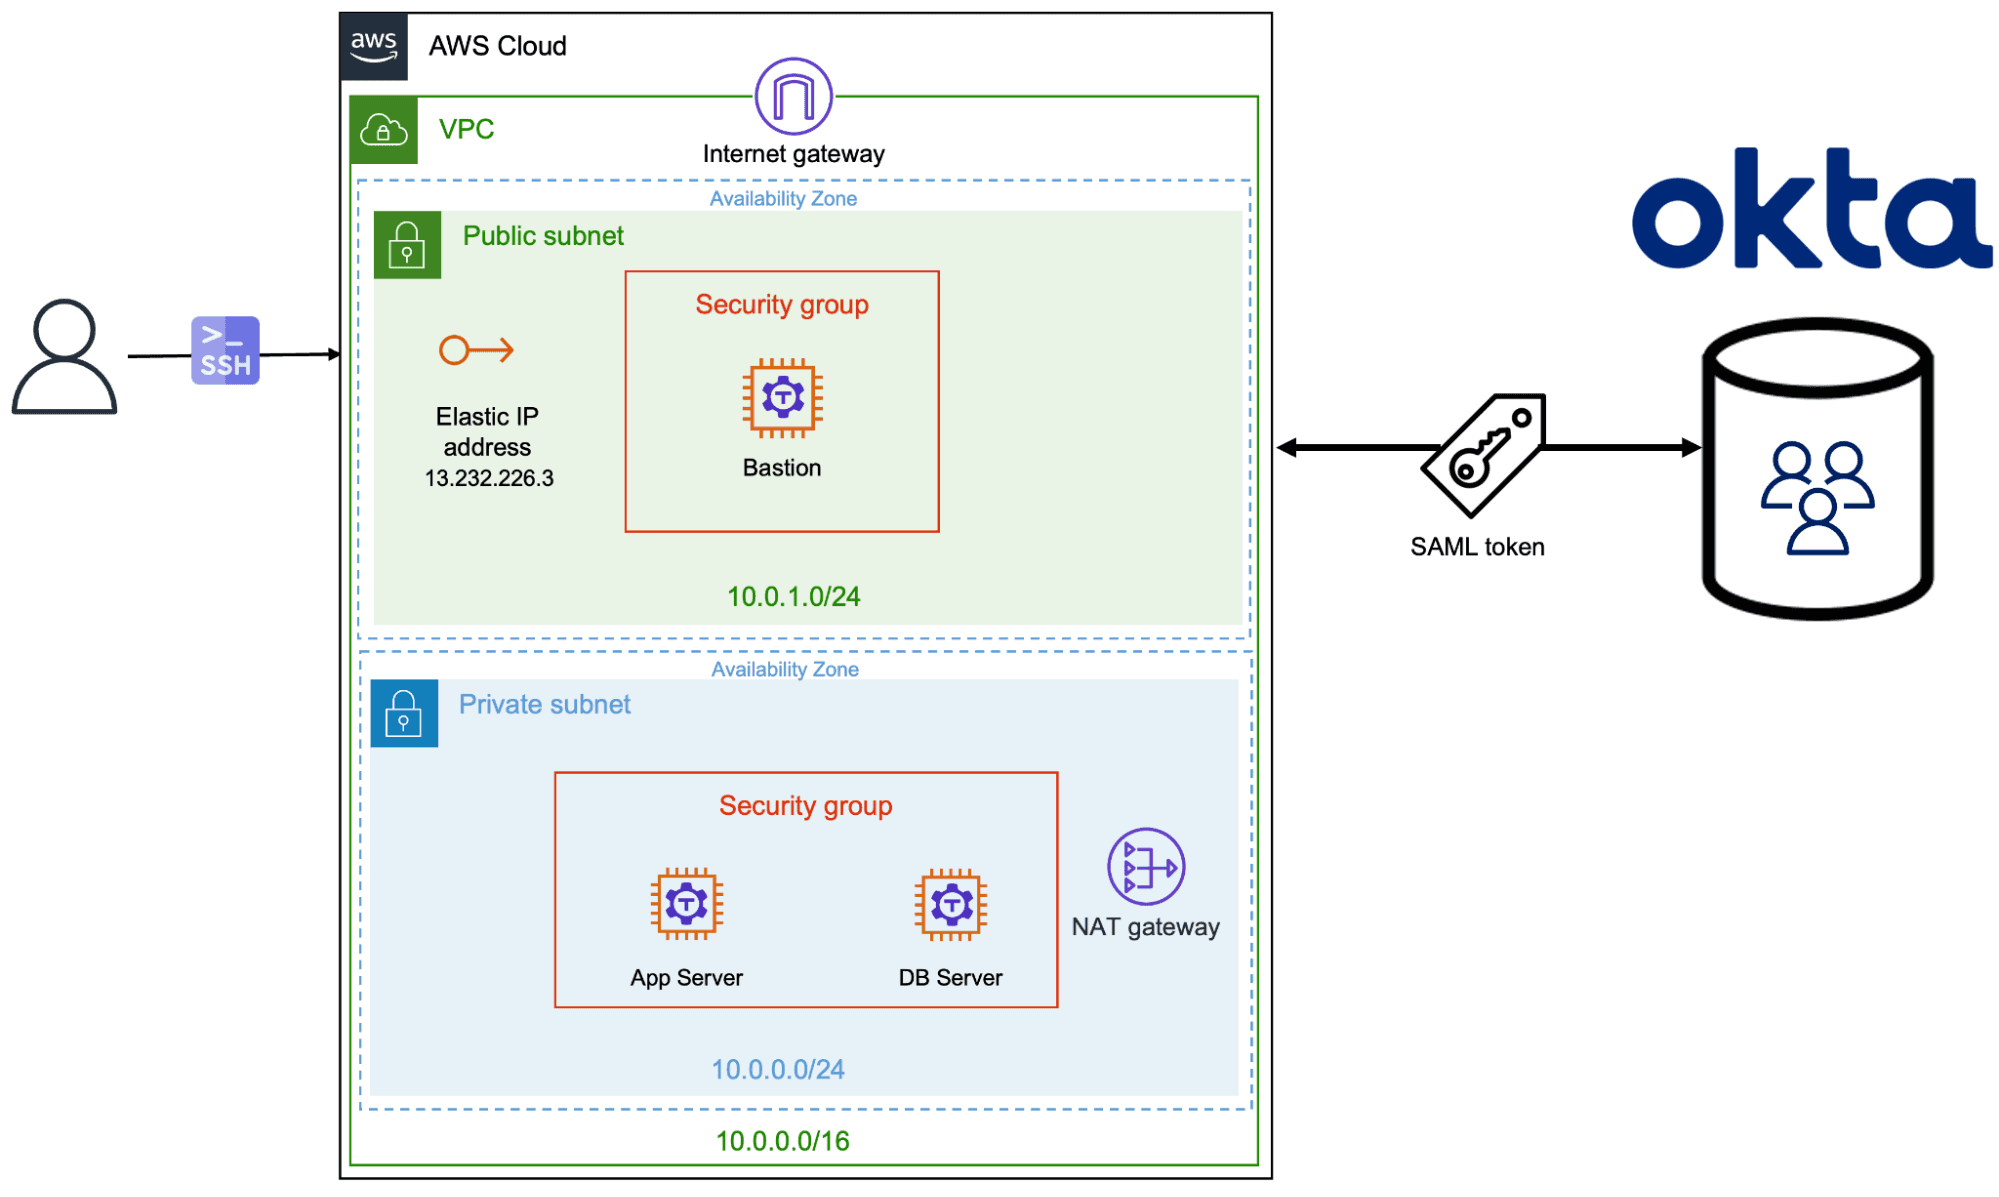
For SSO, the customer uses Okta where the users and groups are centrally managed. There are two groups in Okta: developers and DBAs. The IT team wants to allow only the users belonging to the developer’s Okta group to SSH into the EC2 instances used for application servers. Similarly, only users from the DBA group should be able to SSH into EC2 instances used for database servers. Access must be denied to any user outside of the allowed group.
We will go through the steps necessary to implement this scenario. The prerequisites are:
- AWS Account
- AWS CLI
- DNS Service
- Teleport Enterprise (sign up for a free trial here)
Since this tutorial builds upon the previous scenario of setting up Teleport as an AWS bastion host, please take a look at the steps involved in provisioning the AWS infrastructure including the VPC, security groups, Internet gateway, NAT gateway and routing tables.
Step 1 - Launching Amazon EC2 instances in VPC and installing Teleport Enterprise
Let’s launch three Ubuntu 20.04 instances — the bastion host in the public subnet and the application server and database server in the private subnet.
Launch bastion host
$ aws ec2 run-instances \
    --image-id ami-0851b76e8b1bce90b \
    --count 1 \
    --instance-type t3.xlarge \
    --key-name teleport-demo \
    --security-group-ids sg-082fcb3e66852ea15 \
    --subnet-id subnet-085a3239ee0f9a889 \
    --tag-specifications \
    'ResourceType=instance,Tags=[{Key=Name,Value=Teleport-Proxy}]'
Associate Elastic IP with bastion host
$ aws ec2 associate-address \
    --instance-id i-09e87b2bf7517f1f2 \
    --allocation-id eipalloc-0d7a8e091e6b196c7
Launch app server instance in the private subnet
$ aws ec2 run-instances \
    --image-id ami-0851b76e8b1bce90b \
    --count 1 \
    --instance-type t3.xlarge \
    --key-name teleport-demo \
    --security-group-ids sg-0e50c97f60606e1da \
    --subnet-id subnet-0ac3d4cbe674e87be \
    --tag-specifications \
    'ResourceType=instance,Tags=[{Key=Name,Value=AppServer}]'
Launch DB server instance in the private subnet
$ aws ec2 run-instances \
    --image-id ami-0851b76e8b1bce90b \
    --count 1 \
    --instance-type t3.xlarge \
    --key-name teleport-demo \
    --security-group-ids sg-0e50c97f60606e1da \
    --subnet-id subnet-0ac3d4cbe674e87be \
    --tag-specifications \
    'ResourceType=instance,Tags=[{Key=Name,Value=DBServer}]'
Replace the AMI ID and other resource identifiers with appropriate values from your environment (can be taken from AWS Management Console as shown in the image below).
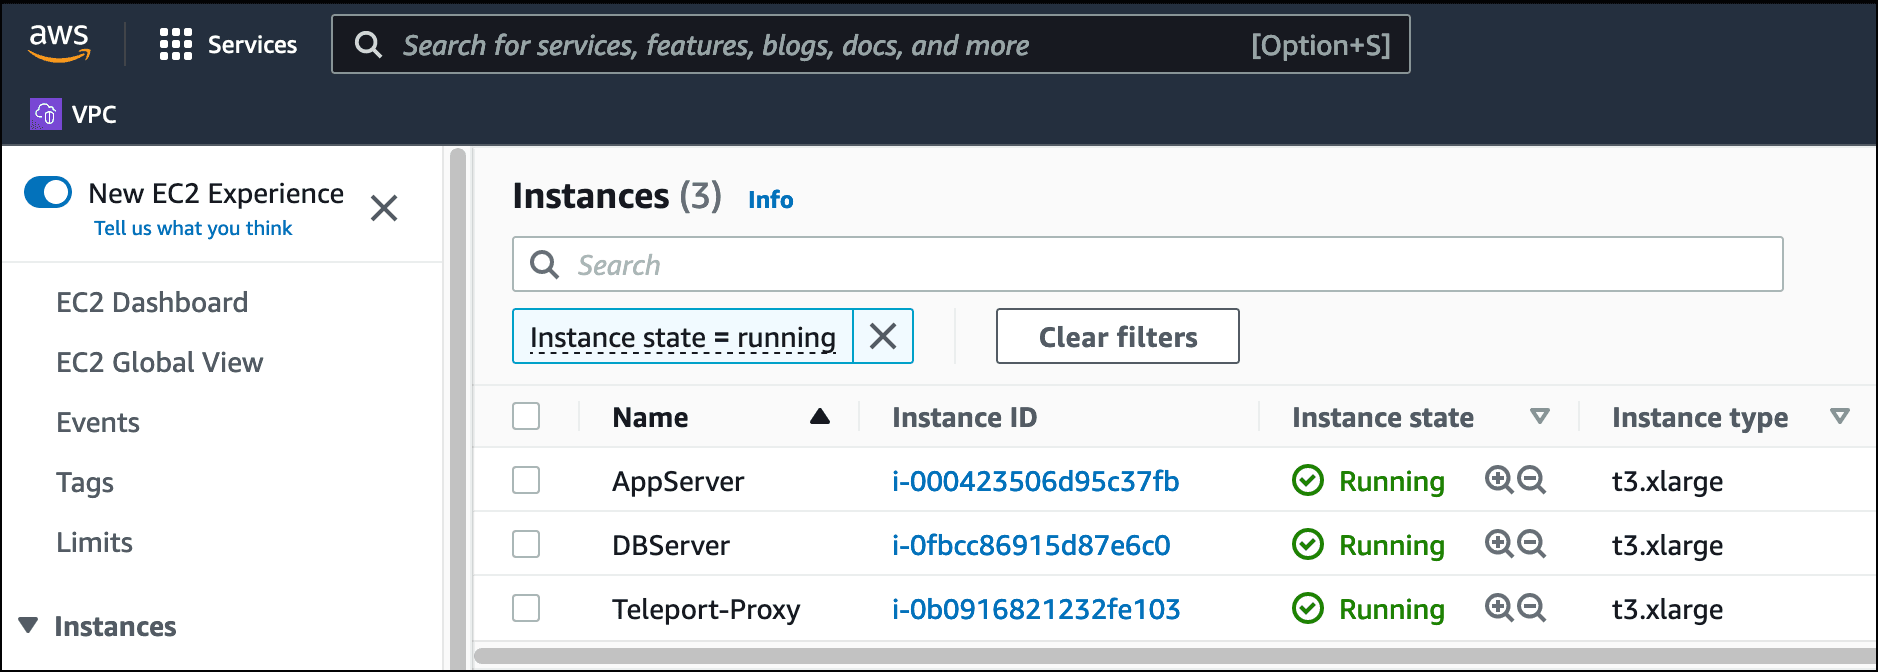
Below is a summary of the EC2 instances, their role and IP address:
| EC2 Instance | Role | IP Address / DNS Name |
|---|---|---|
| AppServer | Acts as the application server | 10.0.0.98 |
| DBServer | Acts as the database server | 10.0.0.213 |
| Teleport-Proxy | Acts as a secure bastion host | tele.j-access.in |
For the next step, you will need to have access to the customer portal to download Teleport Enterprise binaries and the license.
For a quick start, we recommend to try Teleport Cloud — Teleport’s managed access platform hosted for you. It’s free to start — give it a try!
Let’s start with Teleport proxy. Copy the license file downloaded from the customer portal to /var/lib/teleport/license.pem on the bastion host.
SSH into the bastion host, and run the below commands to install and start Teleport Enterprise.
$ tar xvf teleport-ent-v8.3.1-linux-amd64-bin.tar.gz
$ sudo teleport-ent/install
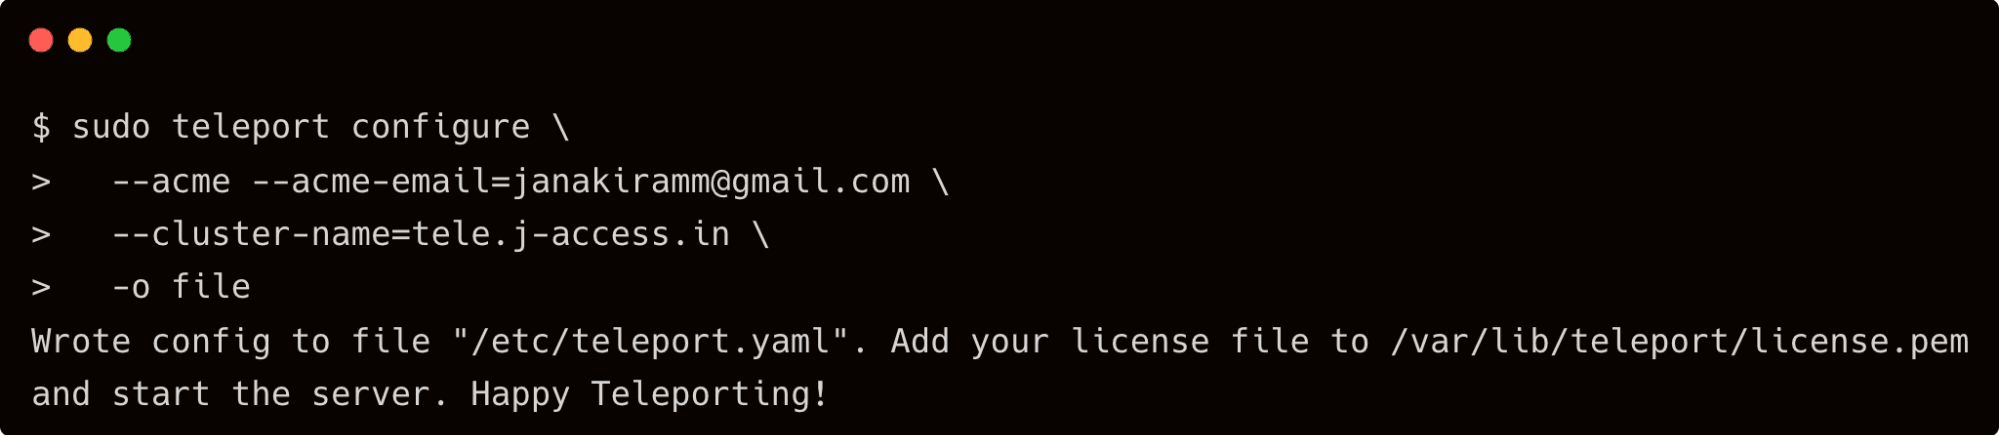
$ sudo teleport configure \
--acme [email protected] \
--cluster-name=tele.j-access.in \
-o file
$ sudo teleport start --labels=name=teleport-proxy
While Teleport is running on the bastion, start another SSH session to generate the token needed to join the nodes. Save the token to a secure location which is needed in the next step.
$ sudo tctl tokens add --type=node
SSH into the instances running in the private subnet through the bastion. Download Teleport binaries and run the below commands to join the application server (10.0.0.98) and database server (10.0.0.213). To easily identify the role of each server, we will pass the –nodename switch to the Teleport command line. This lets us override the hostname assigned by EC2 with a descriptive identifier.
$ sudo teleport start \
   --roles=node \
   --token=63e27547a6c29f0f7e076d34c7925aca \
   --auth-server=tele.j-access.in:443 \
   --nodename=appserver \
   --labels=name=appserver

$ sudo teleport start \
   --roles=node \
   --token=63e27547a6c29f0f7e076d34c7925aca \
   --auth-server=tele.j-access.in:443 \
   --nodename=dbserver \
   --labels=name=dbserver
Verify that the nodes are added to the Teleport cluster by running the following command on the bastion:
$ sudo tctl nodes ls
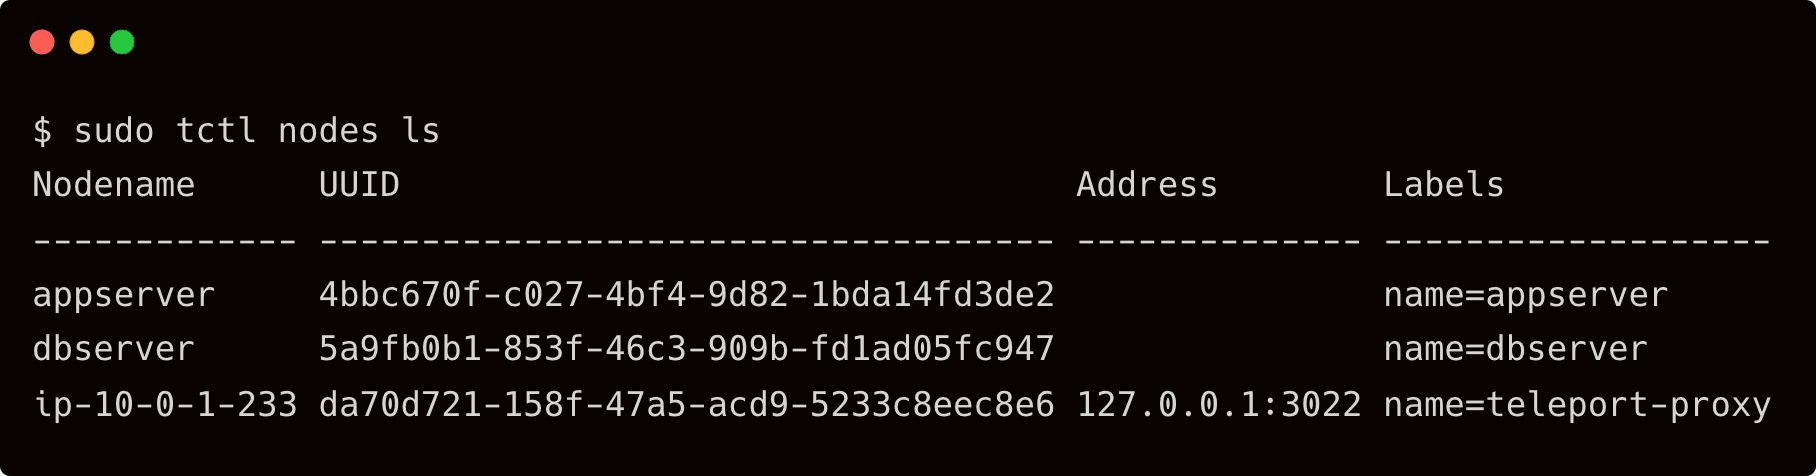
It’s important to note that the servers are associated with an arbitrary label, node=role, which is needed for configuring RBAC in the later sections of this tutorial.
Before moving onto the next step, let’s add a user with the roles editor and access to Teleport, which comes in handy when applying the configuration.
$ sudo tctl users add tele-admin --roles=editor,access --logins=root,ubuntu
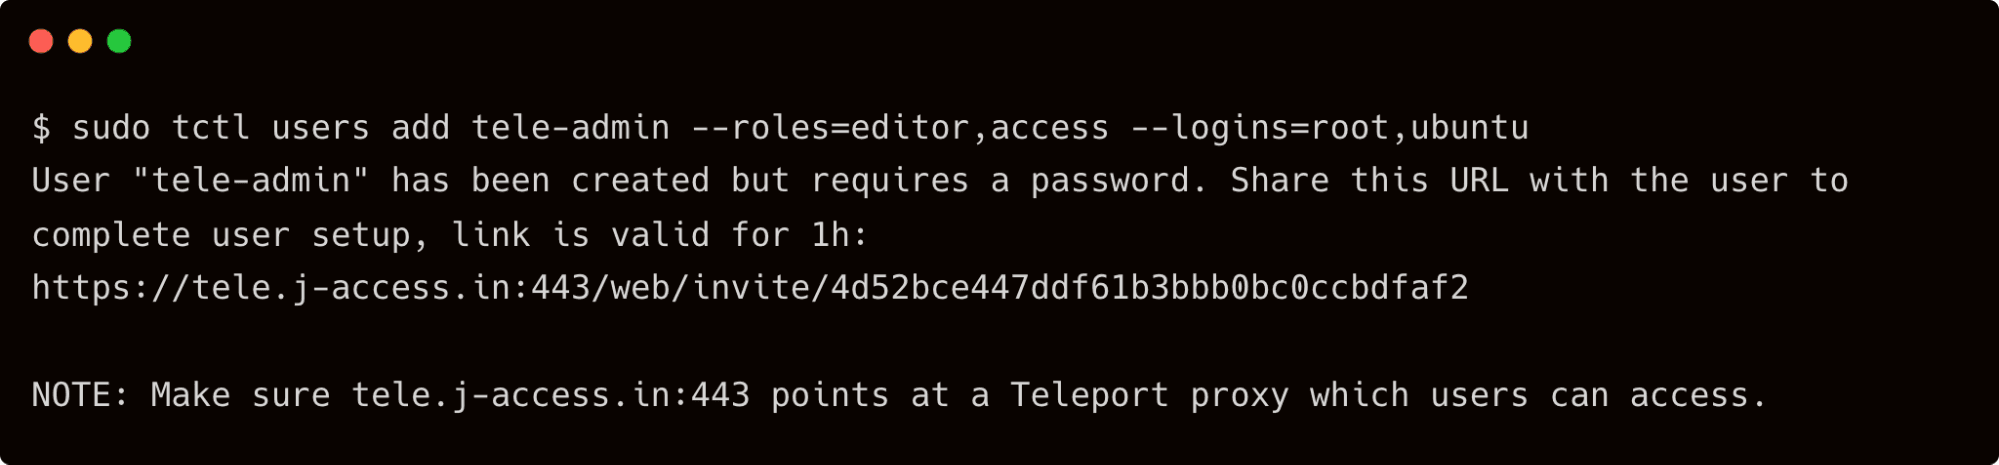
Complete the signup process by visiting the link shown in the output of the above command.
We will configure users, roles and an application in Okta in the next step.
Step 2 - Configuring Okta as an identity provider for Teleport and AWS SSO
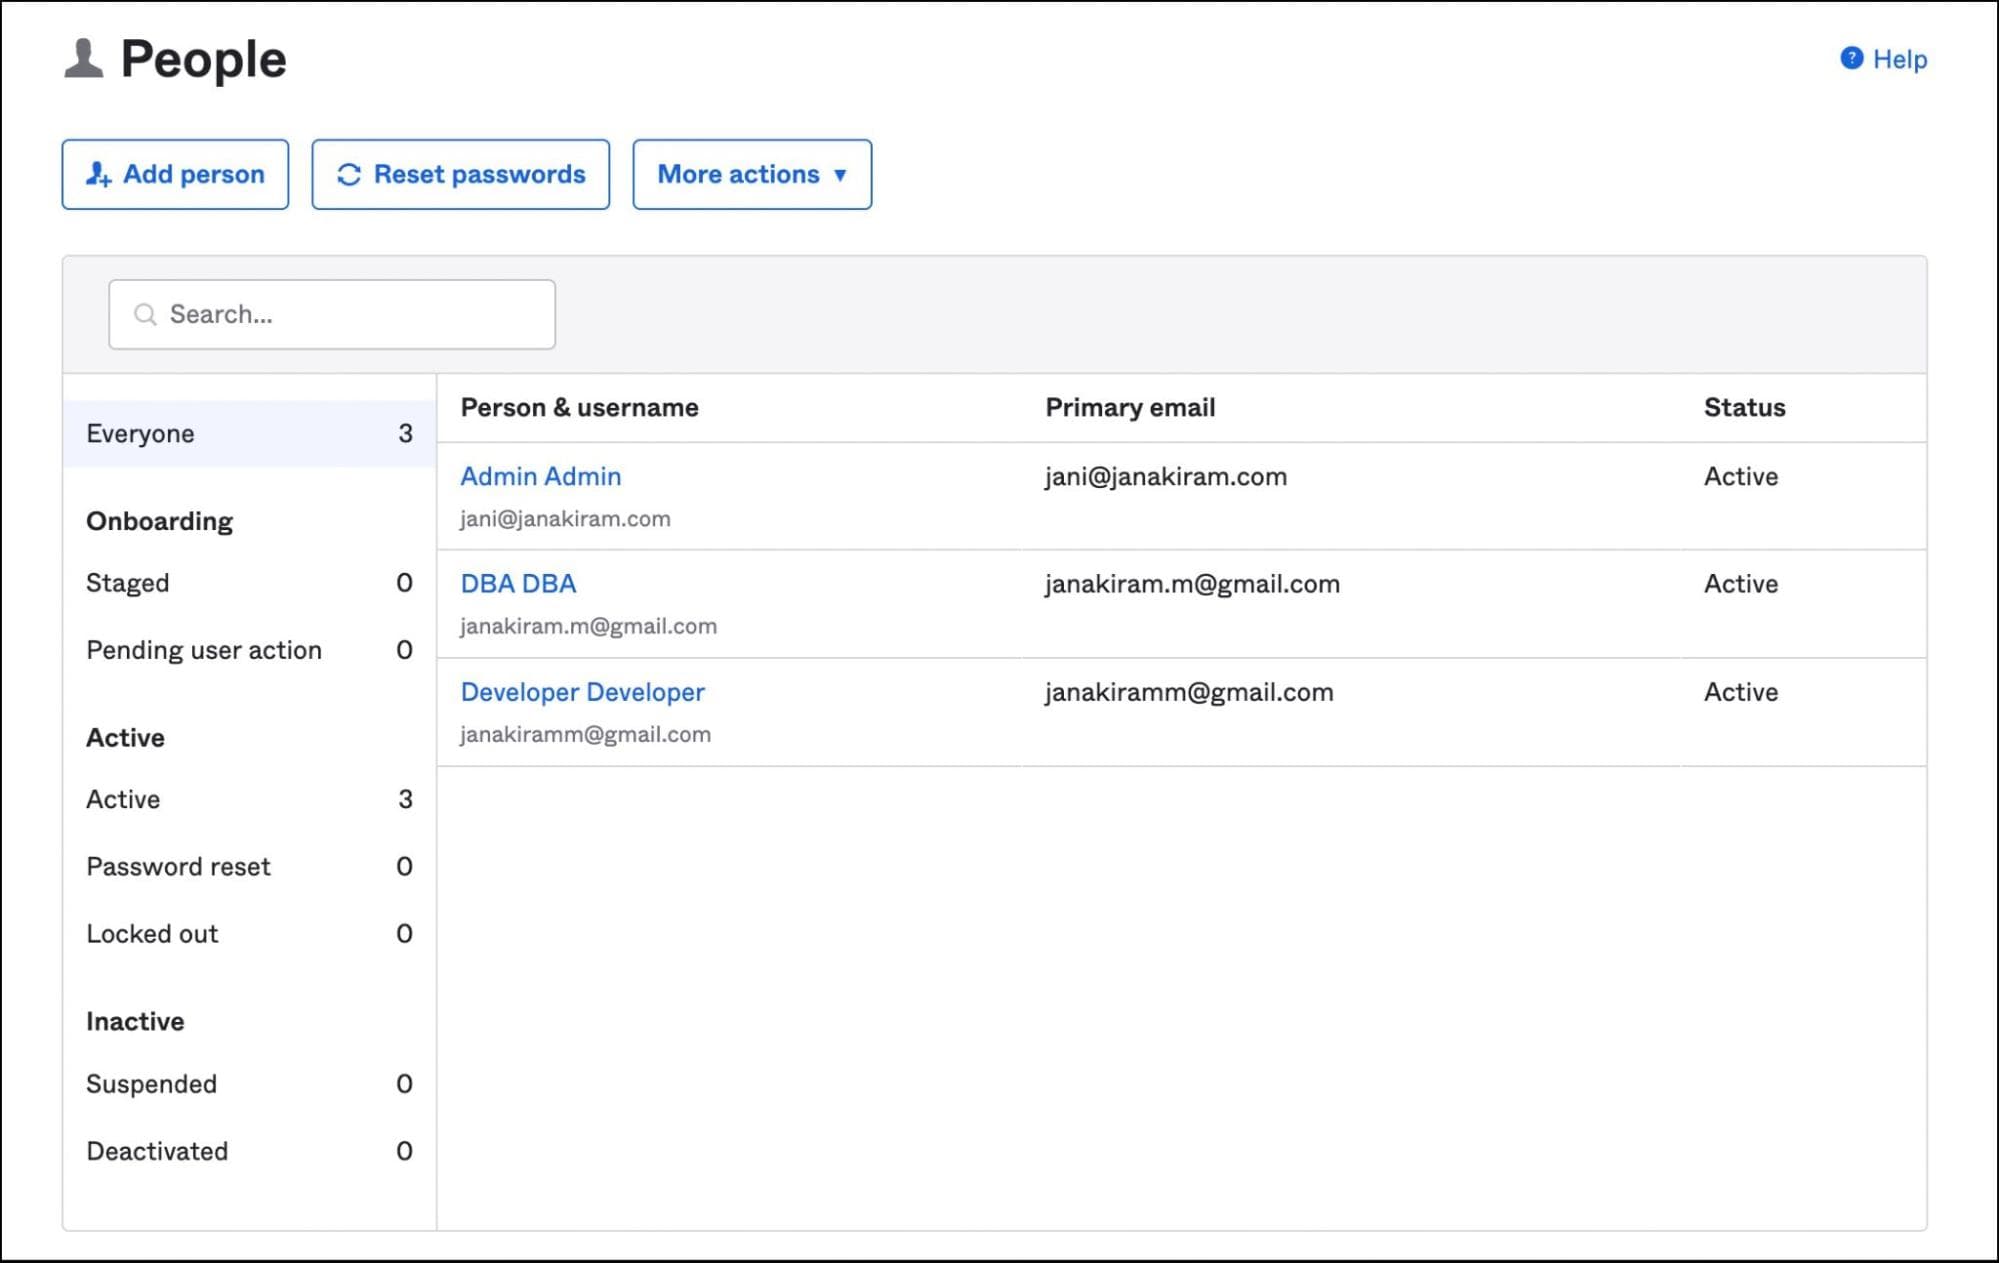
Visit the Admin dashboard in Okta to create users and groups.
Create three users — Admin, Developer, and DBA with an associated email address.
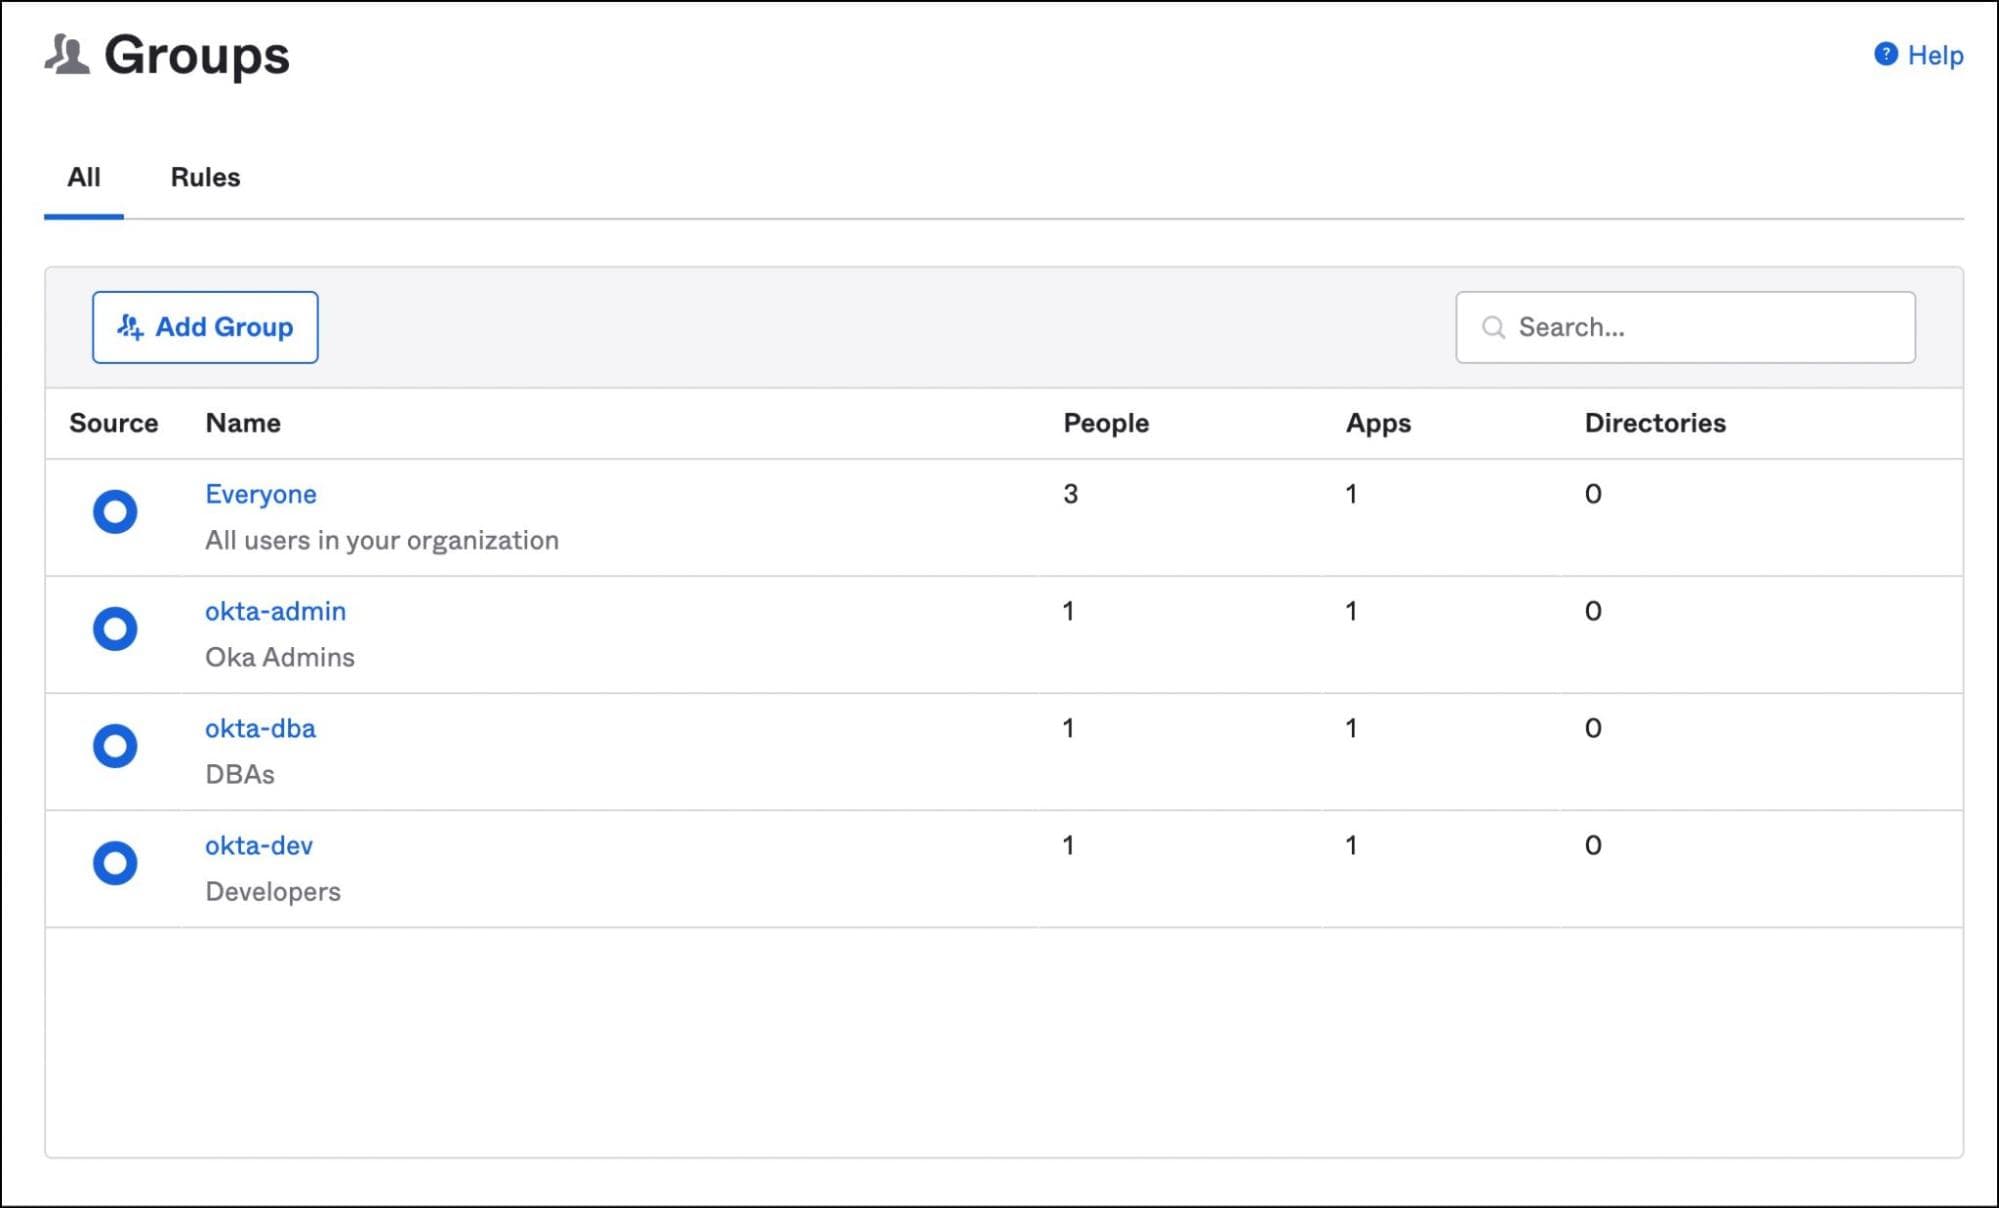
Create three groups - okta-admin, okta-developer, and okta-dba. Add the users created above to each of these groups.
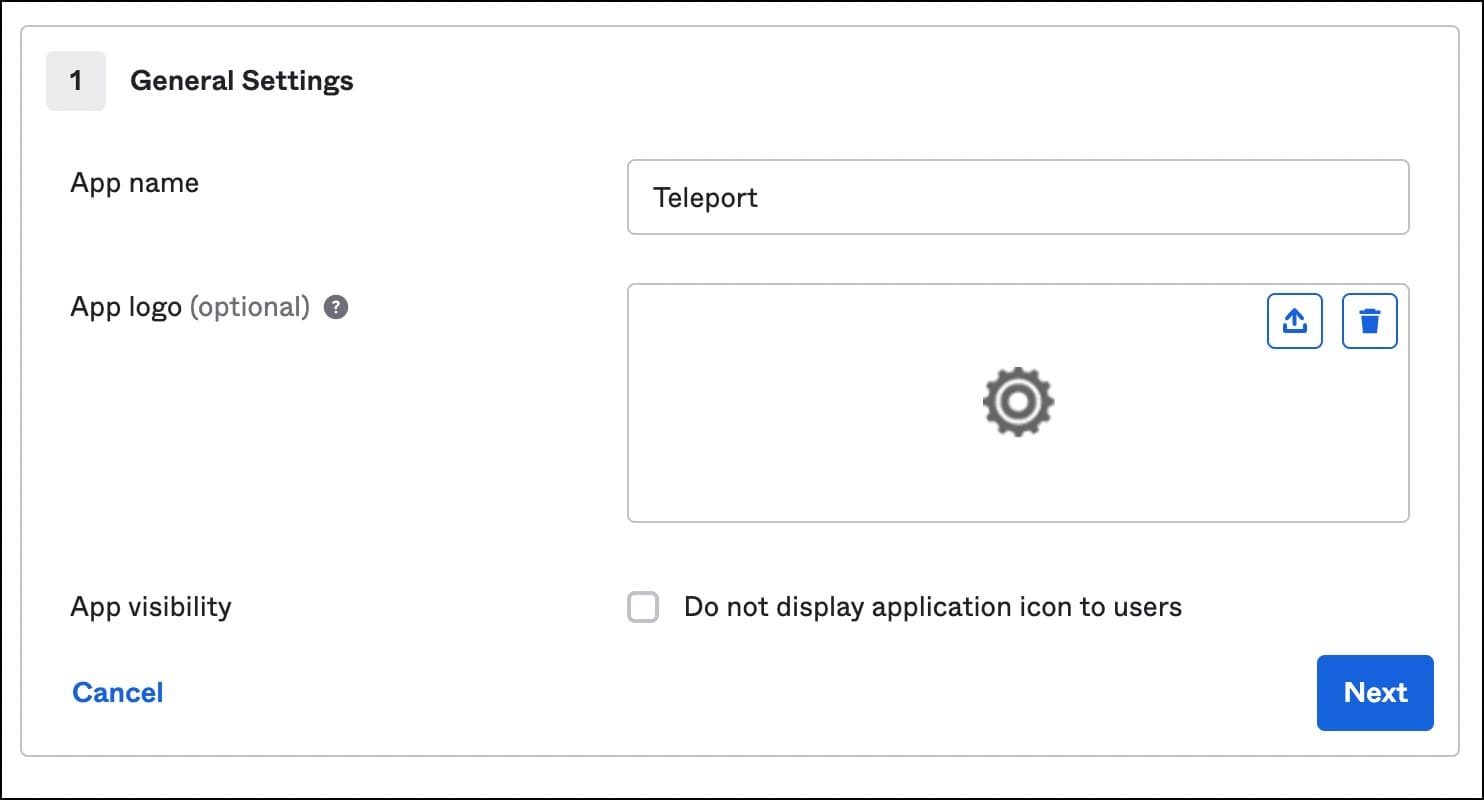
Under applications, click on app integration and choose SAML 2.0.
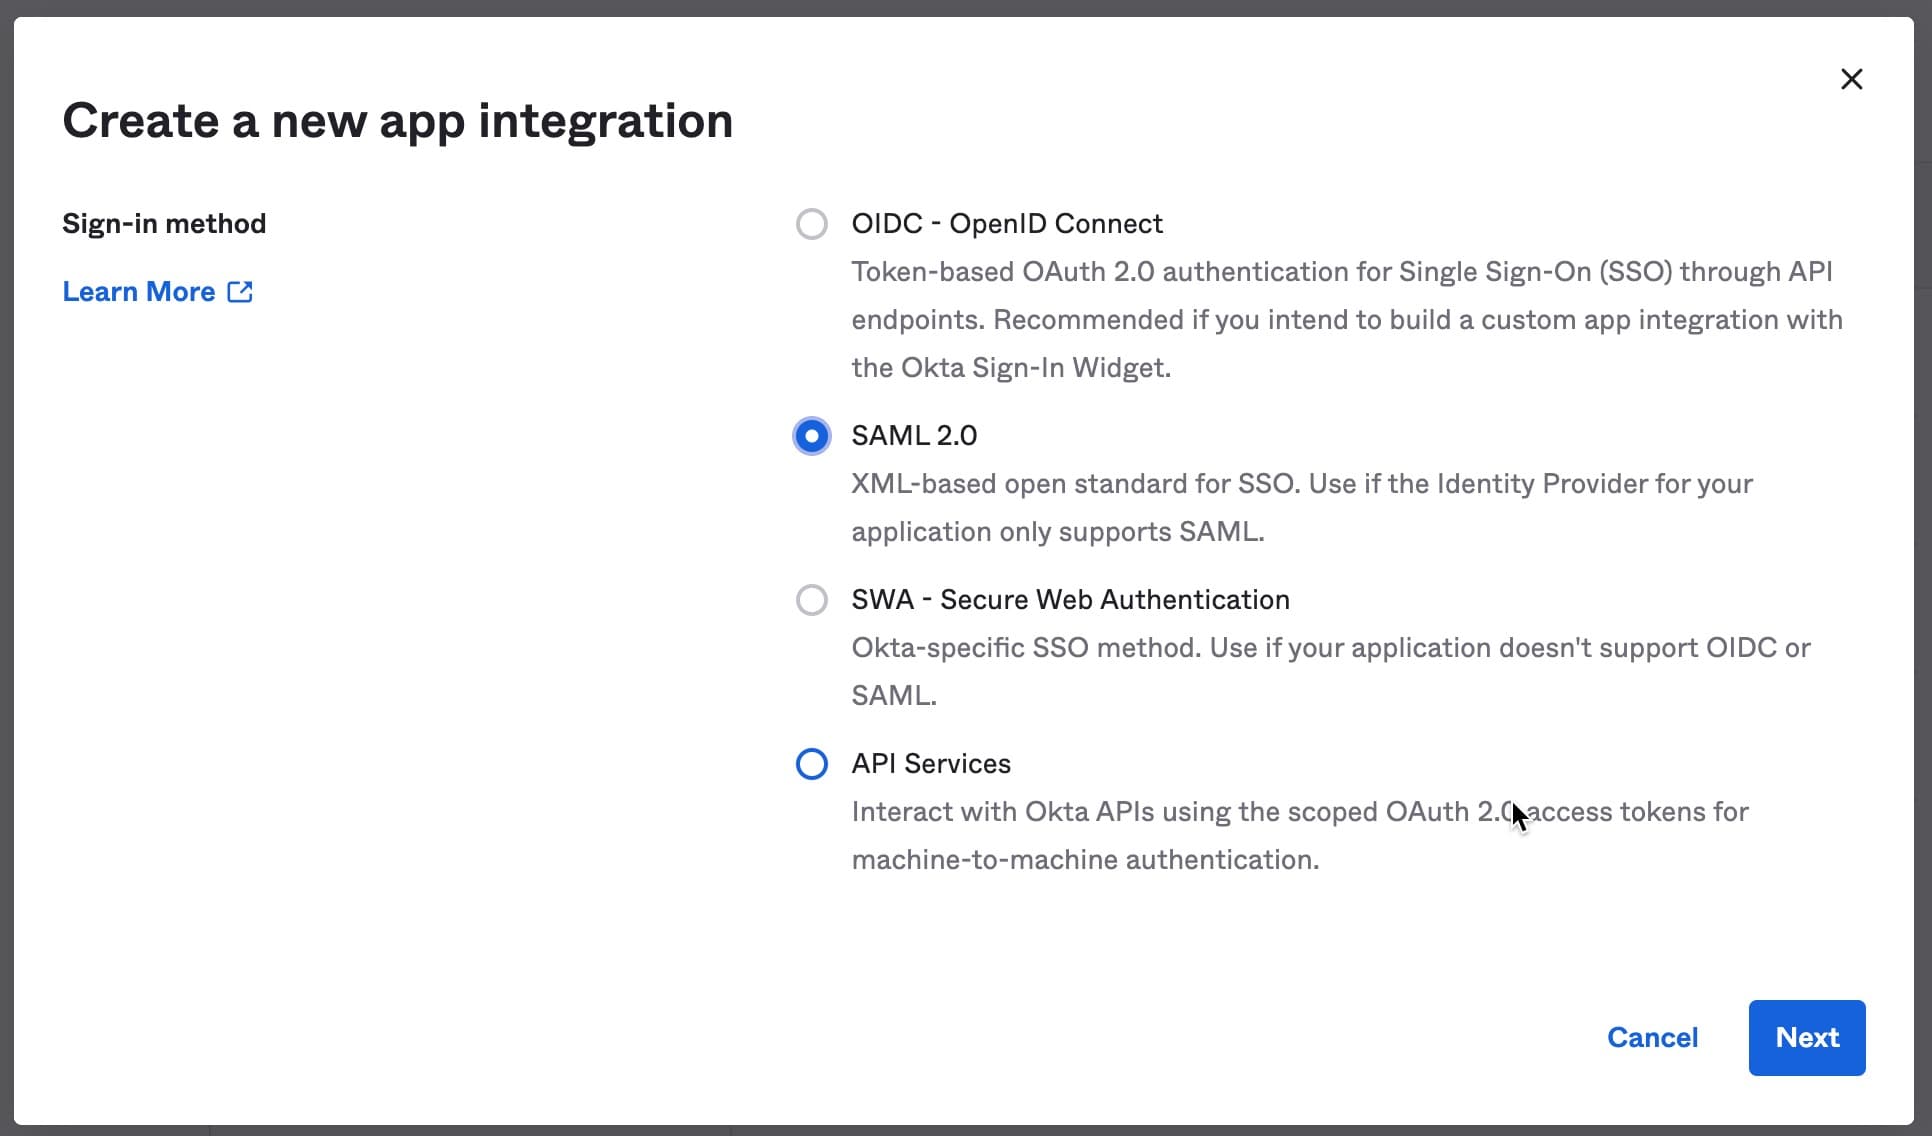
Give a name to the app and click next.
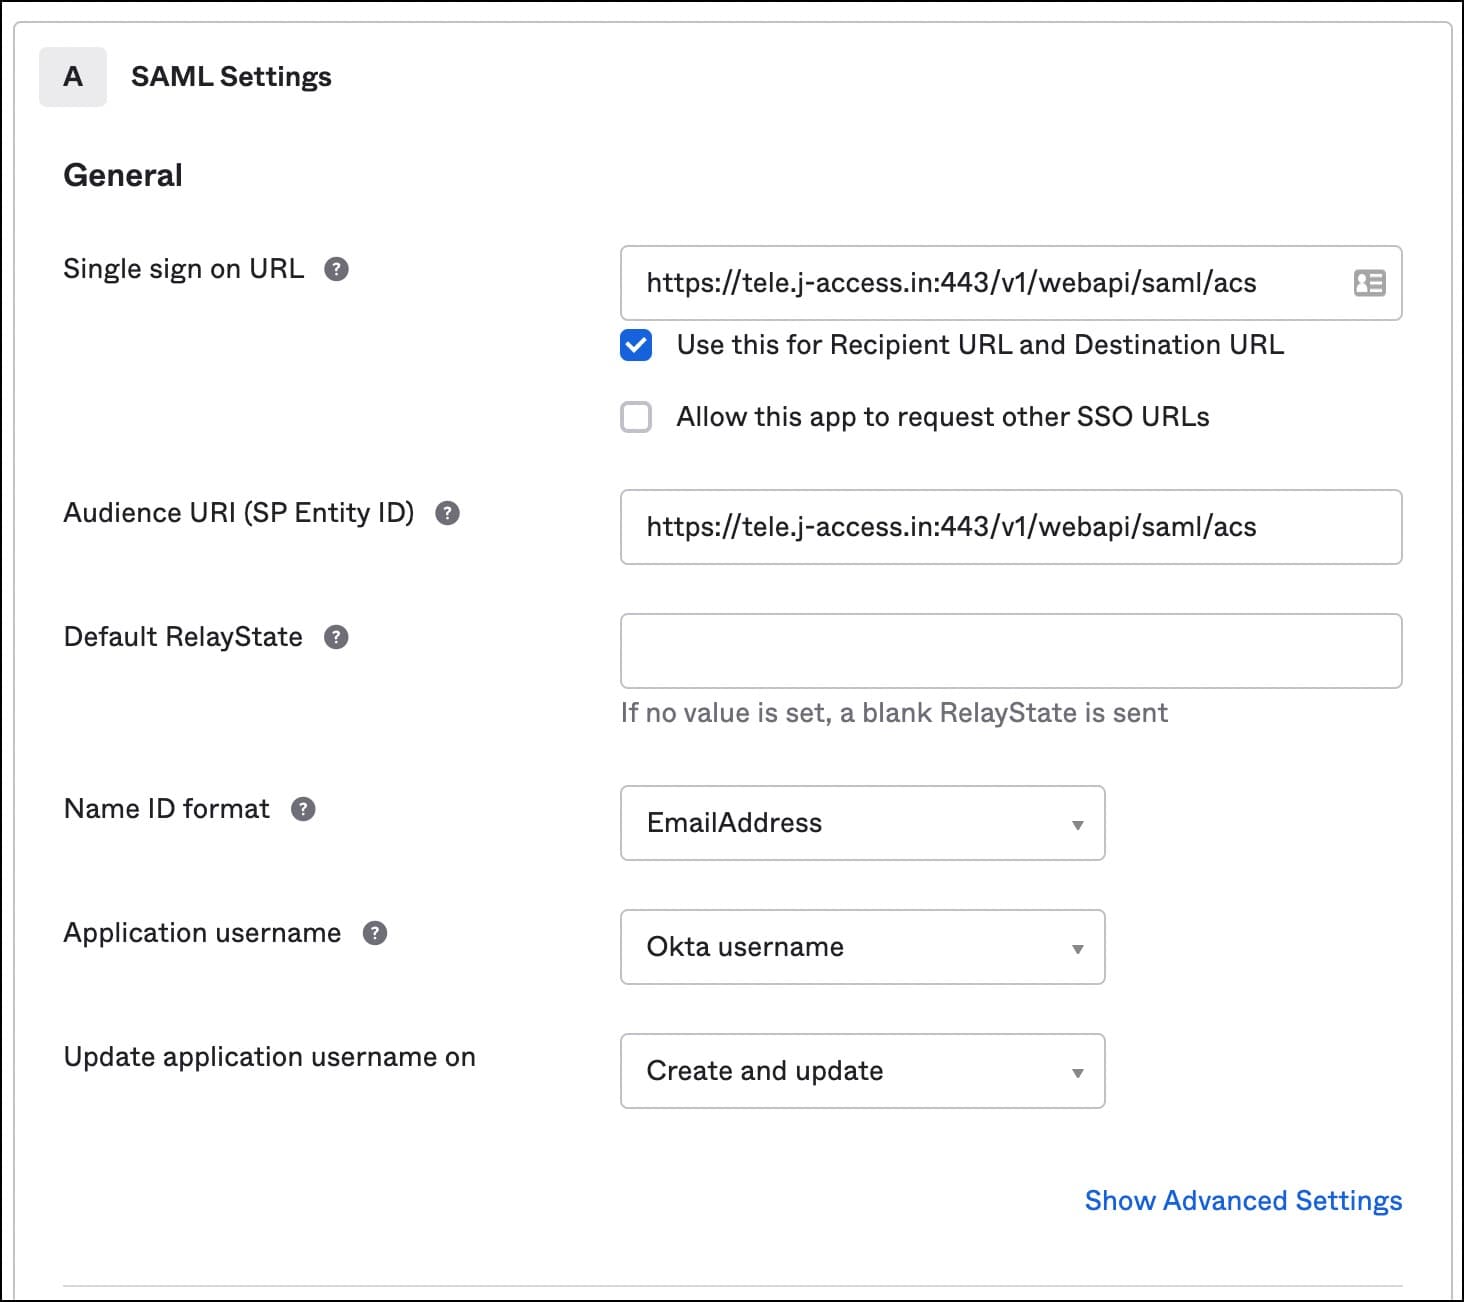
Use the below values for SAML settings:
- Single sign-on URL:
https://tele.j-access.in:443/v1/webapi/saml/acs - Audience URI:
https://tele.j-access.in:443/v1/webapi/saml/acs - Name ID format:
EmailAddress - Application username:
Okta username
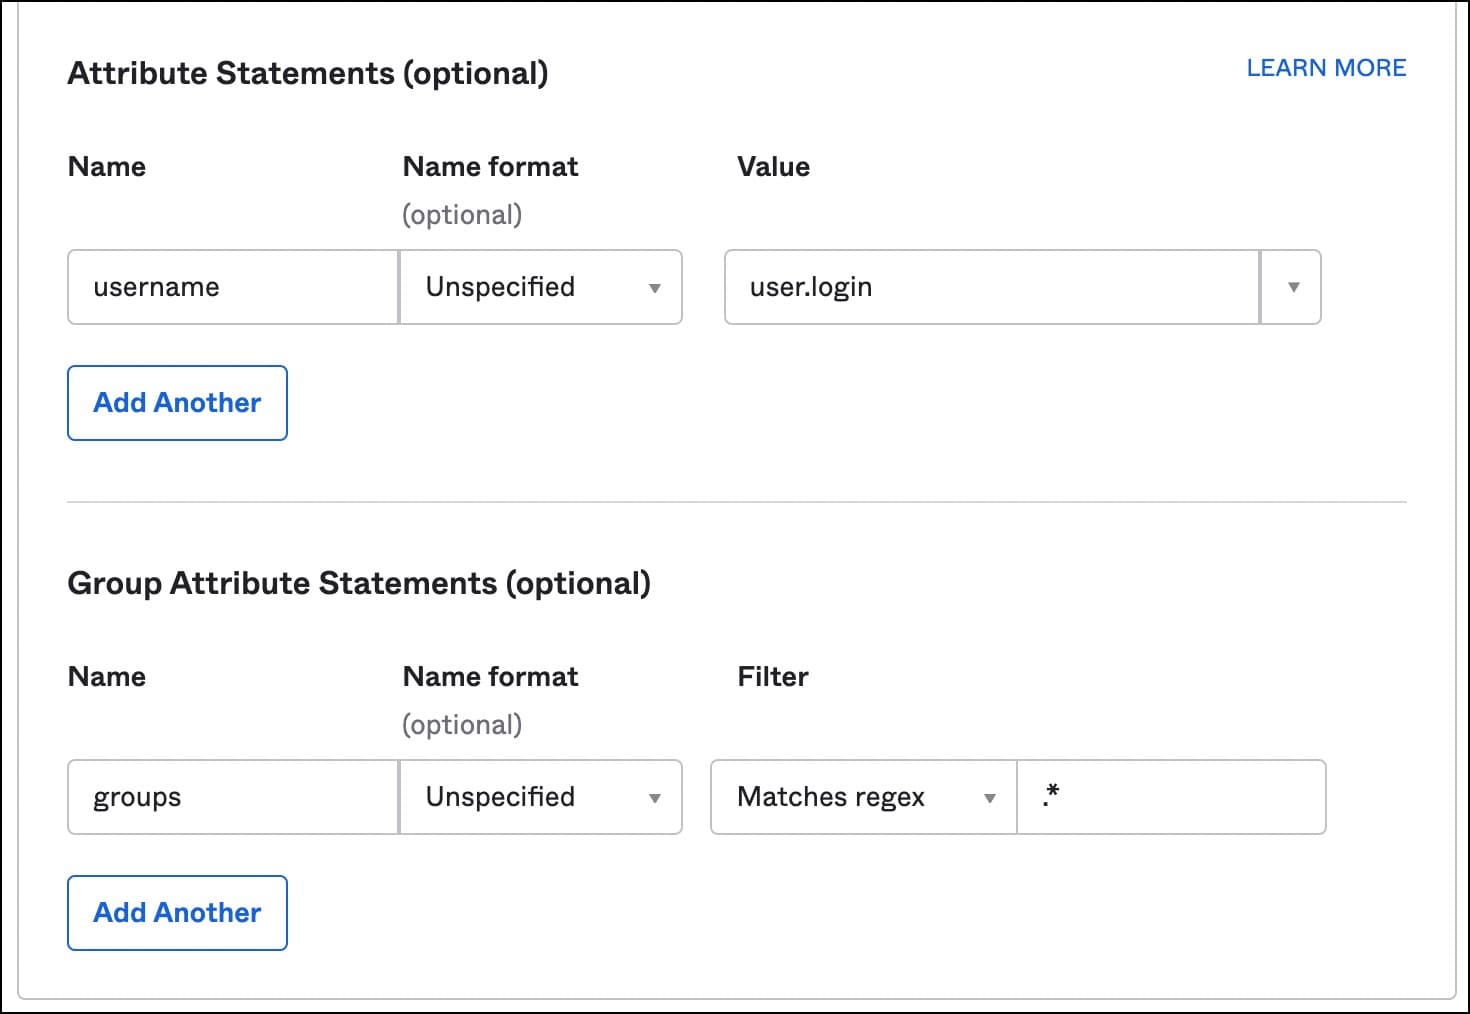
For the attribute statements, provide the below values:
For Single Attribute Statements:
- Name:
username - Name format:
Unspecified - Value:
user.login
For Group Attribute Statements:
- Name:
groups - Name format:
Unspecified - Filter:
Matches regex | .*
Make sure you have exactly the same values shown in the above screenshot before going further. These settings are critical for Teleport’s SAML integration with Okta.
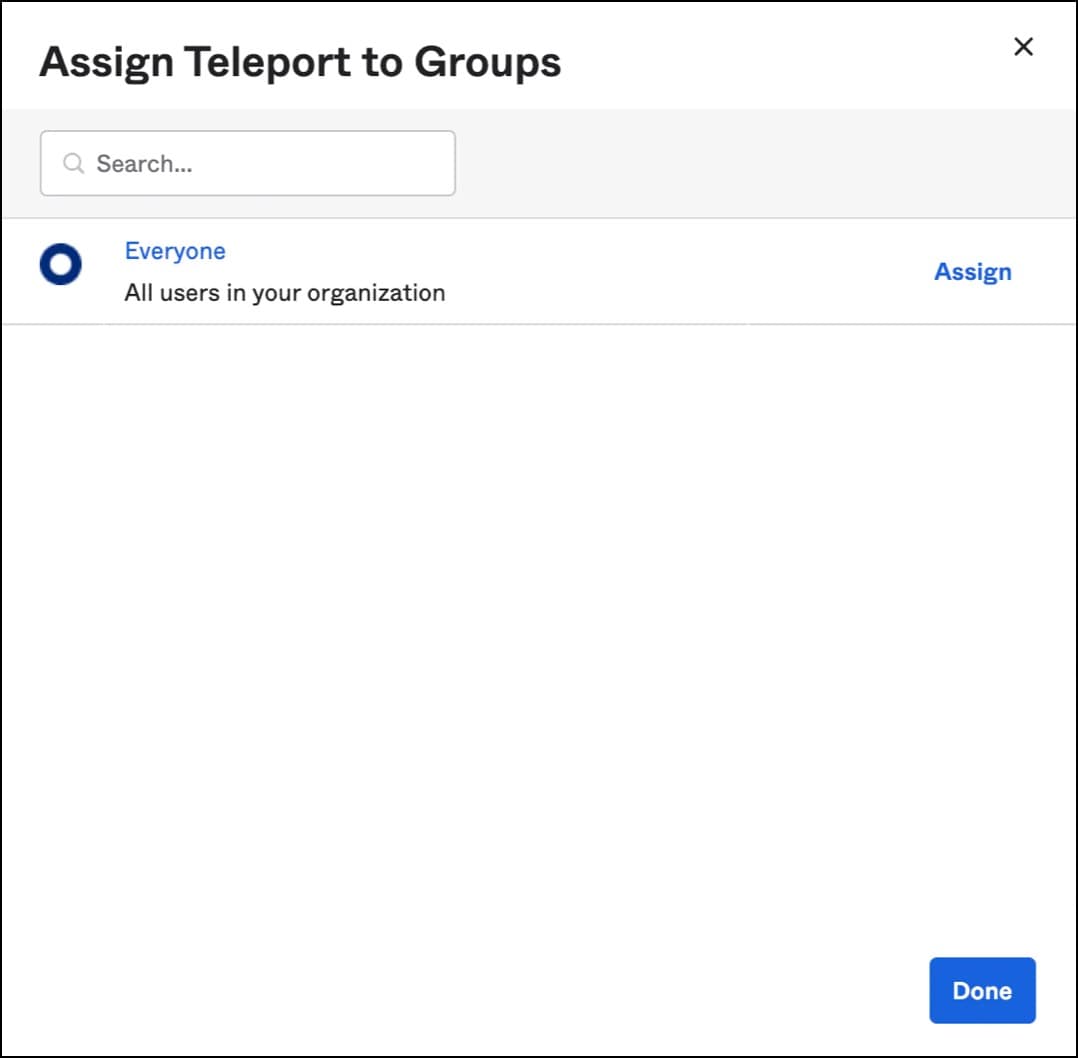
Now, it’s time to assign the application to groups and people.
Finally, download the identity provider metadata, an XML document under the sign-on tab. This will be used to configure the Teleport SAML connector.
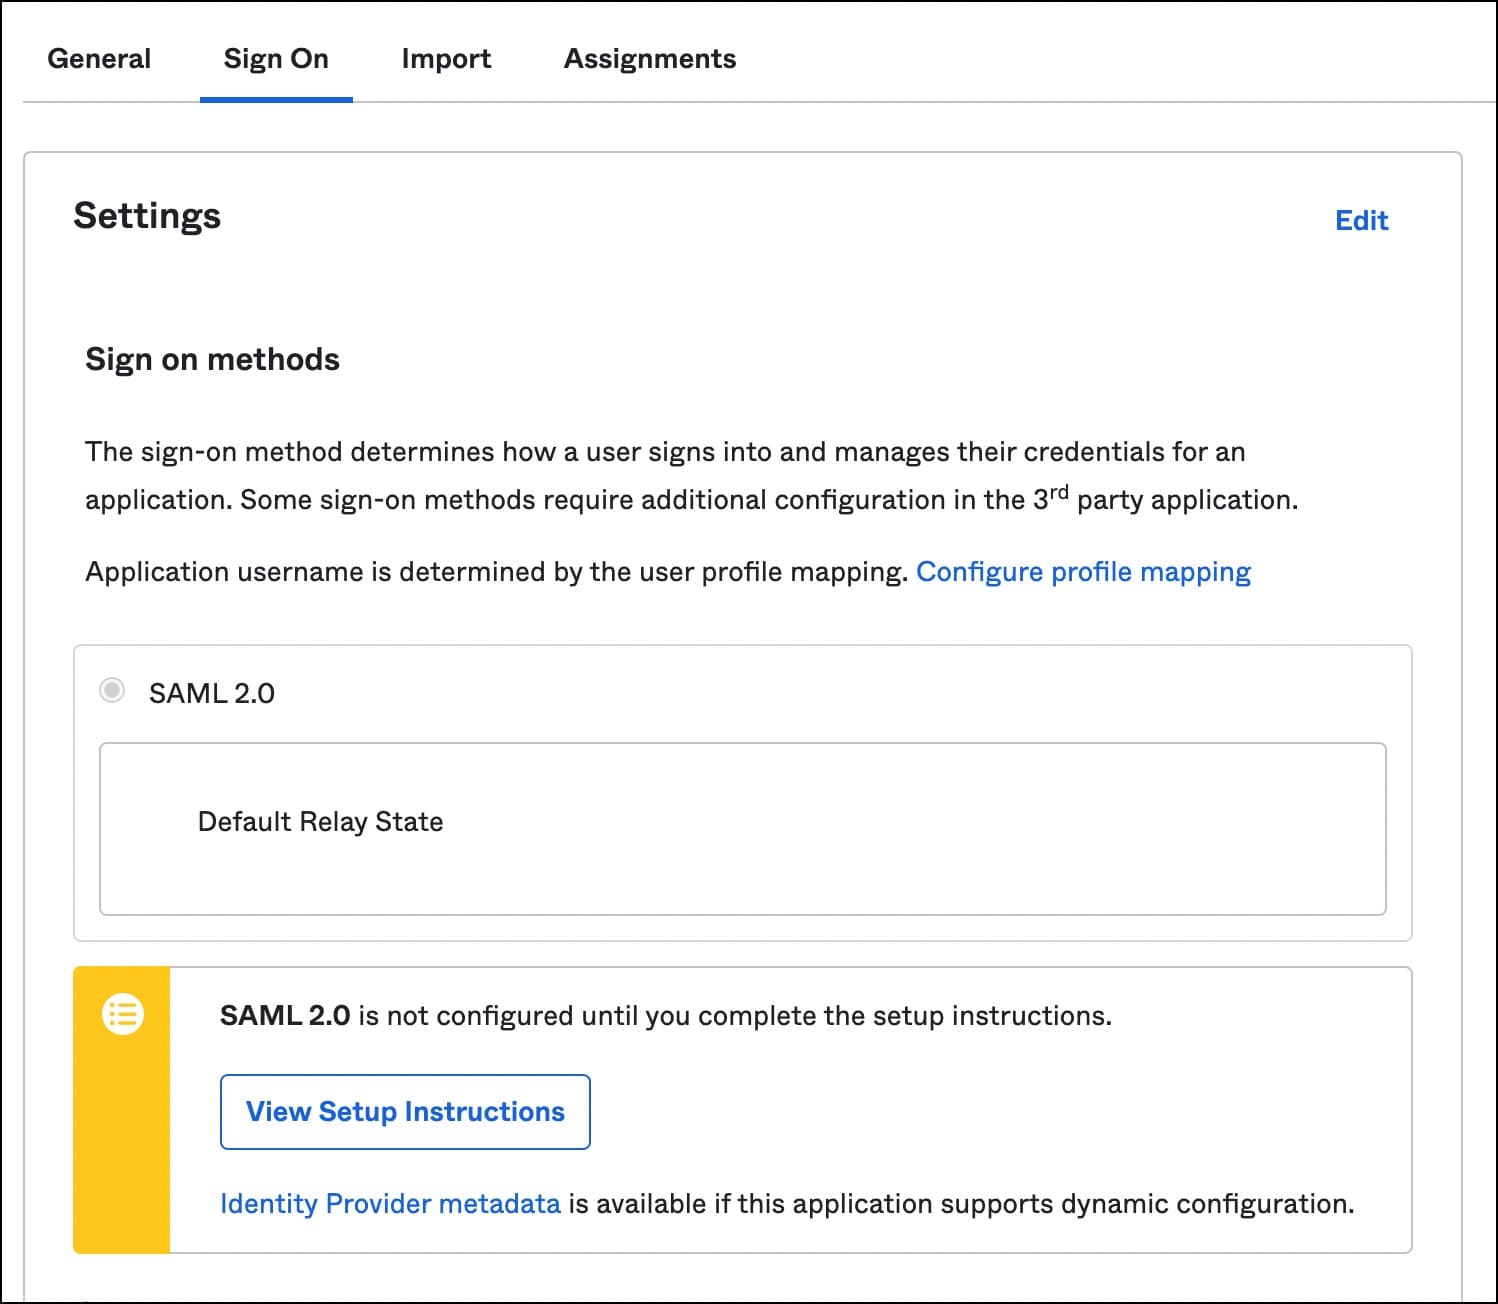
It’s interesting to see that Okta neither has the knowledge of Teleport nor Linux security context. It’s a generic identity provider with SSO capabilities. When we configure the SAML connector in the next step, we will connect the dots across these three contexts — Okta, Teleport and Amazon EC2.
Step 3 - Create Teleport SAML connector and roles
Create the below YAML file by replacing the XML string with the contents of the metadata file downloaded from Okta. Ensure that the formatting is correct by adding 4 spaces to the XML content.
kind: saml
version: v2
metadata:
  name: okta
spec:
  display: Okta
  acs: https://tele.j-access.in:443/v1/webapi/saml/acs
  attributes_to_roles:
    - {name: "groups", value: "okta-admin", roles: ["admin"]}
    - {name: "groups", value: "okta-dev", roles: ["dev"]}
    - {name: "groups", value: "okta-dba", roles: ["dba"]}
  entity_descriptor: |
      <XML String>
This is the most important step where we map Okta groups to Teleport roles.
Before applying the configuration, login to Teleport proxy from your workstation as local user tele-admin that we created earlier.
$ tsh login --proxy=tele.j-access.in --user=tele-admin --auth=local
Apply the connector configuration with the below command:
$ tctl create okta-connector.yaml
Now, let’s create the dev and dba roles within Teleport which will map SAML user attributes to Teleport login roles.
$ vi dev.yaml
kind: role
version: v4
metadata:
  name: dev
spec:
  options:
    max_session_ttl: 24h
  allow:
    logins: [ "{{email.local(external.username)}}", ubuntu ]
    node_labels:
      name: appserver


$ vi dba.yaml
kind: role
version: v4
metadata:
  name: dba
spec:
  options:
    max_session_ttl: 24h
  allow:
    logins: [ "{{email.local(external.username)}}", ubuntu ]
    node_labels:
      name: dbserver


$ tctl create dev.yaml

$ tctl create dba.yaml
Notice how the external Okta user is mapped to the Linux user. The role explicitly allows access to any node that matches the given label. This is a simple yet powerful mechanism of defining RBAC in Teleport.
Finally, we will switch the authentication mode of Teleport proxy on the bastion to use SAML.
Edit the file, /etc/teleport.yaml, to add the below lines under the auth_service section:
auth_service:
  authentication:
    type: saml
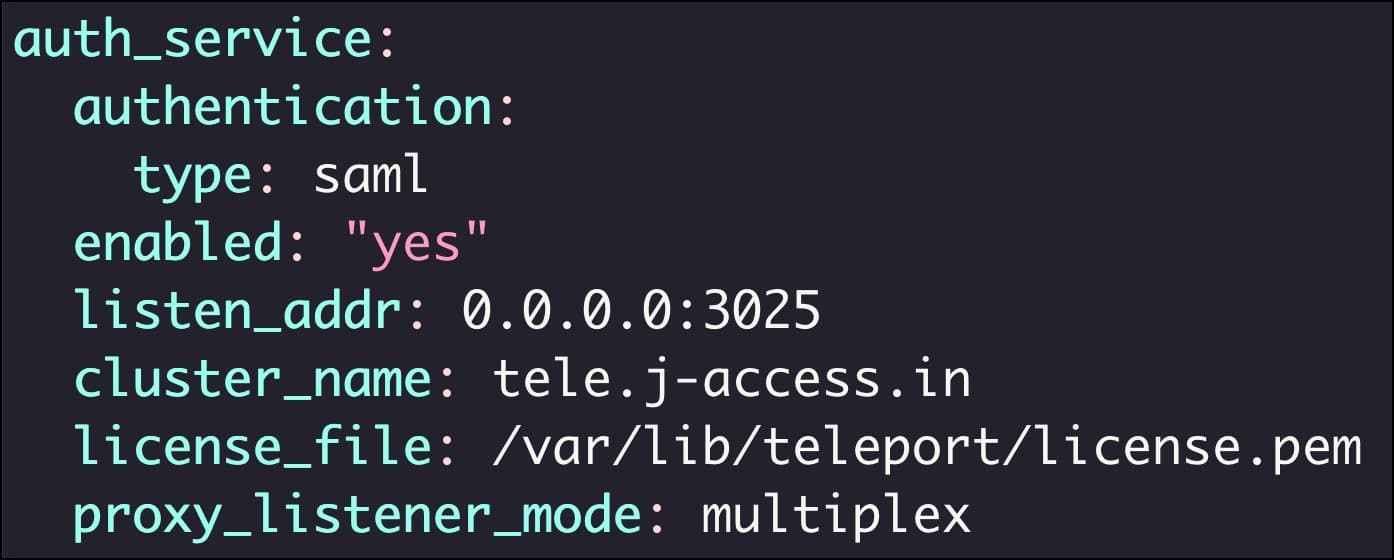
Restart the Teleport daemon on the bastion for the changes to take effect.
If you are using Teleport Cloud, create a file called cap.yaml:
kind: cluster_auth_preference
metadata:
  name: cluster-auth-preference
spec:
  authentication:
    type: saml
version: v2
Create a resource by running the below command:
$ tctl create -f cap.yaml
The above step configures Teleport Cloud to use SAML authentication as the default instead of the local user database.
Step 4 - Verifying SSH access with SSO and RBAC
On the workstation, try to login to Teleport without mentioning the user or authentication type.
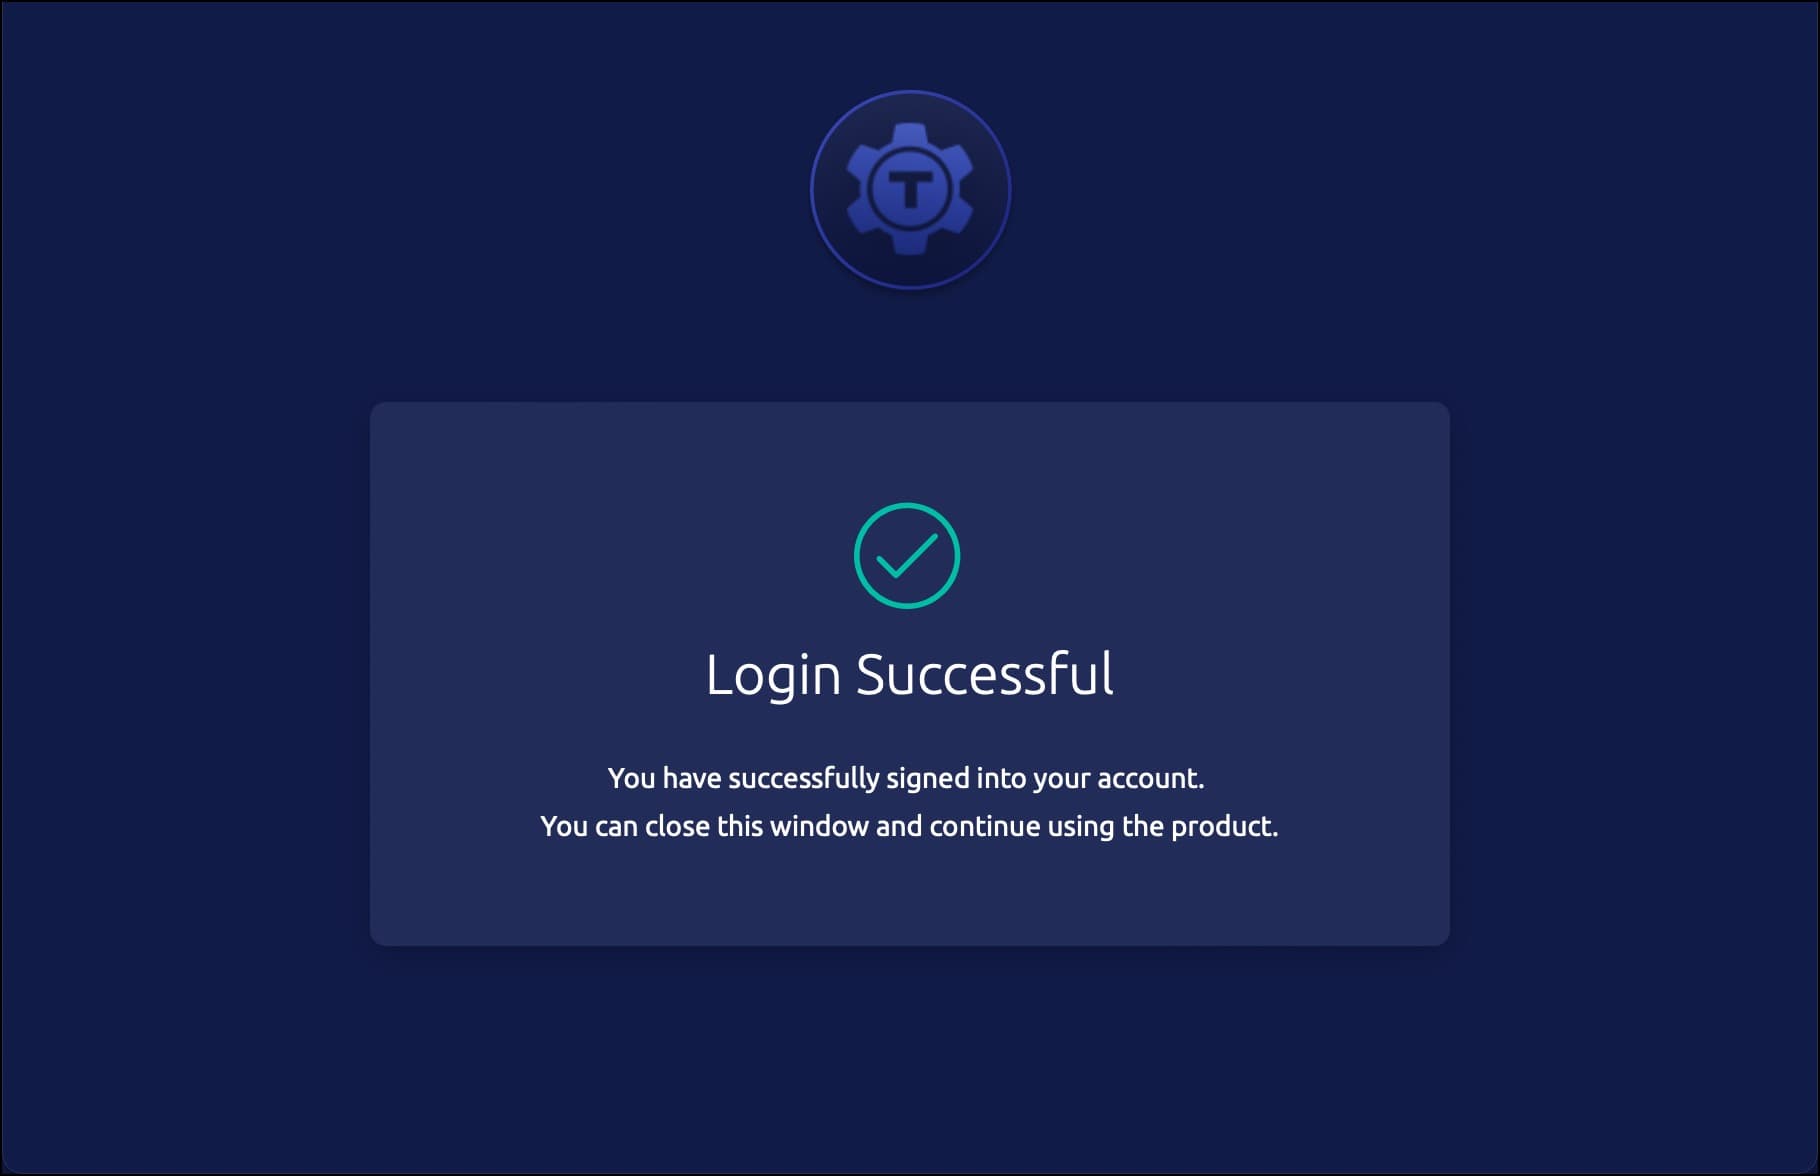
$ tsh login --proxy=tele.j-access.in
This opens the browser prompting the credentials of Okta user. Once signed in, the browser confirms that the login is successful.
The terminal window shows the profile and the mapping of the signed-in Okta user with the Linux user.
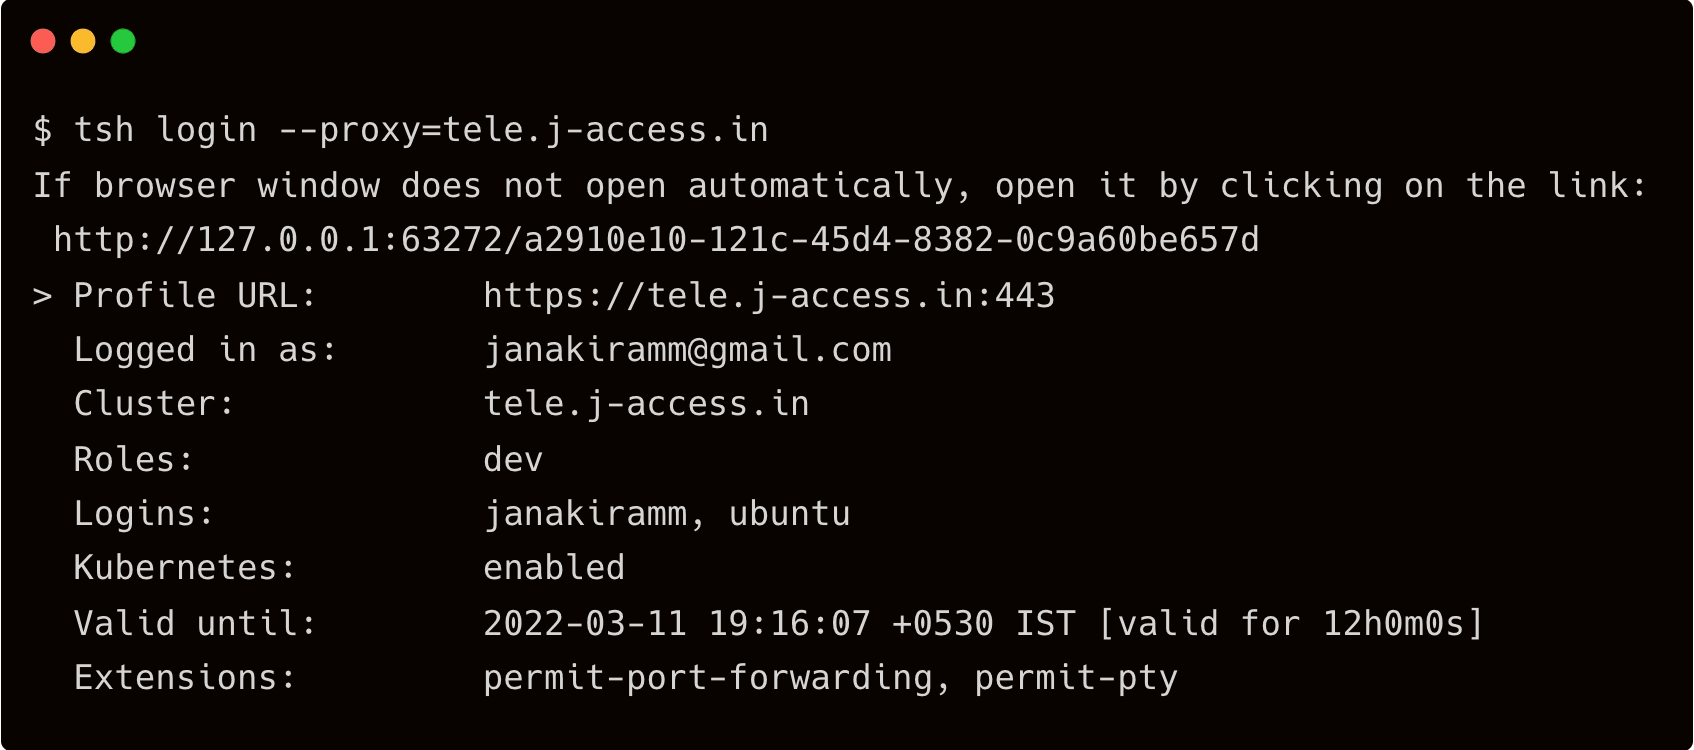
Depending on the group that the Okta user belongs to, the user will have access to the SSH EC2 instance.
First, login as the developer and access the app server.
$ tsh ssh ubuntu@appserver
It will go through since the RBAC has a mapping between the user and the node label. But when the same user tries to access the database server, Teleport will block the access with an access denied error.
$ `tsh ssh ubuntu@dbserver`

Now, try signing in as a user from the Okta DBA group to test the access. You will be allowed to SSH into the database server while getting an access denied error when accessing the application server.
Conclusion
This tutorial demonstrated how to leverage an SSO provider such as Okta to define fine-grained access policies through Teleport's RBAC. In this case, Okta works as an external identity provider (or user's identity source) for Teleport. With this setup, users can be mapped with Teleport access both as a one-to-one user and application mapping or with group membership in Okta. AWS IAM, along with AWS SSM, is a good enough solution to provide access to AWS resources but is limited in terms of deeper protocol-level session auditing capabilities. Additionally, the applicability of AWS IAM and SSM only inside AWS environments for AWS services can be a limiting factor of organizations prioritizing a multi-cloud strategy where users' access requirements span hybrid cloud resources. Learn more about benefits of using Teleport over AWS SSM here.
Get in touch today to learn how Teleport can help manage secure access controls to AWS infrastructure resources with RBAC permission sets, and deep protocol level auditing capabilities for SSH or Windows EC2 instances, RDS and other AWS databases, EKS and web applications.
Table Of Contents
- Part 2: AWS single sign-on (SSO) with Okta, SAML, and Teleport
- Step 1 - Launching Amazon EC2 instances in VPC and installing Teleport Enterprise
- Step 2 - Configuring Okta as an identity provider for Teleport and AWS SSO
- Step 3 - Create Teleport SAML connector and roles
- Step 4 - Verifying SSH access with SSO and RBAC
- Conclusion
Teleport Newsletter
Stay up-to-date with the newest Teleport releases by subscribing to our monthly updates.
Tags
Tags
Teleport Newsletter
Stay up-to-date with the newest Teleport releases by subscribing to our monthly updates.