How to Set-up an Identity-Aware Access Proxy as a Bastion Host in AWS
More and more business-critical applications run on Amazon Web Services. Protecting these mission-critical applications from potential attacks requires moving beyond typical security approaches such as using only a jump box or firewall to control access. This multi-part tutorial will show how DevOps teams can secure their AWS services using a zero-trust, identity-based approach that not only increases security, but improves developer productivity. We will demonstrate these use cases using Teleport, an open-source, identity-based access solution that unifies access for AWS services such as EC2, RDS, EKS, and more.
Part 1: Protect AWS ec2 SSH access with Teleport as a bastion host.
In the first part of the series, we will explore how to replace a traditional bastion host with a secure Teleport proxy and authentication server. In subsequent tutorials, we will explore topics such as IAM joining, accessing services across availability zones of the AWS cloud, managing access with multiple AWS accounts, and more. Let’s dive in.
Why use a bastion host in AWS?
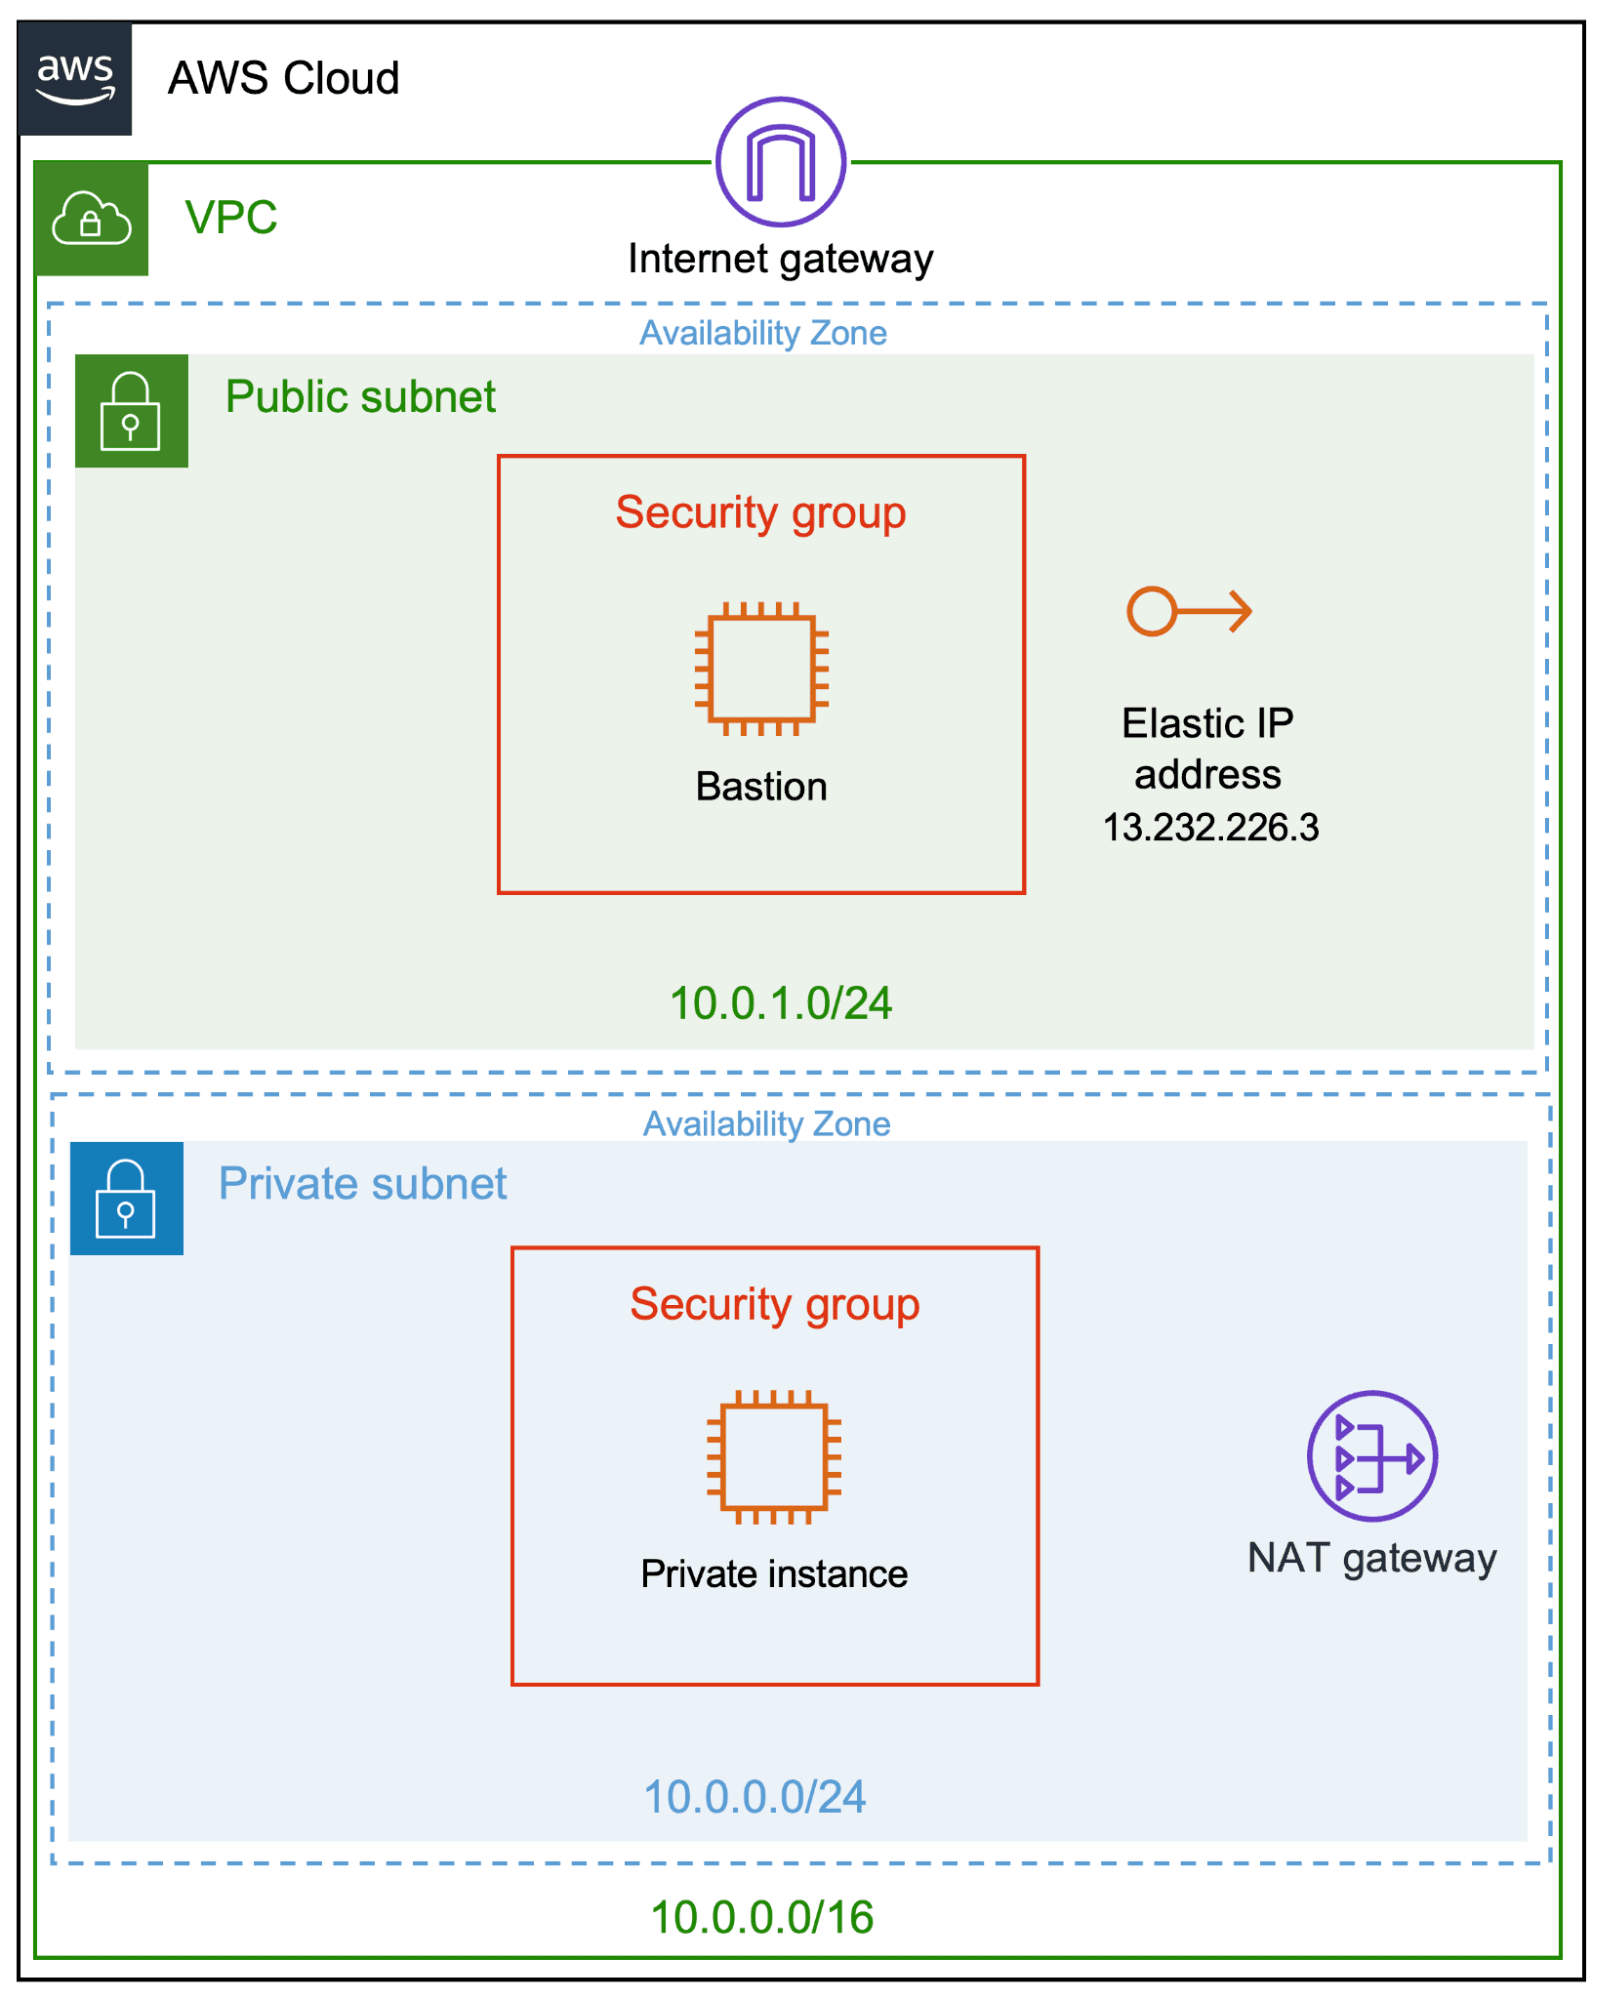
One of the best practices for running secure workloads on Amazon Web Services is to isolate the instances into private and public subnets of a Virtual Private Cloud (VPC). For example, a database backend is typically provisioned within a private subnet while web servers connected to a load balancer are launched in a public subnet.
To access and manage Amazon EC2 instances running in a private subnet, a bastion host is deployed in the public subnet. The bastion host or jump server provides secure access to private instances by limiting the exposure from public IPs. To understand why this approach is important to improve infrastructure access security, read our blog on why you still need a bastion host for more details.
This tutorial will describe how to create a bastion host in AWS using the open-source solution Teleport. While Teleport provides the same advantages of using a traditional bastion host, it has a number of advantages for securing your AWS infrastructure over the bastion host instances alone.
Teleport provides:
- A robust bastion host that goes beyond supporting only SSH for Linux hosts. Teleport also supports identity-based access for other AWS managed services such as Amazon RDS, Amazon EKS, and even RDP for Windows.
- Out-of-the-box enhanced authentication with support for any OIDC or SAML identity provider.
- Sophisticated security features available in open source such as per-session MFA, and support for biometric authentication methods such as Touch ID and Face ID.
- Enhanced authorization with granular, protocol-level RBAC (for example, Teleport roles can provide different levels of access for an EC2 Linux instance and a Postgres RDS instance).
- Robust audit trail through of all activity via automated session recording and playback
- Integration with AWS Management Console so that you can separate who can provision AWS resources from who can access them.
AWS offers SSM as a bastion host alternative for AWS infrastructure access. To learn more on how Teleport fairs with AWS SSM with additional security features and interoperability outside of AWS infrastructure, read our white paper on Teleport vs AWS SSM.
Creating a bastion host on AWS using OSS Teleport
Ok, let’s dive into how to leverage Teleport as a better bastion service for Amazon EC2 instances running in a VPC. Our goal is to set up a bastion host that can be accessed only via an authenticated Teleport user.
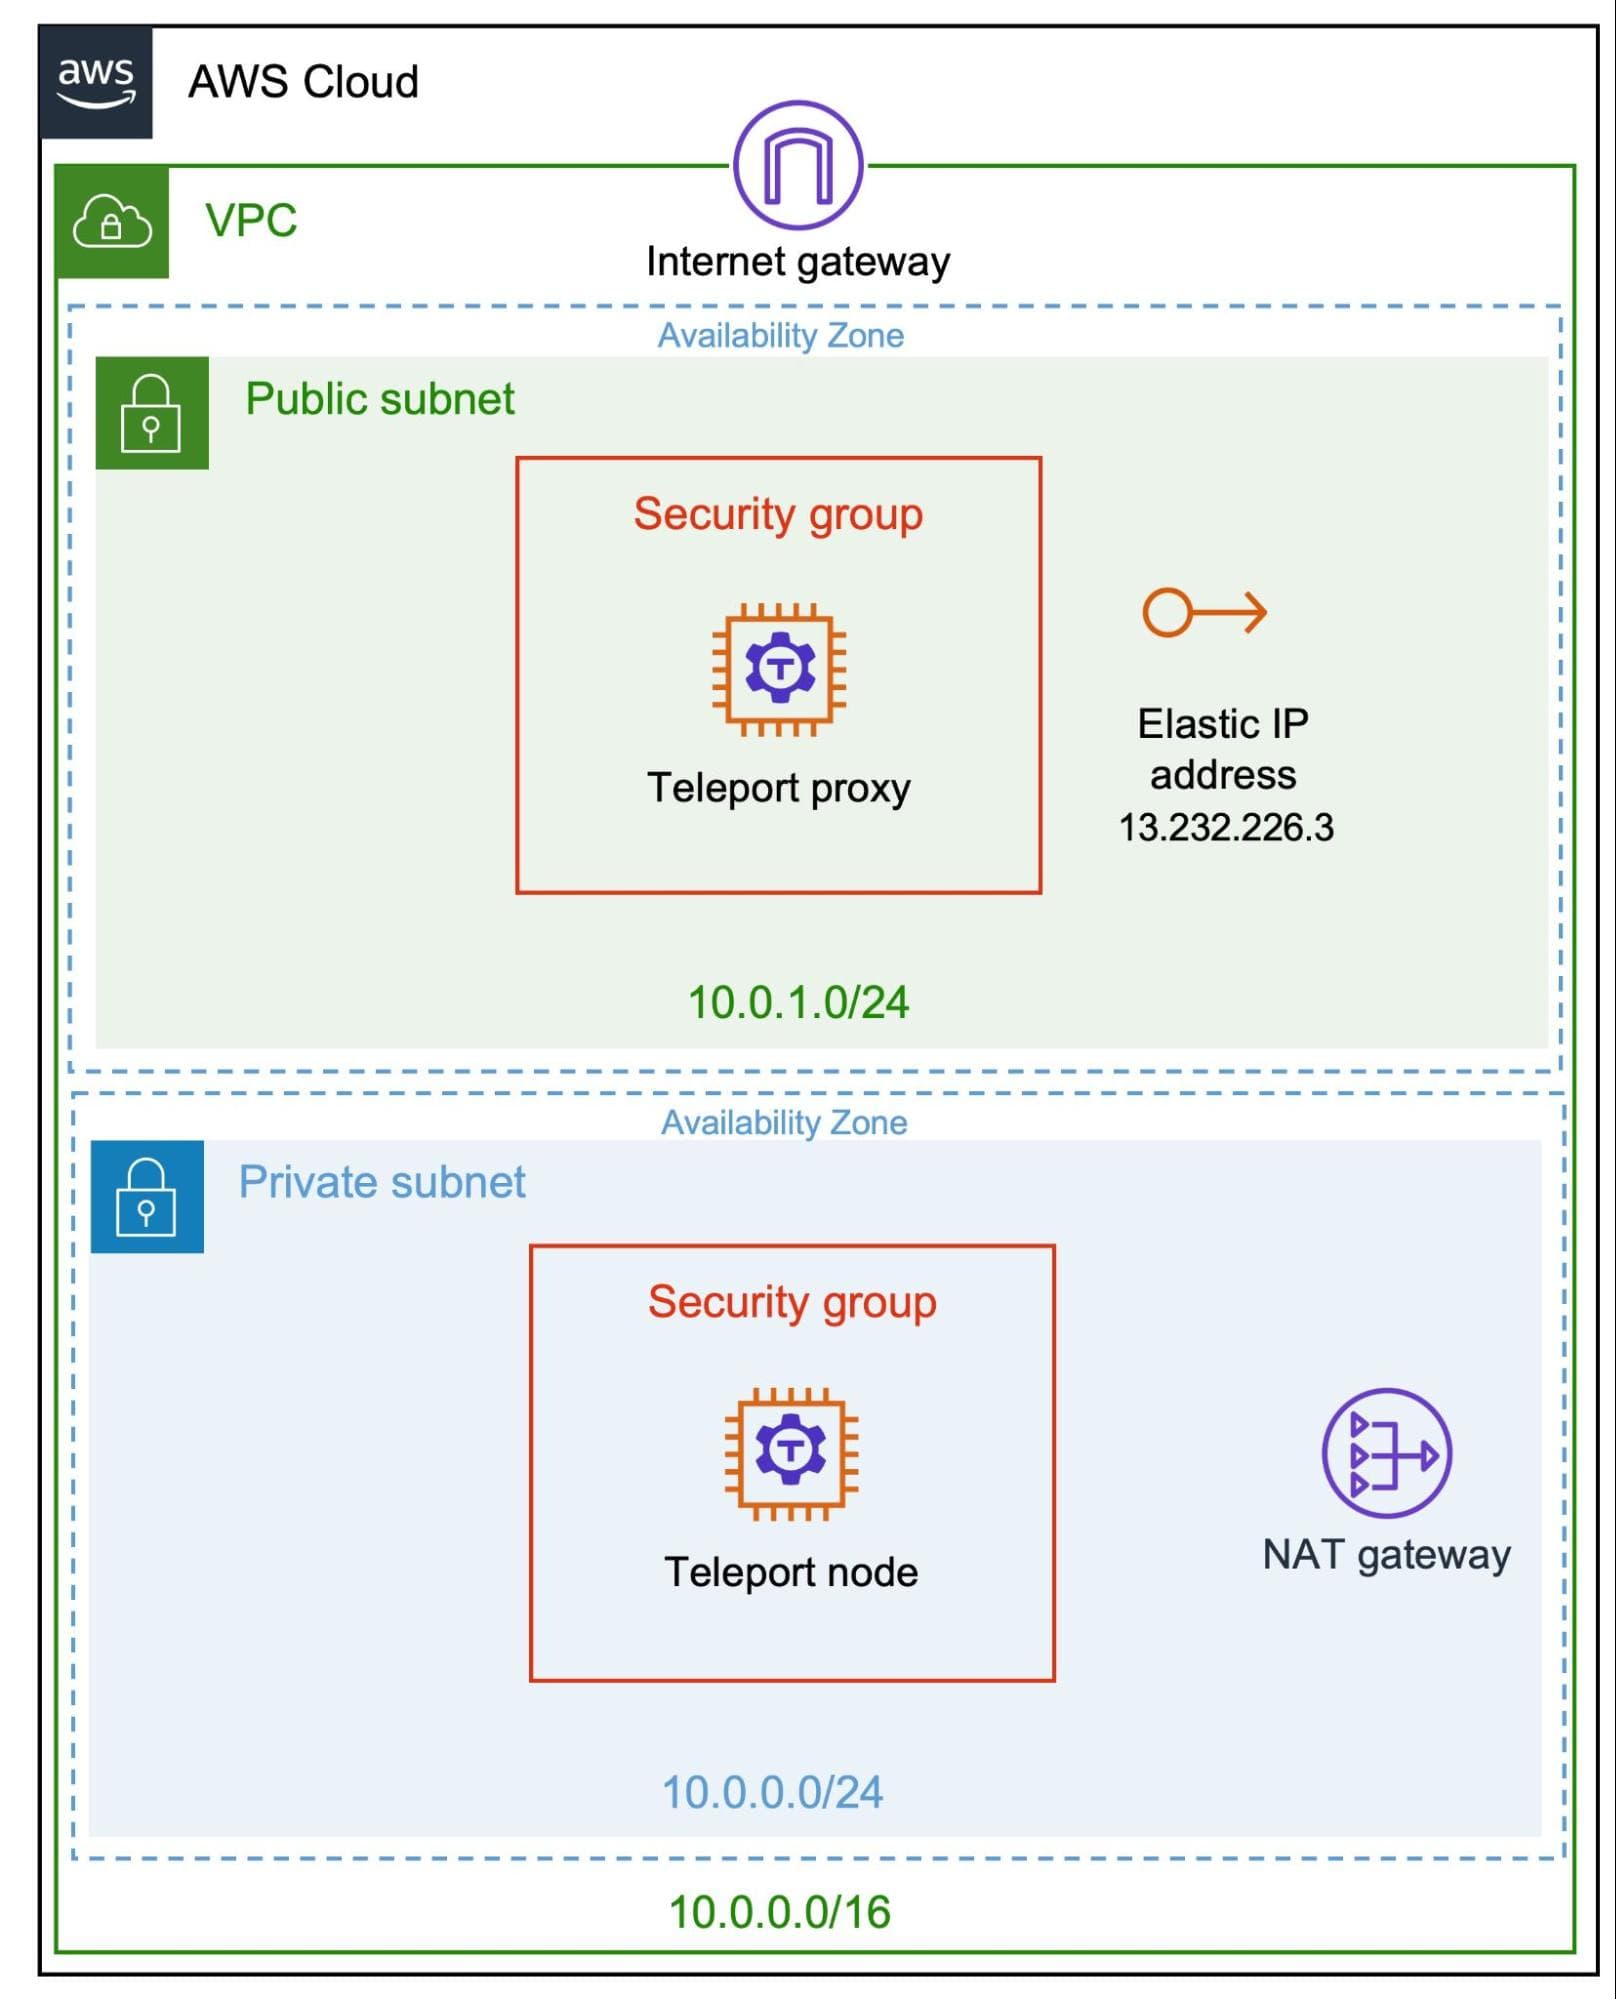
In the steps below, we will walk you through the end-to-end process of configuring the subnets, NAT, Internet gateways, routing tables, security groups, Teleport proxy, Teleport node, and completely isolating the instances to provide zero trust security through Teleport.
Though the tutorial uses a single instance of Teleport proxy, it is possible to launch an autoscaling group for scalability and high availability. We will take a closer look at this in the upcoming articles.
We will use AWS CLI for configuring the infrastructure, but you can use AWS Console or Terraform to provision and configure the cloud resources. The only prerequisite for this tutorial is having access to AWS and a workstation with the AWS command line interface installed. You also need a custom domain name to map the A record to the Elastic IP.
Step 1 - Configuring AWS resources
We will configure the VPC infrastructure and launch two EC2 instances in separate subnets in the first step. The bastion host launched in the public subnet will be associated with an Elastic IP while the other instance will only have outbound traffic routed to the Internet via the NAT Gateway. We will also configure the security groups to allow access to the bastion and the node.
Let’s start by creating the VPC and the subnets. By the end of this step, we will have the VPC and subnets needed for the environment.

$ aws ec2 create-vpc \
    --cidr-block 10.0.0.0/16 \
    --amazon-provided-ipv6-cidr-block
    --query Vpc.VpcId
Make a note of the VPC ID and use it for the subnet creation.
$ aws ec2 create-subnet \
    --vpc-id vpc-0469c1a208568e8c6 \
    --cidr-block 10.0.1.0/24

$ aws ec2 create-subnet \
    --vpc-id vpc-0469c1a208568e8c6 \
    --cidr-block 10.0.0.0/24
We will now configure the public subnet by adding an Internet gateway (IGW) to the VPC and creating a routing table.
$ aws ec2 create-internet-gateway \
    --query InternetGateway.InternetGatewayId

$ aws ec2 attach-internet-gateway \
    --vpc-id vpc-0469c1a208568e8c6 \
    --internet-gateway-id igw-045b5a2749a2c363e

$ aws ec2 create-route-table \
    --vpc-id vpc-0469c1a208568e8c6 \
    --query RouteTable.RouteTableId

$ aws ec2 create-route \
    --route-table-id  rtb-0426dda7ed56e76ae \
    --destination-cidr-block 0.0.0.0/0 \
    --gateway-id igw-045b5a2749a2c363e
Make sure you are replacing the resource Ids with appropriate identifiers from your environment.
With the Internet gateway and routing table in place, we will associate it with one of the subnets to turn that into a public subnet.
aws ec2 associate-route-table  \
    --subnet-id subnet-085a3239ee0f9a889 \
    --route-table-id rtb-0426dda7ed56e76ae
It’s time to launch the bastion host, configure the security group, and associate an Elastic IP with it.
Since we need an SSH key, let’s create it before launching the instance.
$ aws ec2 create-key-pair \
    --key-name teleport-demo \
    --query "KeyMaterial" \
    --output text > teleport-demo.pem
It’s time to create a security group with appropriate ports needed for Teleport proxy.
$ aws ec2 create-security-group \
    --group-name Teleport-Proxy \
    --description "Security group for Teleport Proxy" \
    --vpc-id vpc-0469c1a208568e8c6

$ aws ec2 authorize-security-group-ingress \
    --group-id sg-082fcb3e66852ea15 \
    --protocol tcp --port 22 --cidr 0.0.0.0/0 \

$ aws ec2 authorize-security-group-ingress \
    --group-id sg-082fcb3e66852ea15 \
    --protocol tcp --port 3023 --cidr 0.0.0.0/0 \

$ aws ec2 authorize-security-group-ingress \
    --group-id sg-082fcb3e66852ea15 \
    --protocol tcp --port 3024 --cidr 0.0.0.0/0 \

$ aws ec2 authorize-security-group-ingress \
    --protocol tcp --port 443 --cidr 0.0.0.0/0 \
The security group allows ports 22, 3023, 3024, 443 to the instance we will be launching.
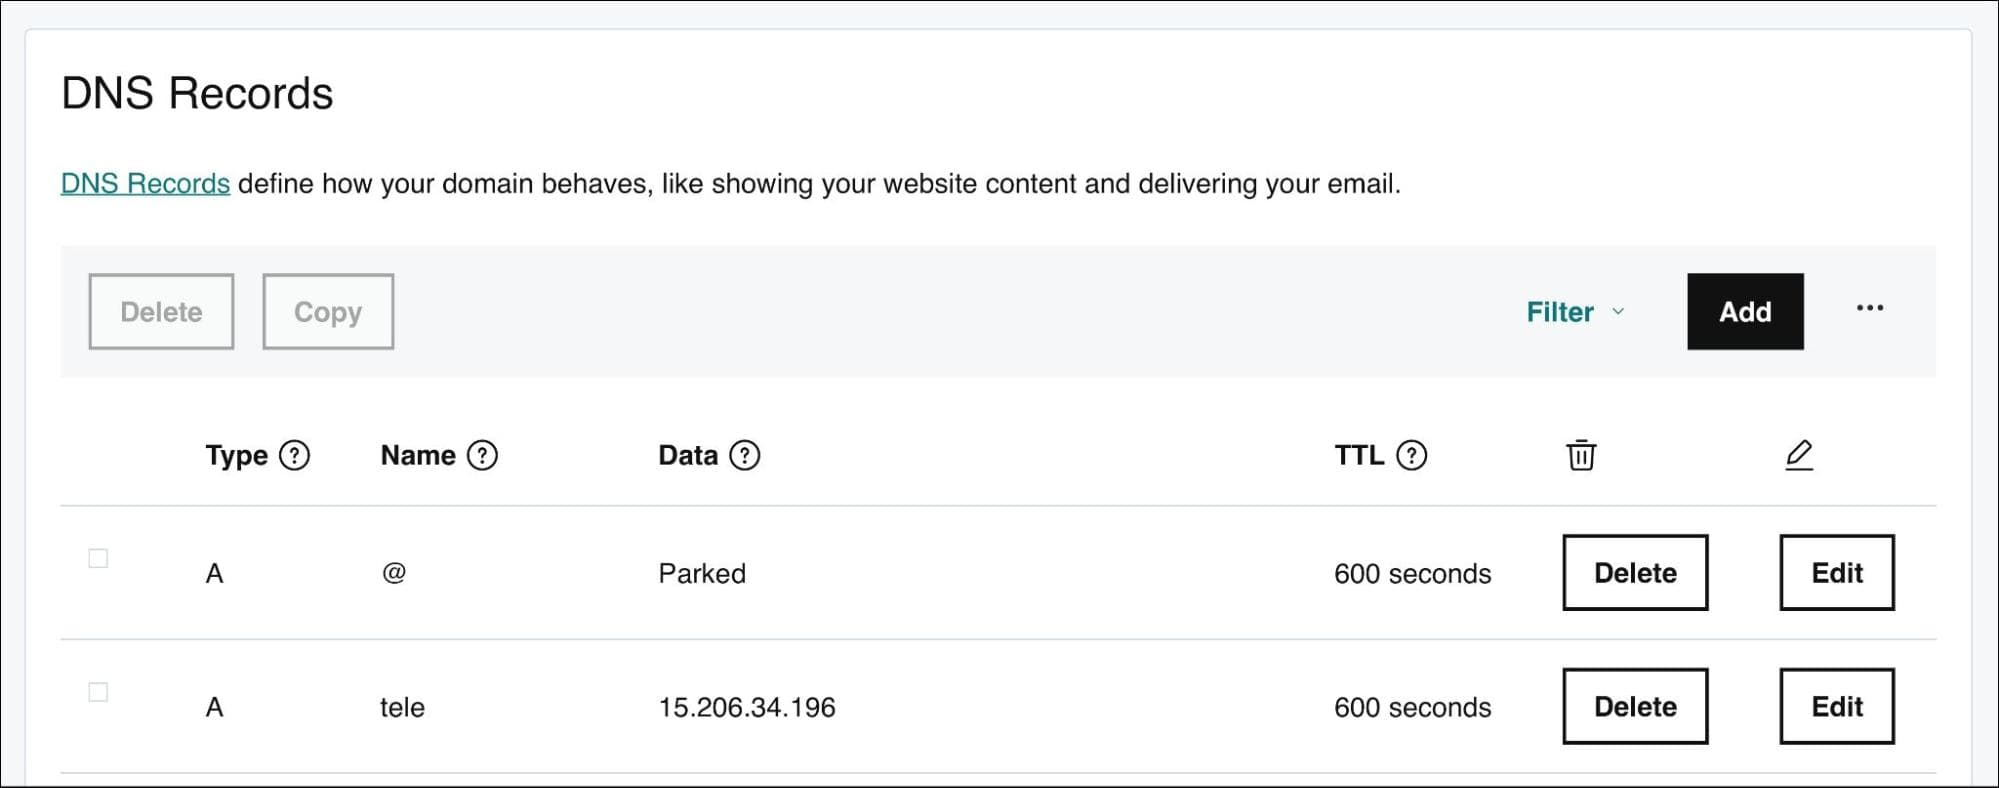
The next step is to create an Elastic IP address needed for creating the A record in your DNS control panel.
$ aws ec2 allocate-address
Make a note of the allocation id which is needed later. With the IP address available to you, go ahead and add an A record pointing tele.YOUR_DOMAIN to it. In the below screenshot, I updated the record in GoDaddy’s DNS control panel for the domain j-access.in.
Finally, let’s launch the EC2 instance and associate it with the Elastic IP.
$ aws ec2 run-instances \
    --image-id ami-0851b76e8b1bce90b \
    --count 1 \
    --instance-type t3.xlarge \
    --key-name teleport-demo \
    --security-group-ids sg-082fcb3e66852ea15 \
    --subnet-id subnet-085a3239ee0f9a889 \
    --tag-specifications \
        'ResourceType=instance,Tags=[{Key=Name,Value=Teleport-Proxy}]'

$ aws ec2 associate-address \
    --instance-id i-0f7d2f5a094ff4e4a \
    --allocation-id eipalloc-0d7a8e091e6b196c7
Don’t forget to replace the AMI id with the Ubuntu 20.04 image Id available in your preferred AWS region. The same is applicable for all the cloud resources referenced in this tutorial.
Let’s configure the private subnet routes, security group, and launch the instance (node) in the private subnet.
We will create an Elastic IP, a NAT gateway, and associate them. We will then create a routing table for the private subnet.
$ aws ec2 allocate-address

$ aws ec2 create-nat-gateway \
    --subnet-id subnet-085a3239ee0f9a889 \
    --allocation-id eipalloc-08207263ced10811c

$ aws ec2 create-route-table \
    --vpc-id vpc-0469c1a208568e8c6 \
    --query RouteTable.RouteTableId

$ aws ec2 create-route \
    --route-table-id rtb-078a46c845bf0536a \
    --destination-cidr-block 0.0.0.0/0 \
    --gateway-id nat-088727714506c79dc

$ aws ec2 associate-route-table \
    --route-table-id rtb-078a46c845bf0536a \
    --subnet-id subnet-0ac3d4cbe674e87be
Let’s create a security group that allows SSH access initiated from the bastion host.
$ aws ec2 create-security-group \
    --group-name Teleport-Node \
    --description "Security group for Teleport Nodes" \
    --vpc-id vpc-0469c1a208568e8c6

$ aws ec2 authorize-security-group-ingress \
    --group-id sg-0e50c97f60606e1da \
    --protocol tcp \
    --port 22 \
    --source-group sg-082fcb3e66852ea15
We will now launch an Ubuntu 20.04 instance in the private subnet associated with the security group created above.
$ aws ec2 run-instances \
    --image-id ami-0851b76e8b1bce90b \
    --count 1 \
    --instance-type t3.xlarge \
    --key-name teleport-demo \
    --security-group-ids sg-0e50c97f60606e1da \
    --subnet-id subnet-0ac3d4cbe674e87be \
    --tag-specifications \
        'ResourceType=instance,Tags=[{Key=Name,Value=Teleport-Node}]'
At this point, we have the required infrastructure needed for the tutorial.

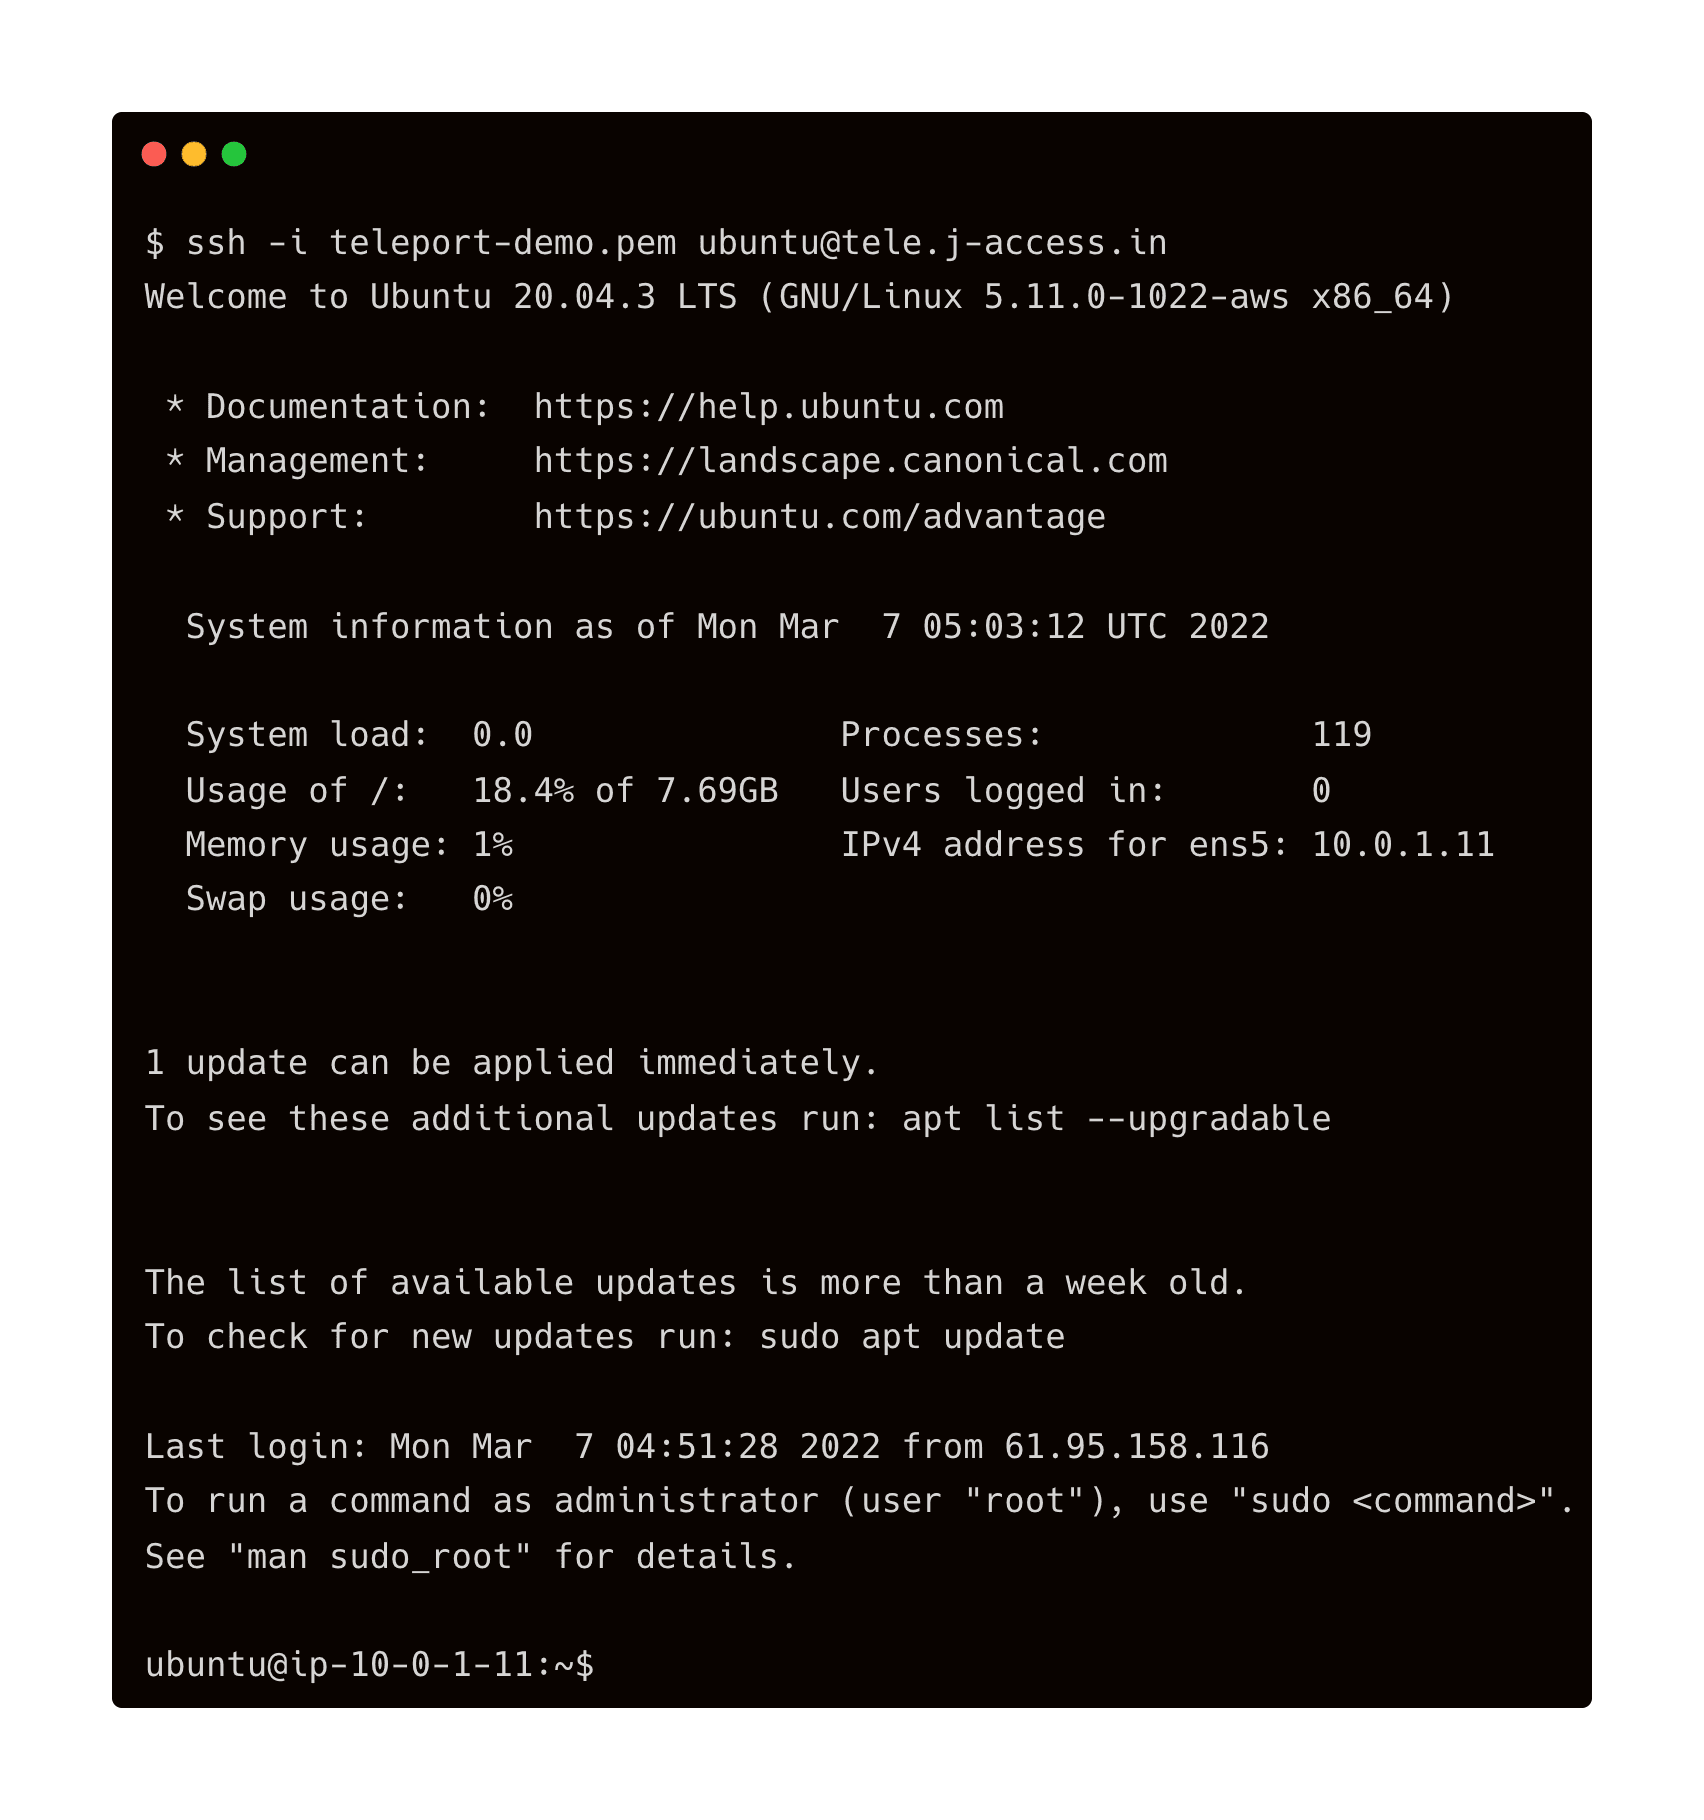
Verify that you can access the bastion host provisioned in the public subnet through the DNS name and the instance running in the private subnet.
Step 2 - Installing and configuring Teleport
In this step, we will replace the traditional OpenSSH-based bastion with a secure Teleport proxy and auth server.
Let’s configure the Teleport proxy and auth server in the bastion host. To do this, SSH into the instance and run the below commands:
$ curl -O https://get.gravitational.com/teleport-v8.3.1-linux-amd64-bin.tar.gz
$ tar xvf teleport-v8.3.1-linux-amd64-bin.tar.gz
$ sudo teleport//install
Let’s generate the default configuration file needed to start Teleport proxy and auth service.
$ sudo teleport configure \
  --acme [email protected] \
  --cluster-name=tele.j-access.in \
  -o file
Finally, launch the Teleport service with the below command:
$ sudo teleport start
Launch another terminal and SSH into the bastion to add a new Teleport user. This will enable us to access the Web UI.
$ sudo tctl users add tele-admin --roles=editor,access --logins=root,ubuntu
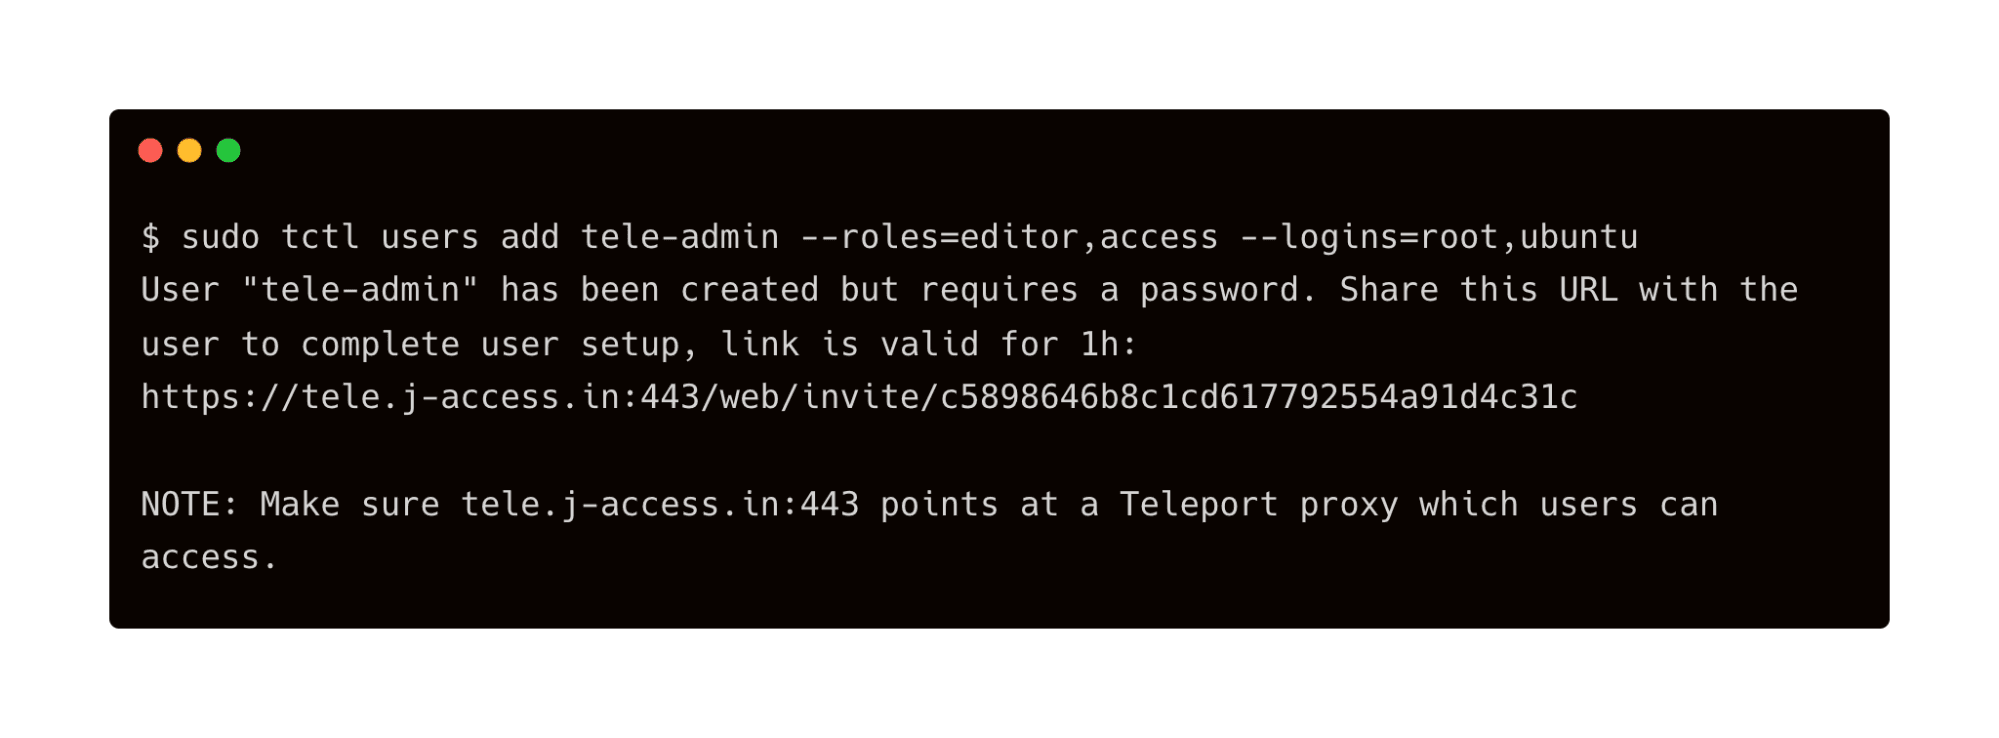
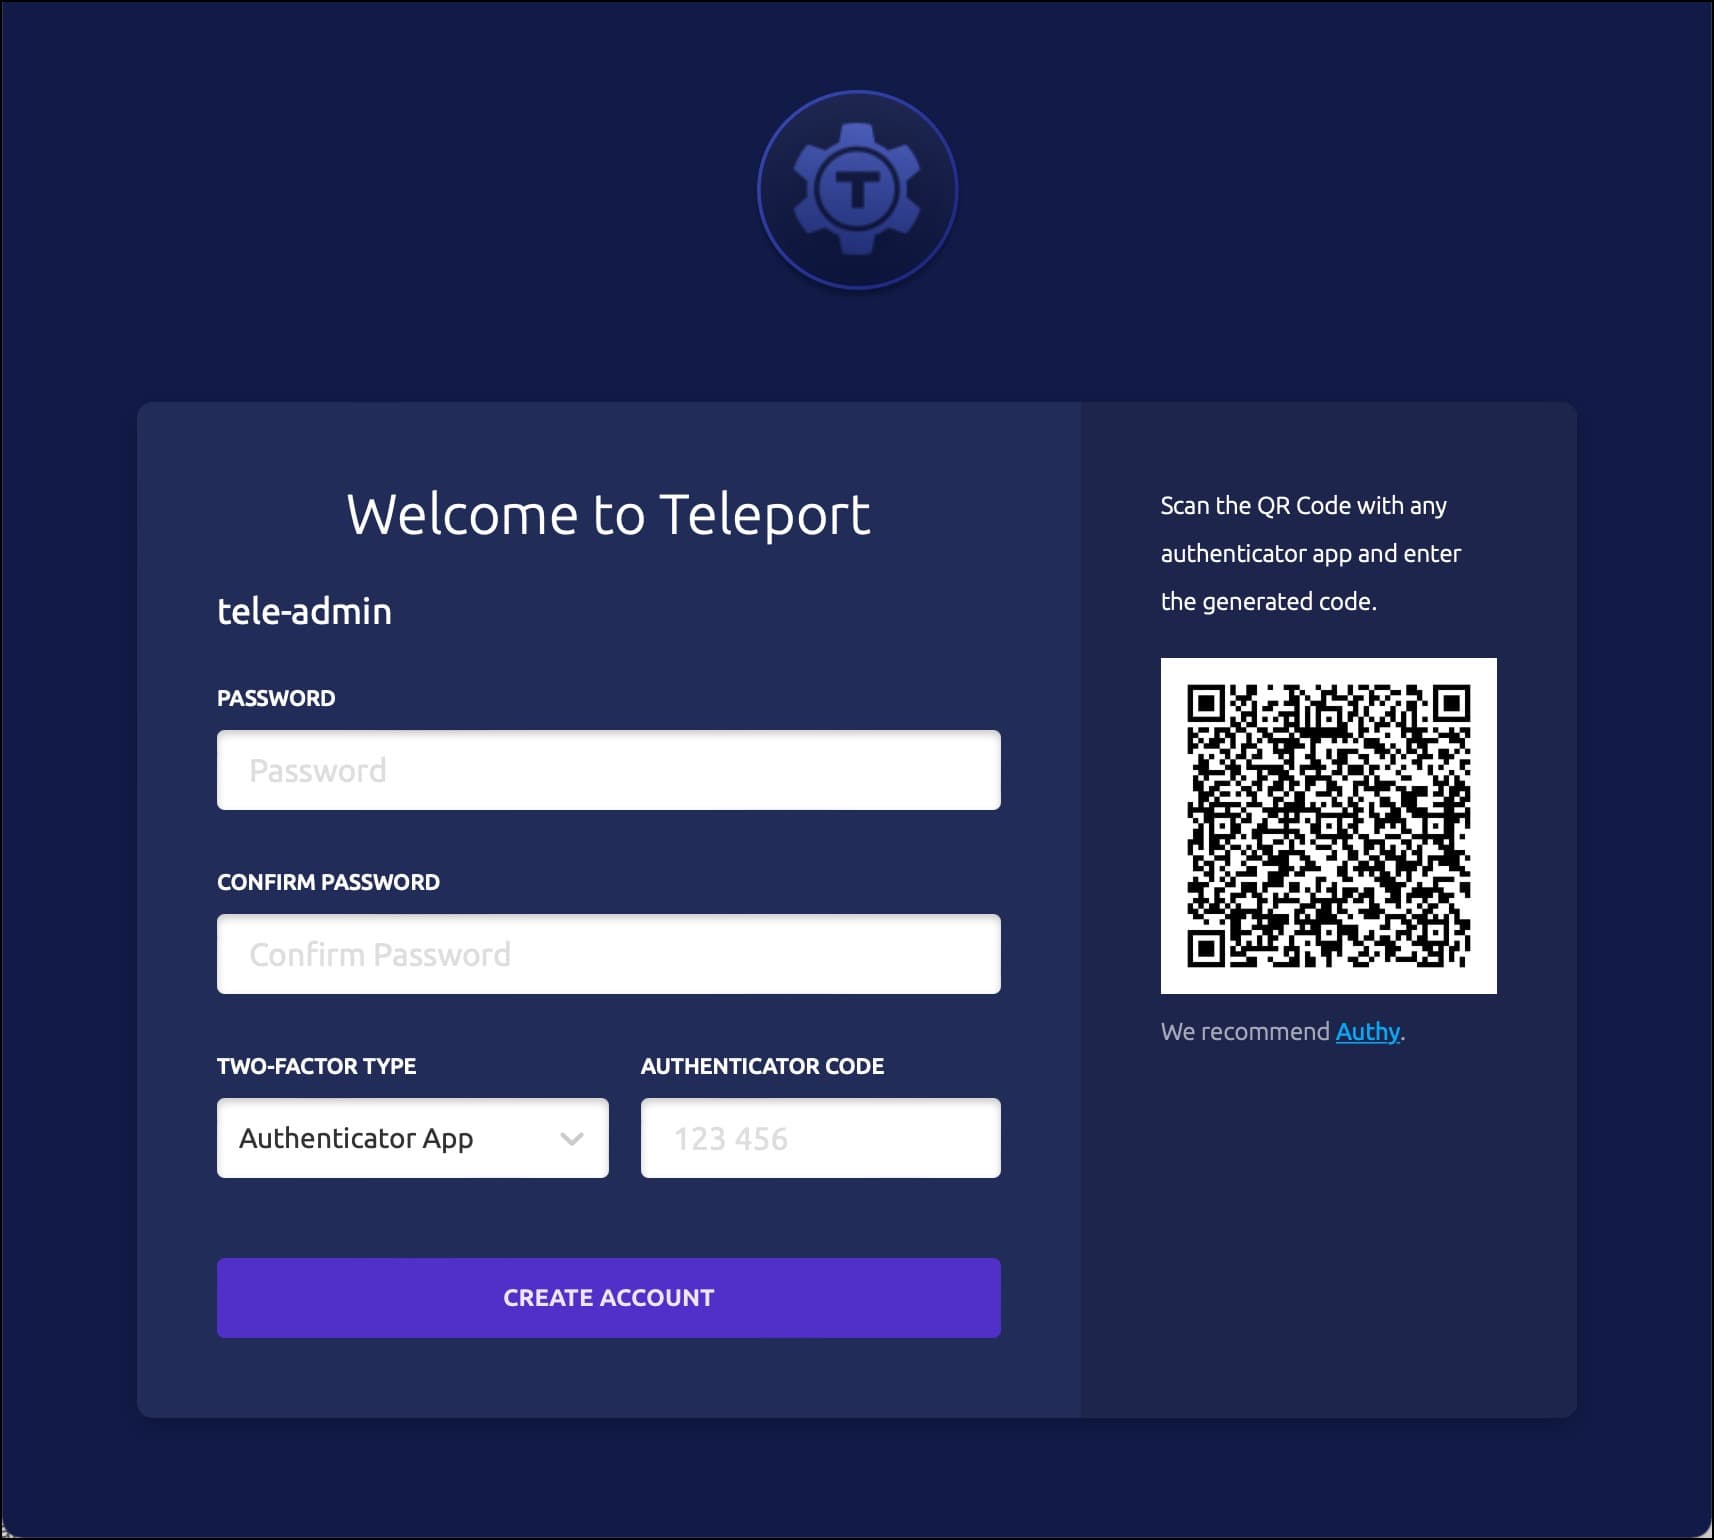
Accessing the URL opens the page to create the password and 2FA for the user.
It’s time to generate a token that is needed to join the nodes to the cluster. Let’s generate it. Save the token to a secure location which is needed in the next step. While still in the bastion’s SSH session, run the below command:
$ sudo tctl tokens add --type=node

Now, let’s configure the node that will join the Teleport cluster. SSH into the instance running in the private subnet through the bastion.
$ curl https://deb.releases.teleport.dev/teleport-pubkey.asc | sudo apt-key add -
$ sudo add-apt-repository 'deb https://deb.releases.teleport.dev/ stable main'
$ sudo apt-get update
$ sudo apt-get install -y teleport
Create the file /opt/teleport/token and paste the token saved in the previous step.
$ sudo mkdir -p /opt/teleport
$ echo 0bbb910cd94aca80457a91c0b3c0cf45 | sudo tee -a /opt/teleport/token.file
Run the below command to join the node:
$ sudo teleport start \
  --roles=node \
  --token=/opt/teleport/token.file \
  --auth-server=tele.j-access.in:443
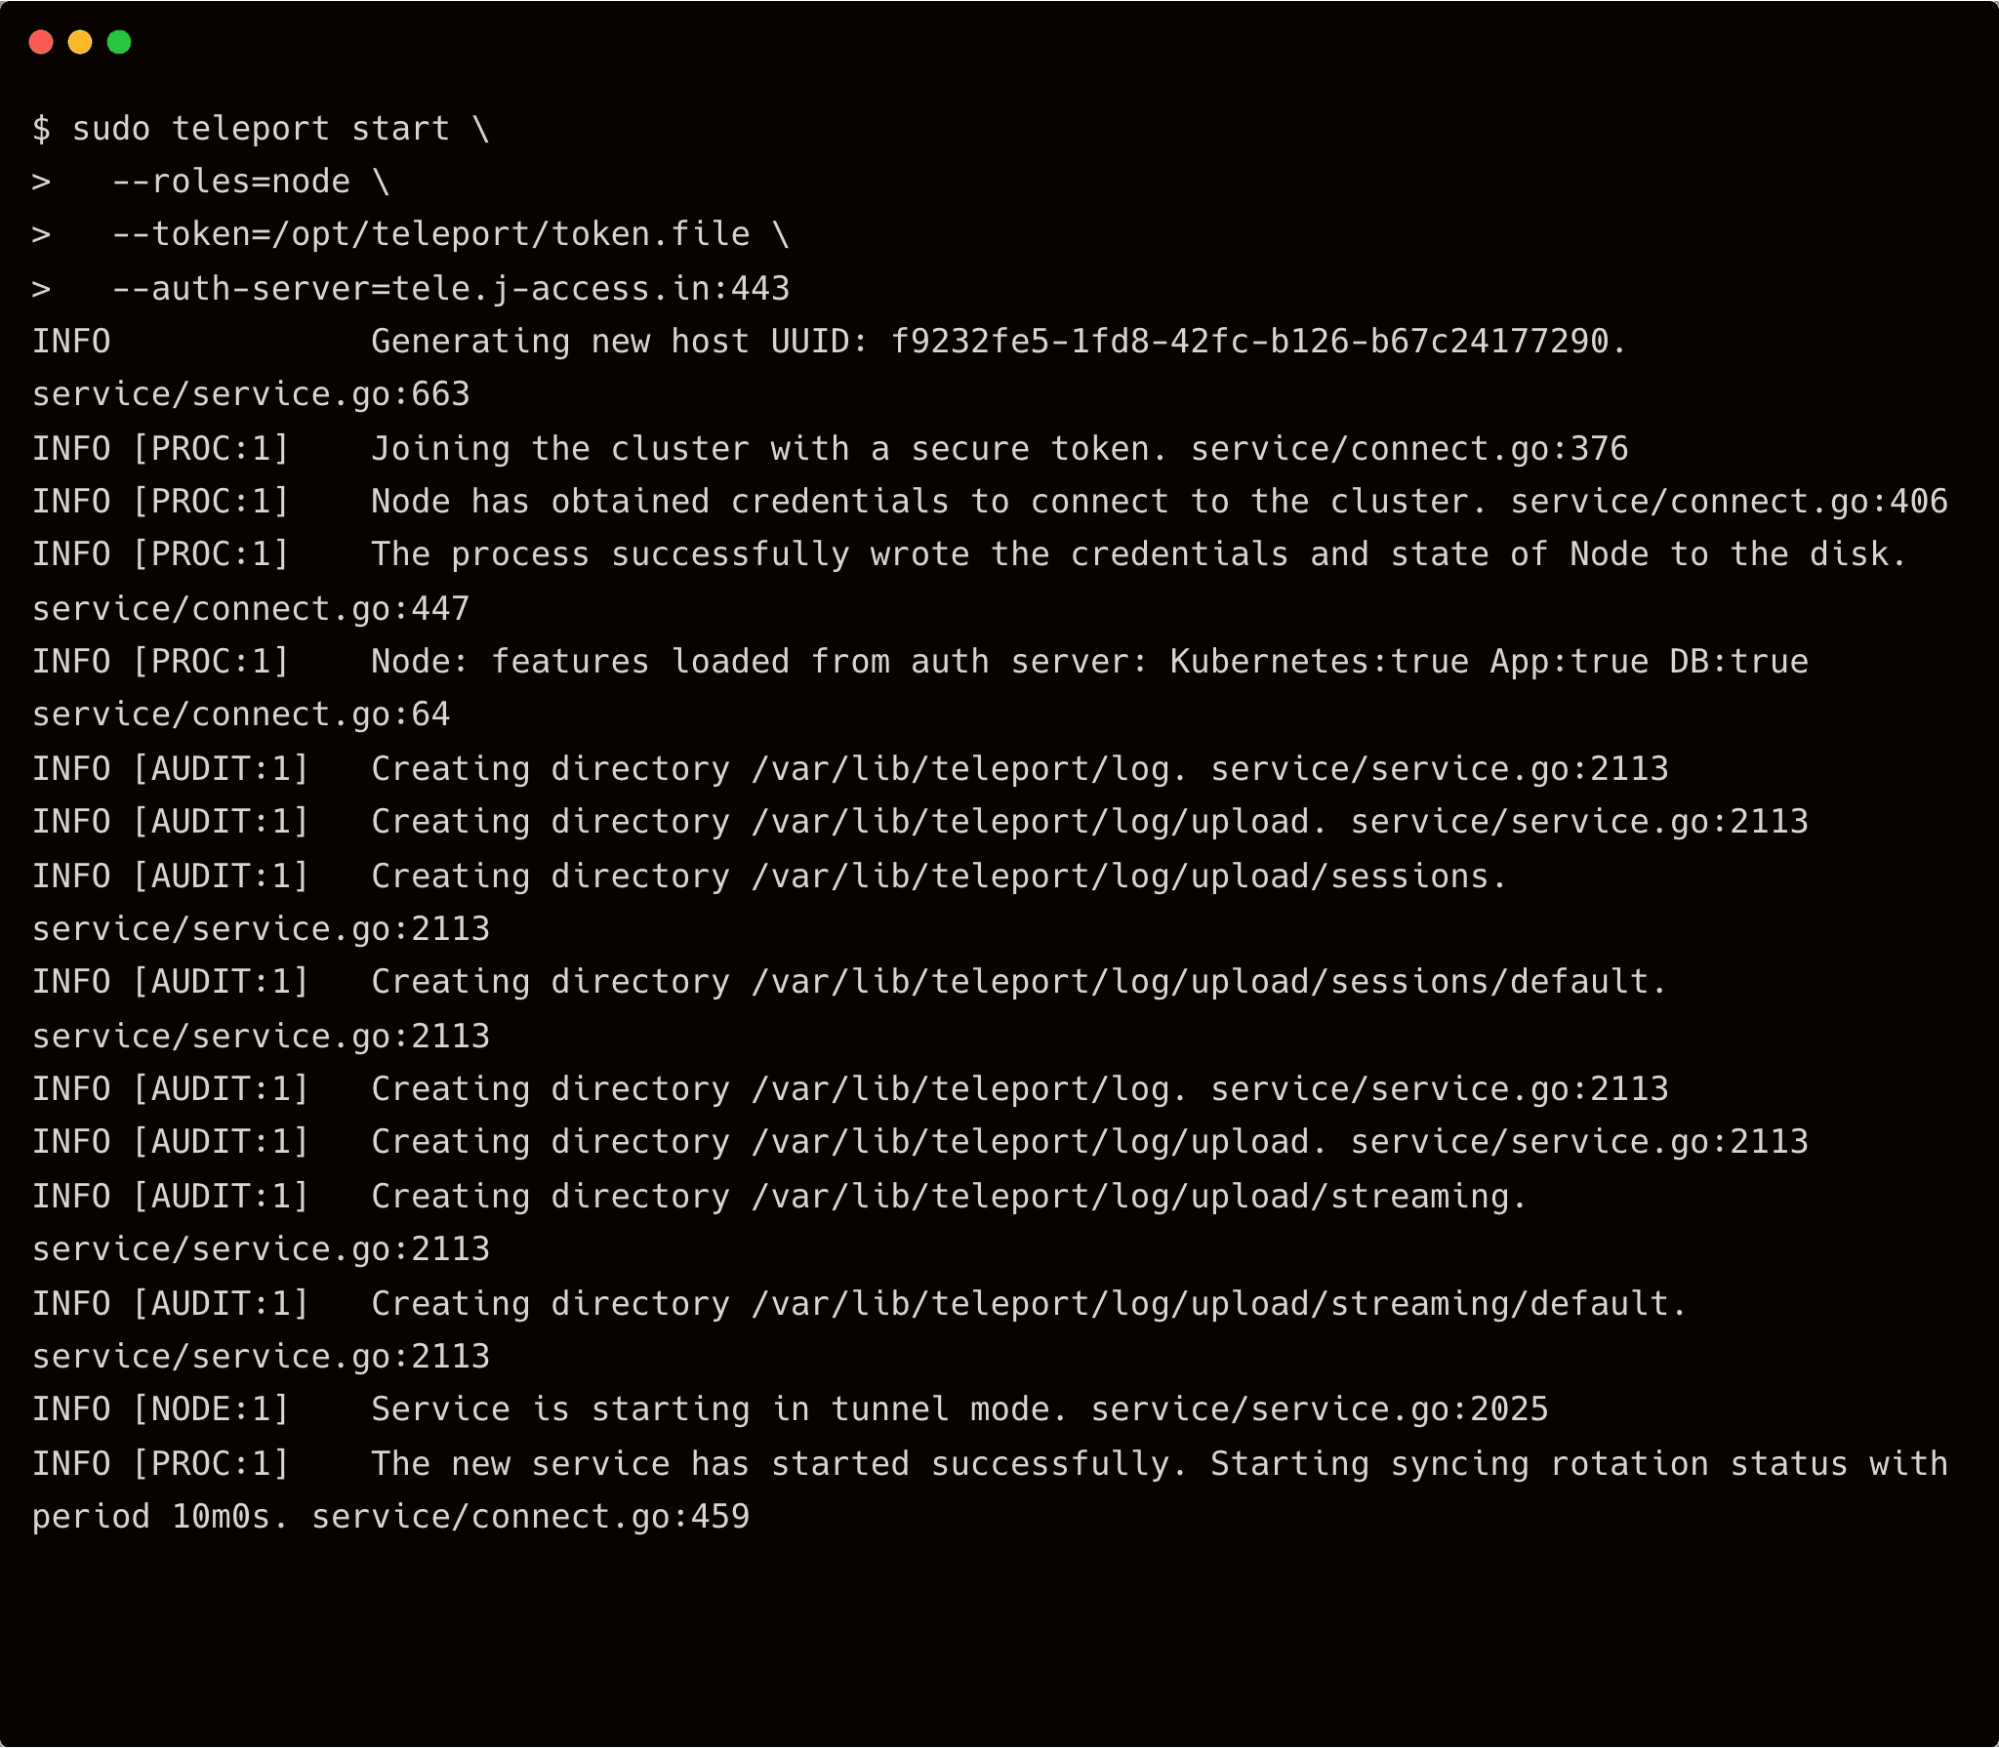
On the bastion host, run the below command to verify that the node has successfully joined the cluster.
$ sudo tctl nodes ls
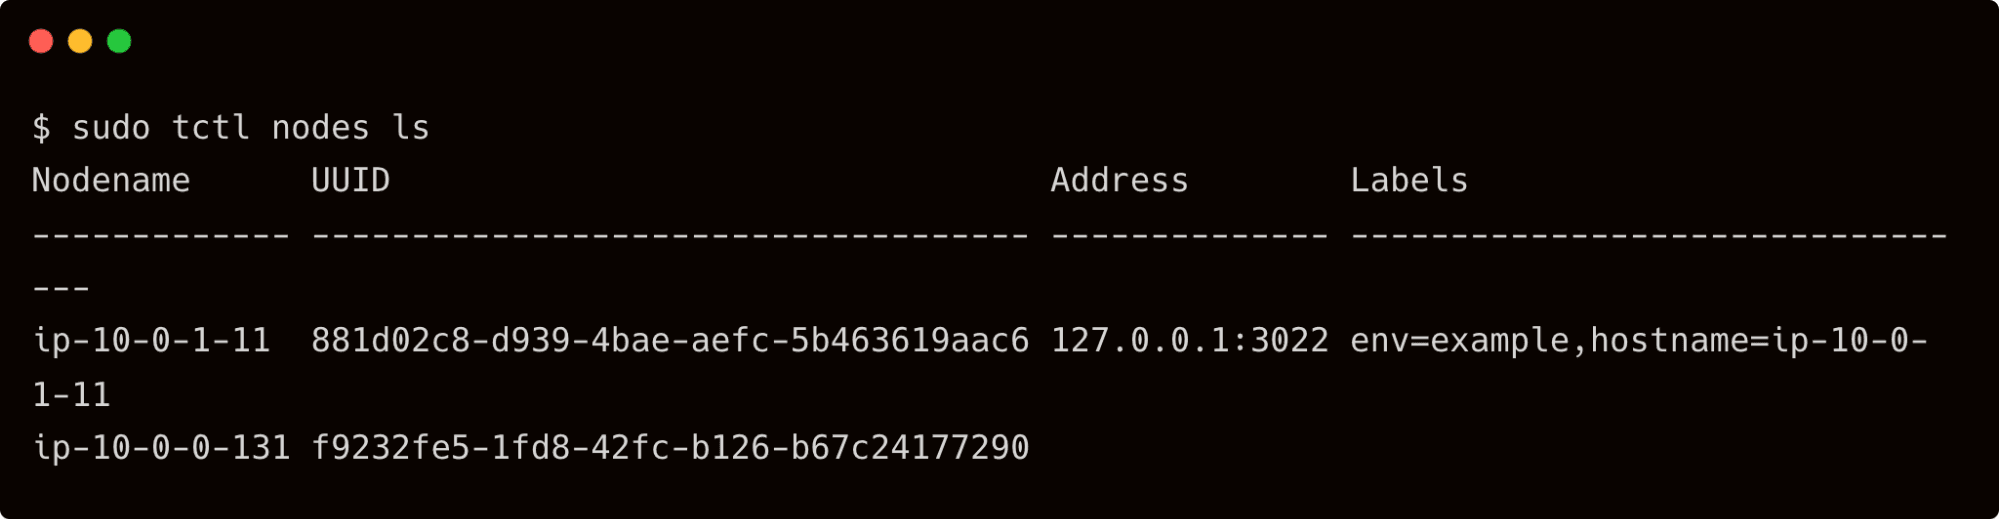
You should see the new node added to the cluster when you refresh the browser.
Step 3 - Securely accessing EC2 instances
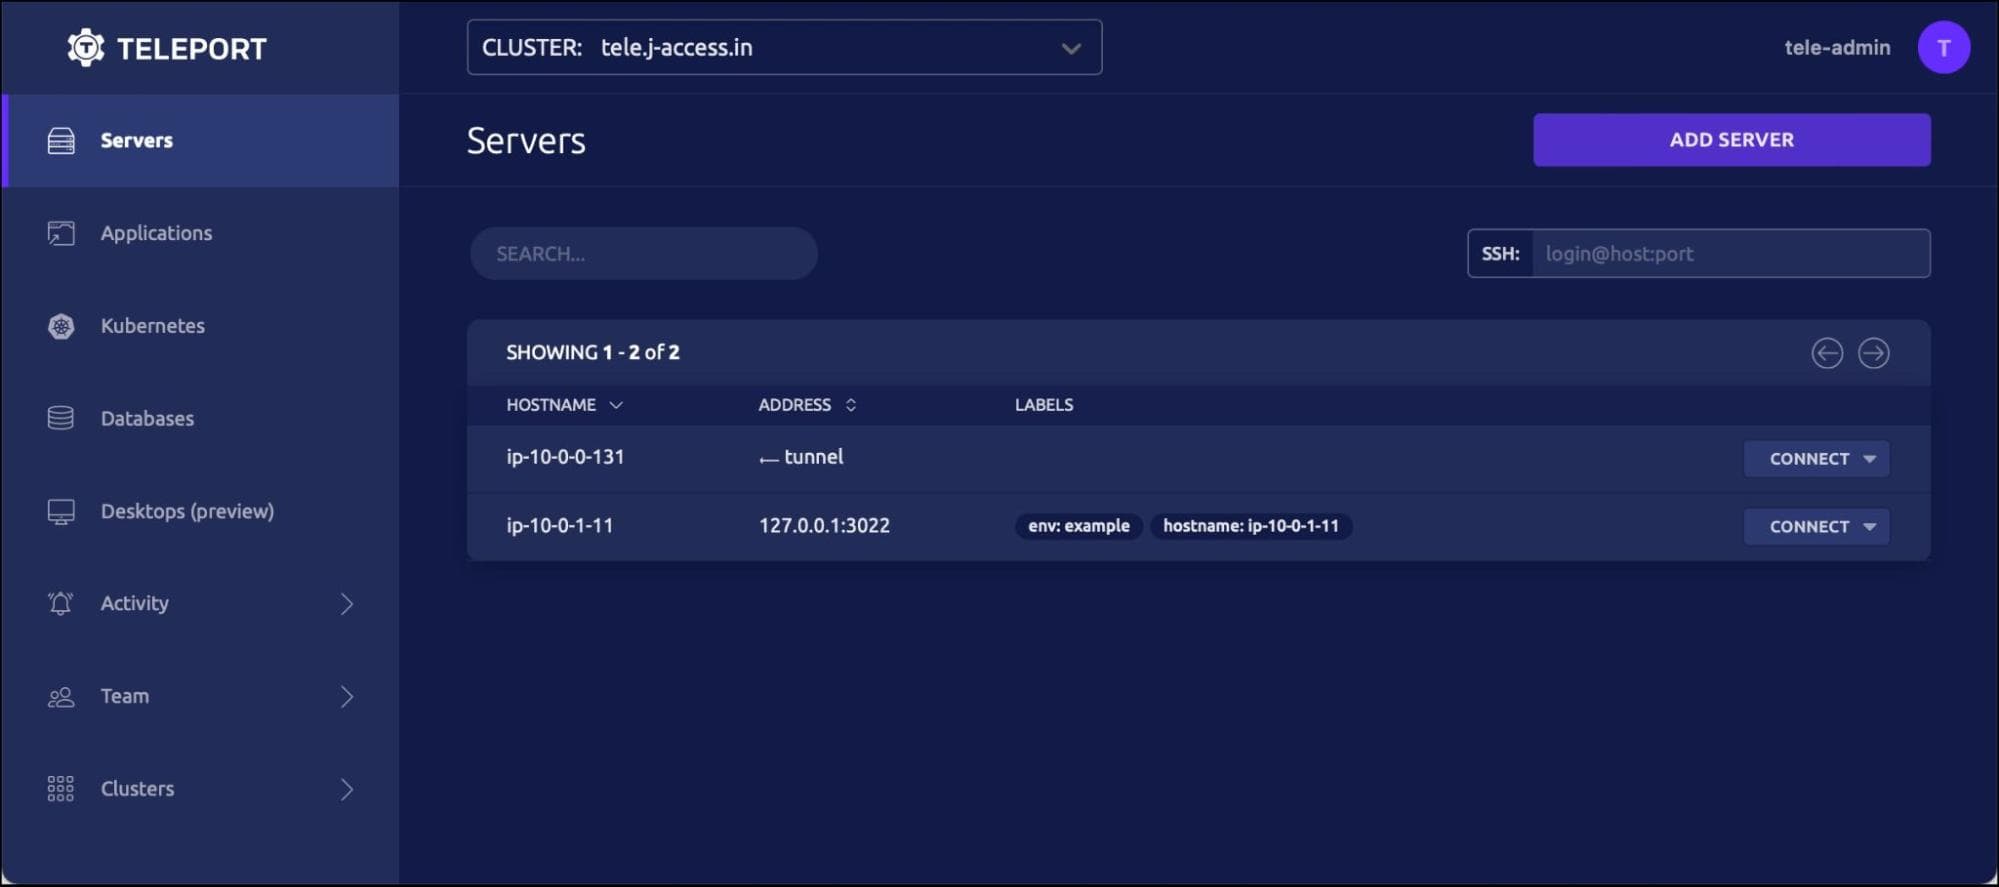
It’s time to access the node through the host running Teleport Proxy. Open the browser and visit the domain name associated with the elastic IP. Click on the node and select the user to open an SSH terminal within the browser.
If you are using macOS, install Teleport CLI with Homebrew. For other OS, refer to the documentation.
$ brew install teleport
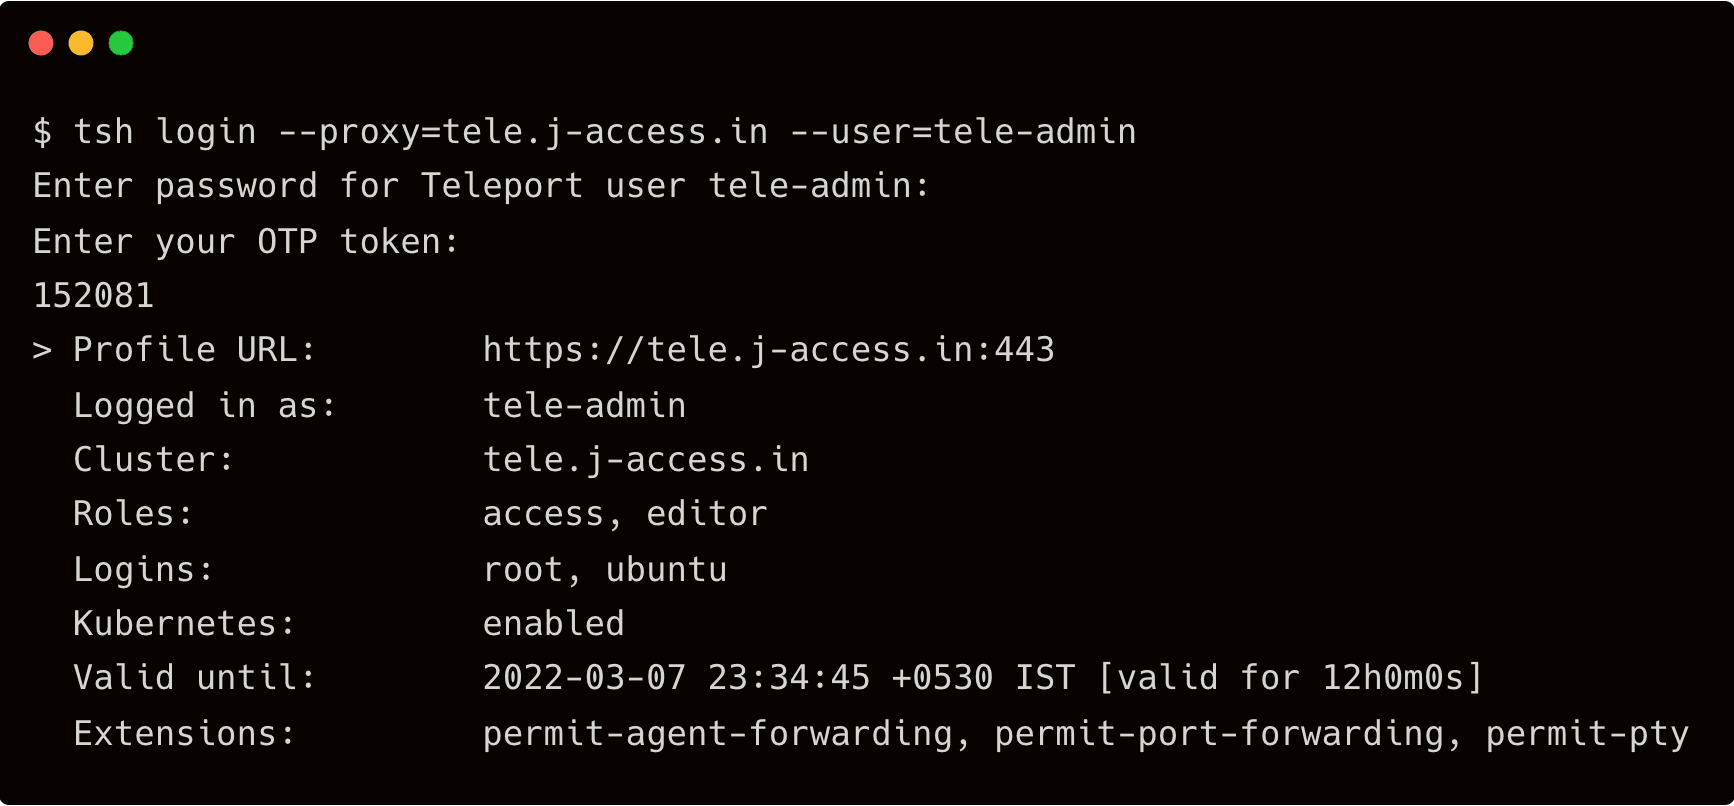
Let’s try to login and then use SSH to access the node. You will be prompted to enter the 2FA token to proceed.
Let’s try to login and then use SSH to access the node. You will be prompted to enter the 2FA token to proceed.
$ tsh login --proxy=tele.j-access.in --user=tele-admin
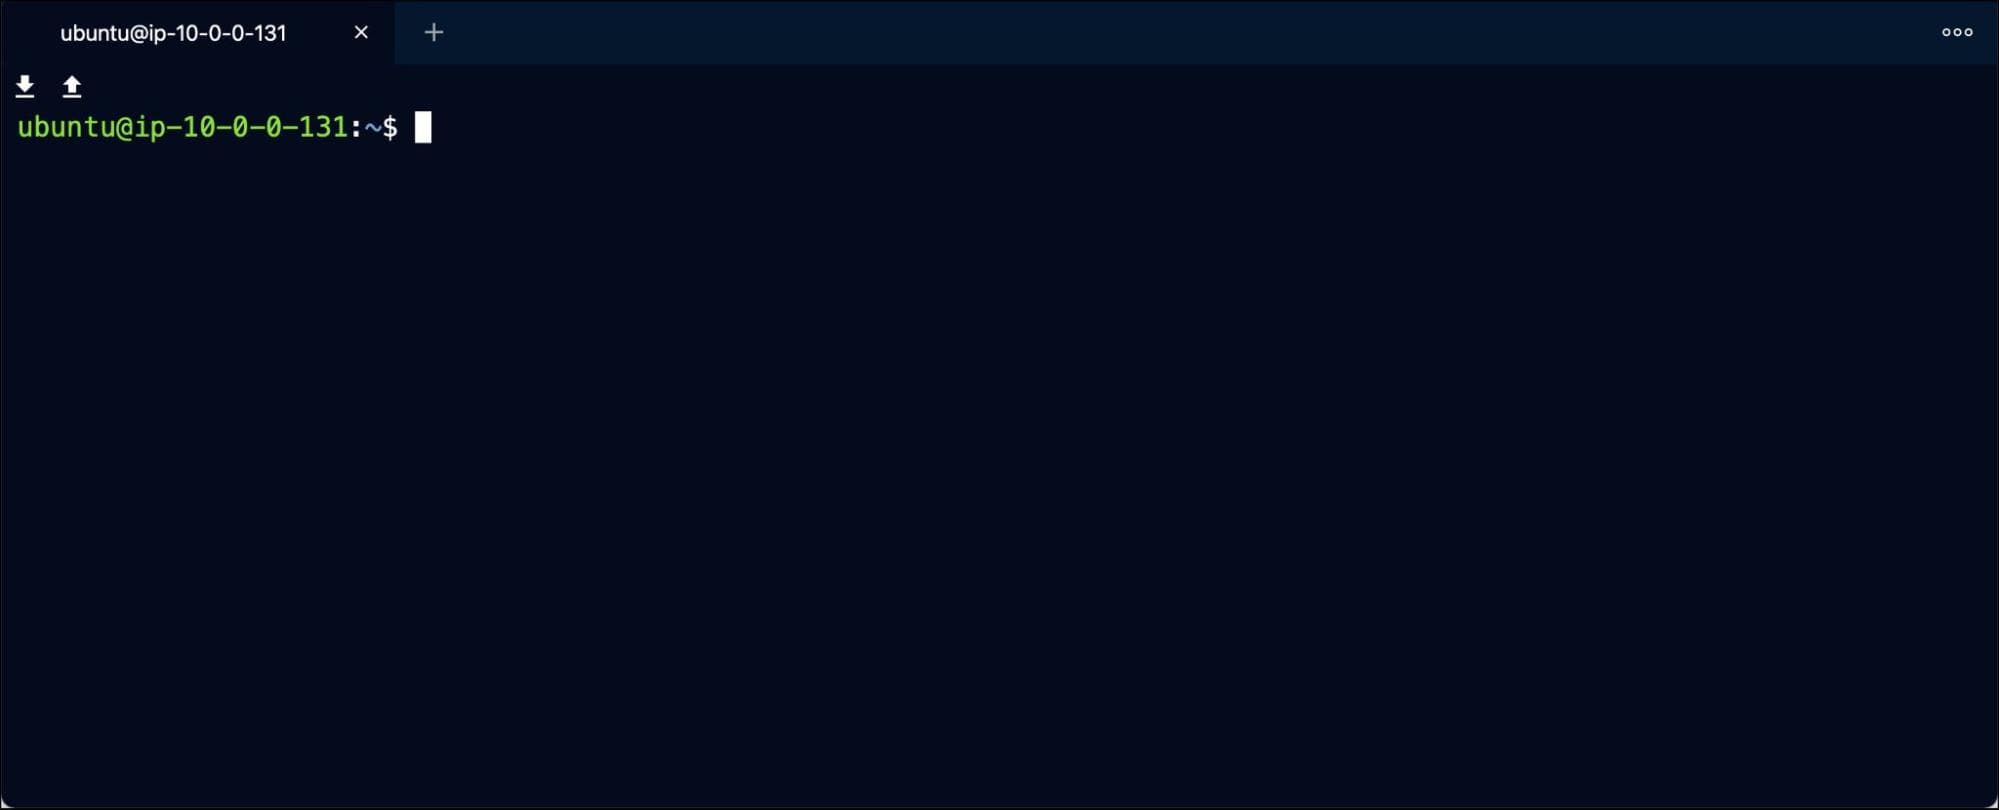
Now that you are authenticated, SSH into the private EC2 instance securely through Teleport proxy.
$ tsh ssh ubuntu@ip-10-0-0-131
Teleport cybersecurity blog posts and tech news
Every other week we'll send a newsletter with the latest cybersecurity news and Teleport updates.
Step 4 - Configuring zero trust security
With the Teleport proxy securely replacing the traditional bastion host, let’s revoke the security group responsible for allowing access to the EC2 instance running in the private subnet. This completely isolates the instance, making it highly secure.
$ aws ec2 revoke-security-group-ingress \
    --group-id sg-0e50c97f60606e1da \
    --protocol tcp \
    --port 22 \
    --source-group sg-082fcb3e66852ea15
Verify that you can still access the node through the Teleport proxy by using the tsh CLI instead of ssh.
$ tsh ssh ubuntu@ip-10-0-0-131
In this first part of the series, we explored Teleport Access to securely connect to Amazon EC2 instances running in a private subnet with no inbound access. In the second part, we will cover how to add SSO for AWS.
Table Of Contents
Teleport Newsletter
Stay up-to-date with the newest Teleport releases by subscribing to our monthly updates.