Detecting Impersonators and Compromised Identities with Teleport
What is Teleport?
Our customers use Teleport to solve a wide range of problems:
They access their infrastructure remotely without passwords or shared secrets, and replace shared credentials in CI/CD systems and workloads with mTLS. They eliminate the need for VPNs and enable Just-In-Time Access to web apps, cloud consoles, databases, and more.
Teleport features include:
- An identity-aware access proxy.
- A Certificate Authority (CA) that issues short-lived certificates.
- A unified access control system.
- A tunneling system to access resources behind firewalls.
- Access requests and reviews.
- Integrations with cloud services and tools.
Introduction
In these times of remote work, organizations need to take even more precautions to prevent unauthorized access of applications and systems.
We have already discussed how impersonators can be detected in the organization using Teleport's built-in features. Let's expand on these ideas, presenting additional metrics that can be used to detect suspicious behavior among employees, along with some options for expanding detection capabilities beyond what Teleport natively offers. We will introduce some of Teleport's hardening mechanisms as well, which can significantly limit the damage potential of a malicious insider.
Detection
When attempting to identify rogue users within the organization, it's not possible to achieve 100% accuracy. Since compromised users possess legitimate privileges within the system, administrators need heuristic methods to identify abnormal behavioral patterns. It's hard to determine baseline values, instead we can compare measured values to the mean of all employees.
Resources Interaction
Our previous article focused heavily on the users' sessions themselves. In this article, let's review a monitoring strategy based on how users interact with resources in the system.
We’ll be using Teleport’s Access Monitoring feature. Access Monitoring will let us run queries against events happened in the system.
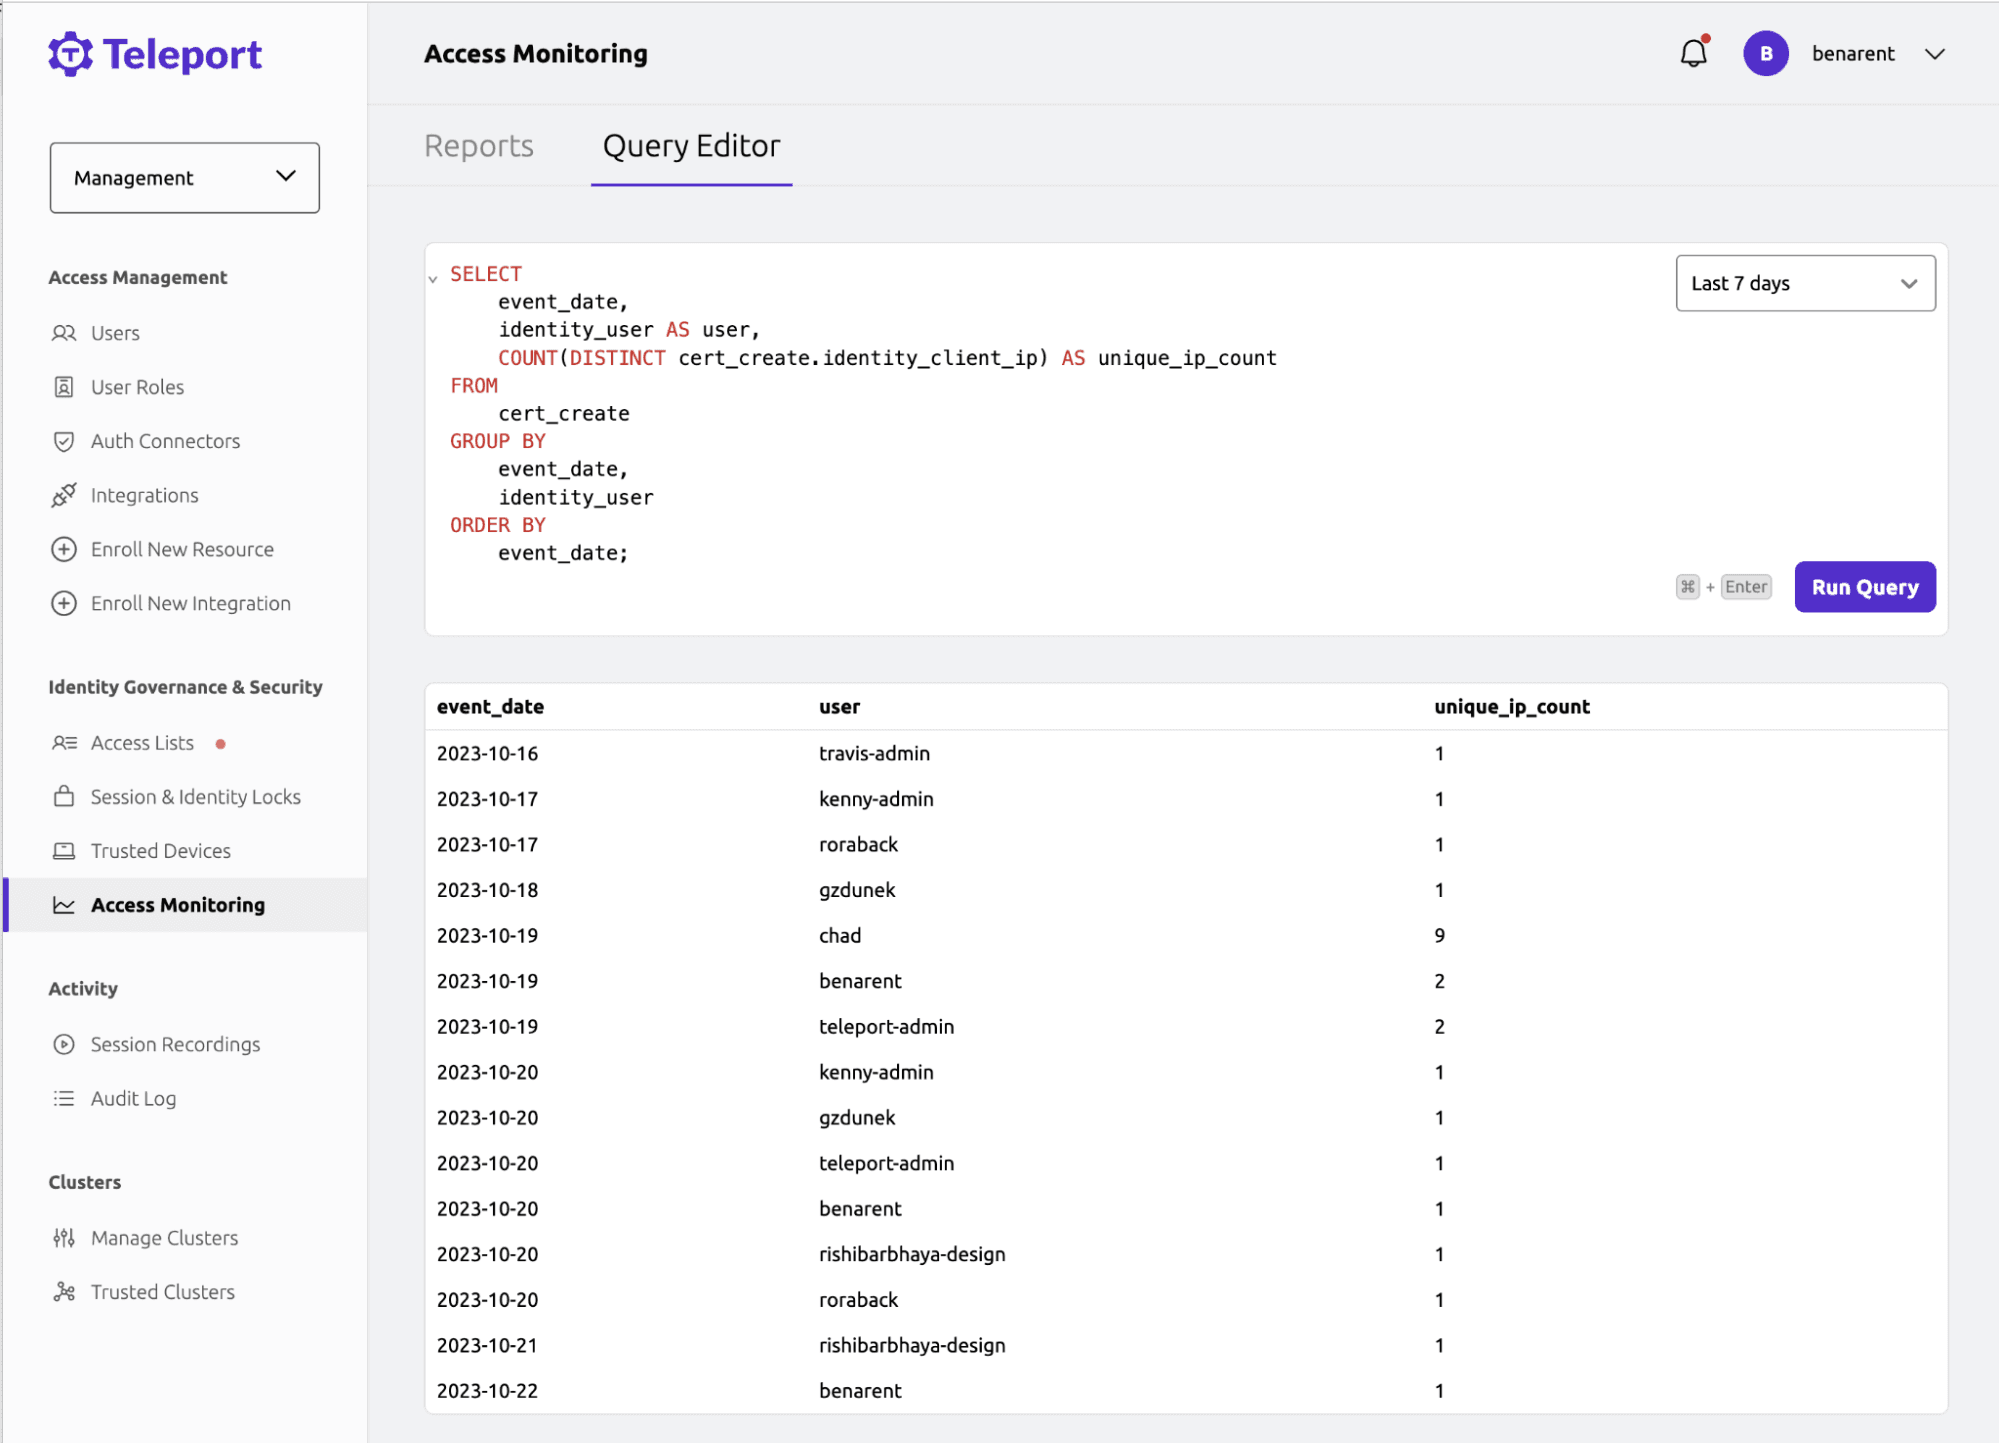
An example of an Access Monitoring query and a response.
Number of Distinct Resources Accessed
Legitimate users typically interact with a restricted number of resources, throughout their workday, as they focus on completing assigned tasks.
Conversely, a malicious user may seek to access as many resources as they can, to gather all accessible data within the system.
The following query will tally the distinct resources accessed by a specific user each day:
SELECT
  session_start.user,
  COUNT(DISTINCT session_start.server_id) AS unique_resources_accessed
FROM
    session_start
GROUP BY
    session_start.user,
    DATE(from_iso8601_timestamp(session_start.time) AT TIME ZONE 'America/Los_Angeles')
ORDER BY
  unique_resources_accessed
In some cases, smaller time frames might be more representative of automated attacks or attackers in a hurry to act and perform reconnaissance. By increasing the granularity to one hour, we can more easily single out peaks of abnormal activity:
SELECT
  session_start.user,
  COUNT(DISTINCT session_start.server_id) AS unique_resources_accessed
FROM
    session_start
GROUP BY
    session_start.user,
    DATE(from_iso8601_timestamp(session_start.time) AT TIME ZONE 'America/Los_Angeles'),
    HOUR(from_iso8601_timestamp(session_start.time) AT TIME ZONE 'America/Los_Angeles')
ORDER BY
  unique_resources_accessed
Suspicious Commands Monitoring
Teleport also allows querying the commands the users are submitting to the resources.
It can be done using the following query:
SELECT
  user,
  command
FROM
  exec
WHERE
  command LIKE '%/etc/passwd%';
There are a number of commands, or their fragments, that are rarely used for legitimate tasks, but are useful for attackers when gathering information, attempting privilege escalation and persisting access. Creating a comprehensive list of such commands exceeds the scope of this blog post.
A command can be important in the context of the resource it's acting upon and vice versa, as it can vary depending on the installed software and purpose of the machines. Therefore, coupling baseline commands with given resources would provide a higher fidelity signal.
With that in mind, the following list is a good start for malicious commands detection:
# Sensitive files
%/etc/passwd%
%/etc/shadow%
%/etc/sudoers%

# trail erasing
%HISTFILESIZE%
%HISTSIZE%
%bash_history%
%zsh_history%
%auth.log%
%service auditd stop%
%history -c%
%systemctl stop auditd%

# Reverse shelling
%-i >&%
%nc -l%

# Networking
%nc%
%netcat%
%tftp%
%nmap%

# Persistence
%.bashrc%
%crontab%
%modprobe%
Additionally, it might make sense to count the number of errored commands, as well as the failed attempts, while trying to access resources.
How Do I Start Creating My Own Rules?
This article contains just a few ideas of how Teleport's Access Monitoring can be used. Using Teleport events for detecting anomalies is a very robust and flexible mechanism.
Take a look at the Access Monitoring documentation for more information and examples.
Canaries
In some cases, it might be a good idea to create a canary. In information security, a canary is a marker purposely placed in sensitive areas of a system or network. If anyone attempts to access the canary, an alarm is raised - serving as an early warning sign of a security breach.
In the case of Teleport, one could create a resource as a canary with an enticing name (e.g., "Domain Controller Backup"). Then, any user that attempts to access such a resource should be identified and thoroughly investigated promptly. The following query would be useful for this purpose:
SELECT
   DISTINCT(session_start.user)
FROM
  session_start
WHERE
  session_start.server_hostname LIKE 'canary.example.com'
Another way to implement such a function would be to utilize a Thinkst Canary. This commercial product provides an out-of-the-box solution for a variety of different types of canaries. These range from generating simple canary links and various canary documents to entire canary virtual machines, which can be set up in a protected environment. Anytime a user attempts to open/access these canaries, the platform sets off an alarm notifying admins about a possible compromise.
Hardening
On top of robust monitoring, the following hardening mechanisms can lower the risk of rogue users accessing systems they are not authorized to. Tying cluster access to a physical client machine can also increase the security.
Require MFA for Administrative Actions
Multifactor Authentication (MFA) is a security process that requires users to provide two or more forms of verification, before granting them access to an account or system. It adds an extra layer of security beyond just a username and password combination, making it more difficult for unauthorized users to gain access. By using hardware keys to protect key resources and actions, administrators can enforce partial limitations of account abuse by tying it to a physical authentication device.
To set it up, edit the Auth Service's teleport.yaml file and restart all Auth Service instances:
# snippet from /etc/teleport.yaml:
auth_service:
  authentication:
    type: local
    # To make webauthn the only form of second factor allowed, set this field to 'webauthn'.
    second_factor: "webauthn"
    webauthn:
      rp_id: example.com
Authenticated Devices
Administrators, looking to go even further in tying the account to a provisioned physical device, can utilize the recently released Device Trust feature. It sets up a strong trust relation between the Teleport account and a given device, therefore enforcing the usage of a privileged account from a single machine. This way the access cannot be easily obtained from an attacker's computer.
Additionally, it makes user monitoring easier, while simultaneously making it harder to extract data.
This can be done in two steps. First, the user needs to be modified with require-trusted-device role:
kind: user
metadata:
  name: myuser
spec:
  created_by:
    time: "2023-08-14T13:42:22.291972449Z"
  roles:
  - access
  - auditor
  - editor
+ - require-trusted-device # add this line
  status:
    is_locked: false
Next, before shipping the device to the user, an admin needs to enroll the given machine:
$ tsh device enroll --current-device
How Do I Find More Hardening Ideas?
These hardening approaches are just the tip of the iceberg as far as Teleport's capabilities. More ideas can be found in the product documentation.
Customize your detection and hardening
Teleport offers a wide variety of tools allowing employees' access and activities monitoring. This post focused on some techniques for detecting abnormal behavior and ways of hardening the infrastructure in order to limit the blast radius of potential breaches. While the ideas described here should provide a good starting point for building a robust monitoring system using Teleport, there are countless configuration settings that can be tailored to the specific environment and risk profile.
Join over 3,000 Teleport users in our Slack community to discuss this and other topics!
Table Of Contents
Teleport Newsletter
Stay up-to-date with the newest Teleport releases by subscribing to our monthly updates.
Teleport Newsletter
Stay up-to-date with the newest Teleport releases by subscribing to our monthly updates.