Run the PagerDuty Access Request Plugin
With Teleport's PagerDuty integration, engineers can access the infrastructure they need to resolve incidents quickly—without longstanding admin permissions that can become a vector for attacks.
Teleport's PagerDuty integration allows you to treat Teleport Role Access Requests as PagerDuty incidents, notify the appropriate on-call team, and approve or deny the requests via Teleport. You can also configure the plugin to approve Role Access Requests automatically if the user making the request is on the on-call team for a service affected by an incident.
This integration is hosted on Teleport Cloud
In Teleport Enterprise Cloud, Teleport manages the PagerDuty integration for you, and you can enroll the PagerDuty integration from the Teleport Web UI.
Visit the Teleport Web UI and click Access Management on the menu bar at the top of the screen.
On the left sidebar, click Enroll New Integration to visit the "Enroll New Integration" page:
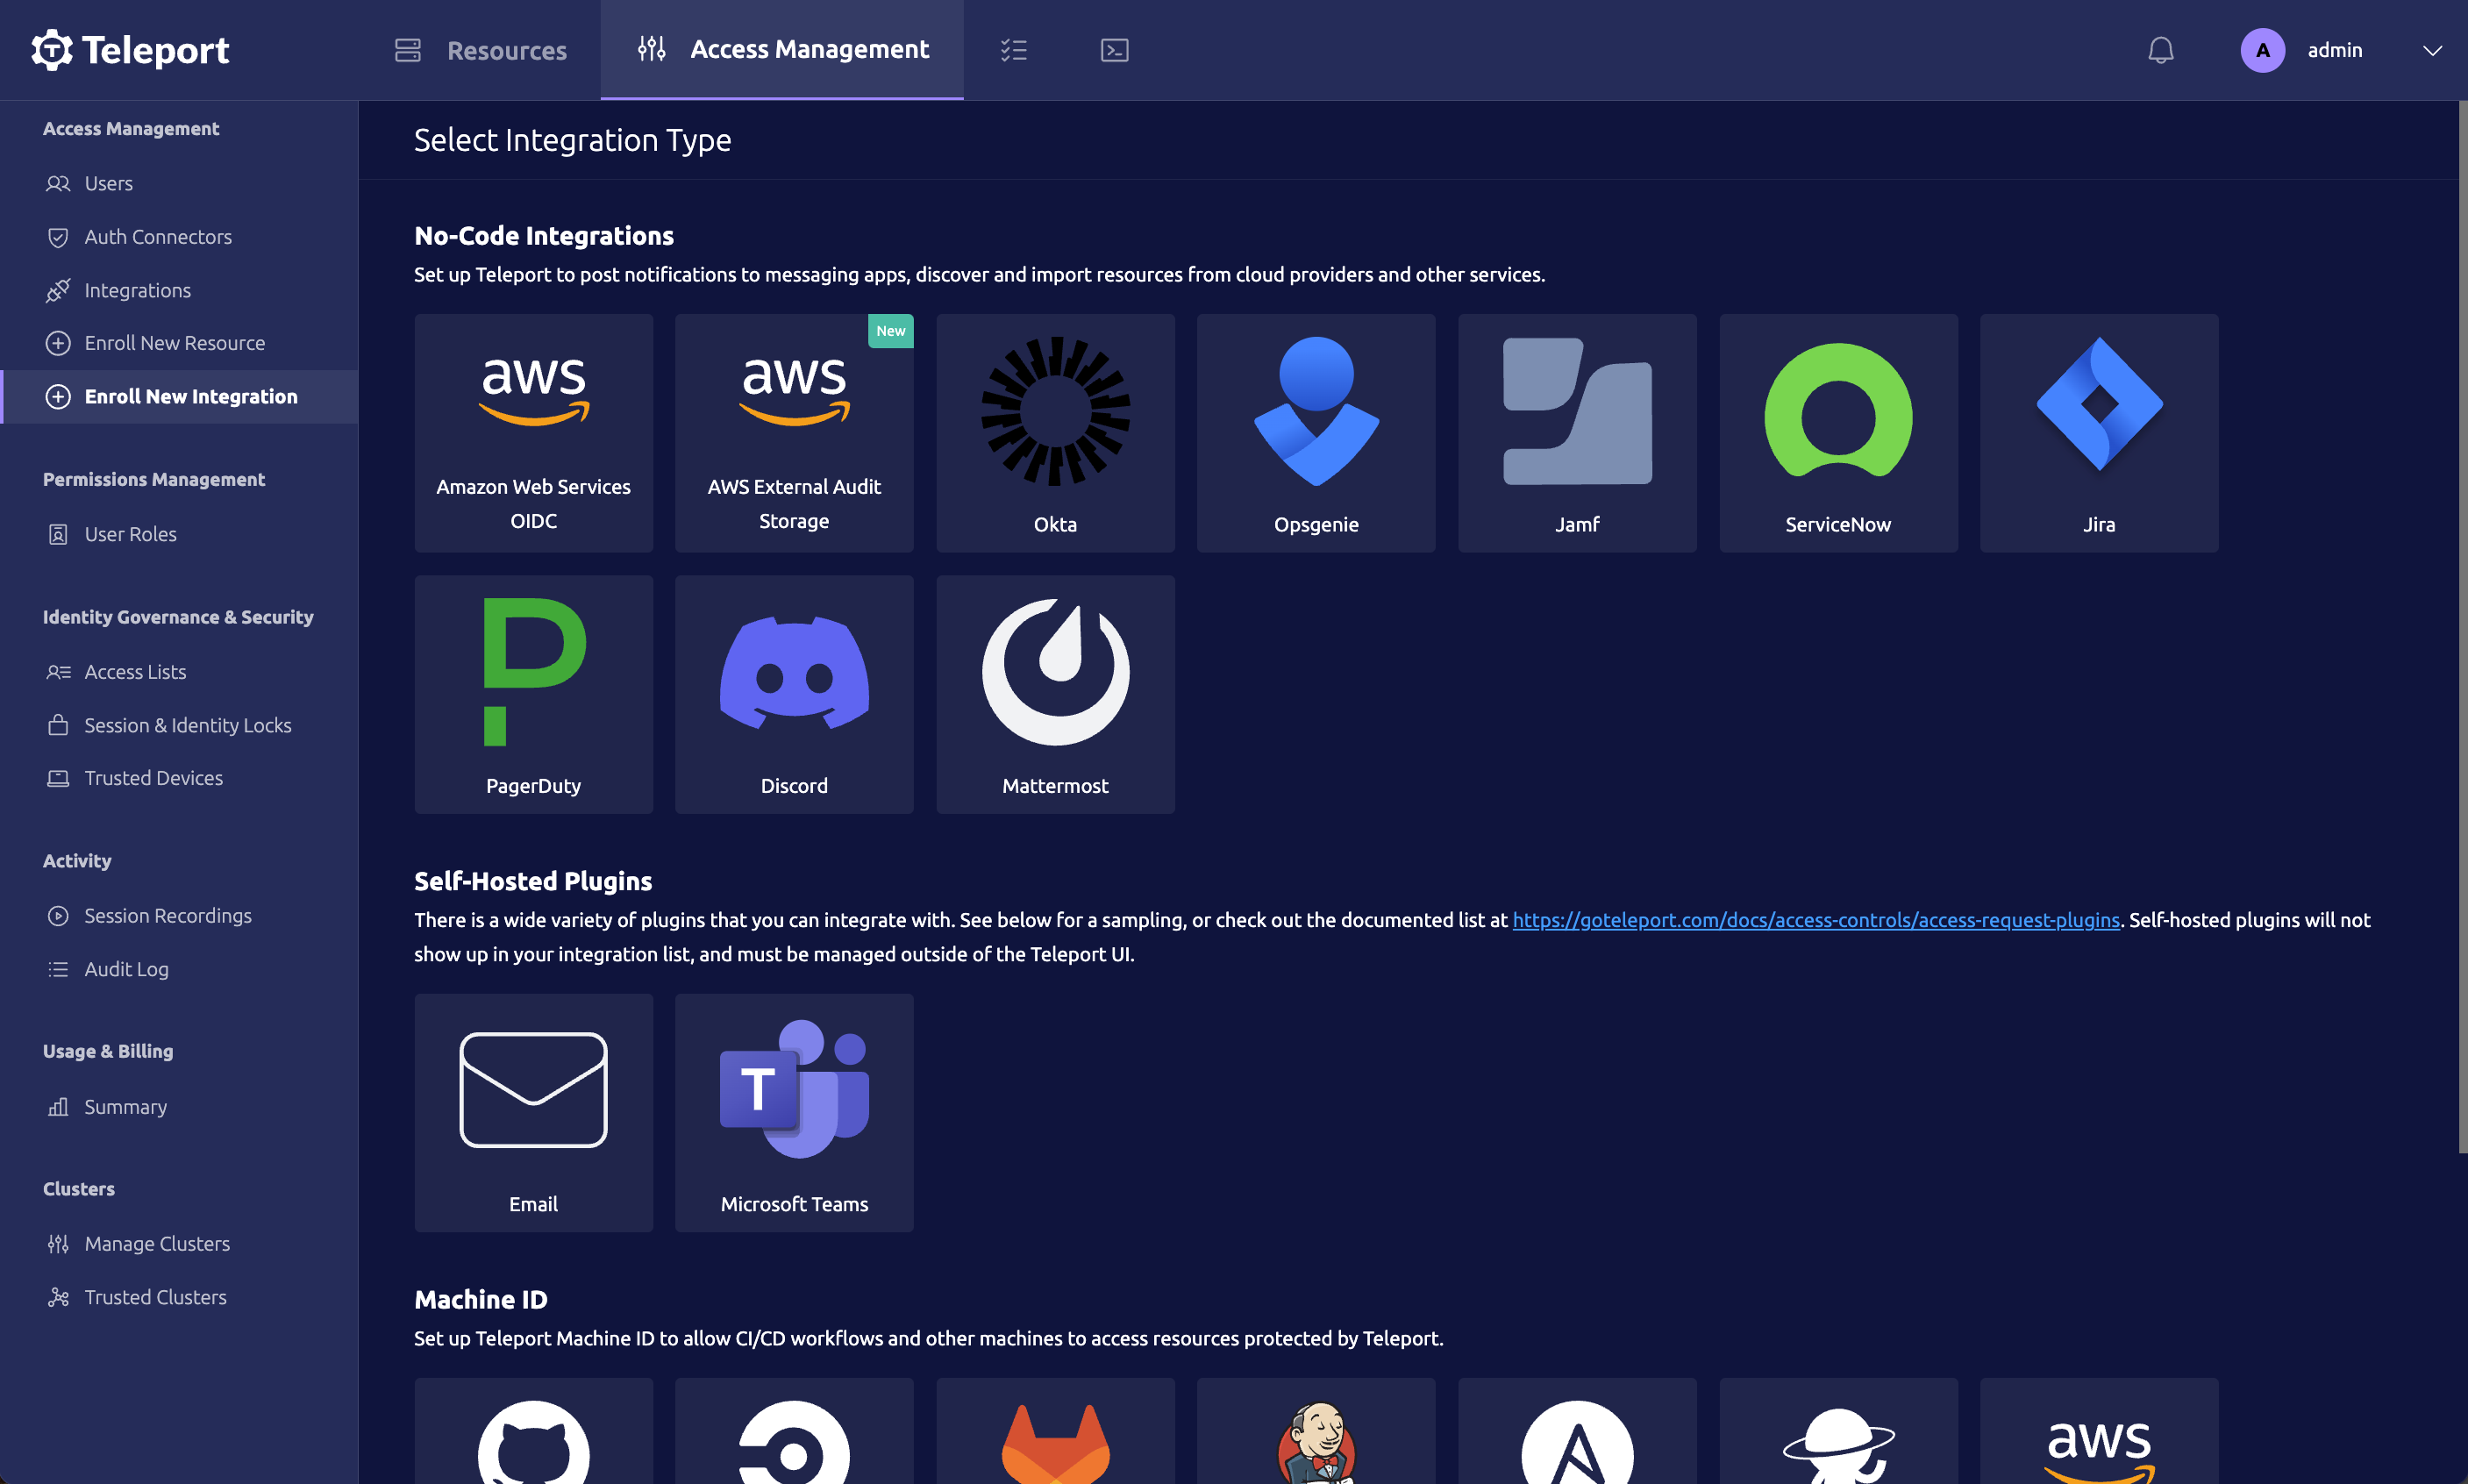
On the "Select Integration Type" menu, click the tile for your integration. You will see a page with instructions to set up the integration, as well as a form that you can use to configure the integration.
This guide will explain how to set up Teleport's Access Request plugin for PagerDuty.
Prerequisites
-
A running Teleport cluster. If you want to get started with Teleport, sign up for a free trial.
-
The Enterprise
tctladmin tool andtshclient tool version >= 15.4.22, which you can download from your Teleport account workspace or the Teleport Installation Downloads page.
Recommended: Configure Machine ID to provide short-lived Teleport
credentials to the plugin. Before following this guide, follow a Machine ID
deployment guide
to run the tbot binary on your infrastructure.
-
A PagerDuty account with the "Admin", "Global Admin", or "Account Owner" roles. These roles are necessary for generating an API token that can list and look up user profiles.
You can see your role by visiting your user page in PagerDuty, navigating to the "Permissions & Teams" tab, and checking the value of the "Base Role" field.
-
Either a Linux host or Kubernetes cluster where you will run the PagerDuty plugin.
-
To check that you can connect to your Teleport cluster, sign in with
tsh login, then verify that you can runtctlcommands using your current credentials.tctlis supported on macOS and Linux machines.For example:
$ tsh login --proxy=teleport.example.com [email protected]
$ tctl status
# Cluster  teleport.example.com
# Version  15.4.22
# CA pin   sha256:abdc1245efgh5678abdc1245efgh5678abdc1245efgh5678abdc1245efgh5678
If you can connect to the cluster and run the
tctl statuscommand, you can use your current credentials to run subsequenttctlcommands from your workstation. If you host your own Teleport cluster, you can also runtctlcommands on the computer that hosts the Teleport Auth Service for full permissions.
Step 1/8. Create services
To demonstrate the PagerDuty plugin, create two services in PagerDuty. For each service, fill in only the "Name" field and skip all other configuration screens, leaving options as the defaults:
Teleport Access Request NotificationsMy Critical Service
We will configure the PagerDuty plugin to create an incident in the Teleport Access Request Notifications service when certain users create an Access
Request.
For users on the on-call team for My Critical Service (in this case, your
PagerDuty user), we will configure the PagerDuty plugin to approve Access
Requests automatically, letting them investigate incidents on the service
quickly.
Step 2/8. Define RBAC resources
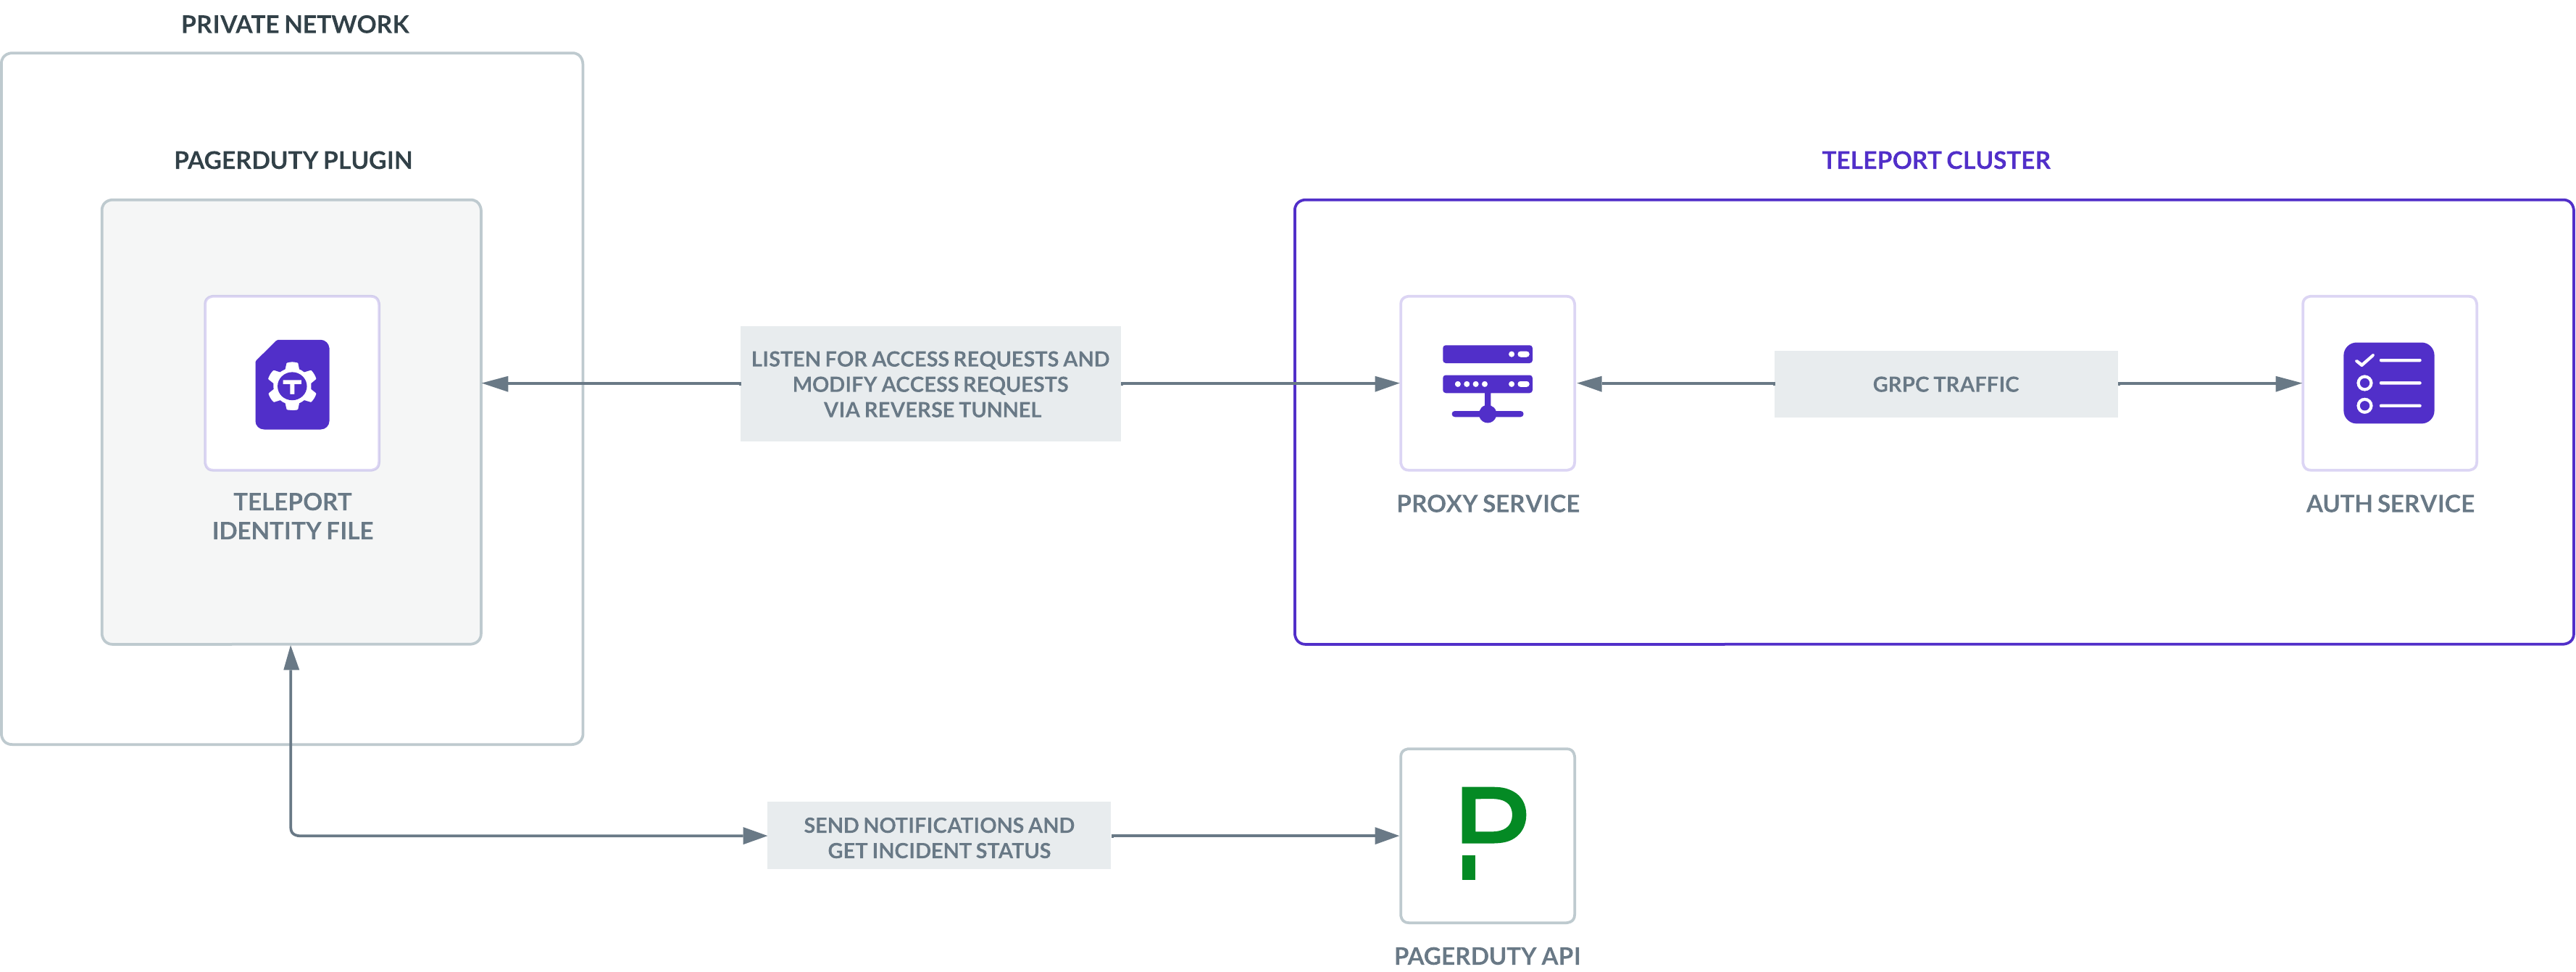
The Teleport PagerDuty plugin works by receiving Access Request events from the Teleport Auth Service and, based on these events, interacting with the PagerDuty API.
In this section, we will show you how to configure the PagerDuty plugin by defining the following RBAC resources:
- A role called
editor-requester, which can request the built-ineditorrole. We will configure this role to open a PagerDuty incident whenever a user requests it, notifying the on-call team for theTeleport Access Request Notificationsservice. - A role called
demo-role-requester, which can request a role calleddemo-role. We will configure the PagerDuty plugin to auto-approve this request whenever the user making it is on the on-call team forMy Critical Service. - A user and role called
access-pluginthat the PagerDuty plugin will assume in order to authenticate to the Teleport Auth Service. This role will have permissions to approve Access Requests from users on the on-call team forMy Critical Serviceautomatically. - A role called
access-plugin-impersonatorthat allows you to generate signed credentials that the PagerDuty plugin can use to authenticate with your Teleport cluster.
editor-requester
Create a file called editor-request-rbac.yaml with the following content,
which defines a role called editor-reviewer that can review requests for the
editor role, plus an editor-requester role that can request this role.
kind: role
version: v5
metadata:
  name: editor-reviewer
spec:
  allow:
    review_requests:
      roles: ['editor']
---
kind: role
version: v5
metadata:
  name: editor-requester
spec:
  allow:
    request:
      roles: ['editor']
      thresholds:
        - approve: 1
          deny: 1
      annotations:
        pagerduty_notify_service: ["Teleport Access Request Notifications"]
The Teleport Auth Service annotates Access Request events with metadata based on the roles of the Teleport user submitting the Access Request. The PagerDuty plugin reads these annotations to determine how to respond to a new Access Request event.
Whenever a user with the editor-requester role requests the editor role, the
PagerDuty plugin will read the pagerduty_notify_service annotation and notify
PagerDuty to open an incident in the specified service, Teleport Access Request Notifications, until someone with the editor-reviewer role approves or denies
the request.
Create the roles you defined:
$ tctl create -f editor-request-rbac.yaml
role 'editor-reviewer' has been created
role 'editor-requester' has been created
demo-role-requester
Create a file called demo-role-requester.yaml with the following content:
kind: role
version: v5
metadata:
  name: demo-role
---
kind: role
version: v5
metadata:
  name: demo-role-requester
spec:
  allow:
    request:
      roles: ['demo-role']
      thresholds:
        - approve: 1
          deny: 1
      annotations:
        pagerduty_services: ["My Critical Service"]
Users with the demo-role-requester role can request the demo-role role. When
such a user makes this request, the PagerDuty plugin will read the
pagerduty_services annotation. If the user making the request is on the
on-call team for a service listed as a value for the annotation, the plugin will
approve the Access Request automatically.
In this case, the PagerDuty plugin will approve any requests from users on the
on-call team for My Critical Service.
Create the resources:
$ tctl create -f demo-role-requester.yaml;
For auto-approval to work, the user creating an Access Request must have a
Teleport username that is also the email address associated with a PagerDuty
account. In this guide, we will add the demo-role-requester role to your own
Teleport account—which we assume is also your email address for PagerDuty—so you
can request the demo-role role.
access-plugin
Teleport's Access Request plugins authenticate to your Teleport cluster as a user with permissions to list, read, and update Access Requests. This way, plugins can retrieve Access Requests from the Teleport Auth Service, present them to reviewers, and modify them after a review.
Define a user and role called access-plugin by adding the following content to
a file called access-plugin.yaml:
kind: role
version: v5
metadata:
  name: access-plugin
spec:
  allow:
    rules:
      - resources: ['access_request']
        verbs: ['list', 'read']
      - resources: ['access_plugin_data']
        verbs: ['update']
    review_requests:
      roles: ['demo-role']
      where: 'contains(request.system_annotations["pagerduty_services"], "My Critical Service")'
---
kind: user
metadata:
  name: access-plugin
spec:
  roles: ['access-plugin']
version: v2
Notice that the access-plugin role includes an allow.review_requests.roles
field with demo-role as a value. This allows the plugin to review requests for
the demo-role role.
We are also restricting the access-plugin role to reviewing only Access
Requests associated with My Critical Service. To do so, we have defined a
predicate expression in the review_requests.where field. This expression
indicates that the plugin cannot review requests for demo-role unless the
request contains an annotation with the key pagerduty_services and the value
My Critical Service.
How "where" conditions work
The where field includes a predicate expression that determines whether a
reviewer is allowed to review a specific request. You can include two functions
in a predicate expression:
| Function | Description | Example |
|---|---|---|
equals | A field is equivalent to a value. | equals(request.reason, "resolve an incident") |
contains | A list of strings includes a value. | contains(reviewer.traits["team"], "devops") |
When you use the where field, you can include the following fields in your
predicate expression:
| Field | Type | Description |
|---|---|---|
reviewer.roles | []string | A list of the reviewer's Teleport role names |
reviewer.traits | map[string][]string | A map of the reviewer's Teleport traits by the name of the trait |
request.roles | []string | A list of the Teleport roles a user is requesting |
request.reason | string | The reason attached to the request |
request.system_annotations | map[string][]string | A map of annotations for the request by annotation key, e.g., pagerduty_services |
You can combine functions using the following operators:
| Operator | Format | Description |
|---|---|---|
&& | function && function | Evaluates to true if both functions evaluate to true |
|| | function || function | Evaluates to true if either one or both functions evaluate to true |
! | !function | Evaluates to true if the function evaluates to false |
An example of a function is equals(request.reason, "resolve an incident"). To
configure an allow condition to match any Access Request that does not include
the reason, "resolve an incident", you could use the function,
!equals(request.reason, "resolve an incident").
Create the user and role:
$ tctl create -f access-plugin.yaml
access-plugin-impersonator
As with all Teleport users, the Teleport Auth Service authenticates the
access-plugin user by issuing short-lived TLS credentials. In this case, we
will need to request the credentials manually by impersonating the
access-plugin role and user.
If you are running a self-hosted Teleport Enterprise cluster and are using
tctl from the Auth Service host, you will already have impersonation
privileges.
To grant your user impersonation privileges for access-plugin, define a role
called access-plugin-impersonator by pasting the following YAML document into
a file called access-plugin-impersonator.yaml:
kind: role
version: v5
metadata:
  name: access-plugin-impersonator
spec:
  allow:
    impersonate:
      roles:
      - access-plugin
      users:
      - access-plugin
Create the access-plugin-impersonator role:
$ tctl create -f access-plugin-impersonator.yaml
Add roles to your user
Later in this guide, your Teleport user will take three actions that require additional permissions:
- Generate signed credentials that the PagerDuty plugin will use to connect to your Teleport Cluster
- Manually review an Access Request for the
editorrole - Create an Access Request for the
demo-rolerole
To grant these permissions to your user, give your user the editor-reviewer,
access-plugin-impersonator, and demo-role-requester roles we defined
earlier.
Retrieve your user definition:
$ TELEPORT_USER=$(tsh status --format=json | jq -r .active.username)
$ tctl get users/${TELEPORT_USER?} > myuser.yaml
Edit myuser.yaml to include the roles you just created:
  roles:
   - access
   - auditor
   - editor
+  - editor-reviewer
+  - access-plugin-impersonator
+  - demo-role-requester
Apply your changes:
$ tctl create -f myuser.yaml
Log out of your Teleport cluster and log in again. You will now be able to
review requests for the editor role, request the demo-role role, and
generate signed certificates for the access-plugin role and user.
Create a user who will request access
Create a user called myuser who has the editor-requester role. Later in this
guide, you will create an Access Request as this user to test the PagerDuty
plugin:
$ tctl users add myuser --roles=editor-requester
tctl will print an invitation URL to your terminal. Visit the URL and log in
as myuser for the first time, registering credentials as configured for your
Teleport cluster.
Step 3/8. Install the Teleport PagerDuty plugin
- Download
- Docker Image
- From Source
- Helm Chart
We currently only provide linux-amd64 binaries. You can also compile these
plugins from source. You can run the plugin from a remote host or your local
development machine.
$ curl -L -O https://get.gravitational.com/teleport-access-pagerduty-v15.4.22-linux-amd64-bin.tar.gz
$ tar -xzf teleport-access-pagerduty-v15.4.22-linux-amd64-bin.tar.gz
$ cd teleport-access-pagerduty
$ sudo ./install
Make sure the binary is installed:
$ teleport-pagerduty version
teleport-pagerduty v15.4.22 git:teleport-pagerduty-v15.4.22-fffffffff go1.21
We currently only provide Docker images for linux-amd64.
Pull the Docker image for the latest access request plugin by running the following command:
$ docker pull public.ecr.aws/gravitational/teleport-plugin-pagerduty:15.4.22
Make sure the plugin is installed by running the following command:
$ docker run public.ecr.aws/gravitational/teleport-plugin-pagerduty:15.4.22 version
teleport-pagerduty v15.4.22 git:teleport-pagerduty-v15.4.22-api/14.0.0-gd1e081e 1.21
For a list of available tags, visit Amazon ECR Public Gallery.
To install from source you need git and go installed. If you do not have Go
installed, visit the Go downloads page.
$ git clone https://github.com/gravitational/teleport -b branch/v15
$ cd teleport/integrations/access/pagerduty
$ git checkout 15.4.22
$ make
Move the teleport-pagerduty binary into your PATH.
Make sure the binary is installed:
$ teleport-pagerduty version
teleport-pagerduty v15.4.22 git:teleport-pagerduty-v15.4.22-fffffffff go1.21
Allow Helm to install charts that are hosted in the Teleport Helm repository:
$ helm repo add teleport https://charts.releases.teleport.dev
Update the cache of charts from the remote repository:
$ helm repo update
Step 4/8. Export the access plugin identity
Give the plugin access to a Teleport identity file. We recommend using Machine
ID for this in order to produce short-lived identity files that are less
dangerous if exfiltrated, though in demo deployments, you can generate
longer-lived identity files with tctl:
- Machine ID
- Long-lived identity files
Configure tbot with an output that will produce the credentials needed by
the plugin. As the plugin will be accessing the Teleport API, the correct
output type to use is identity.
For this guide, the directory destination will be used. This will write these
credentials to a specified directory on disk. Ensure that this directory can
be written to by the Linux user that tbot runs as, and that it can be read by
the Linux user that the plugin will run as.
Modify your tbot configuration to add an identity output.
If running tbot on a Linux server, use the directory output to write
identity files to the /opt/machine-id directory:
outputs:
- type: identity
  destination:
    type: directory
    # For this guide, /opt/machine-id is used as the destination directory.
    # You may wish to customize this. Multiple outputs cannot share the same
    # destination.
    path: /opt/machine-id
If running tbot on Kubernetes, write the identity file to Kubernetes secret
instead:
outputs:
  - type: identity
    destination:
      type: kubernetes_secret
      name: teleport-plugin-pagerduty-identity
If operating tbot as a background service, restart it. If running tbot in
one-shot mode, execute it now.
You should now see an identity file under /opt/machine-id or a Kubernetes
secret named teleport-plugin-pagerduty-identity. This contains the private key and signed
certificates needed by the plugin to authenticate with the Teleport Auth
Service.
Like all Teleport users, access-plugin needs signed credentials in order to
connect to your Teleport cluster. You will use the tctl auth sign command to
request these credentials.
The following tctl auth sign command impersonates the access-plugin user,
generates signed credentials, and writes an identity file to the local
directory:
$ tctl auth sign --user=access-plugin --out=identity
The plugin connects to the Teleport Auth Service's gRPC endpoint over TLS.
The identity file, identity, includes both TLS and SSH credentials. The
plugin uses the SSH credentials to connect to the Proxy Service, which
establishes a reverse tunnel connection to the Auth Service. The plugin
uses this reverse tunnel, along with your TLS credentials, to connect to the
Auth Service's gRPC endpoint.
Certificate Lifetime
By default, tctl auth sign produces certificates with a relatively short
lifetime. For production deployments, we suggest using Machine
ID to programmatically issue and renew
certificates for your plugin. See our Machine ID getting started
guide to learn more.
Note that you cannot issue certificates that are valid longer than your existing credentials.
For example, to issue certificates with a 1000-hour TTL, you must be logged in with a session that is
valid for at least 1000 hours. This means your user must have a role allowing
a max_session_ttl of at least 1000 hours (60000 minutes), and you must specify a --ttl
when logging in:
$ tsh login --proxy=teleport.example.com --ttl=60060
If you are running the plugin on a Linux server, create a data directory to hold certificate files for the plugin:
$ sudo mkdir -p /var/lib/teleport/api-credentials
$ sudo mv identity /var/lib/teleport/plugins/api-credentials
If you are running the plugin on Kubernetes, Create a Kubernetes secret that contains the Teleport identity file:
$ kubectl -n teleport create secret generic --from-file=identity teleport-plugin-pagerduty-identity
Once the Teleport credentials expire, you will need to renew them by running the
tctl auth sign command again.
Step 5/8. Set up a PagerDuty API key
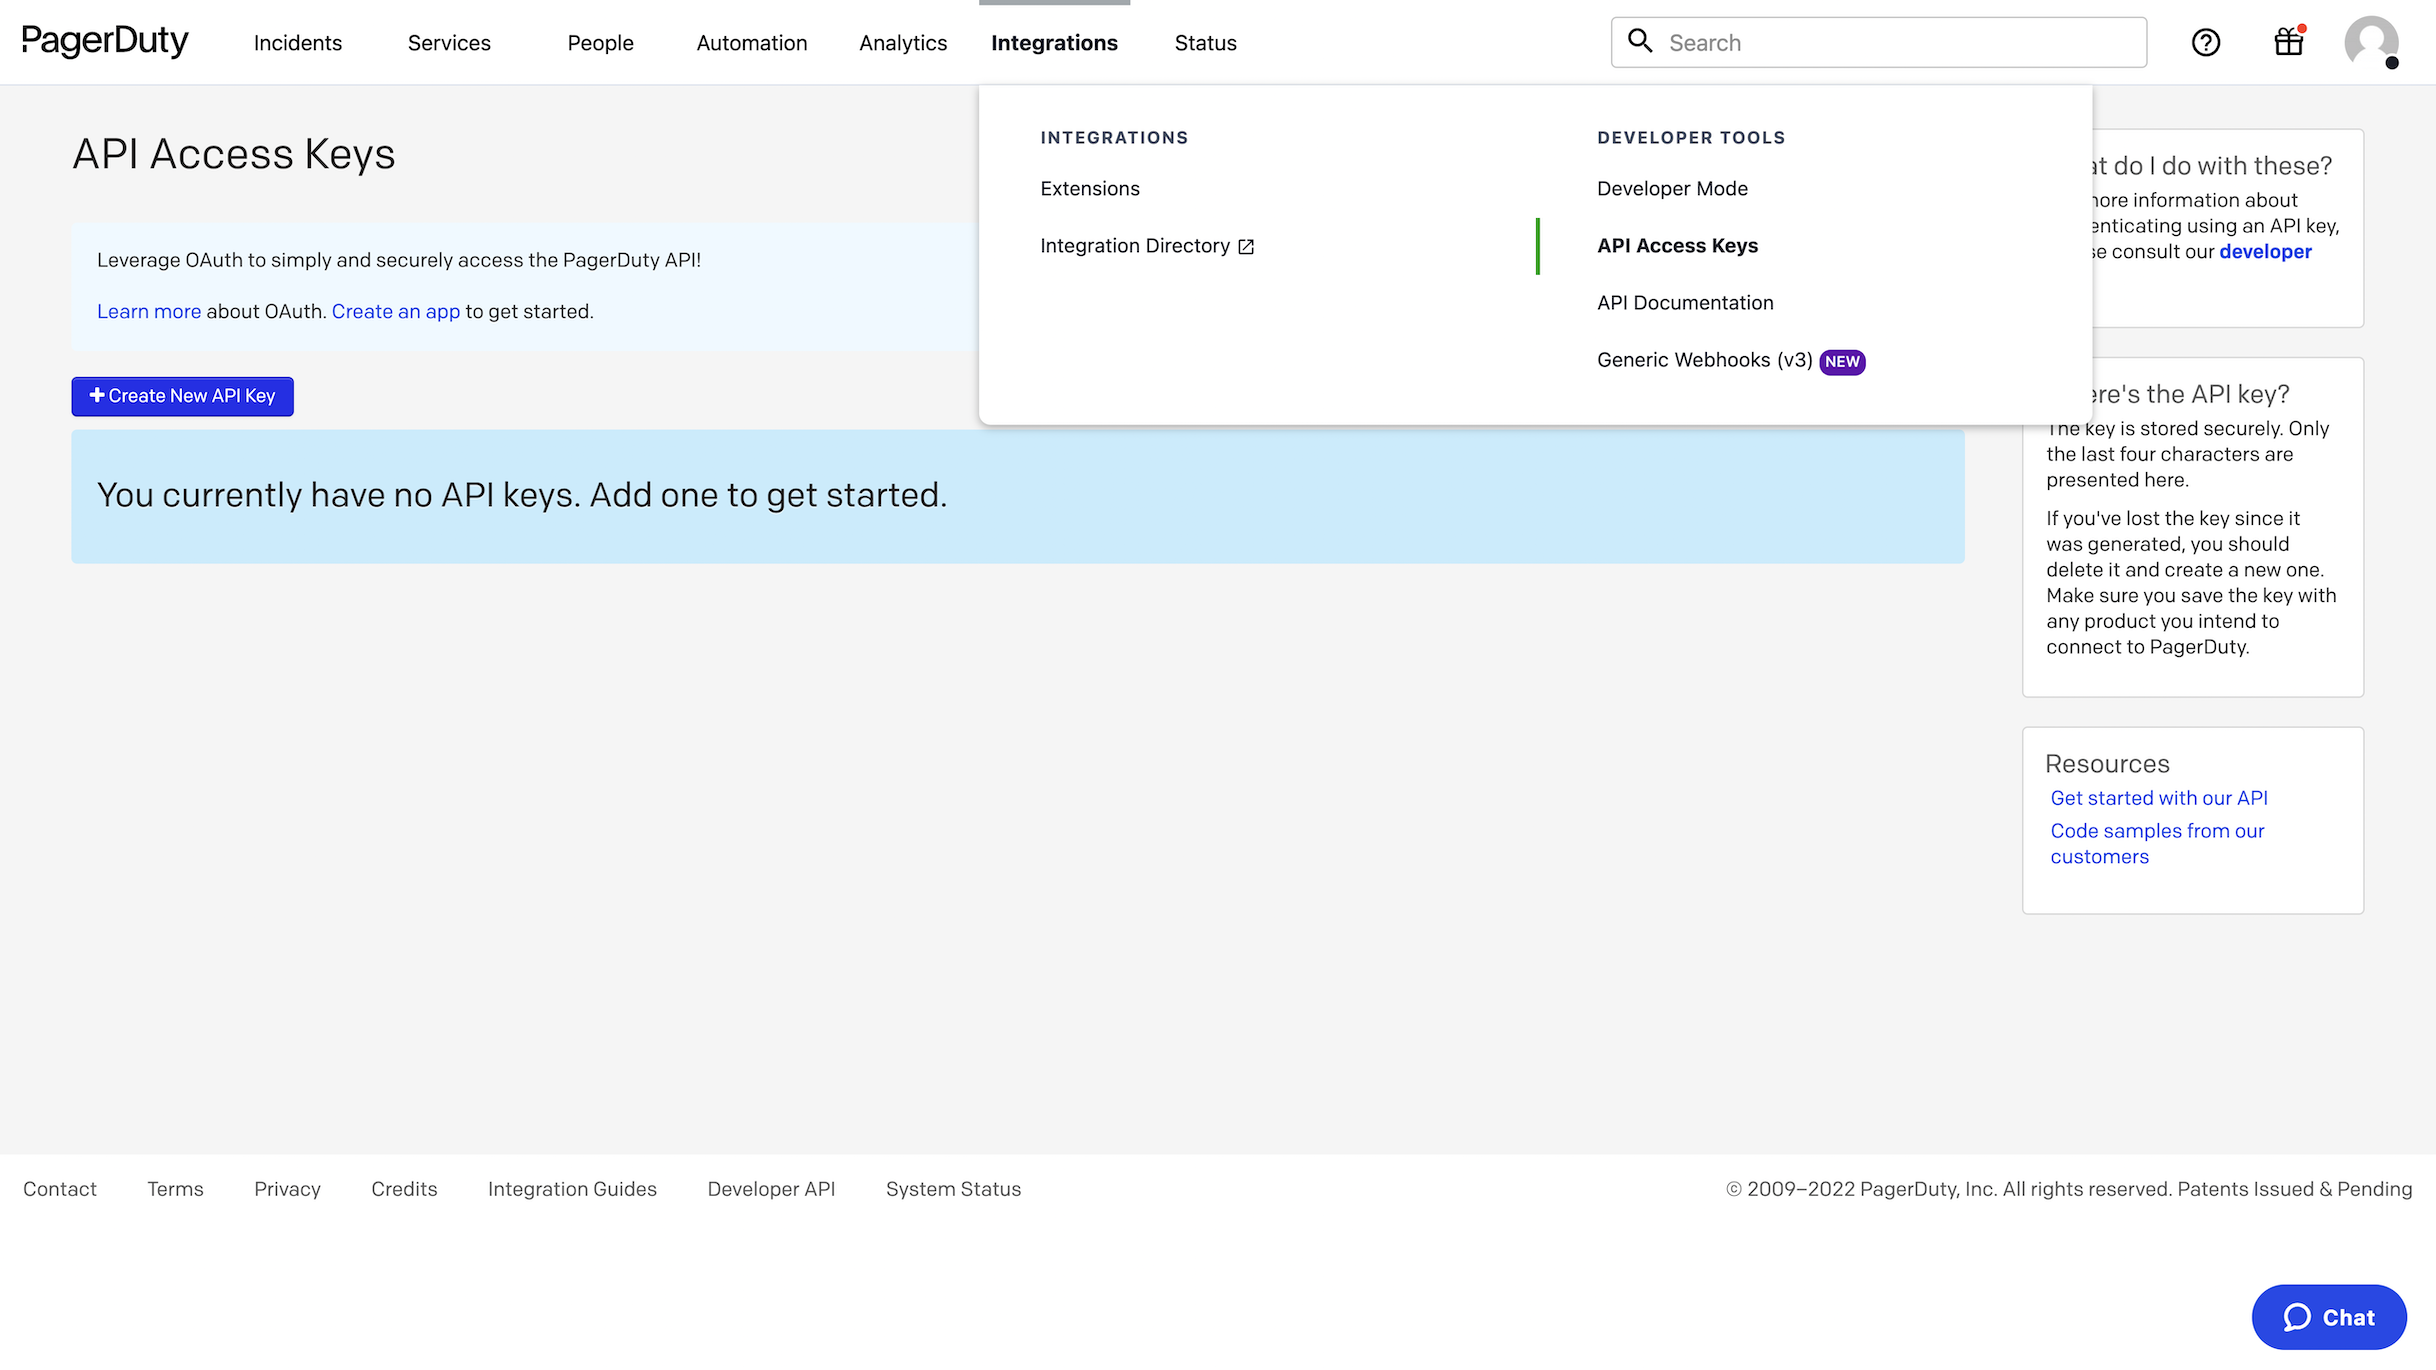
Generate an API key that the PagerDuty plugin will use to create and modify incidents as well as list users, services, and on-call policies.
In your PagerDuty dashboard, go to Integrations → API Access Keys and click Create New API Key. Add a key description, e.g., "Teleport integration". Leave "Read-only API Key" unchecked. Copy the key to a file on your local machine. We'll use the key in the plugin config file later.
Step 6/8. Configure the PagerDuty plugin
At this point, you have generated credentials that the PagerDuty plugin will use to connect to Teleport and the PagerDuty API. You will now configure the PagerDuty plugin to use these credentials, plus adjust any settings required for your environment.
- Executable or Docker
- Helm Chart
Teleport's PagerDuty plugin has its own configuration file in TOML format. On the host where you will run the PagerDuty plugin, generate a boilerplate config by running the following commands:
$ teleport-pagerduty configure > teleport-pagerduty.toml
$ sudo mv teleport-pagerduty.toml /etc
The PagerDuty Helm Chart uses a YAML values file to configure the plugin. On
the host where you have Helm installed, create a file called
teleport-pagerduty-values.yaml based on the following example:
teleport:
  address: ""                 # Teleport Auth Server GRPC API address
  identitySecretName: ""      # Identity secret name
  identitySecretPath: ""      # Identity secret path

pagerduty:
  apiKey: ""                  # PagerDuty API Key
  userEmail: ""               # PagerDuty bot user email (Could be admin email)
Saving the configuration to another location
The PagerDuty plugin expects the configuration to be in
/etc/teleport-pagerduty.toml, but you can override this with the --config
flag when you run the plugin binary later in this guide.
Edit the configuration file in /etc/teleport-pagerduty.toml as explained
below:
[teleport]
The PagerDuty plugin uses this section to connect to your Teleport cluster:
- Executable or Docker
- Helm Chart
addr: Include the hostname and HTTPS port of your Teleport Proxy Service
or Teleport Enterprise Cloud account (e.g., teleport.example.com:443 or
mytenant.teleport.sh:443).
identity: Fill this in with the path to the identity file you exported
earlier.
client_key, client_crt, root_cas: Comment these out, since we
are not using them in this configuration.
address: Include the hostname and HTTPS port of your Teleport Proxy Service
or Teleport Enterprise Cloud tenant (e.g., teleport.example.com:443 or
mytenant.teleport.sh:443).
identitySecretName: Fill in the identitySecretName field with the name
of the Kubernetes secret you created earlier.
identitySecretPath: Fill in the identitySecretPath field with the path
of the identity file within the Kubernetes secret. If you have followed the
instructions above, this will be identity.
If you are providing credentials to the plugin using a tbot binary that runs
on a Linux server, make sure the value of identity is the same as the path of
the identity file you configured tbot to generate, /opt/machine-id/identity.
Configure the plugin to periodically reload the identity file, ensuring that it does not attempt to connect to the Teleport Auth Service with expired credentials.
Add the following to the teleport section of the configuration:
refresh_identity = true
[pagerduty]
Assign api_key to the PagerDuty API key you generated earlier.
Assign user_email to the email address of a PagerDuty user on the account
associated with your API key. When the PagerDuty plugin creates a new incident,
PagerDuty will display this incident as created by that user.
Overriding annotation names
This guide has assumed that the Teleport PagerDuty plugin uses
pagerduty_notify_service annotation to determine which services to notify of
new Access Request events and the pagerduty_services annotation to configure
auto-approval.
If you would like to use a different name for these annotations in your Teleport
roles, you can assign the pagerduty.notify_service and pagerduty.services
fields.
The final configuration should resemble the following:
- Executable or Docker
- Helm Chart
# example teleport-pagerduty configuration TOML file
[teleport]
auth_server = "myinstance.teleport.sh:443"                  # Teleport Cloud proxy HTTPS address
identity = "/var/lib/teleport/plugins/pagerduty/identity"   # Identity file path
refresh_identity = true                                     # Refresh identity file periodically

[pagerduty]
api_key = "key"               # PagerDuty API Key
user_email = "[email protected]" # PagerDuty bot user email (Could be admin email)

[log]
output = "stderr" # Logger output. Could be "stdout", "stderr" or "/var/lib/teleport/pagerduty.log"
severity = "INFO" # Logger severity. Could be "INFO", "ERROR", "DEBUG" or "WARN".
teleport:
  # Teleport HTTPS Proxy web address, for Teleport Enterprise Cloud should be in the form "your-account.teleport.sh:443"
  address: "teleport.example.com:443"
  # Secret containing identity
  identitySecretName: teleport-plugin-pagerduty-identity
  # Path within the secret containing the identity file.
  identitySecretPath: identity

pagerduty:
  apiKey: "key"                # PagerDuty API Key
  userEmail: "[email protected]"  # PagerDuty bot user email (Could be admin email)

log:
  output: "stderr"  # Logger output. Could be "stdout", "stderr" or "/var/lib/teleport/pagerduty.log"
  severity: "INFO"  # Logger severity. Could be "INFO", "ERROR", "DEBUG" or "WARN".
Step 7/8. Test the PagerDuty plugin
- Executable
- Docker
- Helm Chart
After you configure the PagerDuty plugin, run the following command to start it.
The -d flag will provide debug information to ensure that the plugin can
connect to PagerDuty and your Teleport cluster:
$ teleport-pagerduty start -d
# DEBU   DEBUG logging enabled logrus/exported.go:117
# INFO   Starting Teleport Access PagerDuty extension 0.1.0-dev.1: pagerduty/main.go:124
# DEBU   Checking Teleport server version pagerduty/main.go:226
# DEBU   Starting a request watcher... pagerduty/main.go:288
# DEBU   Starting PagerDuty API health check... pagerduty/main.go:170
# DEBU   Starting secure HTTPS server on :8081 utils/http.go:146
# DEBU   Watcher connected pagerduty/main.go:252
# DEBU   PagerDuty API health check finished ok pagerduty/main.go:176
# DEBU   Setting up the webhook extensions pagerduty/main.go:178
Run the plugin:
$ docker run -v <path-to-config>:/etc/teleport-pagerduty.toml public.ecr.aws/gravitational/teleport-plugin-pagerduty:15.4.22 start
After modifying your configuration, run the bot with the following command:
$ helm upgrade --install teleport-plugin-pagerduty teleport/teleport-plugin-pagerduty --values teleport-pagerduty-values.yaml
To inspect the plugin's logs, use the following command:
$ kubectl logs deploy/teleport-plugin-pagerduty
Debug logs can be enabled by setting log.severity to DEBUG in
teleport-pagerduty-helm.yaml and executing the helm upgrade ... command
above again. Then you can restart the plugin with the following command:
$ kubectl rollout restart deployment teleport-plugin-pagerduty
Create an Access Request
As the Teleport user myuser, create an Access Request for the editor role:
- As an Admin
- As a User
- From the Web UI
A Teleport admin can create an Access Request for another user with tctl:
$ tctl request create myuser --roles=editor
Users can use tsh to create an Access Request and log in with approved roles:
$ tsh request create --roles=editor
Seeking request approval... (id: 8f77d2d1-2bbf-4031-a300-58926237a807)
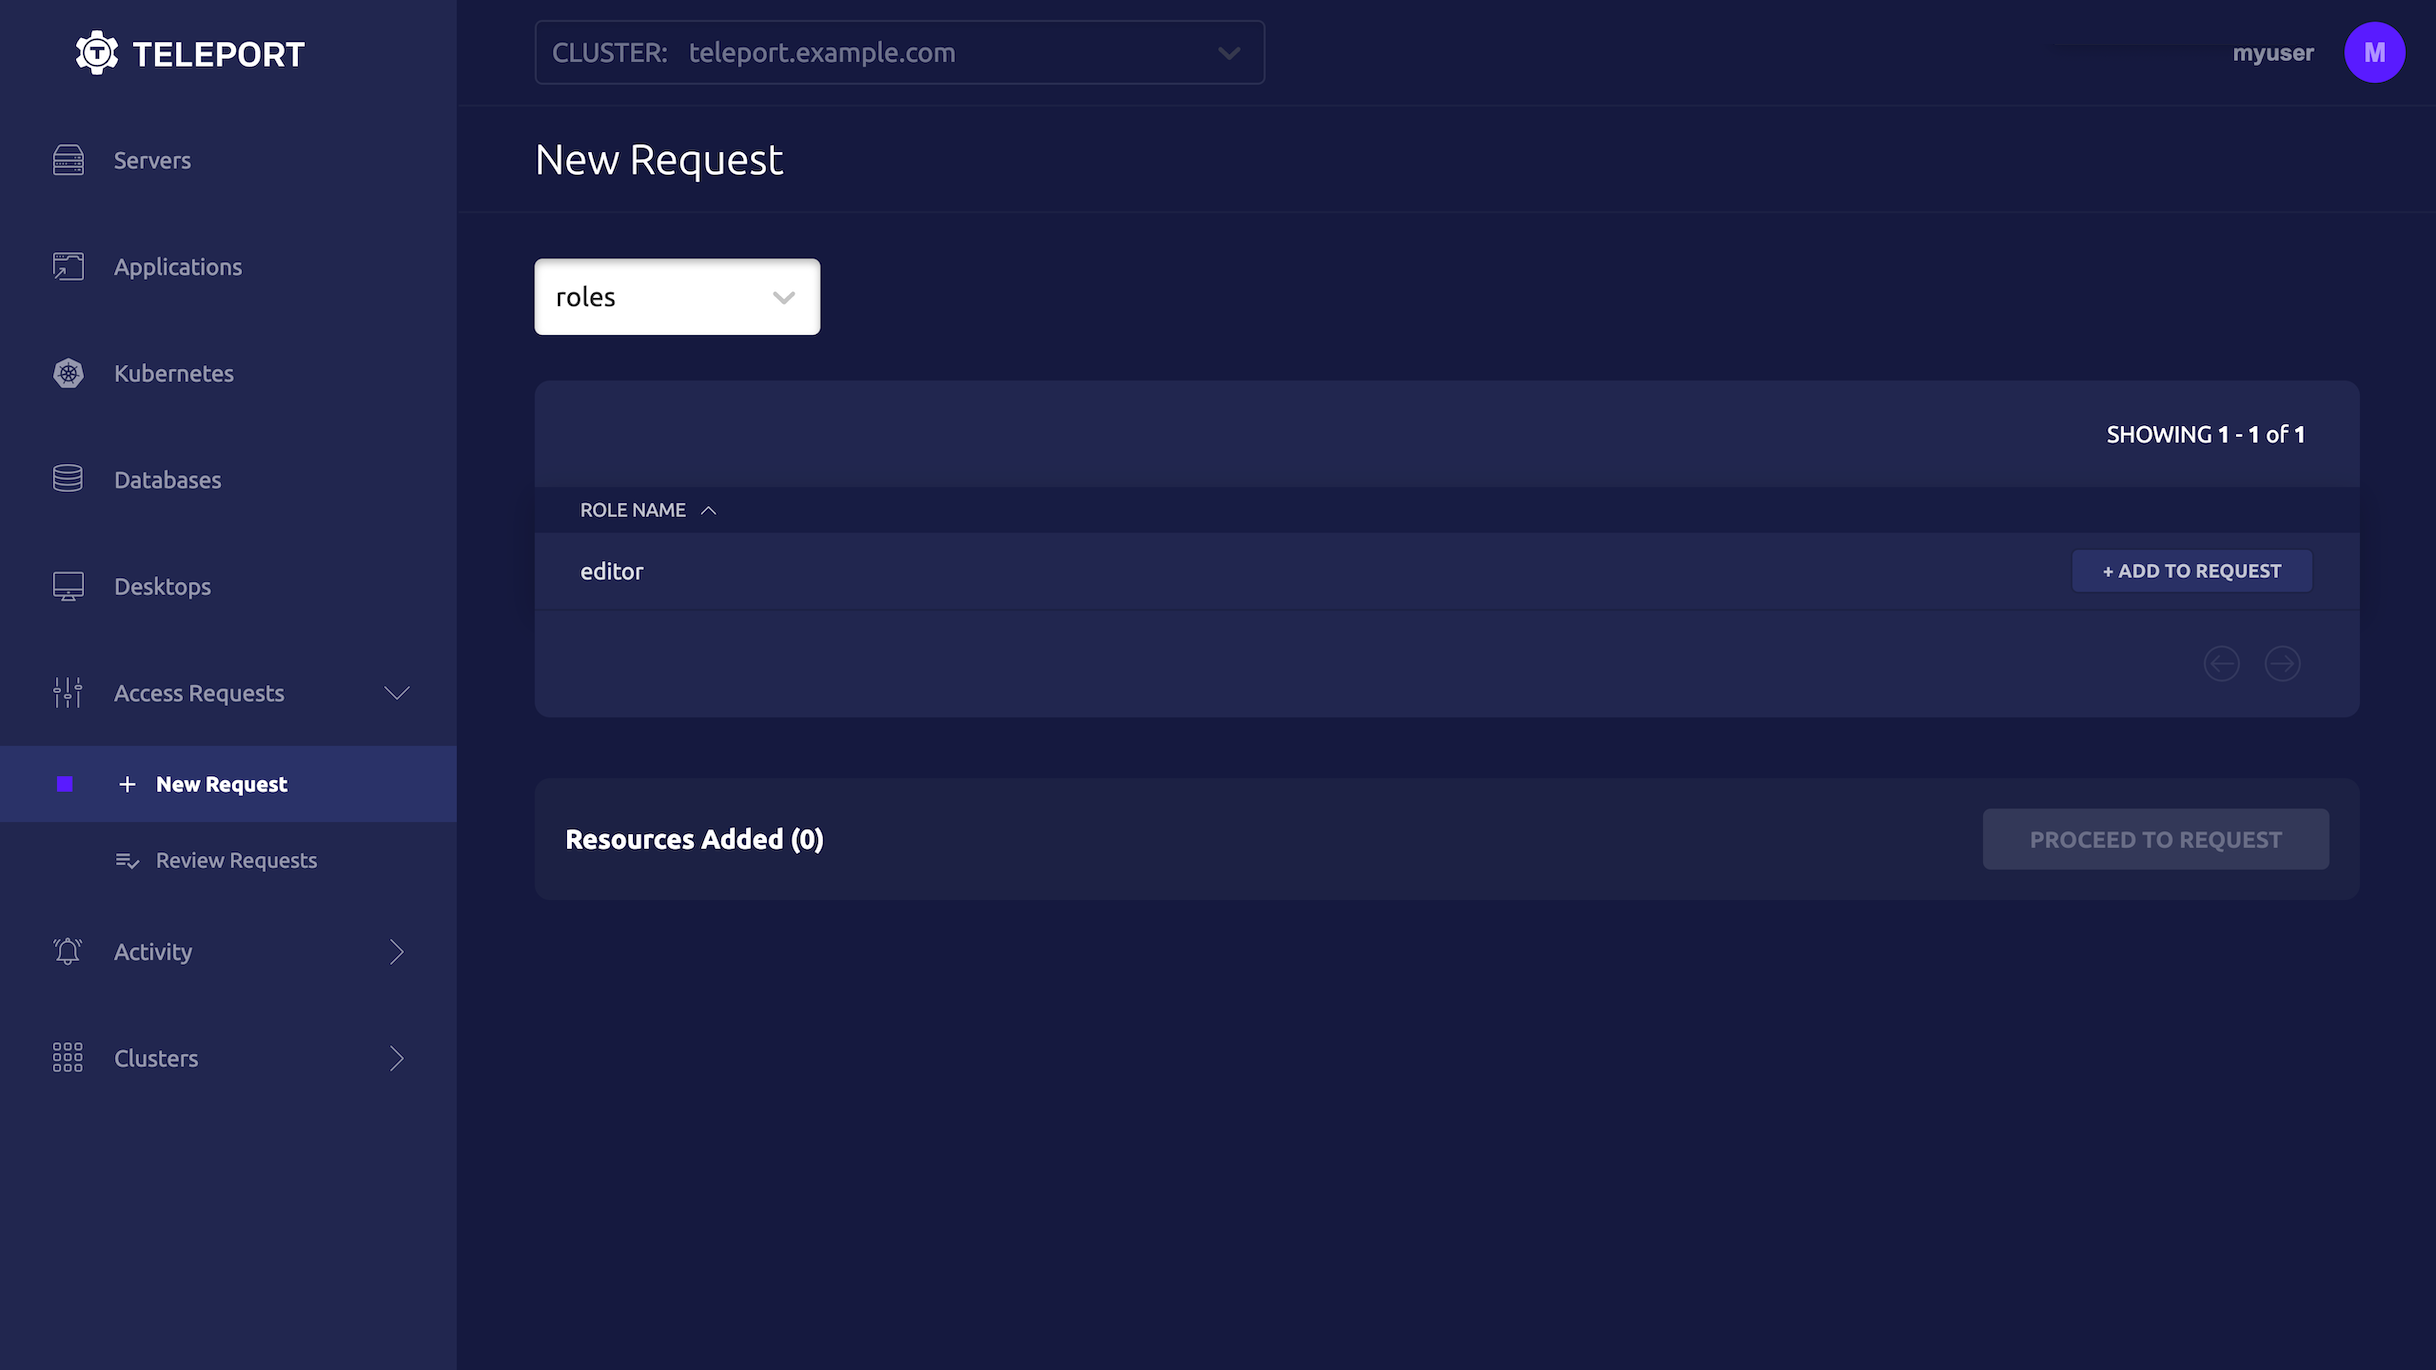
Users can request access using the Web UI by visiting the "Access Requests" tab and clicking "New Request":
You should see a log resembling the following on your PagerDuty plugin host:
INFO   Successfully created PagerDuty incident pd_incident_id:00000000000000
pd_service_name:Teleport Access Request Notifications
request_id:00000000-0000-0000-0000-000000000000 request_op:put
request_state:PENDING pagerduty/app.go:366
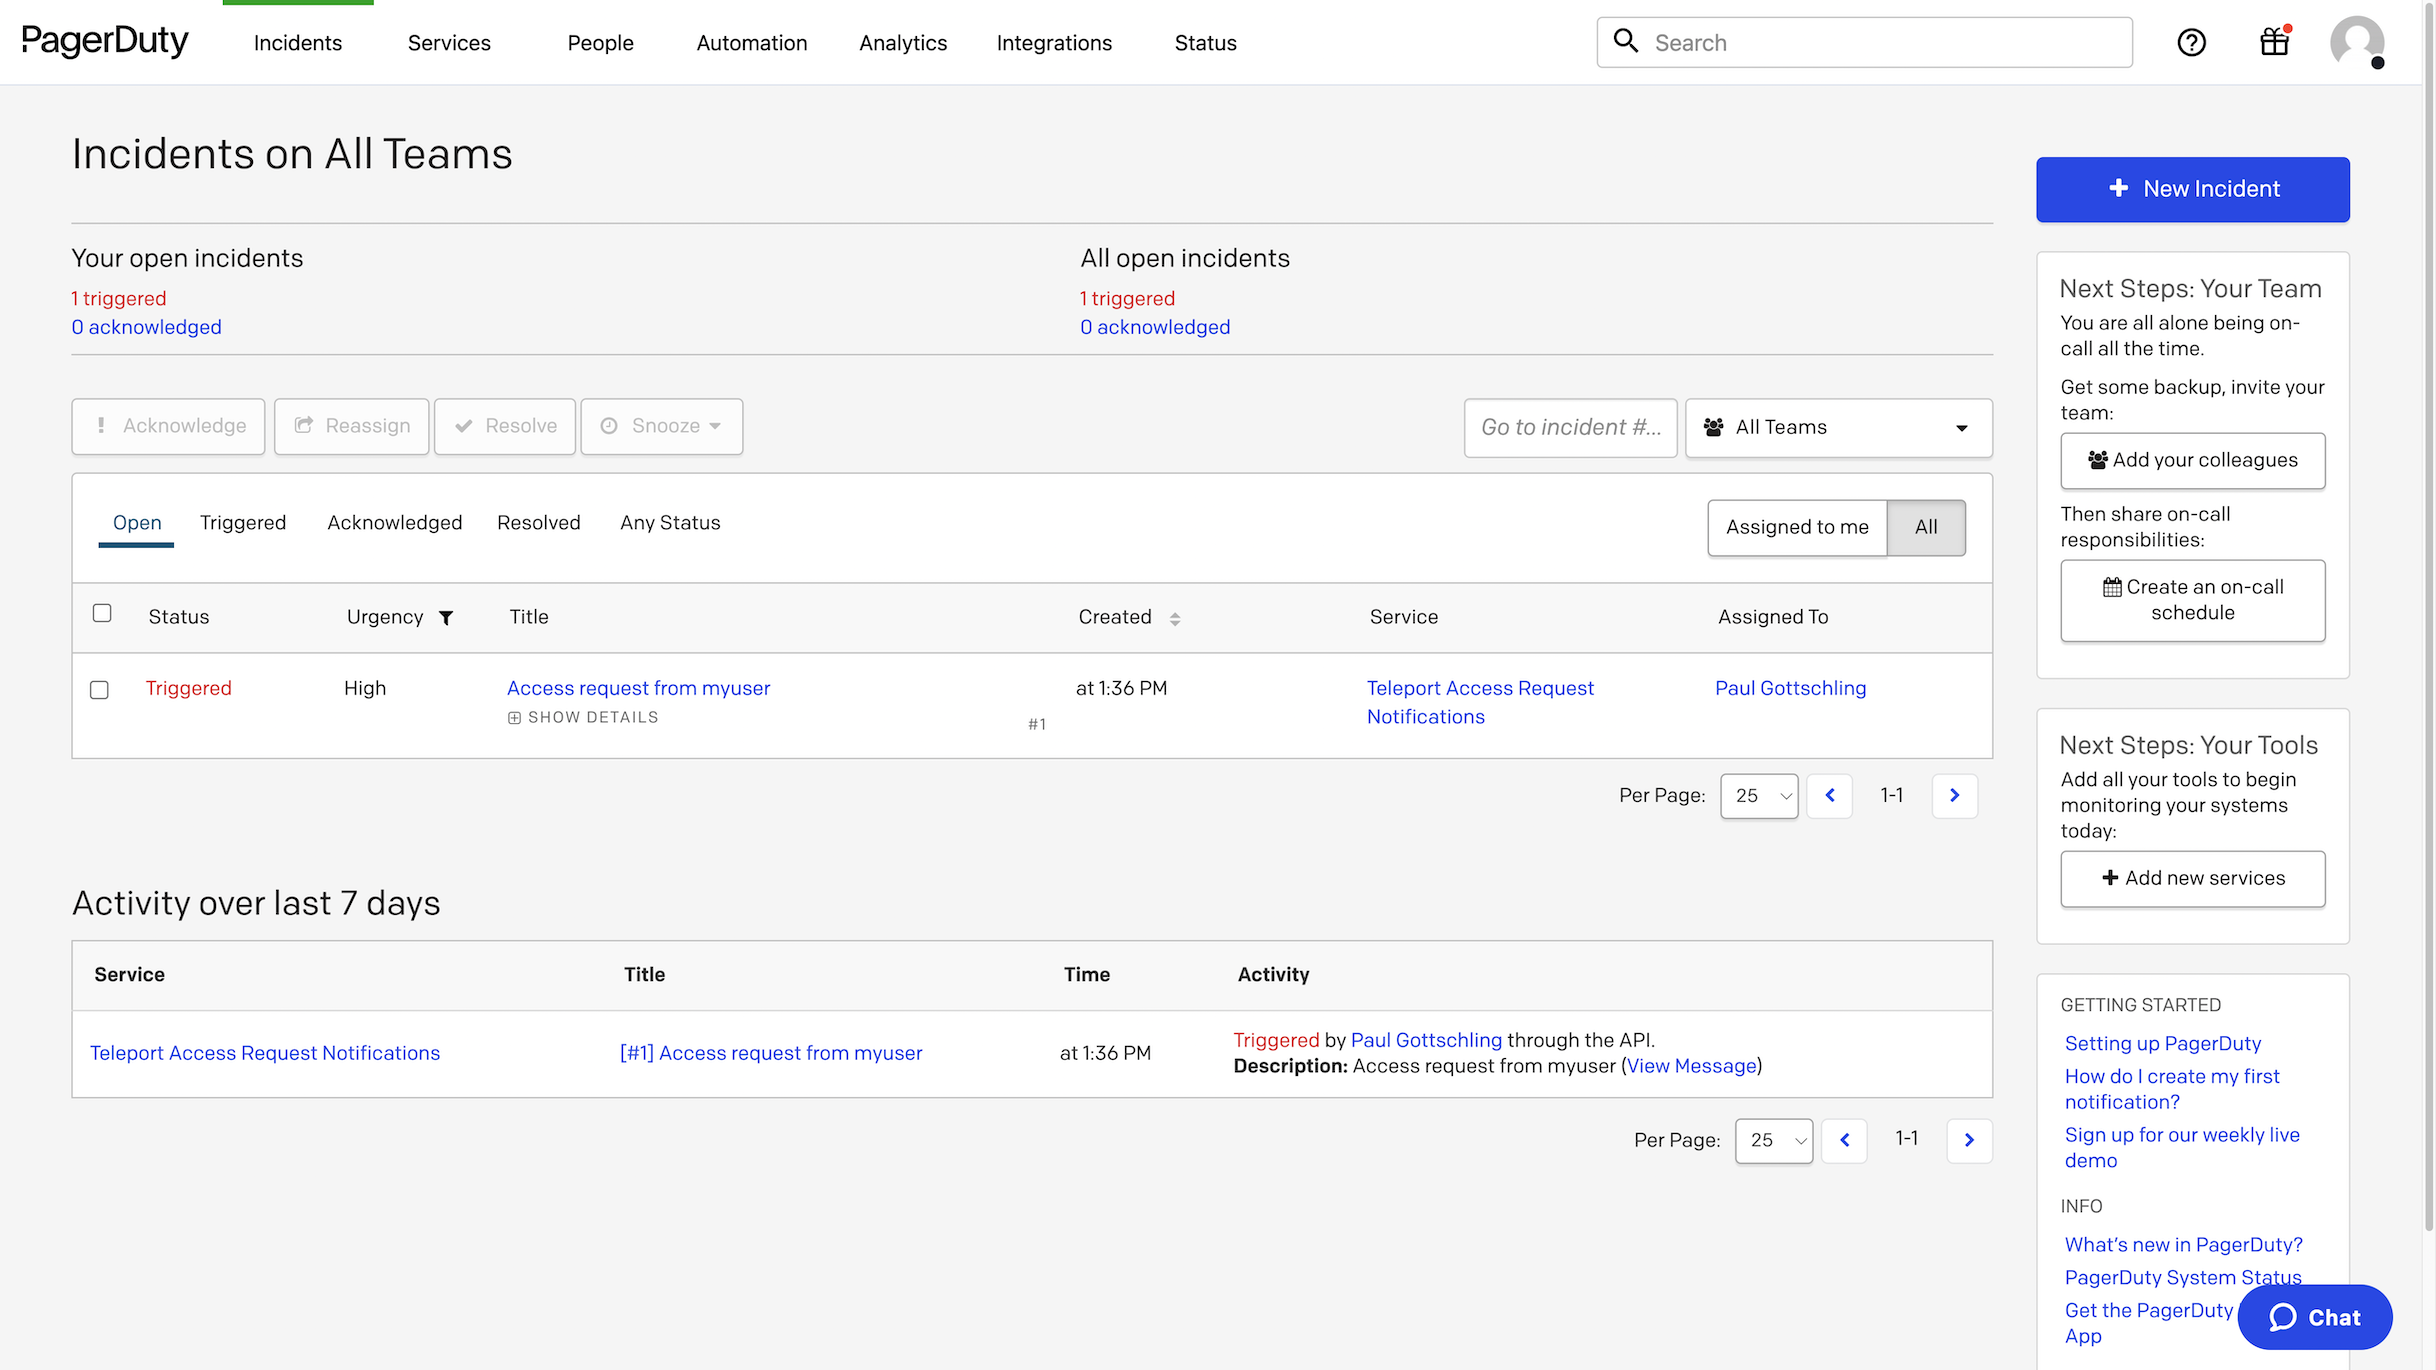
In PagerDuty, you will see a new incident containing information about the Access Request:
Resolve the request
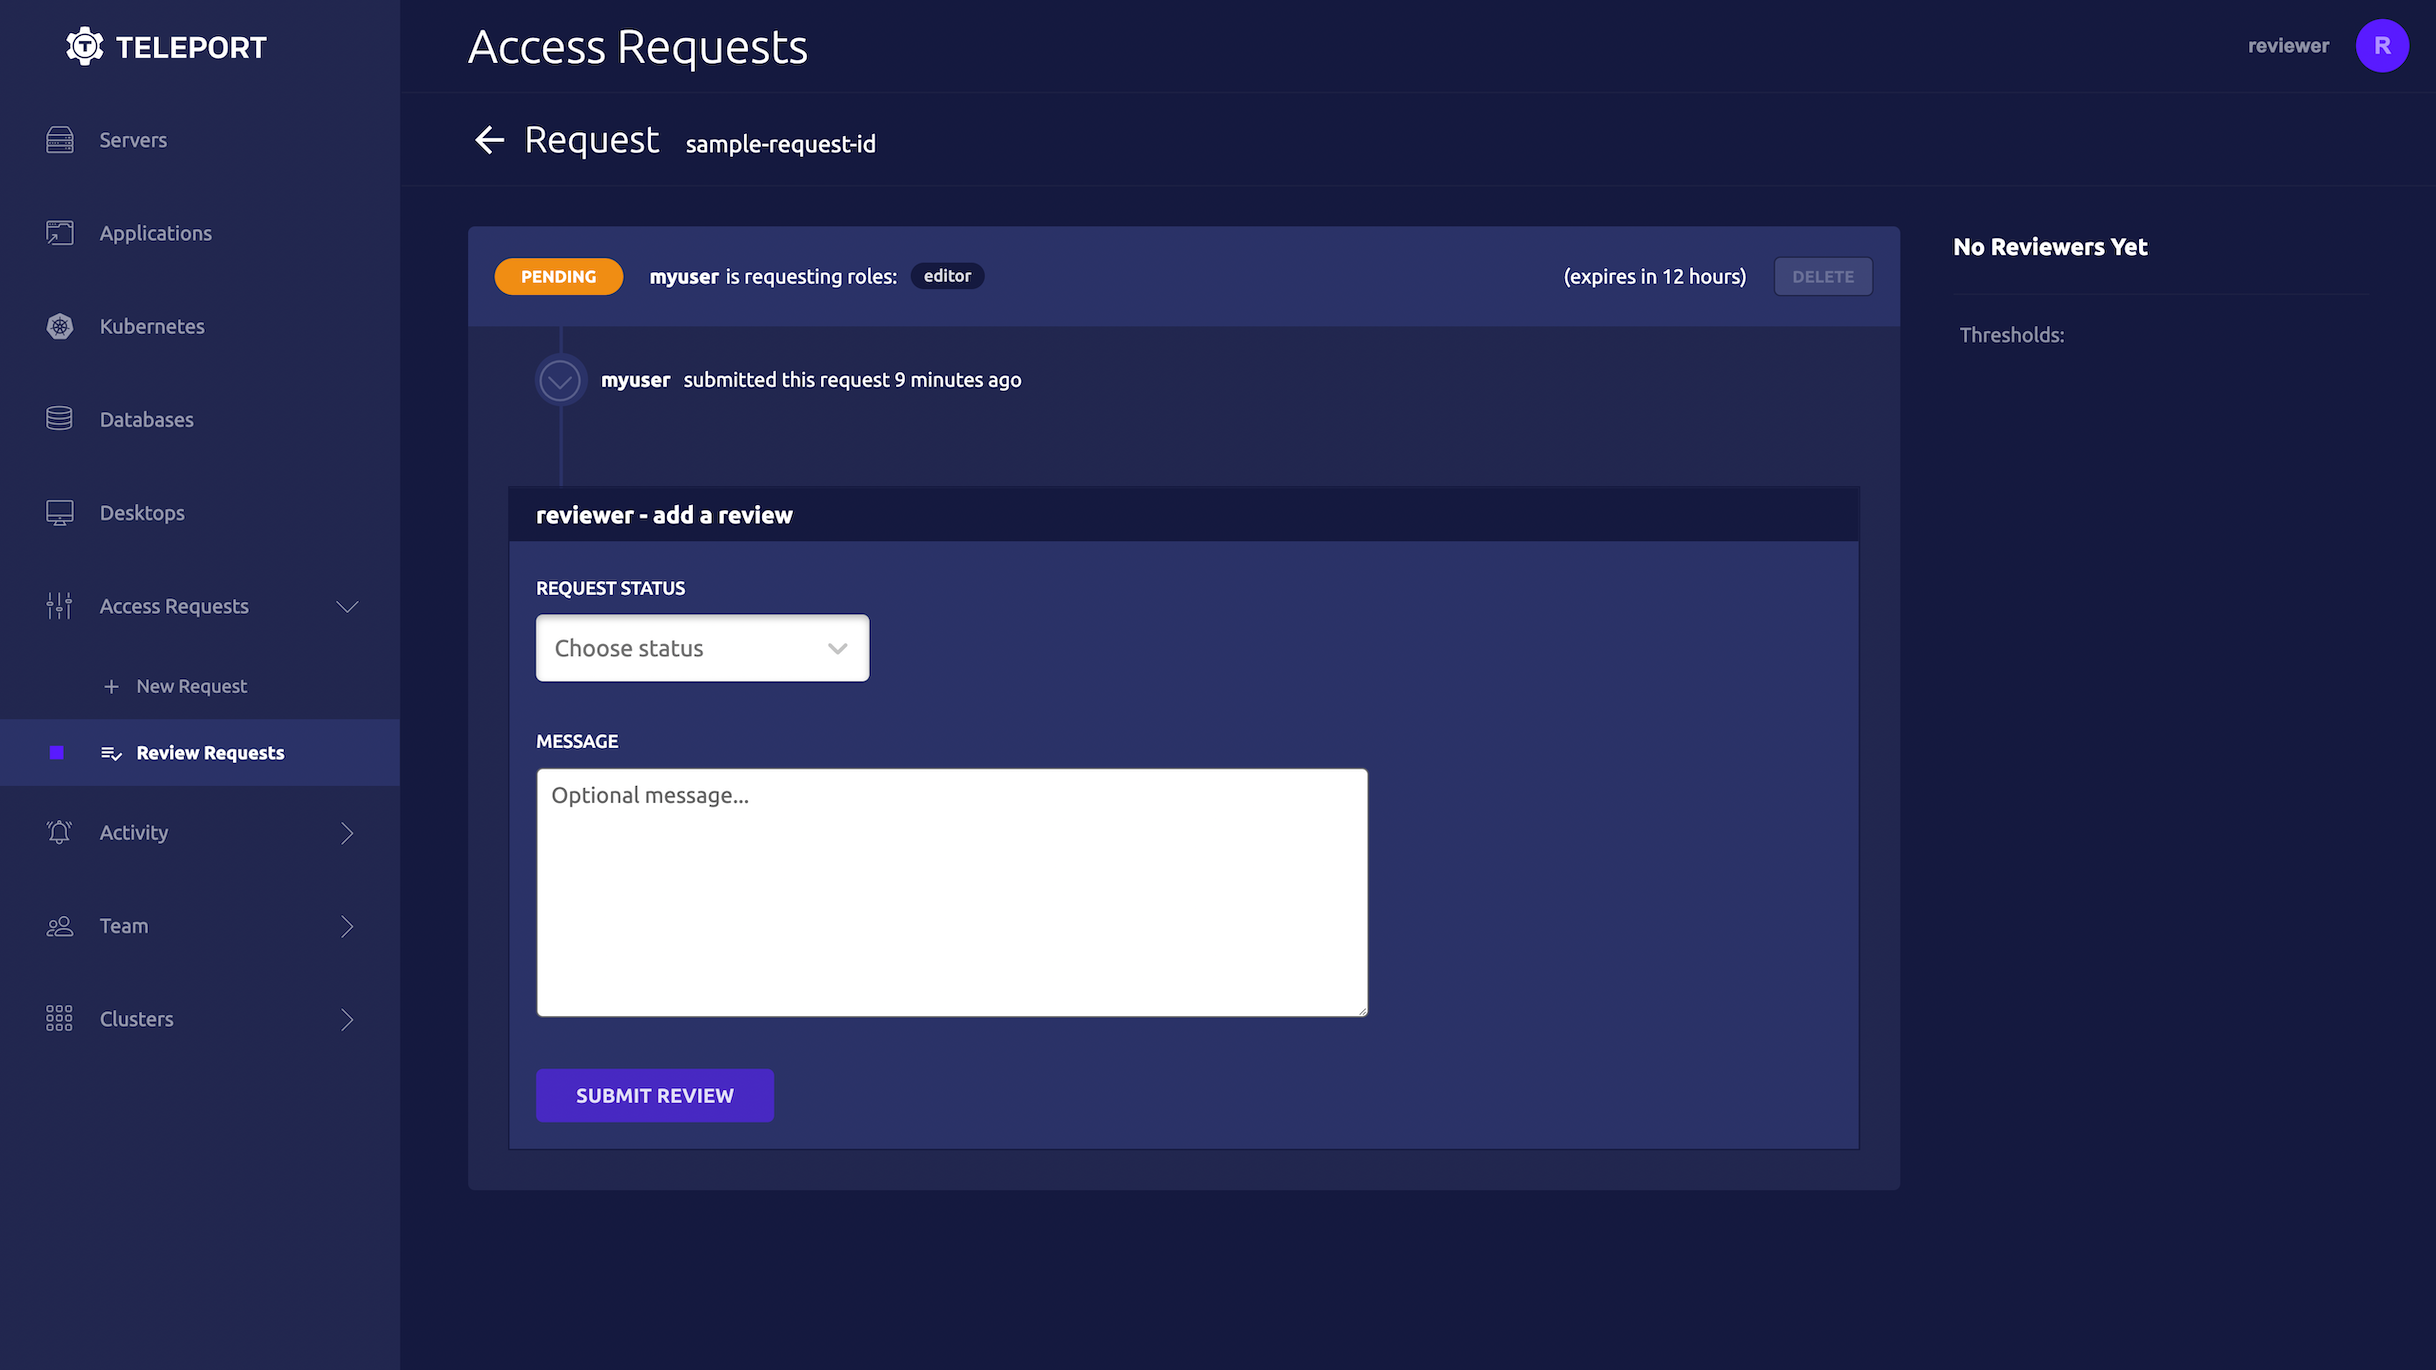
Once you receive an Access Request message, click the link to visit Teleport and approve or deny the request:
Reviewing from the command line
You can also review an Access Request from the command line:
- As an Admin
- As a User
# Replace REQUEST_ID with the id of the request
$ tctl request approve REQUEST_ID
$ tctl request deny REQUEST_ID
# Replace REQUEST_ID with the id of the request
$ tsh request review --approve REQUEST_ID
$ tsh request review --deny REQUEST_ID
When the PagerDuty plugin sends a notification, anyone who receives the notification can follow the enclosed link to an Access Request URL. While users must be authorized via their Teleport roles to review Access Request, you should still check the Teleport audit log to ensure that the right users are reviewing the right requests.
When auditing Access Request reviews, check for events with the type Access Request Reviewed in the Teleport Web UI.
Trigger an auto-approval
As your Teleport user, create an Access Request for the demo-role role.
You will see a log similar to the following on your PagerDuty plugin host:
INFO   Successfully submitted a request approval
pd_user_email:[email protected] pd_user_name:My User
request_id:00000000-0000-0000-0000-000000000000 request_op:put
request_state:PENDING pagerduty/app.go:511
Your Access Request will appear as APPROVED:
$ tsh requests ls
ID                                   User               Roles     Created (UTC)       Status
------------------------------------ ------------------ --------- ------------------- --------
00000000-0000-0000-0000-000000000000 [email protected] demo-role 12 Aug 22 18:30 UTC APPROVED
Step 8/8. Set up systemd
This section is only relevant if you are running the Teleport PagerDuty plugin on a Linux host.
In production, we recommend starting the Teleport plugin daemon via an init system like systemd. Here's the recommended Teleport plugin service unit file for systemd:
[Unit]
Description=Teleport Pagerduty Plugin
After=network.target

[Service]
Type=simple
Restart=on-failure
ExecStart=/usr/local/bin/teleport-pagerduty start --config=/etc/teleport-pagerduty.toml
ExecReload=/bin/kill -HUP $MAINPID
PIDFile=/run/teleport-pagerduty.pid

[Install]
WantedBy=multi-user.target
Save this as teleport-pagerduty.service in either /usr/lib/systemd/system/
or another unit file load
path
supported by systemd.
Enable and start the plugin:
$ sudo systemctl enable teleport-pagerduty
$ sudo systemctl start teleport-pagerduty