Setting up the Okta Service
Teleport can import and grant access to Okta applications and user groups. Okta applications can be accessed through Teleport's application access UI, and access to these applications along with user groups can be managed by Teleport's RBAC along with access requests.
This guide will help you set up the Okta Service and provide some basic configurations to enable it.
This integration is hosted on Teleport Cloud
In Teleport Enterprise Cloud, Teleport manages the Okta integration for you, and you can enroll the Okta integration from the Teleport Web UI.
Visit the Teleport Web UI and find the dropdown menu on the upper left of the screen. Select the Management option.
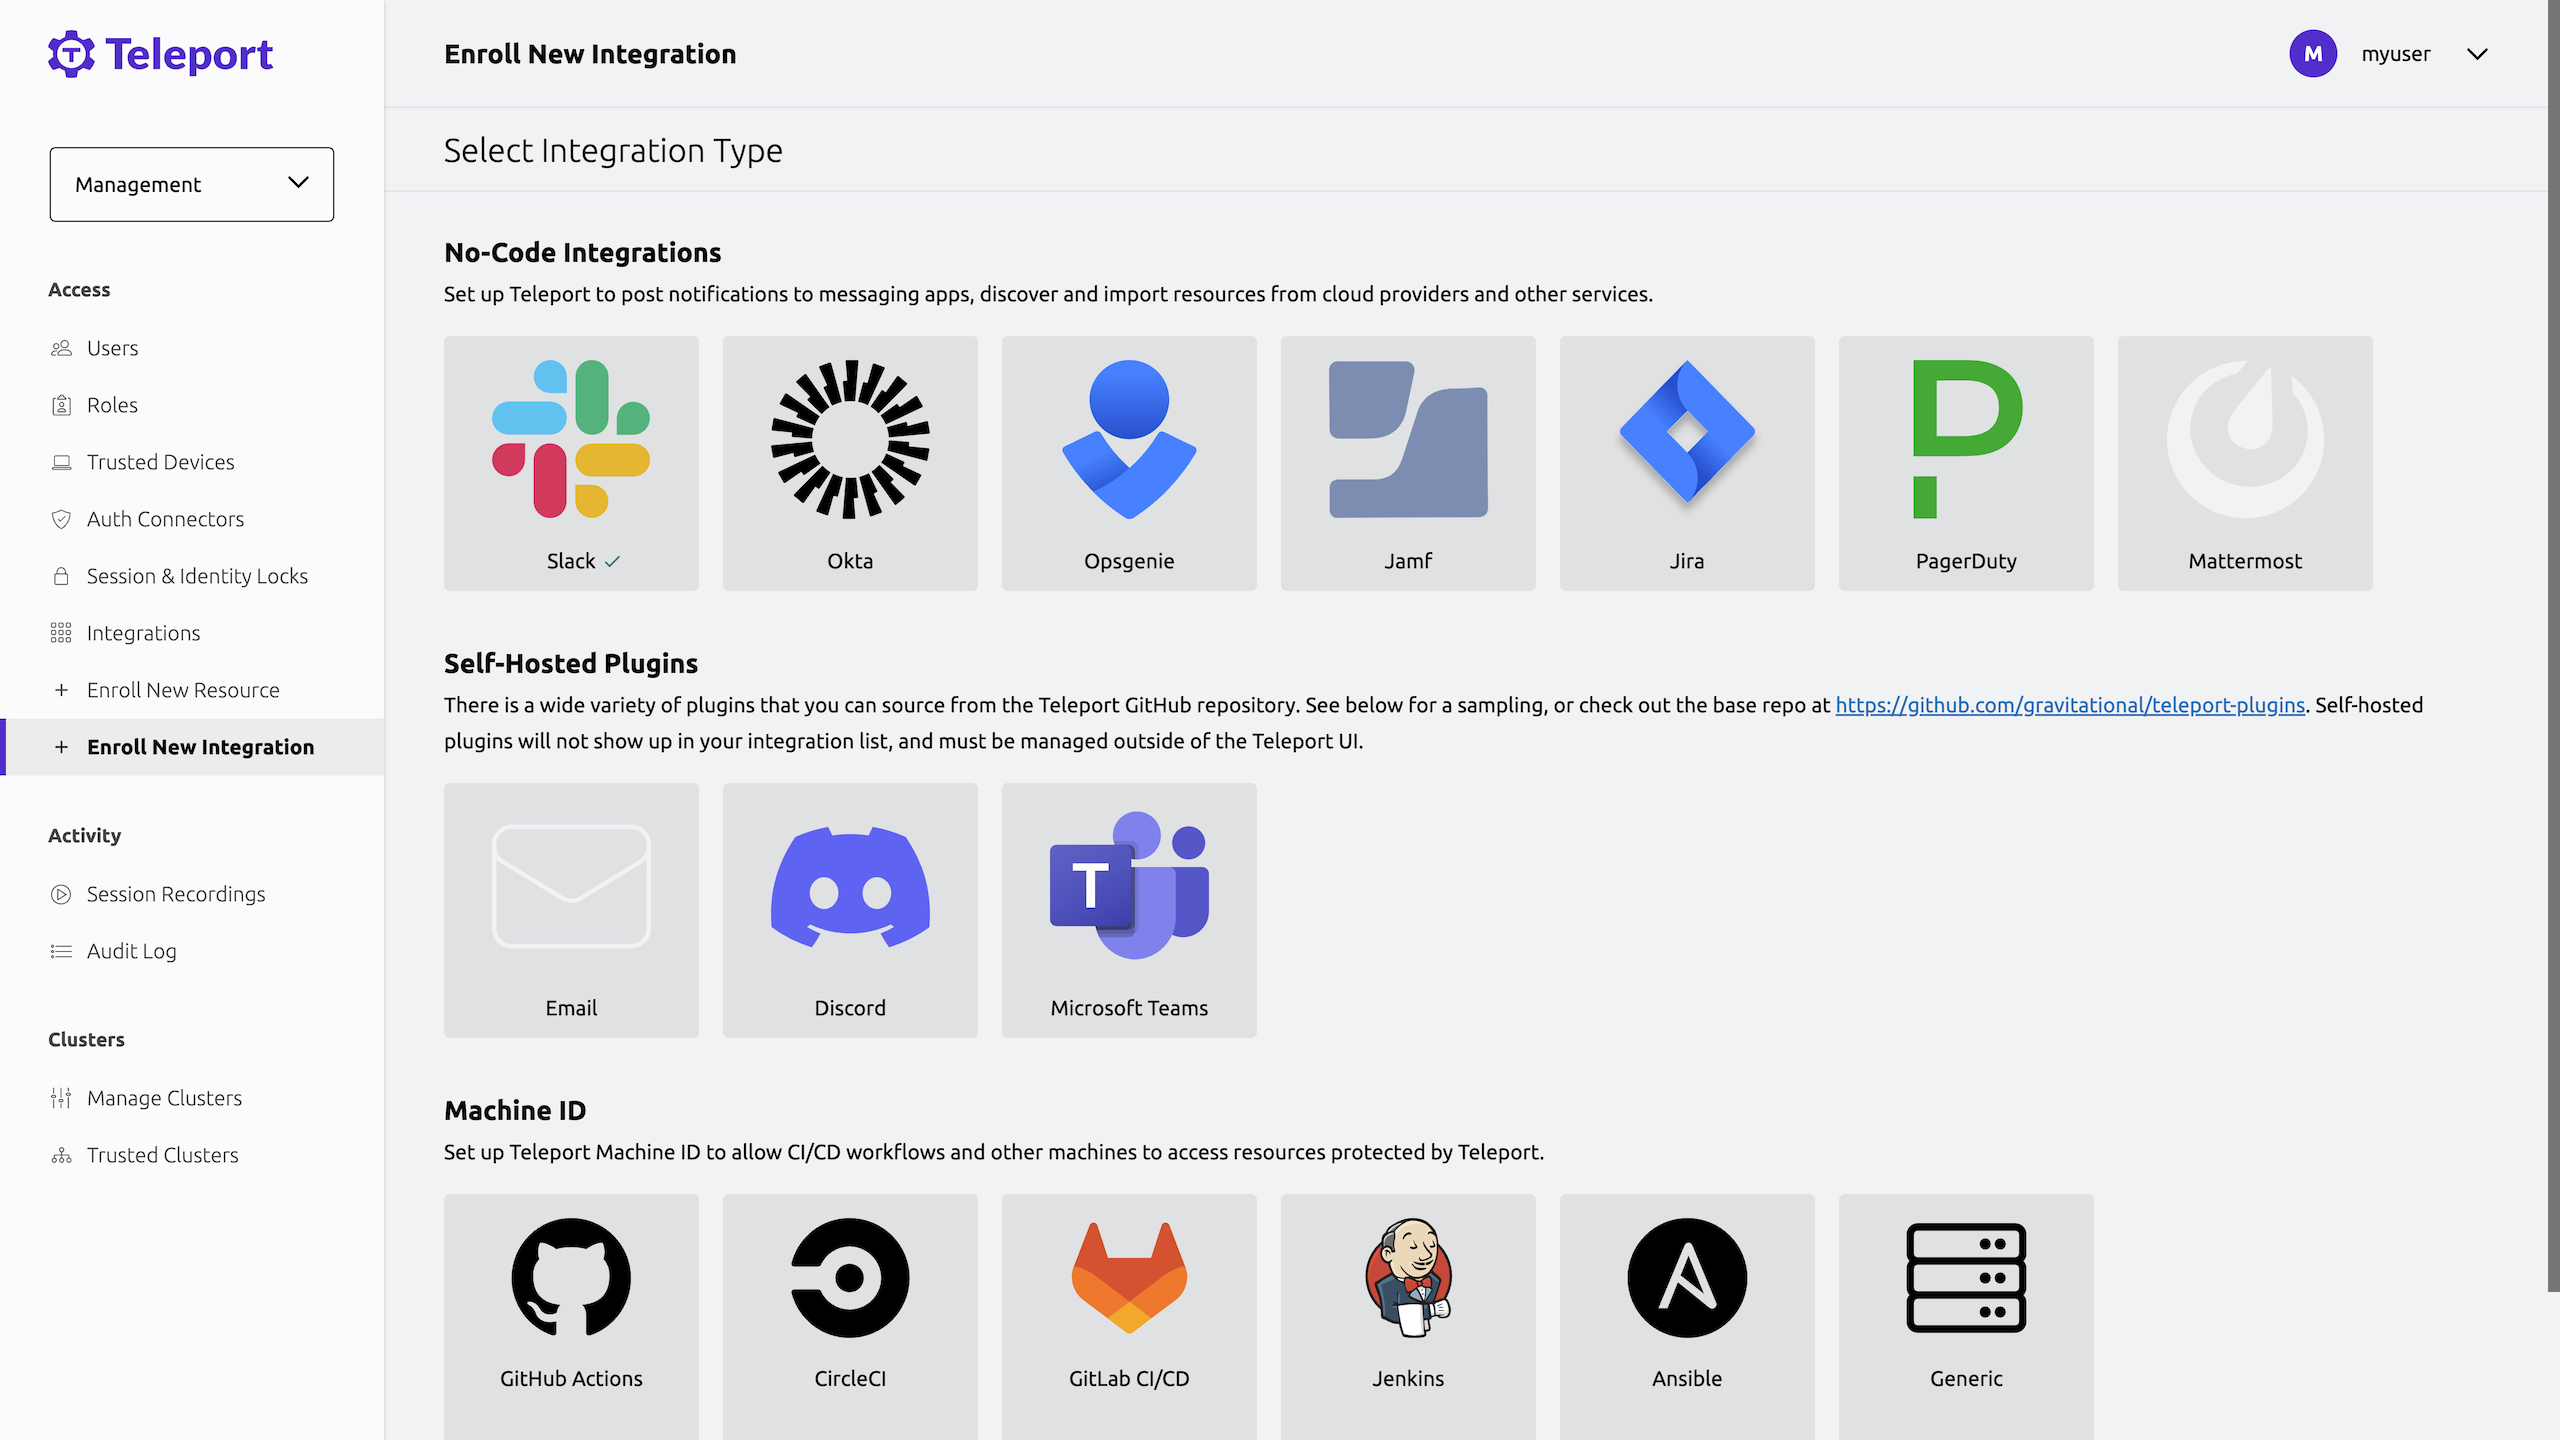
On the left sidebar, click Enroll New Integration to visit the "Enroll New Integration" page:

On the "Select Integration Type" menu, click the tile for your integration. You will see a page with instructions to set up the integration, as well as a form that you can use to configure the integration.
Prerequisites
- Self-Hosted Enterprise
- Teleport Enterprise Cloud
-
A running Teleport Enterprise cluster. For details on how to set this up, see the Enterprise Getting Started guide.
-
The Enterprise
tctladmin tool andtshclient tool version >= 14.3.33. You can download these tools by visiting your Teleport account. You can verify the tools you have installed by running the following commands:$ tctl version
# Teleport Enterprise v14.3.33 go1.21
$ tsh version
# Teleport v14.3.33 go1.21
-
A Teleport Enterprise Cloud account. If you do not have one, visit the signup page to begin a free trial of Teleport Team and upgrade to Teleport Enterprise Cloud.
-
The
tctladmin tool andtshclient tool version >= 16.4.3. To download these tools, visit the Installation page.$ tctl version
# Teleport Enterprise v16.4.3 go1.21
$ tsh version
# Teleport v16.4.3 go1.21
- To check that you can connect to your Teleport cluster, sign in with
tsh login, then verify that you can runtctlcommands using your current credentials.tctlis supported on macOS and Linux machines. For example:If you can connect to the cluster and run the$ tsh login --proxy=teleport.example.com [email protected]
$ tctl status
# Cluster teleport.example.com
# Version 14.3.33
# CA pin sha256:abdc1245efgh5678abdc1245efgh5678abdc1245efgh5678abdc1245efgh5678tctl statuscommand, you can use your current credentials to run subsequenttctlcommands from your workstation. If you host your own Teleport cluster, you can also runtctlcommands on the computer that hosts the Teleport Auth Service for full permissions. - A running Teleport cluster with Okta login configured.
- An instance where you will run the Okta Service. This can live anywhere with outbound access to Okta and must be running Linux.
- An Okta organization with an Okta API token created.
Okta API token permissions
Okta API tokens inherit the permissions of the user who created them. These can be controlled by using custom admin roles and assigning them to a user who will then create the API token. We recommend creating a user dedicated to the Teleport Okta API service to manage this token.
The permissions required are:
User permissions
- View users and their details
- Edit users' group membership
- Edit users' application assignments
Group permissions
- View groups and their details
- Manage group membership
Application permissions
- View applications and their details
- Edit application's user assignments
Additionally, the resource set associated with the target user must have unconstrained access to Users, Applications, and Groups.
One caveat here is that it's impossible to assign API token creation permissions to a custom role. However, the Okta built in role "Group Membership Admin" has permissions to create an API token. See more information about built in roles here.
Step 1/3. Create Okta import rules
Before setting up the Okta Service, you should create Okta import rules in order to ensure that our Okta applications are set up with appropriate labeling before you attempt to synchronize them. First, you'll need to get the group and application IDs from Okta. The easiest way to do this is to use the okta-api-token that was created when when evaluating the prerequisites.
To get group IDs:
$ curl -H "Authorization: SSWS okta-api-token" okta-endpoint-url/api/v1/groups | jq '[.[] |  {"id": .id, "label": .profile.name}]'
...
[
  {
    "id": "111111",
    "label": "Developers"
  },
  {
    "id": "222222",
    "label": "Admins"
  },
  {
    "id": "333333",
    "label": "Everyone"
  },
  {
    "id": "444444",
    "label": "HR"
  },
  ...
]
$ curl -H "Authorization: SSWS okta-api-token" okta-endpoint-url/api/v1/apps | jq '[.[] |  {"id": .id, "label": .label}]'
...
[
  {
    "id": "111111",
    "label": "Okta Admin Console"
  },
  {
    "id": "222222",
    "label": "Okta Browser Plugin"
  },
  {
    "id": "333333",
    "label": "Okta Dashboard"
  },
  {
    "id": "444444",
    "label": "SAML test"
  },
  ...
]
From here, you can copy the IDs from the output of the curl commands and use
these to create the Okta import rule. Put this in a file called okta-import-rule.yaml:
kind: okta_import_rule
version: v1
metadata:
  name: import-rule
  description: "Okta import rule for all groups and applications"
spec:
  mappings:
  - match:
    - app_ids: ["111111", "222222", "333333"] # Replace these with your Okta application IDs.
    add_labels:
      app_label: app-label-value
  - match:
    - group_ids: ["111111", "222222", "333333"] # Replace these with your Okta group IDs.
    add_labels:
      group_label: group-label-value
This will ensure that the applications and groups, once synchronized to Teleport, will be given the specified labels.
Step 2/3. Set up the Okta Service
In this step, you'll set up the Okta Service. The Okta Service will interact with Okta's API to import applications and groups, as well as update memberships to those applications and groups. The Okta Service connects back to the Teleport cluster over a reverse tunnel.
Get a join token
Establish trust between your Teleport cluster and the new Okta Service instance by creating a join token:
$ tctl tokens add --type=okta --ttl=1h --format=text
abcd123-insecure-do-not-use-this
On the host where you will install the Teleport Okta Service, create a
file called /tmp/token that consists only of your token:
$ echo join-token | sudo tee /tmp/token
Configure the Okta Service
First, on the host where you will run the Okta Service , create a file at okta-api-token-path with the contents of the API token.
Install Teleport on the host:
Use the appropriate commands for your environment to install your package:
- Enterprise
- Enterprise Cloud
- Debian 9+/Ubuntu 16.04+ (apt)
- Amazon Linux 2/RHEL 7 (yum)
- Amazon Linux 2/RHEL 7 (zypper)
- Amazon Linux 2023/RHEL 8+ (dnf)
- SLES 12 SP5+ and 15 SP5+ (zypper)
- Tarball
# Download Teleport's PGP public key
$ sudo curl https://apt.releases.teleport.dev/gpg \
-o /usr/share/keyrings/teleport-archive-keyring.asc
# Source variables about OS version
$ source /etc/os-release
# Add the Teleport APT repository for v14. You'll need to update this
# file for each major release of Teleport.
$ echo "deb [signed-by=/usr/share/keyrings/teleport-archive-keyring.asc] \
https://apt.releases.teleport.dev/${ID?} ${VERSION_CODENAME?} stable/v14" \
| sudo tee /etc/apt/sources.list.d/teleport.list > /dev/null

$ sudo apt-get update
$ sudo apt-get install teleport-ent
For FedRAMP/FIPS-compliant installations, install the teleport-ent-fips package instead:
$ sudo apt-get install teleport-ent-fips
# Source variables about OS version
$ source /etc/os-release
# Add the Teleport YUM repository for v14. You'll need to update this
# file for each major release of Teleport.
# First, get the major version from $VERSION_ID so this fetches the correct
# package version.
$ VERSION_ID=$(echo $VERSION_ID | grep -Eo "^[0-9]+")
$ sudo yum install -y yum-utils
$ sudo yum-config-manager --add-repo "$(rpm --eval "https://yum.releases.teleport.dev/$ID/$VERSION_ID/Teleport/%{_arch}/stable/v14/teleport.repo")"
$ sudo yum install teleport-ent
#
# Tip: Add /usr/local/bin to path used by sudo (so 'sudo tctl users add' will work as per the docs)
# echo "Defaults    secure_path = /sbin:/bin:/usr/sbin:/usr/bin:/usr/local/bin" > /etc/sudoers.d/secure_path
For FedRAMP/FIPS-compliant installations, install the teleport-ent-fips package instead:
$ sudo yum install teleport-ent-fips
# Source variables about OS version
$ source /etc/os-release
# Add the Teleport Zypper repository for v14. You'll need to update this
# file for each major release of Teleport.
# First, get the OS major version from $VERSION_ID so this fetches the correct
# package version.
$ VERSION_ID=$(echo $VERSION_ID | grep -Eo "^[0-9]+")
# Use zypper to add the teleport RPM repo
$ sudo zypper addrepo --refresh --repo $(rpm --eval "https://zypper.releases.teleport.dev/$ID/$VERSION_ID/Teleport/%{_arch}/stable/cloud/teleport-zypper.repo")
$ sudo yum install teleport-ent
#
# Tip: Add /usr/local/bin to path used by sudo (so 'sudo tctl users add' will work as per the docs)
# echo "Defaults    secure_path = /sbin:/bin:/usr/sbin:/usr/bin:/usr/local/bin" > /etc/sudoers.d/secure_path
For FedRAMP/FIPS-compliant installations, install the teleport-ent-fips package instead:
$ sudo yum install teleport-ent-fips
# Source variables about OS version
$ source /etc/os-release
# Add the Teleport YUM repository for v14. You'll need to update this
# file for each major release of Teleport.
# First, get the major version from $VERSION_ID so this fetches the correct
# package version.
$ VERSION_ID=$(echo $VERSION_ID | grep -Eo "^[0-9]+")
# Use the dnf config manager plugin to add the teleport RPM repo
$ sudo dnf config-manager --add-repo "$(rpm --eval "https://yum.releases.teleport.dev/$ID/$VERSION_ID/Teleport/%{_arch}/stable/v14/teleport.repo")"

# Install teleport
$ sudo dnf install teleport-ent

# Tip: Add /usr/local/bin to path used by sudo (so 'sudo tctl users add' will work as per the docs)
# echo "Defaults    secure_path = /sbin:/bin:/usr/sbin:/usr/bin:/usr/local/bin" > /etc/sudoers.d/secure_path
For FedRAMP/FIPS-compliant installations, install the teleport-ent-fips package instead:
$ sudo dnf install teleport-ent-fips
# Source variables about OS version
$ source /etc/os-release
# Add the Teleport Zypper repository.
# First, get the OS major version from $VERSION_ID so this fetches the correct
# package version.
$ VERSION_ID=$(echo $VERSION_ID | grep -Eo "^[0-9]+")
# Use Zypper to add the teleport RPM repo
$ sudo zypper addrepo --refresh --repo $(rpm --eval "https://zypper.releases.teleport.dev/$ID/$VERSION_ID/Teleport/%{_arch}/stable/v14/teleport-zypper.repo")

# Install teleport
$ sudo zypper install teleport-ent
For FedRAMP/FIPS-compliant installations, install the teleport-ent-fips package instead:
$ sudo zypper install teleport-ent-fips
In the example commands below, update $SYSTEM_ARCH with the appropriate
value (amd64, arm64, or arm). All example commands using this variable
will update after one is filled out.
$ curl https://cdn.teleport.dev/teleport-ent-v14.3.33-linux-$SYSTEM_ARCH-bin.tar.gz.sha256
# <checksum> <filename>
$ curl -O https://cdn.teleport.dev/teleport-ent-v14.3.33-linux-$SYSTEM_ARCH-bin.tar.gz
$ shasum -a 256 teleport-ent-v14.3.33-linux-$SYSTEM_ARCH-bin.tar.gz
# Verify that the checksums match
$ tar -xvf teleport-ent-v14.3.33-linux-$SYSTEM_ARCH-bin.tar.gz
$ cd teleport-ent
$ sudo ./install
For FedRAMP/FIPS-compliant installations of Teleport Enterprise, package URLs will be slightly different:
$ curl https://cdn.teleport.dev/teleport-ent-v14.3.33-linux-$SYSTEM_ARCH-fips-bin.tar.gz.sha256
# <checksum> <filename>
$ curl -O https://cdn.teleport.dev/teleport-ent-v14.3.33-linux-$SYSTEM_ARCH-fips-bin.tar.gz
$ shasum -a 256 teleport-ent-v14.3.33-linux-$SYSTEM_ARCH-fips-bin.tar.gz
# Verify that the checksums match
$ tar -xvf teleport-ent-v14.3.33-linux-$SYSTEM_ARCH-fips-bin.tar.gz
$ cd teleport-ent
$ sudo ./install
- Debian 9+/Ubuntu 16.04+ (apt)
- Amazon Linux 2/RHEL 7/CentOS 7 (yum)
- Amazon Linux 2023/RHEL 8+ (dnf)
- SLES 12 SP5+ and 15 SP5+ (zypper)
Add the Teleport repository to your repository list:
# Download Teleport's PGP public key
$ sudo curl https://apt.releases.teleport.dev/gpg \
-o /usr/share/keyrings/teleport-archive-keyring.asc
# Source variables about OS version
$ source /etc/os-release
# Add the Teleport APT repository for cloud.
$ echo "deb [signed-by=/usr/share/keyrings/teleport-archive-keyring.asc] \
https://apt.releases.teleport.dev/${ID?} ${VERSION_CODENAME?} stable/cloud" \
| sudo tee /etc/apt/sources.list.d/teleport.list > /dev/null

# Provide your Teleport domain to query the latest compatible Teleport version
$ export TELEPORT_DOMAIN=example.teleport.com
$ export TELEPORT_VERSION="$(curl https://$TELEPORT_DOMAIN/v1/webapi/automaticupgrades/channel/default/version | sed 's/v//')"

# Update the repo and install Teleport and the Teleport updater
$ sudo apt-get update
$ sudo apt-get install "teleport-ent=$TELEPORT_VERSION" teleport-ent-updater
# Source variables about OS version
$ source /etc/os-release
# Add the Teleport YUM repository for cloud.
# First, get the OS major version from $VERSION_ID so this fetches the correct
# package version.
$ VERSION_ID=$(echo $VERSION_ID | grep -Eo "^[0-9]+")
$ sudo yum install -y yum-utils
$ sudo yum-config-manager --add-repo "$(rpm --eval "https://yum.releases.teleport.dev/$ID/$VERSION_ID/Teleport/%{_arch}/stable/cloud/teleport-yum.repo")"

# Provide your Teleport domain to query the latest compatible Teleport version
$ export TELEPORT_DOMAIN=example.teleport.com
$ export TELEPORT_VERSION="$(curl https://$TELEPORT_DOMAIN/v1/webapi/automaticupgrades/channel/default/version | sed 's/v//')"

# Install Teleport and the Teleport updater
$ sudo yum install "teleport-ent-$TELEPORT_VERSION" teleport-ent-updater

# Tip: Add /usr/local/bin to path used by sudo (so 'sudo tctl users add' will work as per the docs)
# echo "Defaults    secure_path = /sbin:/bin:/usr/sbin:/usr/bin:/usr/local/bin" > /etc/sudoers.d/secure_path
# Source variables about OS version
$ source /etc/os-release
# Add the Teleport YUM repository for cloud.
# First, get the OS major version from $VERSION_ID so this fetches the correct
# package version.
$ VERSION_ID=$(echo $VERSION_ID | grep -Eo "^[0-9]+")
# Use the dnf config manager plugin to add the teleport RPM repo
$ sudo dnf config-manager --add-repo "$(rpm --eval "https://yum.releases.teleport.dev/$ID/$VERSION_ID/Teleport/%{_arch}/stable/cloud/teleport-yum.repo")"

# Provide your Teleport domain to query the latest compatible Teleport version
$ export TELEPORT_DOMAIN=example.teleport.com
$ export TELEPORT_VERSION="$(curl https://$TELEPORT_DOMAIN/v1/webapi/automaticupgrades/channel/default/version | sed 's/v//')"

# Install Teleport and the Teleport updater
$ sudo dnf install "teleport-ent-$TELEPORT_VERSION" teleport-ent-updater

# Tip: Add /usr/local/bin to path used by sudo (so 'sudo tctl users add' will work as per the docs)
# echo "Defaults    secure_path = /sbin:/bin:/usr/sbin:/usr/bin:/usr/local/bin" > /etc/sudoers.d/secure_path
# Source variables about OS version
$ source /etc/os-release
# Add the Teleport Zypper repository for cloud.
# First, get the OS major version from $VERSION_ID so this fetches the correct
# package version.
$ VERSION_ID=$(echo $VERSION_ID | grep -Eo "^[0-9]+")
# Use Zypper to add the teleport RPM repo
$ sudo zypper addrepo --refresh --repo $(rpm --eval "https://zypper.releases.teleport.dev/$ID/$VERSION_ID/Teleport/%{_arch}/stable/cloud/teleport-zypper.repo")

# Provide your Teleport domain to query the latest compatible Teleport version
$ export TELEPORT_DOMAIN=example.teleport.com
$ export TELEPORT_VERSION="$(curl https://$TELEPORT_DOMAIN/v1/webapi/automaticupgrades/channel/default/version | sed 's/v//')"

# Install Teleport and the Teleport updater
$ sudo zypper install "teleport-ent-$TELEPORT_VERSION" teleport-ent-updater
Is my Teleport instance compatible with Teleport Enterprise Cloud?
Before installing a teleport binary with a version besides v16,
read our compatibility rules to ensure that the binary is compatible with
Teleport Enterprise Cloud.
Teleport uses Semantic Versioning. Version numbers
include a major version, minor version, and patch version, separated by dots.
When running multiple teleport binaries within a cluster, the following rules
apply:
- Patch and minor versions are always compatible, for example, any 8.0.1 component will work with any 8.0.3 component and any 8.1.0 component will work with any 8.3.0 component.
- Servers support clients that are one major version behind, but do not support
clients that are on a newer major version. For example, an 8.x.x Proxy Service
instance is compatible with 7.x.x agents and 7.x.x
tsh, but we don't guarantee that a 9.x.x agent will work with an 8.x.x Proxy Service instance. This also means you must not attempt to upgrade from 6.x.x straight to 8.x.x. You must upgrade to 7.x.x first. - Proxy Service instances and agents do not support Auth Service instances that
are on an older major version, and will fail to connect to older Auth Service
instances by default. You can override version checks by passing
--skip-version-checkwhen starting agents and Proxy Service instances.
Next, on the same host, create a file at /etc/teleport.yaml with the
following content:
version: v3
teleport:
  join_params:
    token_name: "/tmp/token"
    method: token
  proxy_server: "teleport.example.com:443"
auth_service:
  enabled: no
proxy_service:
  enabled: no
ssh_service:
  enabled: no
okta_service:
  enabled: yes
  api_endpoint: okta-endpoint-url
  api_token_path: okta-api-token-path
Edit /etc/teleport.yaml to replace teleport.example.com:443 with the host
and port of your Teleport Proxy Service or Teleport Cloud tenant, e.g.,
mytenant.teleport.sh:443.
Run the Teleport Okta Service
Configure the Teleport Okta Service to start automatically when the host boots up by creating a systemd service for it. The instructions depend on how you installed the Teleport Okta Service.
- Package Manager
- TAR Archive
On the host where you will run the Teleport Okta Service, enable and start Teleport:
$ sudo systemctl enable teleport
$ sudo systemctl start teleport
On the host where you will run the Teleport Okta Service, create a systemd service configuration for Teleport, enable the Teleport service, and start Teleport:
$ sudo teleport install systemd -o /etc/systemd/system/teleport.service
$ sudo systemctl enable teleport
$ sudo systemctl start teleport
You can check the status of the Teleport Okta Service with systemctl status teleport
and view its logs with journalctl -fu teleport.
Step 3/3. Connect to the Teleport web UI
Navigate to the application access page within the Teleport web UI to see the list of of synchronized Okta applications. If you're unable to see the applications, please refer to the application Access Controls and update your roles to match the labels given to your applications by the above specified Okta import rules.
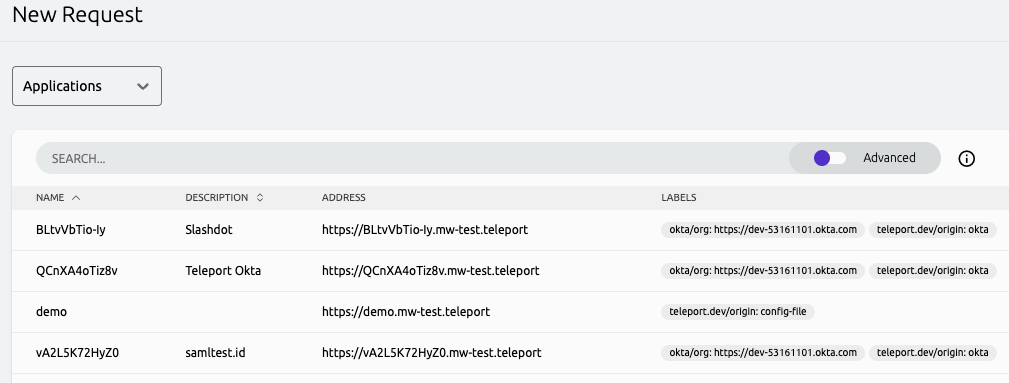
You can also try Access Requests by navigating to the Access Requests page and creating a new Access Request. From here, you can navigate to applications and see the Okta applications in the request list:

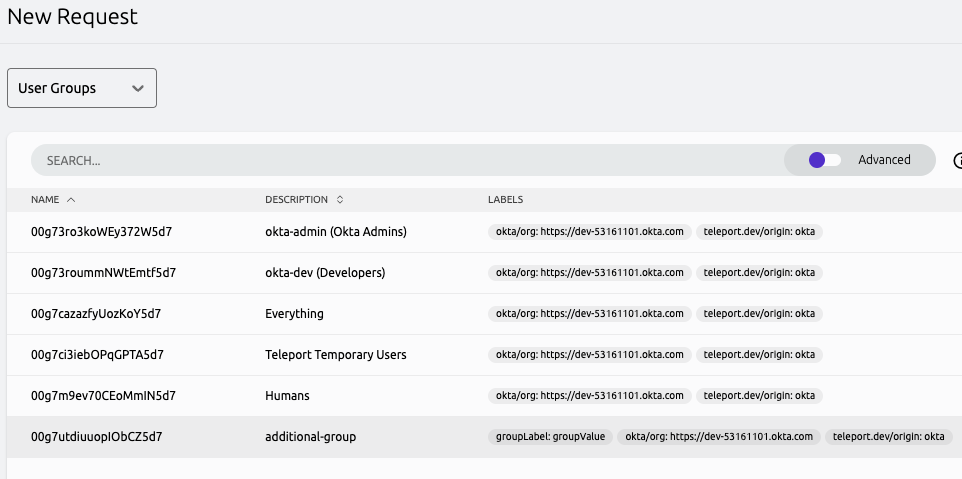
Or you can navigate to user groups and see the user groups in the request list:

Next steps
- Learn more about accessing APIs with the Teleport Application Service.
- Take a look at application-related Access Controls.