Kubernetes 101 Workshop
We are heavy users of Kubernetes (aka, k8s). It powers our Private SaaS deployments and we have found it to be a very powerful tool. However, learning about Kubernetes can be a little daunting so we have created this Kubernetes 101 workshop to help people get started with Kubernetes.
In this workshop, you will learn:
- How to install Kubernetes on your OSX or Linux machine using Minikube. Minikube is a community-recommended method to run Kubernetes on a single laptop.
- The basic concepts of Kubernetes, including Pods, Deployments, Replica Sets, Services and ConfigMaps.
- How to deploy a sample application into Kubernetes. We are going to be deploying Mattermost, the open source Slack alternative, for this workshop.
Installation
Requirements
You will need a machine with at least 7GB RAM and 8GB free disk space available, we'll be
installing the following components on it:
- Docker
- VirtualBox
- Kubectl
- Minikube
Workshop files
First of all, let's download the files needed for the workshop:
$ git clone https://github.com/gravitational/workshop.git
$ cd workshop/
Docker
For Linux: follow instructions provided here.
If you have Mac OS X (Yosemite or newer), please download Docker for Mac here.
Older docker package for OSes older than Yosemite -- Docker Toolbox located here.
VirtualBox
First, install VirtualBox by getting the latest stable version from https://www.virtualbox.org/wiki/Downloads
Kubectl
kubectl is a Kubernetes CLI client. You will use it to create, delete and inspect various
Kubernetes objects.
For Mac OS X:
$ curl -O https://storage.googleapis.com/kubernetes-release/release/v1.3.8/bin/darwin/amd64/kubectl \
&& chmod +x kubectl && sudo mv kubectl /usr/local/bin/
For Linux:
$ curl -O https://storage.googleapis.com/kubernetes-release/release/v1.3.8/bin/linux/amd64/kubectl \
&& chmod +x kubectl && sudo mv kubectl /usr/local/bin/
Minikube
For Mac OS X:
$ curl -Lo minikube https://storage.googleapis.com/minikube/releases/v0.12.2/minikube-darwin-amd64 \
&& chmod +x minikube && sudo mv minikube /usr/local/bin/
For Linux:
curl -Lo minikube https://storage.googleapis.com/minikube/releases/v0.12.2/minikube-linux-amd64 \
&& chmod +x minikube && sudo mv minikube /usr/local/bin/
Also, you can install the drivers for various VM providers to optimize your minikube VM performance.
IMPORTANT: OSX users will likely need Xcode to be installed from the AppStore.
Starting Kubernetes
To run your local Kubernetes cluster:
$ minikube start
$ kubectl get nodes
$ minikube ssh
$ docker run -p 5000:5000 --name registry -d registry:2
NOTE: For Mac OS X users: you need to allow your docker daemon to work with your local insecure registry. It could be achieved via adding VM address to Docker for Mac.
- Get minikube VM IP via calling
minikube ip - Add the IP with port 5000 (specified above in
docker runcommand) to Docker insecure registries as shown here:

Running nginx
Now, with your local cluster running, let's start by launching something simple
like nginx on it:
$ kubectl run my-nginx --image=nginx --replicas=2 --port=80 --record
$ kubectl expose deployment my-nginx --type=LoadBalancer --port=80
Let's go step by step and explore what just happened:
By executing kubectl run ... command we launched several "Pods". Pods are a basic building block
of Kubernetes-managed infrastructure. A Pod is a group of containers running on the same
machine and sharing the networking namespace. They are used to group related processes together
and can be compared to traditional VMs.
We can see them running with kubectl get:
$ kubectl get pods

NAME                        READY     STATUS    RESTARTS   AGE
my-nginx-3800858182-auusv   1/1       Running   0          32m
my-nginx-3800858182-jzoxe   1/1       Running   0          32m
You can explore individual Pods or a group of Pods (or anything, really) by using
kubectl describe command:
$ kubectl describe pods

Name:		my-nginx-3800858182-auusv
Namespace:	default
Node:		172.28.128.5/172.28.128.5
Start Time:	Sun, 15 May 2016 19:37:01 +0000
Labels:		pod-template-hash=3800858182,run=my-nginx
Status:		Running
IP:		10.244.33.109
Controllers:	ReplicaSet/my-nginx-3800858182
Containers:
  my-nginx:
    Container ID:	docker://f322f42081024e8374d23765652d3abc4cb1f28d3cfd4ed37a7dd0c990c12c5f
    Image:		nginx
    Image ID:		docker://44d8b6f34ba13fdbf1da947d4bc6467eadae1cc84c2090011803f7b0862ea124
    Port:		80/TCP
    QoS Tier:
      cpu:		BestEffort
      memory:		BestEffort
    State:		Running
      Started:		Sun, 15 May 2016 19:37:36 +0000
    Ready:		True
    Restart Count:	0
    Environment Variables:
Conditions:
  Type		Status
  Ready 	True
Volumes:
  default-token-8n3l2:
    Type:	Secret (a volume populated by a Secret)
    SecretName:	default-token-8n3l2
Events:
  FirstSeen	LastSeen	Count	From			SubobjectPath			Type		Reason		Message
  ---------	--------	-----	----			-------------			--------	------		-------
  33m		33m		1	{default-scheduler }					Normal		Scheduled	Successfully assigned my-nginx-3800858182-auusv to 172.28.128.5
  33m		33m		1	{kubelet 172.28.128.5}	spec.containers{my-nginx}	Normal		Pulling		pulling image "nginx"
  32m		32m		1	{kubelet 172.28.128.5}	spec.containers{my-nginx}	Normal		Pulled		Successfully pulled image "nginx"
  32m		32m		1	{kubelet 172.28.128.5}	spec.containers{my-nginx}	Normal		Created		Created container with docker id f322f4208102
  32m		32m		1	{kubelet 172.28.128.5}	spec.containers{my-nginx}	Normal		Started		Started container with docker id f322f4208102
Let's explore Pods some more.
Pod IPs
You can spot the IP in the overlay network assigned to Pod.
In our case it is 10.244.33.109. Can we access it directly?
Let's try and see!
$ kubectl run -i -t --rm cli --image=tutum/curl --restart=Never
$ curl http://10.244.33.109

<!DOCTYPE html>
<html>
<head>
<title>Welcome to nginx!</title>
<style>
...
Whoa, that worked! The sandbox machine is joined to the cluster's overlay
network, so you can access it directly, however in practice that's rarely necessary.
Pod Containers
In our Nginx Pod there's only one running container my-nginx, however we can have
multiple containers running in a single Pod.
Our container exposes port 80. Thanks to the overlay network, every container can expose the same port on the same machine and they won't collide.
We can enter the Pod container using the kubectl exec command:
$ kubectl exec -ti my-nginx-3800858182-auusv -c my-nginx -- /bin/bash
NOTE: You'll need to replace my-nginx-3800858182-auusv with the Name: returned from your kubectl describe pods command.
kubectl exec command specifies Pod id and container name within the Pod.
-ti stands for attach PTY and connects input to the container respectively.
If there's just one container, we can omit the container name within the Pod:
$ kubectl exec -ti my-nginx-3800858182-auusv /bin/bash
Let's explore our nginx container a bit:
$ ps uax
root         1  0.0  0.1  31676  3020 ?        Ss   19:37   0:00 nginx: master p
nginx        5  0.0  0.0  32060  1936 ?        S    19:37   0:00 nginx: worker p
root       265  0.2  0.0  20224  1912 ?        Ss   20:24   0:00 /bin/bash
root       270  0.0  0.0  17492  1144 ?        R+   20:25   0:00 ps uax
As you can see, this container has its own separate PID namespace - nginx process is actually PID 1.
$ ls -l /var/run/secrets/kubernetes.io/serviceaccount/
Kubernetes also mounted a special volume in our container serviceaccount with
the access credentials needed to talk to the k8s API process. Kubernetes uses the
technique of exposing information to containers via mounted volumes quite
often. For example, it can create volumes for container configuration or for
encrypted application secrets. We will explore this in more detail a bit later.
We don't need to always run interactive sessions within container. For example, we can execute command without attaching PTY:
$ kubectl exec my-nginx-3800858182-auusv -- /bin/ls -l

total 0
drwxr-xr-x.   1 root root 1190 May  3 18:53 bin
drwxr-xr-x.   1 root root    0 Mar 13 23:46 boot
drwxr-xr-x.   5 root root  380 May 15 19:37 dev
drwxr-xr-x.   1 root root 1646 May 15 19:47 etc
drwxr-xr-x.   1 root root    0 Mar 13 23:46 home
drwxr-xr-x.   1 root root  100 May  4 02:38 lib
drwxr-xr-x.   1 root root   40 May  3 18:52 lib64
drwxr-xr-x.   1 root root    0 May  3 18:52 media
drwxr-xr-x.   1 root root    0 May  3 18:52 mnt
drwxr-xr-x.   1 root root    0 May  3 18:52 opt
dr-xr-xr-x. 151 root root    0 May 15 19:37 proc
drwx------.   1 root root   56 May 15 19:46 root
drwxr-xr-x.   1 root root   48 May 15 19:37 run
drwxr-xr-x.   1 root root 1344 May  3 18:53 sbin
drwxr-xr-x.   1 root root    0 May  3 18:52 srv
dr-xr-xr-x.  13 root root    0 May 15 17:56 sys
drwxrwxrwt.   1 root root    0 May 15 19:47 tmp
drwxr-xr-x.   1 root root   70 May  4 02:38 usr
drwxr-xr-x.   1 root root   90 May  4 02:38 var
NOTE: when calling kubectl exec, don't forget --. You don't need to escape or join
the command arguments passed to exec, kubectl will simply send everything after -- as-is.
Deployments and Replica Sets
We asked Kubernetes to create two Pods but that's not all that happened.
Kubernetes also created a deployment with a replicaset consisting of two Pods:
$ kubectl get deployments

NAME       DESIRED   CURRENT   UP-TO-DATE   AVAILABLE   AGE
my-nginx   2         2         2            2           1h
$ kubectl get replicasets

NAME                  DESIRED   CURRENT   AGE
my-nginx-3800858182   2         2         1h
A Deployment is a special declarative state of your Pods and Replica Sets. A Replica Set specifies the number of Pod “replicas” running at any one time. You simply declare the desired state of your Deployment and k8s converges the current state to it.
Every time you update the Deployment, it kicks off the update procedure using whatever update strategy you've selected for it.
Let's dig a little deeper into this deployment:
Here we see that it manages 2 replicas of our Pod and using the RollingUpdate strategy,
which updates one Pod at a time, rather than taking down the entire Service at the same time:
$ kubectl describe deployments/my-nginx

Name:			my-nginx
Namespace:		default
CreationTimestamp:	Sun, 15 May 2016 12:37:01 -0700
Labels:			run=my-nginx
Selector:		run=my-nginx
Replicas:		2 updated | 2 total | 2 available | 0 unavailable
StrategyType:		RollingUpdate
MinReadySeconds:	0
RollingUpdateStrategy:	1 max unavailable, 1 max surge
OldReplicaSets:		<none>
NewReplicaSet:		my-nginx-3800858182 (2/2 replicas created)
Events:
  FirstSeen	LastSeen	Count	From				SubobjectPath	Type		Reason			Message
  ---------	--------	-----	----				-------------	--------	------			-------
  1h		1h		1	{deployment-controller }			Normal		ScalingReplicaSet	Scaled up replica set my-nginx-3800858182 to 2
Events tell us what happened to this Deployment in the past. We'll dig a little bit deeper into this Deployment later. For now, let's move on to Services.
Services
Services are a way to define a logical set of Pods and a scalable way to access them.
Services provide special Virtual IPs which load balance traffic to the set of Pods in a Replica Set.
$ kubectl get services

kubernetes   10.100.0.1     <none>        443/TCP   2h
my-nginx     10.100.68.75   <none>        80/TCP    1h
As you see there are two services. One is a system service kubernetes that
points to the K8s API. The other one is my-nginx service, pointing to our Pods in a
Replica Set.
Let's dig a little deeper into Services:
$ kubectl describe services/my-nginx

Name:			my-nginx
Namespace:		default
Labels:			<none>
Selector:		run=my-nginx
Type:			ClusterIP
IP:			10.100.68.75
Port:			<unset>	80/TCP
Endpoints:		10.244.33.109:80,10.244.40.109:80
Session Affinity:	None
No events.
The ClusterIP type means that it's an internal IP managed by k8s and not reachable outside. You can create other types of Services that play nicely with AWS/GCE and Azure called LoadBalancer.
You can also see there are two endpoints:
Endpoints: 10.244.33.109:80,10.244.40.109:80
Each one points to the appropriate Pod in the Replica Set. As long as Pods come and go, this section will be updated, so applications don't have to worry about individual Pod locations.
And finally, there's the Service IP:
IP: 10.100.68.75
This is our Virtual IP that never changes and provides a static piece of configuration, making it easier for our components in the system to talk to each other.
$ kubectl run -i -t --rm cli --image=tutum/curl --restart=Never

Waiting for pod default/cli to be running, status is Pending, pod ready: false

Hit enter for command prompt
Now let's curl the Service IP:
$ curl http://10.100.68.75

<!DOCTYPE html>
<html>
<head>
<title>Welcome to nginx!</title>
<style>
    body {
        width: 35em;
        margin: 0 auto;
        font-family: Tahoma, Verdana, Arial, sans-serif;
    }
</style>
</head>
<body>
<h1>Welcome to nginx!</h1>
<p>If you see this page, the nginx web server is successfully installed and
working. Further configuration is required.</p>
It works! Wait, so you need to hardcode this VIP in your configuration? What if it changes from environment to environment? Thankfully, k8s team thought about this as well, and we can simply use the Service name:
$ curl http://my-nginx

<!DOCTYPE html>
...
K8s is integrated with the SkyDNS service
that watches the Services and Pods and sets up appropriate A records. Our sandbox local DNS server is simply configured to point to the DNS Service provided by k8s.
That's very similar how k8s manages discovery in containers, as well. Let's login into one of the nginx boxes and
discover /etc/resolv.conf there:
$ kubectl exec -ti my-nginx-3800858182-auusv -- /bin/bash

root@my-nginx-3800858182-auusv:/# cat /etc/resolv.conf

nameserver 10.100.0.4
search default.svc.cluster.local svc.cluster.local cluster.local hsd1.ca.comcast.net
options ndots:5
As you see, resolv.conf is set up to point to the DNS resolution service managed by k8s.
Back to Deployments
The power of Deployments comes from their ability to do smart upgrades and rollbacks when something goes wrong.
Let's update our Deployment of nginx to the newer version. There's a Deployment
in the workshop directory called my-nginx-new.yaml:
$ cat my-nginx-new.yaml
apiVersion: extensions/v1beta1
kind: Deployment
metadata:
  labels:
    run: my-nginx
  name: my-nginx
  namespace: default
spec:
  replicas: 2
  selector:
    matchLabels:
      run: my-nginx
  template:
    metadata:
      labels:
        run: my-nginx
    spec:
      containers:
      - image: nginx:1.11.5
        name: my-nginx
        ports:
        - containerPort: 80
          protocol: TCP
Now let's apply our Deployment:
$ kubectl apply -f my-nginx-new.yaml

deployment "my-nginx" configured
We can see that a new Replica Set has been created
$ kubectl get rs

NAME                  DESIRED   CURRENT   AGE
my-nginx-1413250935   2         2         50s
my-nginx-3800858182   0         0         2h
If we look at the events section of the Deployment we will see how it performed a rolling update, scaling up the new Replica Set and scaling down the old Replica Set:
$ kubectl describe deployments/my-nginx

Name:			my-nginx
Namespace:		default
CreationTimestamp:	Sun, 15 May 2016 19:37:01 +0000
Labels:			run=my-nginx
Selector:		run=my-nginx
Replicas:		2 updated | 2 total | 2 available | 0 unavailable
StrategyType:		RollingUpdate
MinReadySeconds:	0
RollingUpdateStrategy:	1 max unavailable, 1 max surge
OldReplicaSets:		<none>
NewReplicaSet:		my-nginx-1413250935 (2/2 replicas created)
Events:
  FirstSeen	LastSeen	Count	From				SubobjectPath	Type		Reason			Message
  ---------	--------	-----	----				-------------	--------	------			-------
  2h		2h		1	{deployment-controller }			Normal		ScalingReplicaSet	Scaled up replica set my-nginx-3800858182 to 2
  1m		1m		1	{deployment-controller }			Normal		ScalingReplicaSet	Scaled up replica set my-nginx-1413250935 to 1
  1m		1m		1	{deployment-controller }			Normal		ScalingReplicaSet	Scaled down replica set my-nginx-3800858182 to 1
  1m		1m		1	{deployment-controller }			Normal		ScalingReplicaSet	Scaled up replica set my-nginx-1413250935 to 2
  1m		1m		1	{deployment-controller }			Normal		ScalingReplicaSet	Scaled down replica set my-nginx-3800858182 to 0
And now it's 1.11.5, let's check out in the headers:
$ kubectl run -i -t --rm cli --image=tutum/curl --restart=Never
$ curl -v http://my-nginx

* About to connect() to my-nginx port 80 (#0)
*   Trying 10.100.68.75...
* Connected to my-nginx (10.100.68.75) port 80 (#0)
> GET / HTTP/1.1
> User-Agent: curl/7.29.0
> Host: my-nginx
> Accept: */*
>
< HTTP/1.1 200 OK
< Server: nginx/1.9.1
Let's simulate a situation when a Deployment fails and we need to rollback. There's a Deployment
in the workshop directory with an error called my-nginx-typo.yaml:
$ cat my-nginx-typo.yaml
apiVersion: extensions/v1beta1
kind: Deployment
metadata:
  labels:
    run: my-nginx
  name: my-nginx
  namespace: default
spec:
  replicas: 2
  selector:
    matchLabels:
      run: my-nginx
  template:
    metadata:
      labels:
        run: my-nginx
    spec:
      containers:
      - image: nginx:1.91
        name: my-nginx
        ports:
        - containerPort: 80
          protocol: TCP
Now let's apply the bad configuration:
$ kubectl apply -f my-nginx-typo.yaml
deployment "my-nginx" configured
Our new Pods are now in a bad state:
$ kubectl get pods
NAME                        READY     STATUS             RESTARTS   AGE
my-nginx-1413250935-rqstg   1/1       Running            0          10m
my-nginx-2896527177-8wmk7   0/1       ImagePullBackOff   0          55s
my-nginx-2896527177-cv3fd   0/1       ImagePullBackOff   0          55s
And the Deployment shows 2 unavailable Replicas:
$ kubectl describe deployments/my-nginx

Name:			my-nginx
Namespace:		default
CreationTimestamp:	Sun, 15 May 2016 19:37:01 +0000
Labels:			run=my-nginx
Selector:		run=my-nginx
Replicas:		2 updated | 2 total | 1 available | 2 unavailable
StrategyType:		RollingUpdate
MinReadySeconds:	0
RollingUpdateStrategy:	1 max unavailable, 1 max surge
OldReplicaSets:		my-nginx-1413250935 (1/1 replicas created)
NewReplicaSet:		my-nginx-2896527177 (2/2 replicas created)
Events:
  FirstSeen	LastSeen	Count	From				SubobjectPath	Type		Reason			Message
  ---------	--------	-----	----				-------------	--------	------			-------
  2h		2h		1	{deployment-controller }			Normal		ScalingReplicaSet	Scaled up replica set my-nginx-3800858182 to 2
  11m		11m		1	{deployment-controller }			Normal		ScalingReplicaSet	Scaled up replica set my-nginx-1413250935 to 1
  11m		11m		1	{deployment-controller }			Normal		ScalingReplicaSet	Scaled down replica set my-nginx-3800858182 to 1
  11m		11m		1	{deployment-controller }			Normal		ScalingReplicaSet	Scaled up replica set my-nginx-1413250935 to 2
  10m		10m		1	{deployment-controller }			Normal		ScalingReplicaSet	Scaled down replica set my-nginx-3800858182 to 0
  1m		1m		1	{deployment-controller }			Normal		ScalingReplicaSet	Scaled up replica set my-nginx-2896527177 to 1
  1m		1m		1	{deployment-controller }			Normal		ScalingReplicaSet	Scaled down replica set my-nginx-1413250935 to 1
  1m		1m		1	{deployment-controller }			Normal		ScalingReplicaSet	Scaled up replica set my-nginx-2896527177 to 2
The rollout has stopped. Let's view the history:
$ kubectl rollout history deployments/my-nginx

deployments "my-nginx":
REVISION	CHANGE-CAUSE
1		kubectl run my-nginx --image=nginx --replicas=2 --port=80 --expose --record
2		kubectl apply -f my-nginx-new.yaml
3		kubectl apply -f my-nginx-typo.yaml
NOTE: We used --record flag and now all commands are recorded!
Let's roll back the last Deployment:
$ kubectl rollout undo deployment/my-nginx

deployment "my-nginx" rolled back
We've created a new revision by doing undo:
$ kubectl rollout history deployment/my-nginx

deployments "my-nginx":
REVISION	CHANGE-CAUSE
1		kubectl run my-nginx --image=nginx --replicas=2 --port=80 --expose --record
3		kubectl apply -f my-nginx-typo.yaml
4		kubectl apply -f my-nginx-new.yaml
Deployments are a very powerful tool, and we've barely scratched the surface of what they can do. Check out the Kubernetes docs for more detail.
Configuration management basics
With our nginx containers are up and running, let's make sure they actually do
something useful by configuring them to say hello, kubernetes!
ConfigMap is a special K8s resource that maps to configuration files or environment variables inside a Pod.
Lets create a Configmap from a directory. First, let's create a conf.d directory with a default.conf file that has the following configuration:
$ mkdir conf.d
$ cat > default.conf
server {
    listen       80;
    server_name  localhost;

    location / {
        return 200 'hello, Kubernetes!';
    }
}
We can convert the whole directory into a Configmap:
$ kubectl create configmap my-nginx-v1 --from-file=conf.d

configmap "my-nginx-v1" created

$ kubectl describe configmaps/my-nginx-v1

Name:		my-nginx-v1
Namespace:	default
Labels:		<none>
Annotations:	<none>

Data
====
default.conf:	125 bytes
Every file is now it's own property, e.g. default.conf. Now, the trick is to
mount this config map in the /etc/nginx/conf.d/ of our nginxes.
There's a a new Deployment for this purpose
in the workshop directory called my-nginx-configmap.yaml:
$ cat my-nginx-configmap.yaml

apiVersion: extensions/v1beta1
kind: Deployment
metadata:
  labels:
    run: my-nginx
  name: my-nginx
  namespace: default
spec:
  replicas: 2
  selector:
    matchLabels:
      run: my-nginx
  template:
    metadata:
      labels:
        run: my-nginx
    spec:
      containers:
      - image: nginx:1.9.1
        name: my-nginx
        ports:
        - containerPort: 80
          protocol: TCP
        volumeMounts:
        - name: config-volume
          mountPath: /etc/nginx/conf.d
      volumes:
       - name: config-volume
         configMap:
           name: my-nginx-v1
Notice that we've introduced a volumes section that tells k8s to attach volumes
to the Pods. One special volume type we support is configmap that
is created on the fly from the ConfigMap resource my-nginx-v1 that we've just created.
Another part of our config is volumemounts that are specified for each container and tell it where to mount the volume.
Let's apply our ConfigMap:
$ kubectl apply -f my-nginx-configmap.yaml
Just as usual, new pods have been created:
$ kubectl get pods

NAME                        READY     STATUS    RESTARTS   AGE
my-nginx-3885498220-0c6h0   1/1       Running   0          39s
my-nginx-3885498220-9q61s   1/1       Running   0          38s
Out of curiosity, let's login into one of them and see ourselves the mounted ConfigMap:
$ kubectl exec -ti my-nginx-3885498220-0c6h0 /bin/bash
$ cat /etc/nginx/conf.d/default.conf

server {
    listen       80;
    server_name  localhost;

    location / {
        return 200 'hello, Kubernetes!';
    }
}
and finally, let's see it all in action:
$ kubectl run -i -t --rm cli --image=tutum/curl --restart=Never
$ curl http://my-nginx

hello, Kubernetes!
Connecting services
Let's deploy a slightly more complicated stack. In this exercise we will deploy Mattermost - an alternative to Slack that you can self host. We will build our own containers and configuration and push it to the registry. Mattermost is composed of a worker process that connects to a running PostgreSQL instance.
Build container
Let's build a container image for our worker and push it to our local private registry:
$ minikube ip
192.168.99.100

$ cd mattermost/worker
$ sudo docker build -t $(minikube ip):5000/mattermost-worker:6.7.0 .
$ sudo docker push $(minikube ip):5000/mattermost-worker:6.7.0
NOTE: Notice the $(minikube ip):5000 prefix. This is a private registry we've set up on our master server.
Create configmap
Mattermost's worker expects configuration to be mounted at:
/var/mattermost/config/config.json
$ cat mattermost/worker-config/config.json
If we examine config closely, we will notice that mattermost expects a connector string to postgres:
"DataSource": "postgres://postgres:mattermost@postgres:5432/postgres?sslmode=disable"
"DataSourceReplicas": ["postgres://postgres:mattermost@postgres:5432/postgres?sslmode=disable"]
Here's where k8s power comes into play. We don't need to provide hardcoded IPs, we can simply make sure that there's a postgres service pointing to our postgres database running somewhere in the cluster.
Let us create ConfigMap based on this file:
$ kubectl create configmap mattermost-v1 --from-file=mattermost/worker-config
$ kubectl describe configmaps/mattermost-v1

Name:		mattermost-v1
Namespace:	default
Labels:		<none>
Annotations:	<none>

Data
====
config.json:	2951 bytes
Starting Up Postgres
Let's create a single Pod running postgres and point our Service to it:
$ kubectl create -f mattermost/postgres.yaml
pod "mattermost-database" created
$ kubectl get pods

NAME                        READY     STATUS    RESTARTS   AGE
mattermost-database         1/1       Running   0          12m
Let's check out the logs of our postgres:
$ kubectl logs mattermost-database

The files belonging to this database system will be owned by user "postgres".
This user must also own the server process.

The database cluster will be initialized with locale "en_US.utf8".
The default database encoding has accordingly been set to "UTF8".
The default text search configuration will be set to "english".

Data page checksums are disabled.

fixing permissions on existing directory /var/lib/postgresql/data ... ok
creating subdirectories ... ok
selecting default max_connections ... 100
selecting default shared_buffers ... 128MB
NOTE: Our mattermost-database is not replicated here. In a real production systems we must create a proper Replica Set for the stateful service, what is slightly more complicated than this example.
Creating Postgres Service
Let's create a postgres Service:
$ kubectl create -f mattermost/postgres-service.yaml
Let's check out that everything is allright:
$ kubectl describe svc/postgres

Name:			postgres
Namespace:		default
Labels:			app=mattermost,role=mattermost-database
Selector:		role=mattermost-database
Type:			NodePort
IP:			    10.100.41.153
Port:			<unset>	5432/TCP
NodePort:		<unset>	31397/TCP
Endpoints:		10.244.40.229:5432
Session Affinity:	None
Seems like IP has been allocated and endpoints have been found. Last final touch:
$ kubectl run -i -t --rm cli --image=jess/telnet --restart=Never postgres 5432

Trying 10.100.41.153...
Connected to postgres.
Escape character is '^]'.
quit
Connection closed by foreign host.
Works!
Creating Mattermost worker deployment
Now, let's create our Mattermost worker. We have a Deployment already in the
workshop directory:
$ cat mattermost/worker.yaml

apiVersion: extensions/v1beta1
kind: Deployment
metadata:
  labels:
    app: mattermost
    role: mattermost-worker
  name: mattermost-worker
  namespace: default
spec:
  replicas: 1
  selector:
    matchLabels:
      role: mattermost-worker
  template:
    metadata:
      labels:
        app: mattermost
        role: mattermost-worker
    spec:
      containers:
      - image: localhost:5000/mattermost-worker:2.1.0
        name: mattermost-worker
        ports:
        - containerPort: 80
          protocol: TCP
        volumeMounts:
        - name: config-volume
          mountPath: /var/mattermost/config
      volumes:
       - name: config-volume
         configMap:
           name: mattermost-v1
Let's run the deployment:
$ kubectl create -f mattermost/worker.yaml --record
Let's check out the status of the deployment to see if everything is ok:
$ kubectl describe deployments/mattermost-worker
Name:			mattermost-worker
Namespace:		default
CreationTimestamp:	Sun, 15 May 2016 23:56:57 +0000
Labels:			app=mattermost,role=mattermost-worker
Selector:		role=mattermost-worker
Replicas:		1 updated | 1 total | 1 available | 0 unavailable
StrategyType:		RollingUpdate
MinReadySeconds:	0
RollingUpdateStrategy:	1 max unavailable, 1 max surge
OldReplicaSets:		<none>
NewReplicaSet:		mattermost-worker-1848122701 (1/1 replicas created)
Events:
  FirstSeen	LastSeen	Count	From				SubobjectPath	Type		Reason			Message
  ---------	--------	-----	----				-------------	--------	------			-------
  3m		3m		1	{deployment-controller }			Normal		ScalingReplicaSet	Scaled up replica set mattermost-worker-1932270926 to 1
  1m		1m		1	{deployment-controller }			Normal		ScalingReplicaSet	Scaled up replica set mattermost-worker-1848122701 to 1
  1m		1m		1	{deployment-controller }			Normal		ScalingReplicaSet	Scaled down replica set mattermost-worker-1932270926 to 0
Creating mattermost service
Our last step is to create a mattermost Service:
$ kubectl create -f mattermost/worker-service.yaml

You have exposed your service on an external port on all nodes in your
cluster.  If you want to expose this service to the external internet, you may
need to set up firewall rules for the service port(s) (tcp:32321) to serve traffic.

See http://releases.k8s.io/release-1.2/docs/user-guide/services-firewalls.md for more details.
service "mattermost" created
Hey, wait a second! What was that message about? Let's inspect the Service spec we
put in the workshop directory:
$ cat mattermost/worker-service.yaml
Here's what we got. Notice NodePort service type.
# service for web worker
apiVersion: v1
kind: Service
metadata:
  name: mattermost
  labels:
    app: mattermost
    role: mattermost-worker
spec:
  type: NodePort
  ports:
    - port: 80
      name: http
  selector:
    role: mattermost-worker
NodePort service type exposes a static port on every node in the cluster. In this case this port
is 32321. This is handy sometimes when you are working on-prem or locally.
Teleport cybersecurity blog posts and tech news
Every other week we'll send a newsletter with the latest cybersecurity news and Teleport updates.
Accessing the installation
$ kubectl run -i -t --rm cli --image=tutum/curl --restart=Never
$ curl http://mattermost

<!DOCTYPE html>
<html>

<head>
    <meta name="viewport" content="width=device-width, initial-scale=1, maximum-scale=1">
    <meta name="robots" content="noindex, nofollow">
    <meta name="referrer" content="no-referrer">

    <title>Mattermost - Signup</title>
Okay, we need to actually access the website now. Well, that' where NodePort comes in handy.
Let's take a closer look:
$ kubectl describe svc/mattermost

Name:			mattermost
Namespace:		default
Labels:			app=mattermost,role=mattermost-worker
Selector:		role=mattermost-worker
Type:			NodePort
IP:			10.100.226.155
Port:			http	80/TCP
NodePort:		http	32321/TCP
Endpoints:		10.244.40.23:80
Session Affinity:	None
Notice this:
NodePort: http 32321/TCP
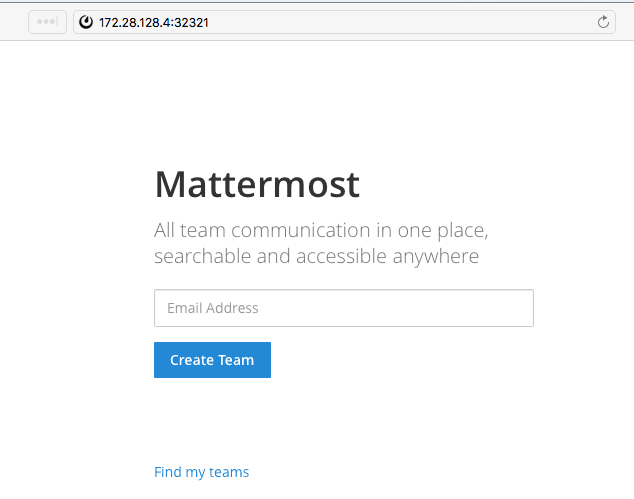
Here we see that on my Vagrant every node in the system should have IP:32321 resolve to the mattermost web app.
On your Vagrant the port most likely will be different!
So on my computer I can now open mattermost app using one of the nodes IP:
Recap
We've learned several quite important concepts like Services, Pods, Replica Sets and Configmaps. But that's just a small part of what Kubernetes can do. You can find more information on the Kubernetes website.
Table Of Contents
Teleport Newsletter
Stay up-to-date with the newest Teleport releases by subscribing to our monthly updates.
Tags
Tags
Teleport Newsletter
Stay up-to-date with the newest Teleport releases by subscribing to our monthly updates.