Database Access Getting Started Guide
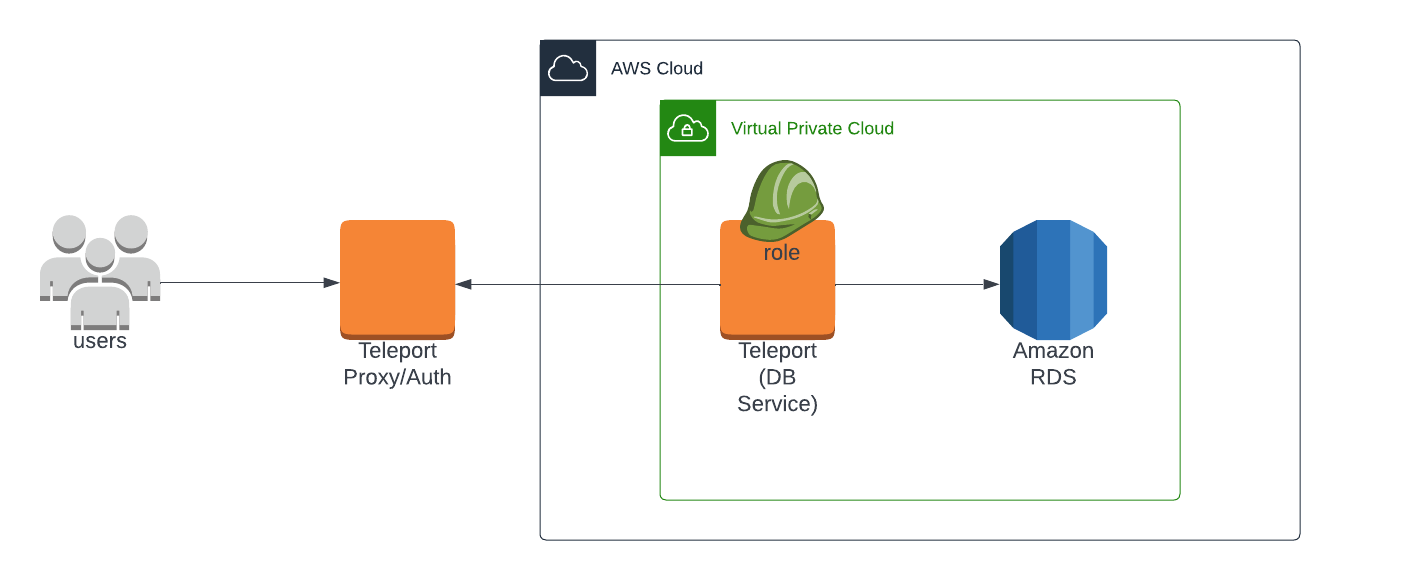
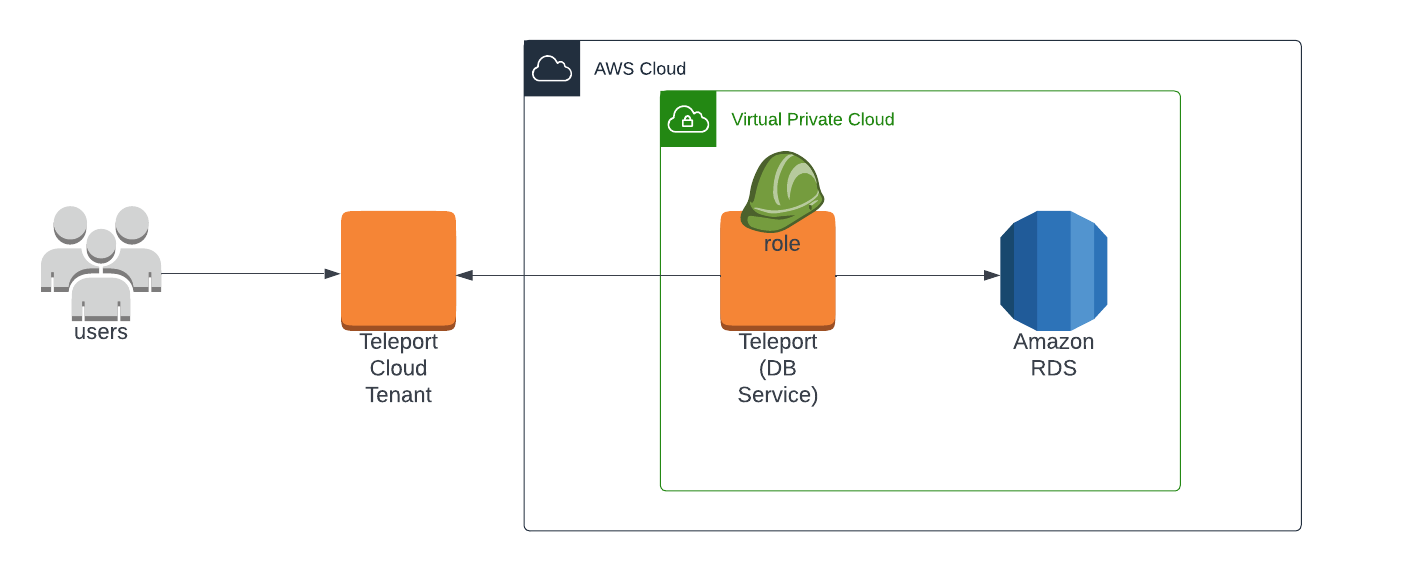
Teleport can provide secure access to PostgreSQL Amazon Aurora via the Teleport Database Service. This allows for fine-grained access control through Teleport's RBAC.
In this guide, you will:
- Configure your PostgreSQL Amazon Aurora database with IAM authentication.
- Add the database to your Teleport cluster.
- Connect to the database via Teleport.
- Self-Hosted
- Teleport Enterprise Cloud


Prerequisites
-
A running Teleport cluster version 17.0.0-dev or above. If you want to get started with Teleport, sign up for a free trial or set up a demo environment.
-
The
tctladmin tool andtshclient tool.Visit Installation for instructions on downloading
tctlandtsh.
- An AWS account with a PostgreSQL AWS Aurora database and permissions to create and attach IAM policies.
- A host, e.g., an EC2 instance, where you will run the Teleport Database Service.
- To check that you can connect to your Teleport cluster, sign in with
tsh login, then verify that you can runtctlcommands using your current credentials. For example:If you can connect to the cluster and run the$ tsh login --proxy=teleport.example.com [email protected]
$ tctl status
# Cluster teleport.example.com
# Version 17.0.0-dev
# CA pin sha256:abdc1245efgh5678abdc1245efgh5678abdc1245efgh5678abdc1245efgh5678tctl statuscommand, you can use your current credentials to run subsequenttctlcommands from your workstation. If you host your own Teleport cluster, you can also runtctlcommands on the computer that hosts the Teleport Auth Service for full permissions.
Step 1/5. Set up Aurora
In order to allow Teleport connections to an Aurora instance, the instance needs to support IAM authentication.
If you don't have a database provisioned yet, create an instance of an Aurora PostgreSQL in the RDS control panel. Make sure to choose the "Standard create" database creation method and enable "Password and IAM database authentication" in the Database Authentication dialog.
For existing Aurora instances, the status of IAM authentication is displayed on the Configuration tab and can be enabled by modifying the database instance.
Next, create the following IAM policy and attach it to the AWS user or service account. The Teleport Database Service will need to use the credentials of this AWS user or service account in order to use this policy.
{
   "Version": "2012-10-17",
   "Statement": [
      {
         "Effect": "Allow",
         "Action": [
             "rds-db:connect"
         ],
         "Resource": [
             "arn:aws:rds-db:<region>:<account-id>:dbuser:<resource-id>/*"
         ]
      }
   ]
}
This policy allows any database account to connect to the Aurora instance specified with resource ID using IAM auth.
The database resource ID is shown on the Configuration tab of a particular
database instance in the RDS control panel, under "Resource id". For regular
RDS database it starts with db- prefix. For Aurora, use the database
cluster resource ID (cluster-), not the individual instance ID.
Finally, connect to the database and create a database account with IAM auth support (or update an existing one). Once connected, execute the following SQL statements to create a new database account and allow IAM auth for it:
CREATE USER alice;
GRANT rds_iam TO alice;
For more information about connecting to the PostgreSQL instance directly, see the AWS documentation.
See the Automatic User Provisioning guide for how to configure Teleport to create accounts for your PostgreSQL users on demand.
Step 2/5. Configure the Teleport Database Service
The Database Service requires a valid join token to join your Teleport cluster.
Run the following tctl command and save the token output in /tmp/token
on the server that will run the Database Service:
$ tctl tokens add --type=db --format=text
abcd123-insecure-do-not-use-this
Alternative methods
For users with a lot of infrastructure in AWS, or who might create or recreate many instances, consider alternative methods for joining new EC2 instances running Teleport:
Install Teleport on the host where you will run the Teleport Database Service:
Install Teleport on your Linux server:
-
Assign edition to one of the following, depending on your Teleport edition:
Edition Value Teleport Enterprise Cloud cloudTeleport Enterprise (Self-Hosted) enterpriseTeleport Community Edition oss -
Get the version of Teleport to install. If you have automatic agent updates enabled in your cluster, query the latest Teleport version that is compatible with the updater:
$ TELEPORT_DOMAIN=example.teleport.com
$ TELEPORT_VERSION="$(curl https://$TELEPORT_DOMAIN/v1/webapi/automaticupgrades/channel/default/version | sed 's/v//')"
Otherwise, get the version of your Teleport cluster:
$ TELEPORT_DOMAIN=example.teleport.com
$ TELEPORT_VERSION="$(curl https://$TELEPORT_DOMAIN/v1/webapi/ping | jq -r '.server_version')" -
Install Teleport on your Linux server:
$ curl https://cdn.teleport.dev/install-v15.4.11.sh | bash -s ${TELEPORT_VERSION} editionThe installation script detects the package manager on your Linux server and uses it to install Teleport binaries. To customize your installation, learn about the Teleport package repositories in the installation guide.
- Self-Hosted
- Teleport Enterprise Cloud
On the node where you will run the Teleport Database Service, configure Teleport and
point it to your Aurora database instance. Make sure to update the database
endpoint and region appropriately. The --proxy flag must point to the
address of your Teleport Proxy Service.
$ sudo teleport db configure create \
  --token=/tmp/token \
  --name=aurora \
  --proxy=teleport.example.com:443 \
  --protocol=postgres \
  --uri=postgres-aurora-instance-1.abcdefghijklm.us-west-1.rds.amazonaws.com:5432 \
  --aws-region=us-west-1 \
  --output file:///etc/teleport.yaml
On the node where you will run the Teleport Database Service, configure Teleport and
point it to your Aurora database instance. Make sure to update the database
endpoint and region appropriately. The --proxy flag must point to the
address of your Teleport Cloud tenant.
$ sudo teleport db configure create \
  --token=/tmp/token \
  --name=aurora \
  --proxy=mytenant.teleport.sh:443 \
  --protocol=postgres \
  --uri=postgres-aurora-instance-1.abcdefghijklm.us-west-1.rds.amazonaws.com:5432 \
  --aws-region=us-west-1 \
  --output file:///etc/teleport.yaml
The node that connects to the database should have AWS credentials configured with the policy from step 1.
Step 3/5. Start the Database Service
Start the Teleport Database Service in your environment:
Configure the Database Service to start automatically when the host boots up by creating a systemd service for it. The instructions depend on how you installed the Database Service.
- Package Manager
- TAR Archive
On the host where you will run the Database Service, enable and start Teleport:
$ sudo systemctl enable teleport
$ sudo systemctl start teleport
On the host where you will run the Database Service, create a systemd service configuration for Teleport, enable the Teleport service, and start Teleport:
$ sudo teleport install systemd -o /etc/systemd/system/teleport.service
$ sudo systemctl enable teleport
$ sudo systemctl start teleport
You can check the status of the Database Service with systemctl status teleport
and view its logs with journalctl -fu teleport.
Step 4/5. Create a user and role
Create the role that will allow a user to connect to any database using any database account:
$ tctl create <<EOF
kind: role
version: v3
metadata:
  name: db
spec:
  allow:
    db_labels:
      '*': '*'
    db_names:
    - '*'
    db_users:
    - '*'
EOF
Create the Teleport user assigned the db role we've just created:
- Teleport Community Edition
- Commercial
$ tctl users add --roles=access,db alice
$ tctl users add --roles=access,requester,db alice
Step 5/5. Connect
Now that Aurora is configured with IAM authentication, Teleport is running, and the local user is created, we're ready to connect to the database.
Log in to Teleport with the user we've just created.
- Self-Hosted
- Teleport Enterprise Cloud
$ tsh login --proxy=teleport.example.com --user=alice
$ tsh login --proxy=mytenant.teleport.sh --user=alice
Now we can inspect available databases:
$ tsh db ls
Finally, connect to the database:
$ tsh db connect --db-user=alice --db-name postgres aurora
Auditing
You can view database session activity in the audit log.
After a session is uploaded, you can play back the audit data
with the tsh play command.
Database session ID will be in a UUID format (ex: 307b49d6-56c7-4d20-8cf0-5bc5348a7101)
See the audit log to get a database session ID with a key of sid.
Example:
$ tsh play --format json database.session
    {
        "cluster_name": "teleport.example.com",
        "code": "TDB02I",
        "db_name": "example",
        "db_origin": "dynamic",
        "db_protocol": "postgres",
        "db_query": "select * from sample;",
        "db_roles": [
            "access"
        ],
        "db_service": "example",
        "db_type": "rds",
        "db_uri": "databases-1.us-east-1.rds.amazonaws.com:5432",
        "db_user": "alice",
        "ei": 2,
        "event": "db.session.query",
        "sid": "307b49d6-56c7-4d20-8cf0-5bc5348a7101",
        "success": true,
        "time": "2023-10-06T10:58:32.88Z",
        "uid": "a649d925-9dac-44cc-bd04-4387c295580f",
        "user": "alice"
    }
The audit log is viewable in Activity under Management in the Web UI for users
with permission to the event resources. Database sessions do not appear
in the session recordings page.
Troubleshooting
Certificate error
If your tsh db connect error includes the following text, you likely have an RDS or DocumentDB database created before July 28, 2020, which presents an X.509 certificate that is incompatible with Teleport:
x509: certificate relies on legacy Common Name field, use SANs instead
AWS provides instructions to rotate your SSL/TLS certificate.
No credential providers error
If you see the error NoCredentialProviders: no valid providers in chain in Database Service logs then Teleport
is not detecting the required credentials to connect via AWS IAM permissions. Check whether
the credentials or security role has been applied in the machine running the Teleport Database Service.
When running on EKS, this error may occur if the Teleport Database Service cannot access IMDSv2 when the PUT requests hop limit on the worker node instance is set to 1. You can use the following commands to check the hop limit:
$ aws ec2 describe-instances --instance-ids <node-instance-id> | grep HttpPutResponseHopLimit
                        "HttpPutResponseHopLimit": 1,
See IMDSv2 support for EKS and EKS best practices for more details.
Timeout errors
The Teleport Database Service needs connectivity to your database endpoints. That may require
enabling inbound traffic on the database from the Database Service on the same VPC or routing rules from another VPC. Using the nc
program you can verify connections to databases:
$ nc -zv postgres-instance-1.sadas.us-east-1.rds.amazonaws.com 5432
# Connection to postgres-instance-1.sadas.us-east-1.rds.amazonaws.com (172.31.24.172) 5432 port [tcp/postgresql] succeeded!
Not authorized to perform sts:AssumeRole
The Database Service assumes an IAM role in one of following situations:
- A Teleport user specifies an IAM role as the database user they wish to use when accessing AWS services that require IAM roles as database users. Databases that support using an IAM role as a database user include: DynamoDB, Keyspaces, Opensearch, Redshift, and Redshift Serverless.
- The
assume_role_arnfield is specified for the database resources or dynamic resource matchers.
What if both situations apply? (role chaining)
When both of the above conditions are true for a database connection, the
Database Service performs a role chaining by assuming the IAM role specified
in assume_role_arn first, then using that IAM role to assume the IAM role for
the database user.
You may encounter the following error if the trust relationship is not configured properly between the IAM roles:
AccessDenied: User: arn:aws:sts::111111111111:assumed-role/teleport-db-service-role/i-* is not authorized to perform: sts:AssumeRole on resource: arn:aws:iam::111111111111:role/db-user-role
how to properly configure the trust relationship?
To allow IAM Role teleport-db-service-role to assume IAM Role db-user-role, the following is
generally required:
1. Configure Trust Relationships on db-user-role
teleport-db-service-role or its AWS account should be set as Principal in db-user-role's trust
policy.
- Role as principal
- Account as principal
- Cross-account with external-id
{
  "Version": "2012-10-17",
  "Statement": [
    {
      "Effect": "Allow",
      "Principal": {
        "AWS": "arn:aws:iam::aws-account-id:role/teleport-db-service-role"
      },
      "Action": "sts:AssumeRole"
    }
  ]
}
{
  "Version": "2012-10-17",
  "Statement": [
    {
      "Effect": "Allow",
      "Principal": {
        "AWS": "arn:aws:iam::aws-account-id:root"
      },
      "Action": "sts:AssumeRole"
    }
  ]
}
{
  "Version": "2012-10-17",
  "Statement": [
    {
      "Effect": "Allow",
      "Principal": {
        "AWS": "arn:aws:iam::external-aws-account-id:role/teleport-db-service-role"
      },
      "Action": "sts:AssumeRole",
      "Condition": {
        "StringEquals": {
          "sts:ExternalId": "example-external-id"
        }
      }
    }
  ]
}
2. Configure Permissions Policies on teleport-db-service-role
teleport-db-service-role requires sts:AssumeRole permissions, for example:
{
    "Version": "2012-10-17",
    "Statement": [
        {
            "Action": "sts:AssumeRole",
            "Effect": "Allow",
            "Resource": "arn:aws:iam::aws-account-id:role/db-user-role"
        }
    ]
}
Note that this policy can be omitted when teleport-db-service-role and db-user-role are in the same
AWS account and teleport-db-service-role's full ARN is configured as Principal in db-user-role's
trust policy.
3. Configure Permissions Boundary on teleport-db-service-role
If teleport-db-service-role does not have an attached
Permissions boundary
then you can skip this step.
Otherwise, the boundary policy attached to teleport-db-service-role must include
sts:AssumeRole permissions, for example:
{
    "Version": "2012-10-17",
    "Statement": [
        {
            "Action": "sts:AssumeRole",
            "Effect": "Allow",
            "Resource": "*"
        }
    ]
}
You can test the trust relationship by running this AWS CLI command as teleport-db-service-role:
$ aws sts assume-role --role-arn arn:aws:iam::111111111111:role/db-user-role --role-session-name test-trust-relationship
Learn more on how to use trust policies with IAM roles.
Next Steps
For the next steps, dive deeper into the topics relevant to your Database Access use-case, for example:
- Check out configuration guides.
- Learn how to configure GUI clients.
- Learn about database access role-based access control.
- See frequently asked questions.