Protect a GitHub Organization with Teleport
Teleport protects your GitHub organization with a GitHub App scoped to specific
repositories and permissions. git and gh commands go through Teleport with
short-lived credentials instead of long-lived personal access tokens and SSH
keys. Teleport records this activity in its audit log.
In this guide, you will:
- Connect a GitHub organization to Teleport.
- Configure access for a user.
- Clone a repository and use the
ghCLI through Teleport.
How it works
Teleport uses a private GitHub App installed on your organization to
authenticate on behalf of users. Once a user authorizes the app, Teleport
proxies their Git commands and gh CLI calls using securely-stored,
short-lived OAuth tokens.
A user's effective access is the narrowest of three: what Teleport's RBAC allows, what the GitHub App's installation grants, and what the user's own GitHub permissions cover.
Prerequisites
-
A running Teleport cluster accessible at a hostname with a valid TLS certificate. If you want to get started with Teleport, sign up for a free trial or set up a demo environment.
-
The
tctlandtshclients.Installing
tctlandtshclients-
Determine the version of your Teleport cluster. The
tctlandtshclients must be at most one major version behind your Teleport cluster version. Send a GET request to the Proxy Service at/v1/webapi/findand use a JSON query tool to obtain your cluster version. Replace teleport.example.com:443 with the web address of your Teleport Proxy Service:- Mac/Linux
- Windows - Powershell
TELEPORT_DOMAIN=teleport.example.com:443TELEPORT_VERSION="$(curl -s https://$TELEPORT_DOMAIN/v1/webapi/find | jq -r '.server_version')"$TELEPORT_DOMAIN = "teleport.example.com:443"$TELEPORT_VERSION = (Invoke-RestMethod -Uri "https://${TELEPORT_DOMAIN}/v1/webapi/find").server_version -
Follow the instructions for your platform to install
tctlandtshclients:- Mac
- Windows - Powershell
- Linux
Download the signed macOS .pkg installer for Teleport, which includes the
tctlandtshclients:curl -O https://cdn.teleport.dev/teleport-${TELEPORT_VERSION?}.pkgIn Finder double-click the
pkgfile to begin installation.dangerUsing Homebrew to install Teleport is not supported. The Teleport package in Homebrew is not maintained by Teleport and we can't guarantee its reliability or security.
curl.exe -O https://cdn.teleport.dev/teleport-v$TELEPORT_VERSION-windows-amd64-bin.zipUnzip the archive and move the `tctl` and `tsh` clients to your %PATH%
NOTE: Do not place the `tctl` and `tsh` clients in the System32 directory, as this can cause issues when using WinSCP.
Use %SystemRoot% (C:\Windows) or %USERPROFILE% (C:\Users\<username>) instead.
All of the Teleport binaries in Linux installations include the
tctlandtshclients. For more options (including RPM/DEB packages and downloads for i386/ARM/ARM64) see our installation page.curl -O https://cdn.teleport.dev/teleport-v${TELEPORT_VERSION?}-linux-amd64-bin.tar.gztar -xzf teleport-v${TELEPORT_VERSION?}-linux-amd64-bin.tar.gzcd teleportsudo ./installTeleport binaries have been copied to /usr/local/bin
Connecting with TLS routing disabled
This guide's commands assume your Teleport cluster uses TLS routing (
proxy_listener_mode: multiplex), where thetctlandtshclients reach every Teleport service through the Proxy Service's web address on port443. If you're not sure whether this applies to your cluster, check with whoever manages it.If your cluster uses separate listener ports instead, adjust ports as follows:
-
tshcommands (e.g.,tsh login --proxy=...): continue using the Proxy Service web address on port3080(or443if behind a load balancer). Do not change these to port3025. -
Direct
tctlor Auth Service API commands: use port3025for the Auth Service gRPC listener:tctl status --auth-server=teleport.example.com:3025
-
- Check that you can connect to your Teleport cluster and verify that you can run
tctlandtshcommands using your current credentials.-
Assign teleport.example.com to the domain name of the Teleport Proxy Service in your cluster and [email protected] to your Teleport username.
-
Authenticate to your Teleport cluster. This depends on whether your shell is interactive or not.
In an interactive shell: Run the following command. By default, this triggers a multi-factor authentication prompt:
tsh login --proxy=teleport.example.com --user=[email protected]tctl statusCluster teleport.example.com
Version 19.0.0-dev
CA pin sha256:abdc1245efgh5678abdc1245efgh5678abdc1245efgh5678abdc1245efgh5678
On non-interactive environments: If you are running
tshandtctlas an AI agent, in a CI/CD environment, or similar, make sure theTELEPORT_IDENTITY_FILEenvironment variable is assigned to a valid file path with credentials for your cluster.tshandtctlread the file path from the environment variable and do not require a separate authentication step. If there is no identity file available, we recommend that you set up Machine ID to provision one automatically.When executing
tctlcommands with an identity file, you must pass the--auth-serverflag to provide the Teleport Auth Service address, which is not included in the identity file. If you provide the Proxy Service address,tctlconnects to the Proxy Service, which forwards traffic to and from the Teleport Auth Service. Update 443 to3025if you are contacting the Auth Service directly withtctl:tctl status --auth-server=teleport.example.com:443For
tshcommands that read an identity file, you must pass the--proxyflag, which pointstshto the address of the Teleport Proxy Service:tsh status --proxy=teleport.example.comEnsure client commands can access your identity file. Replace path/to/identity/file with the path to your identity file:
export TELEPORT_IDENTITY_FILE="${TELEPORT_IDENTITY_FILE:-path/to/identity/file}"Add the
--auth-serveror--proxyflags to all subsequenttctlandtshcommands.
tctl statuscommand, you can use your current credentials to run subsequenttctlcommands from your workstation. If you host your own Teleport cluster, you can also runtctlcommands on the computer that hosts the Teleport Auth Service for full permissions. -
- You must be an owner of the GitHub organization you want to connect.
- If the organization is on GitHub Enterprise, your Teleport cluster requires a valid Teleport Enterprise license.
gitandghinstalled and added to your system'sPATHenvironment variable.
Git over HTTPS is not supported when the Teleport cluster runs in FIPS mode. For FIPS clusters, use GitHub over SSH instead. Support for GitHub Enterprise Server (self-hosted) is not available as of the current release.
Step 1/3. Connect your GitHub organization
Run the following command, replacing doc-example-org with your organization's name:
tctl integrations github add --org doc-example-orgThis command connects your GitHub organization to Teleport for Git over HTTPS:
  "doc-example-org"
Prerequisites:  - You are an owner of the GitHub organization.  - You are a Teleport admin who can create integrations and git servers,    for example with the preset editor role.  - If the organization is on GitHub Enterprise, the Teleport cluster has a    Teleport Enterprise license.
Steps:  1. On your behalf, tctl creates the Teleport resources for the GitHub integration.  2. In your browser, you create the GitHub App "teleport.example.com",     requesting read and write access to contents, issues and pull     requests. You can customize its name there.  3. On your behalf, tctl saves the GitHub App credentials in Teleport.  4. In your browser, you install the GitHub App in "doc-example-org"     and choose which repositories it can access.
If a step fails, tctl deletes the Teleport resources it created.
Proceed with GitHub App creation [y/N]: y
The command opens your browser once, to create a GitHub App in your organization from a predefined manifest. After you approve, you're redirected to install the app in doc-example-org and choose which repositories it can access.
The GitHub App is created with read and write access to contents, issues, and pull requests. You can always go to the app's settings on GitHub to change its permissions if needed.
Step 2/3. Configure access
You can grant access to the GitHub organization with a custom role or with
the preset access role.
- Use a custom role
- Use the preset access role (local users)
Create a role that grants access to the organization:
# role_with_github_permissions.yaml
kind: role
metadata:
  name: github-access
spec:
  allow:
    github_permissions:
    - orgs:
      - doc-example-org
version: v8
Create the role:
tctl create role_with_github_permissions.yaml
Assign the github-access role to your Teleport user. The commands to run depend on how
you authenticate to Teleport, that is, whether you have a local Teleport user, a
single sign-on authentication connector, or a non-interactive user:
- Local User
- GitHub
- SAML
- OIDC
- Non-Interactive
-
Retrieve your local user's roles as a comma-separated list:
ROLES=$(tsh status -f json | jq -r '.active.roles | join(",")') -
Edit your local user to add the new role:
tctl users update $(tsh status -f json | jq -r '.active.username') \ --set-roles "${ROLES?},github-access" -
Sign out of the Teleport cluster and sign in again to assume the new role.
-
Open your
githubauthentication connector in a text editor:tctl edit github/github -
Edit the
githubconnector, addinggithub-accessto theteams_to_rolessection.The team you should map to this role depends on how you have designed your organization's role-based access controls (RBAC). However, the team must include your user account and should be the smallest team possible within your organization.
Here is an example:
teams_to_roles: - organization: octocats team: admins roles: - access + - github-access -
Apply your changes by saving and closing the file in your editor.
-
Sign out of the Teleport cluster and sign in again to assume the new role.
-
Retrieve your
samlconfiguration resource:tctl get --with-secrets saml/mysaml > saml.yamlNote that the
--with-secretsflag adds the value ofspec.signing_key_pair.private_keyto thesaml.yamlfile. Because this key contains a sensitive value, you should remove the saml.yaml file immediately after updating the resource. -
Edit
saml.yaml, addinggithub-accessto theattributes_to_rolessection.The attribute you should map to this role depends on how you have designed your organization's role-based access controls (RBAC). However, the group must include your user account and should be the smallest group possible within your organization.
Here is an example:
attributes_to_roles: - name: "groups" value: "my-group" roles: - access + - github-access -
Apply your changes:
tctl create -f saml.yaml -
Sign out of the Teleport cluster and sign in again to assume the new role.
-
Retrieve your
oidcconfiguration resource:tctl get oidc/myoidc --with-secrets > oidc.yamlNote that the
--with-secretsflag adds the value ofspec.signing_key_pair.private_keyto theoidc.yamlfile. Because this key contains a sensitive value, you should remove the oidc.yaml file immediately after updating the resource. -
Edit
oidc.yaml, addinggithub-accessto theclaims_to_rolessection.The claim you should map to this role depends on how you have designed your organization's role-based access controls (RBAC). However, the group must include your user account and should be the smallest group possible within your organization.
Here is an example:
claims_to_roles: - name: "groups" value: "my-group" roles: - access + - github-access -
Apply your changes:
tctl create -f oidc.yaml -
Sign out of the Teleport cluster and sign in again to assume the new role.
For non-interactive users such as AI agents and CI/CD runners, follow these steps.
If you are using Machine ID to issue identity files to your user:
-
Add the new role to your bot. Assign mybot to the name of the Machine ID bot that issues your certificate:
tctl bots update mybot --add-roles github-access -
Force
tbotto regenerate the certificate:pkill -HUP tbotThe bot will also generate a certificate with the new role on its next renewal.
Otherwise, update your user and regenerate your identity file:
-
Retrieve your local user's roles as a comma-separated list. Make sure username is the Teleport user you want to assign the new role to.
ROLES=$(tctl get user/username --format=json | jq -r '.[].spec.roles | join(",")') -
Edit your local user to add the new role:
tctl users update username \ --set-roles "${ROLES?},github-access" -
Regenerate the identity file. Make sure path/to/identity/file corresponds to the correct output path:
tctl auth sign \ --user=username \ --out=path/to/identity/file \ --overwrite
If a local user already has the preset access role, grant them access to the
organization. Replace teleport-user with the name of the user:
tctl users update teleport-user --set-github-orgs=doc-example-org
Sign out of the Teleport cluster and sign in again to pick up the new access.
Step 3/3. Connect
Use tsh git ls to view a list of GitHub organizations you have access to:
tsh git lsType Organization Username URL------ --------------- -------- ----------------------------------GitHub doc-example-org my-user https://github.com/doc-example-org
Connect your GitHub identity so Teleport can act on your behalf:
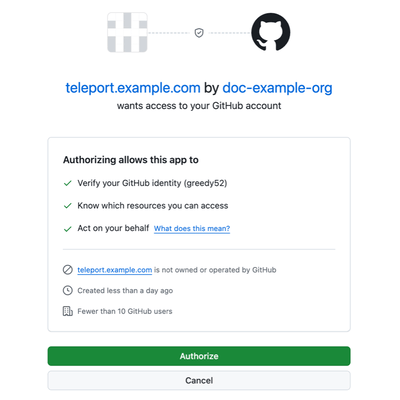
tsh git login --github-org doc-example-org
This command opens a browser, prompting you to authorize access to your
GitHub account:
To clone a repository from your GitHub organization, copy its HTTPS clone URL from the repository page on GitHub (Code > HTTPS) and run:
tsh git clone https://github.com/doc-example-org/my-repo.gitCloning into 'my-repo'...
Configuring an existing Git repository instead
To configure an existing Git repository to proxy through Teleport, go to the repository and run:
tsh git config updateRemote "origin" is updated to use Teleport over HTTPS.
tsh git config update configures the protocol matching the current URL
scheme of the "origin" remote, for example HTTPS if the remote already uses
an HTTPS URL. To switch protocols instead, update the remote URL first, for
example:
git remote set-url origin https://github.com/doc-example-org/my-repo.git
then run tsh git config update again.
Once the repo is cloned or configured, use git commands as normal:
cd my-repogit fetch
Use tsh gh -- as a direct replacement for gh once your GitHub organization
is connected to Teleport:
tsh gh -- api /user
Next steps
- Access Controls for Git Platforms: configure a custom
role instead of the preset
accessrole.