How to Configure SSH Certificate-Based Authentication

Table Of Contents
- How are SSH keys and SSH certificates different?
- How SSH certificate-based authentication works
- How to generate the Certificate Authority (CA)
- How to issue host certificates (to authenticate hosts to users)
- How to configure SSH to use host certificates
- How to issue user certificates (to authenticate users to hosts)
- How to configure SSH for user certificate authentication
- Conclusion
- More resources
Last updated: December 5, 2025
What is SSH certificate-based authentication?
SSH certificate-based authentication is a method of verifying a user or a host in Secure Shell (SSH) by using short-lived cryptographic certificates instead of long-term SSH keys.
The SSH protocol offers multiple authentication options: passwords, public keys, and certificates. Certificate-based authentication is the most secure of them all, but can be more complex to set up.
This tutorial will guide you through simple steps to configure certificate-based authentication for an OpenSSH server.
How are SSH keys and SSH certificates different?
First, let’s explore the differences between SSH keys and SSH certificates.
SSH keys
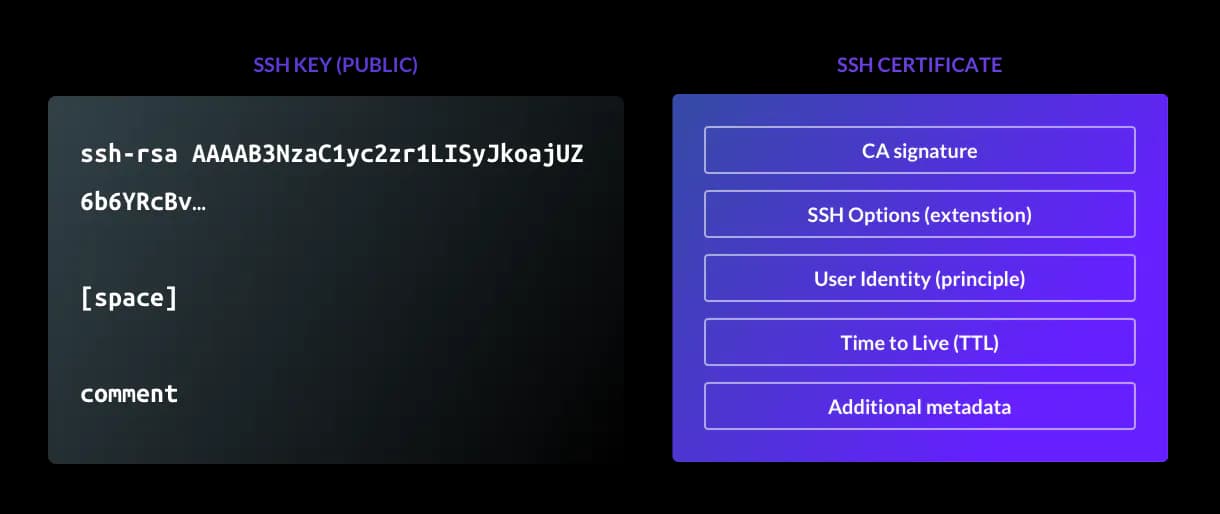
An SSH key acts like a physical door key. If you possess the key, you can unlock access to a server.
However, SSH keys contain almost no information about the user, as emphasized in Figure 1. Fields like comment are optional and not interpreted by the server, which means access is based solely on possession of the key.
SSH certificates
An SSH certificate includes identity information, an expiration (also known as a time-to-live, or TTL), and additional optional restrictions.
A trusted Certificate Authority signs each certificate, tying it to a specific user, limiting how long it is valid, and allowing servers and clients to trust each other without trust on first use (TOFU) authentication.
The following table compares the differences between SSH keys and SSH certificates side-by-side.
| Topic | SSH Keys | SSH Certificates |
|---|---|---|
| Identity data | None | Includes user identity |
| Expiration | Does not expire by default | Expire automatically after a TTL |
| Trust model | TOFU | Signed by a CA, no TOFU needed |
| Use restrictions | Cannot set usage limits | Can restrict actions like PTY or port forwarding |
| Roles | No support | Supports RBAC through metadata |
| Kubernetes | No support | Can sync with Kubernetes certs |
| Management | Keys must be added and removed manually | Centralized issuance and revocation |
| Security | Long-lived and tied to key possession | Short-lived and tied to user identity |
How SSH certificate-based authentication works
SSH certificates use the same underlying cryptography as SSH keys, but with added identity, expiration, and policy controls through a Certificate Authority (CA).
The SSH certificate-based authentication process works as follows:
- First, a Certificate Authority (CA) must be created using
ssh-keygen. In OpenSSH, the CA certificate consists of public and private key pairs with additional identity and constraints data. - The CA’s private key is used to sign user and host public keys, producing short-lived certificates.
- The CA’s public key can be copied to SSH servers to verify any certificate presented to it.
- For user authentication, the SSH client presents the user certificate (the certificate signed by the certificate authority) to the SSH server for each new connection.
- The SSH server validates the certificate by checking it against the CA's public key. Along with the signature validation, the server will also check if the user certificate is not expired and if it violates security constraints.
- Access is granted upon successful validation of the certificate.
Though more complex to configure, this method replaces authentication with long-lived static keys with centrally issued, time-bound certificates. This ties access to identity for more accurate forensics and reduces manual SSH key management responsibilities.
How to generate the Certificate Authority (CA)
To generate the certificate authority, first generate the SSH CA keypair using the ssh-keygen command. This will look like the following:
$ ssh-keygen -t rsa -b 4096 -f host_ca -C host_ca
Generating public/private rsa key pair.
Enter passphrase (empty for no passphrase):
Enter same passphrase again:
Your identification has been saved in host_ca.
Your public key has been saved in host_ca.pub.
The key fingerprint is:
SHA256:tltbnMalWg+skhm+VlGLd2xHiVPozyuOPl34WypdEO0 host_ca
The key's randomart image is:
+---[RSA 4096]----+
|              +o.|
|            .+..o|
|           o.o.+ |
|          o o.= E|
|        S  o o=o |
|       ....+ = +.|
|       ..=. %.o.o|
|        *o Oo=.+.|
|       .oo=ooo+..|
+----[SHA256]-----+

$ ls -l
total 8
-rw-------. 1 honda honda 3381 Mar 19 14:30 host_ca
-rw-r--r--. 1 honda honda  737 Mar 19 14:30 host_ca.pub
It is regarded as best practice to generate and use two separate CAs:
- One for signing host certificates: host_ca
- One for signing user certificates: user_ca
The same processes that add hosts to your fleet should not be able to add users (and vice-versa). Using separate CAs means that in the event of a private key being compromised, you will only need to reissue the certificates for either your hosts or your users, rather than both at once.
host_ca
The host_ca file is the host CA's private key and should be protected as any sensitive credential. Refrain from distributing or copying it, and ensure as few people have access to it as possible.
The host_ca file should live on a machine without direct access, and all certificates should be issued by an automated process.
user_ca
The user_ca file is the user CA's private key and should also be protected in the same way as the host CA's private key.
You can generate a user_ca with this command:
$ ssh-keygen -t rsa -b 4096 -f user_ca -C user_ca
How to issue host certificates (to authenticate hosts to users)
Now, you can generate a new host key and sign it with the CA key. This will look like the following:
$ ssh-keygen -f ssh_host_rsa_key -N '' -b 4096 -t rsa

$ ls -l
-rw------- 1 ec2-user ec2-user 3247 Mar 17 14:49 ssh_host_rsa_key
-rw-r--r-- 1 ec2-user ec2-user  764 Mar 17 14:49 ssh_host_rsa_key.pub

$ ssh-keygen -s host_ca -I host.example.com -h -n host.example.com -V +52w ssh_host_rsa_key.pub
Enter passphrase: # the passphrase used for the host CA
Signed host key ssh_host_rsa_key-cert.pub: id "host.example.com" serial 0 for host.example.com valid from 2020-03-16T15:00:00 to 2021-03-15T15:01:37

$ ls -l
-rw------- 1 ec2-user ec2-user 3247 Mar 17 14:49 ssh_host_rsa_key
-rw-r--r-- 1 ec2-user ec2-user 2369 Mar 17 14:50 ssh_host_rsa_key-cert.pub
-rw-r--r-- 1 ec2-user ec2-user  764 Mar 17 14:49 ssh_host_rsa_key.pub
ssh_host_rsa_key-cert.pub contains the signed host certificate.
Here's an explanation of the flags used:
-s host_ca— This specifies the filename of the CA private key that should be used for signing.-I host.example.com— This is the certificate's identity: an alphanumeric string that will identify the server. I recommend using the server's hostname. This value can also be used to revoke a certificate in future if needed.-h— This specifies that this certificate will be a host certificate rather than a user certificate.-n host.example.com— This specifies a comma-separated list of principals that the certificate will be valid for authenticating. For host certificates, this is the hostname used to connect to the server. If you have DNS set up, you should use the server's FQDN (for example, host.example.com) here. Otherwise, use the hostname you will be using in the ~/.ssh/config file to connect to the server.-V +52w— This flag specifies the validity period of the certificate. In this case, the period is 52 weeks (one year). Remember that certificates are valid forever by default, so expiry periods for host certificates are highly recommended to encourage certificate rotation and replacement when needed.
How to configure SSH to use host certificates
Now we can begin configuring SSH to use the host certificates.
First, copy the three files you just generated to the server.
Store them under the /etc/ssh directory and set the permissions to match the other files there. Then, add the following line to your /etc/ssh/sshd_config file:
HostCertificate /etc/ssh/ssh_host_rsa_key-cert.pub
Once this is done, restart sshd with systemctl restart sshd. Your server is now configured to present a certificate to anyone who connects.
For your local ssh client to make use of this (and automatically trust the host based on the certificate's identity), you will also need to add the CA's public key to your known_hosts file.
You can do this by taking the contents of the host_ca.pub file, adding @cert-authority *.example.com to the beginning, and then appending the contents to ~/.ssh/known_hosts.
For example:
@cert-authority *.example.com ssh-rsa AAAAB3NzaC1yc2EAAAADAQABAAACAQDwiOso0Q4W+KKQ4OrZZ1o1X7g3yWcmAJtySILZSwo1GXBKgurV4jmmBN5RsHetl98QiJq64e8oKX1vGR251afalWu0w/iW9jL0isZrPrmDg/p6Cb6yKnreFEaDFocDhoiIcbUiImIWcp9PJXFOK1Lu8afdeKWJA2f6cC4lnAEq4sA/Phg4xfKMQZUFG5sQ/Gj1StjIXi2RYCQBHFDzzNm0Q5uB4hUsAYNqbnaiTI/pRtuknsgl97xK9P+rQiNfBfPQhsGeyJzT6Tup/KKlxarjkMOlFX2MUMaAj/cDrBSzvSrfOwzkqyzYGHzQhST/lWQZr4OddRszGPO4W5bRQzddUG8iC7M6U4llUxrb/H5QOkVyvnx4Dw76MA97tiZItSGzRPblU4S6HMmCVpZTwva4LLmMEEIk1lW5HcbB6AWAc0dFE0KBuusgJp9MlFkt7mZkSqnim8wdQApal+E3p13d0QZSH3b6eB3cbBcbpNmYqnmBFrNSKkEpQ8OwBnFvjjdYB7AXqQqrcqHUqfwkX8B27chDn2dwyWb3AdPMg1+j3wtVrwVqO9caeeQ1310CNHIFhIRTqnp2ECFGCCy+EDSFNZM+JStQoNO5rMOvZmecbp35XH/UJ5IHOkh9wE5TBYIeFRUYoc2jHNAuP2FM4LbEagGtP8L5gSCTXNRM1EX2gQ== host_ca
The value *.example.com is a pattern match, indicating that this certificate should be trusted for identifying any host you connect to that has a domain of *.example.com — such as host.example.com above.
This is a comma-separated list of applicable hostnames for the certificate. If you're using IP addresses or SSH config entries here, you can change this to something like host1,host2,host3 or 1.2.3.4,1.2.3.5 as appropriate.
Once this is configured, remove any old host key entries for host.example.com in your ~/.ssh/known_hosts file, and start an ssh connection.
You should be connected directly to the host without needing to trust the host key. You can check that the certificate is being presented correctly with a command like this:
$ ssh -vv host.example.com 2>&1 | grep "Server host certificate"
debug1: Server host certificate: [email protected] SHA256:dWi6L8k3Jvf7NAtyzd9LmFuEkygWR69tZC1NaZJ3iF4, serial 0 ID "host.example.com" CA ssh-rsa SHA256:8gVhYAAW9r2BWBwh7uXsx2yHSCjY5OPo/X3erqQi6jg valid from 2020-03-17T11:49:00 to 2021-03-16T11:50:21
debug2: Server host certificate hostname: host.example.com
At this point, you could continue by issuing host certificates for all hosts in your estate using your host CA. There are two major benefits to taking this approach:
- You no longer need to rely on the insecure trust on first use (TOFU) model for new hosts
- When redeploying a server (and therefore changing the host key for a certain hostname) your new host should automatically present a signed host certificate. This avoids encountering the dreaded
WARNING: REMOTE HOST IDENTIFICATION HAS CHANGED!Message. An example of this message is included below for reference.
@@@@@@@@@@@@@@@@@@@@@@@@@@@@@@@@@@@@@@@@@@@@@@@@@@@@@@@@@@@
@     WARNING: REMOTE HOST IDENTIFICATION HAS CHANGED!    @
@@@@@@@@@@@@@@@@@@@@@@@@@@@@@@@@@@@@@@@@@@@@@@@@@@@@@@@@@@@
IT IS POSSIBLE THAT SOMEONE IS DOING SOMETHING NASTY!
Someone could be eavesdropping on you right now (man-in-the-middle attack)!
It is also possible that a host key has just been changed.
The fingerprint for the ECDSA key sent by the remote host is
SHA256:dWi6L8k3Jvf7NAtyzd9LmFuEkygWR69tZC1NaZJ3iF4.
Please contact your system administrator.
Add correct host key in /home/honda/.ssh/known_hosts to get rid of this message.
Offending ECDSA key in /home/honda/.ssh/known_hosts:12
  remove with:
  ssh-keygen -f "/home/honda/.ssh/known_hosts" -R "host.example.com"
ECDSA host key for host.example.com has changed and you have requested strict checking.
Host key verification failed.
How to issue user certificates (to authenticate users to hosts)
To issue user certificates to authenticate to hosts, we will first generate a user keypair and sign it with our user CA, as follows:
Note: It is at your discretion whether to use a passphrase or not.
$ ssh-keygen -f user-key -b 4096 -t rsa

$ ls -l
-rw-r--r--. 1 honda honda  737 Mar 19 16:33 user-key.pub
-rw-------. 1 honda honda 3369 Mar 19 16:33 user-key

$ ssh-keygen -s user_ca -I [email protected] -n ec2-user,honda -V +1d user-key.pub
Enter passphrase: # the passphrase used for the user CA
Signed user key user-key-cert.pub: id "[email protected]" serial 0 for ec2-user,honda valid from 2020-03-19T16:33:00 to 2020-03-20T16:34:54

$ ls -l
-rw-------. 1 honda honda 3369 Mar 19 16:33 user-key
-rw-r--r--. 1 honda honda 2534 Mar 19 16:34 user-key-cert.pub
-rw-r--r--. 1 honda honda  737 Mar 19 16:33 user-key.pub
user-key-cert.pub contains the signed user certificate. You'll need both this and the private key (user-key) for logging in.
Here's an explanation of the flags used:
-s user_ca— This specifies the CA private key that should be used for signing.-I [email protected]— This is the certificate's identity, an alphanumeric string that will be visible in SSH logs when the user certificate is presented. I recommend using the email address or internal username of the user that the certificate is for. This will allow you to uniquely identify a user later, and can also be used to revoke a certificate if needed.-n ec2-user,honda— This specifies the comma-separated list of principals that the certificate will be valid for authenticating; i.e. the users this certificate is allowed to log in as. In our example, we're giving this certificate access to both ec2-user and honda.-V +1d— This specifies the validity period of the certificate. In this case, +1d means one day. Again, certificates are valid forever by default, so using an expiry period or TTL is critical for ensuring certificates are not used for access perpetually.
If you need to see the options that a given certificate was signed with, you can use ssh-keygen -L, which will present the following:
$ ssh-keygen -L -f user-key-cert.pub
user-key-cert.pub:
        Type: [email protected] user certificate
        Public key: RSA-CERT SHA256:egWNu5cUZaqwm76zoyTtktac2jxKktj30Oi/ydrOqZ8
        Signing CA: RSA SHA256:tltbnMalWg+skhm+VlGLd2xHiVPozyuOPl34WypdEO0 (using ssh-rsa)
        Key ID: "[email protected]"
        Serial: 0
        Valid: from 2020-03-19T16:33:00 to 2020-03-20T16:34:54
        Principals:
                ec2-user
                honda
        Critical Options: (none)
        Extensions:
                permit-X11-forwarding
                permit-agent-forwarding
                permit-port-forwarding
                permit-pty
                permit-user-rc
How to configure SSH for user certificate authentication
Once you've signed a certificate, you also need to tell the server that it should trust certificates signed by the user CA.
To do this, copy the user_ca.pub file to the server and store it under /etc/ssh.
Set the permissions to match the other public key files in the directory, then add this line to /etc/ssh/sshd_config:
TrustedUserCAKeys /etc/ssh/user_ca.pub
Once this is done, restart sshd with systemctl restart sshd. Now, your server is configured to trust anyone who presents a certificate issued by your user CA when they connect.
If you have a certificate in the same directory as your private key, it will automatically be used when connecting to servers. This is specified with the -i flag, such as: ssh -i /home/honda/user-key [email protected].
Conclusion
In this tutorial, you will have learned how to generate and configure OpenSSH hosts and clients with certificate-based authentication.
Certificate-based authentication is the most secure form of authentication for SSH. We highly recommend certificates as a passwordless authentication method for all infrastructure access requirements, including SSH, RDP, Kubernetes clusters, web applications, and database access.
Teleport automatically manages the certificate authority for user and host certificate issuance. Learn more about how Teleport works, or try Teleport for free.
More resources
Table Of Contents
- How are SSH keys and SSH certificates different?
- How SSH certificate-based authentication works
- How to generate the Certificate Authority (CA)
- How to issue host certificates (to authenticate hosts to users)
- How to configure SSH to use host certificates
- How to issue user certificates (to authenticate users to hosts)
- How to configure SSH for user certificate authentication
- Conclusion
- More resources
Teleport Newsletter
Stay up-to-date with the newest Teleport releases by subscribing to our monthly updates.
Tags
Tags
Teleport Newsletter
Stay up-to-date with the newest Teleport releases by subscribing to our monthly updates.