Run the Slack Access Request Plugin with Native Reviews
In this guide, you will configure the Teleport Slack plugin to be able to review Access Requests directly within Slack.
Currently, only self-hosted plugins support this feature. Support for Teleport-hosted plugins will be added in the future.
Security-critical Teleport deployments should follow the regular Slack plugin guide, which requires reviewers to authenticate to Teleport before approving or denying requests.
Enabling this feature reduces the security of the Teleport cluster. Access Request reviews submitted through Slack are bound to a Slack identity rather than the reviewer's Teleport identity, and bypass Teleport authentication (and MFA for admin actions if enabled on cluster). As a result, a compromised Slack account can approve requests from Slack and escalate privileges in Teleport.
How it works
Teleport's Slack integration notifies individuals and channels of Access Requests. By enabling the plugin with native Access Request reviews, users can then approve or deny Access Requests directly within Slack without being redirected to the Teleport Web UI.
Prerequisites
-
A running Teleport Enterprise cluster accessible at a hostname with a valid TLS certificate. If you want to get started with Teleport, sign up for a free trial or set up a demo environment.
-
The
tctlandtshclients.Installing
tctlandtshclients-
Determine the version of your Teleport cluster. The
tctlandtshclients must be at most one major version behind your Teleport cluster version. Send a GET request to the Proxy Service at/v1/webapi/findand use a JSON query tool to obtain your cluster version. Replace teleport.example.com:443 with the web address of your Teleport Proxy Service:- Mac/Linux
- Windows - Powershell
TELEPORT_DOMAIN=teleport.example.com:443TELEPORT_VERSION="$(curl -s https://$TELEPORT_DOMAIN/v1/webapi/find | jq -r '.server_version')"$TELEPORT_DOMAIN = "teleport.example.com:443"$TELEPORT_VERSION = (Invoke-RestMethod -Uri "https://${TELEPORT_DOMAIN}/v1/webapi/find").server_version -
Follow the instructions for your platform to install
tctlandtshclients:- Mac
- Windows - Powershell
- Linux
Download the signed macOS .pkg installer for Teleport, which includes the
tctlandtshclients:curl -O https://cdn.teleport.dev/teleport-${TELEPORT_VERSION?}.pkgIn Finder double-click the
pkgfile to begin installation.dangerUsing Homebrew to install Teleport is not supported. The Teleport package in Homebrew is not maintained by Teleport and we can't guarantee its reliability or security.
curl.exe -O https://cdn.teleport.dev/teleport-v$TELEPORT_VERSION-windows-amd64-bin.zipUnzip the archive and move the `tctl` and `tsh` clients to your %PATH%
NOTE: Do not place the `tctl` and `tsh` clients in the System32 directory, as this can cause issues when using WinSCP.
Use %SystemRoot% (C:\Windows) or %USERPROFILE% (C:\Users\<username>) instead.
All of the Teleport binaries in Linux installations include the
tctlandtshclients. For more options (including RPM/DEB packages and downloads for i386/ARM/ARM64) see our installation page.curl -O https://cdn.teleport.dev/teleport-v${TELEPORT_VERSION?}-linux-amd64-bin.tar.gztar -xzf teleport-v${TELEPORT_VERSION?}-linux-amd64-bin.tar.gzcd teleportsudo ./installTeleport binaries have been copied to /usr/local/bin
Connecting with TLS routing disabled
This guide's commands assume your Teleport cluster uses TLS routing (
proxy_listener_mode: multiplex), where thetctlandtshclients reach every Teleport service through the Proxy Service's web address on port443. If you're not sure whether this applies to your cluster, check with whoever manages it.If your cluster uses separate listener ports instead, adjust ports as follows:
-
tshcommands (e.g.,tsh login --proxy=...): continue using the Proxy Service web address on port3080(or443if behind a load balancer). Do not change these to port3025. -
Direct
tctlor Auth Service API commands: use port3025for the Auth Service gRPC listener:tctl status --auth-server=teleport.example.com:3025
-
Recommended: Configure Machine & Workload Identity to provide short-lived
Teleport credentials to the plugin. Before following this guide, follow a
Machine & Workload Identity deployment guide
to run the tbot binary on your infrastructure.
-
Slack admin privileges to create an app and install it to your workspace. Your Slack profile must have the "Workspace Owner" or "Workspace Admin" banner below your profile picture.
-
Slack users that are linked to persistent Teleport users in order to review Access Requests from Slack. When using an external Identity Provider, users should be imported using the User Sync feature from the Teleport Okta integration or the Teleport Entra ID integration. SSO-only users are represented by temporary users in Teleport and they will be able to submit reviews until their temporary Teleport user expires, after which they must re-login to Teleport again.
-
Either a Linux host or Kubernetes cluster where you will run the Teleport Slack plugin.
-
A Slack application, Bot OAuth token, and App-level token to use for the plugin.
Creating a Slack app
-
Visit https://api.slack.com/apps to create a new Slack app. Click "Create an App", then "From scratch". Fill in the form as shown below:
The "App Name" should be "Teleport". Click the "Development Slack Workspace" dropdown and choose the workspace where you would like to see Access Request messages.
-
Configure your application to authenticate to the Slack API. We will do this by generating an OAuth token that the plugin will present to the Slack API.
We will restrict the plugin to the narrowest possible permissions by using OAuth scopes. The Slack plugin needs to post messages to your workspace. It also needs to read usernames and email addresses in order to direct Access Request notifications from the Auth Service to the appropriate Teleport users in Slack.
After creating your app, the Slack website will open a console where you can specify configuration options.
-
On the sidebar menu under "Features", click "OAuth & Permissions".
-
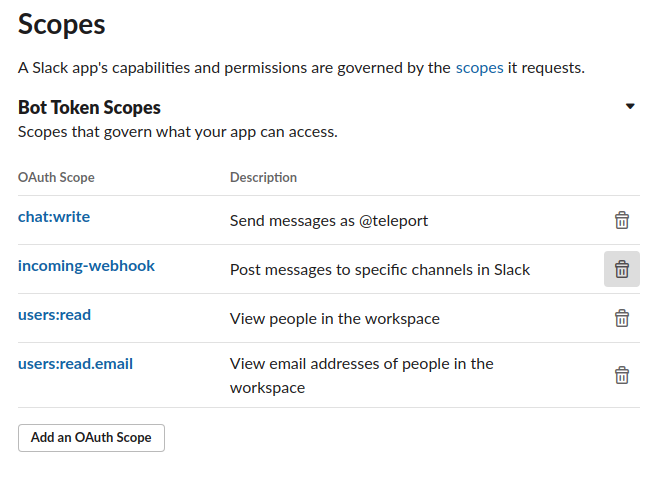
Scroll to the "Scopes" section and click "Add an OAuth Scope" for each of the following scopes:
chat:writeincoming-webhookusers:readusers:read.email
The result should look like this:
-
After you have configured scopes for your plugin, scroll back to the top of the OAuth & Permissions page, find the "OAuth Tokens for Your Workspace" section, and click "Install to Workspace". You will see a summary of the permission you configured for the Slack plugin earlier.
-
In "Where should Teleport post?", choose "Slackbot" as the default channel the plugin will post to. The plugin will post here when sending direct messages. Later in this guide, we will configure the plugin to post in other channels as well.
After submitting this form, you will see an OAuth token in the "OAuth & Permissions" tab under "Tokens for Your Workspace":
You will use this token later when configuring the Slack plugin.
-
Check that you can connect to your Teleport cluster and verify that you can run
tctl and tsh commands using your current credentials.
-
Assign teleport.example.com to the domain name of the Teleport Proxy Service in your cluster and [email protected] to your Teleport username.
-
Authenticate to your Teleport cluster. This depends on whether your shell is interactive or not.
In an interactive shell: Run the following command. By default, this triggers a multi-factor authentication prompt:
tsh login --proxy=teleport.example.com --user=[email protected]tctl statusCluster teleport.example.com
Version 19.0.0-dev
CA pin sha256:abdc1245efgh5678abdc1245efgh5678abdc1245efgh5678abdc1245efgh5678
On non-interactive environments: If you are running
tshandtctlas an AI agent, in a CI/CD environment, or similar, make sure theTELEPORT_IDENTITY_FILEenvironment variable is assigned to a valid file path with credentials for your cluster.tshandtctlread the file path from the environment variable and do not require a separate authentication step. If there is no identity file available, we recommend that you set up Machine ID to provision one automatically.When executing
tctlcommands with an identity file, you must pass the--auth-serverflag to provide the Teleport Auth Service address, which is not included in the identity file. If you provide the Proxy Service address,tctlconnects to the Proxy Service, which forwards traffic to and from the Teleport Auth Service. Update 443 to3025if you are contacting the Auth Service directly withtctl:tctl status --auth-server=teleport.example.com:443For
tshcommands that read an identity file, you must pass the--proxyflag, which pointstshto the address of the Teleport Proxy Service:tsh status --proxy=teleport.example.comEnsure client commands can access your identity file. Replace path/to/identity/file with the path to your identity file:
export TELEPORT_IDENTITY_FILE="${TELEPORT_IDENTITY_FILE:-path/to/identity/file}"Add the
--auth-serveror--proxyflags to all subsequenttctlandtshcommands.
If you can connect to the cluster and run the tctl status command, you can use your
current credentials to run subsequent tctl commands from your workstation.
If you host your own Teleport cluster, you can also run tctl commands on the computer that
hosts the Teleport Auth Service for full permissions.
Step 1/7. Configure your Slack app
In this step, you will configure your Slack app to support the native Access Request reviews feature.
Generate an app-level token
Enter the following URL and select your Slack app to reach your app's settings:
https://api.slack.com/apps
In your Slack app's settings, head to the Basic Information tab.
Then, under App-Level Tokens, click Generate Token and Scopes. Set a name
and add the connections:write scope. This will provide the plugin with the necessary permissions
to receive user interactions from Slack.
Copy the generated app-level token for use in a later step.
The Slack app-level token is different from the Slack bot token and must be set up separately.
The bot token xoxb-... provides the plugin permissions to read Slack user info and write to channels.
The app-level token xapp-... provides the plugin permissions to receive user interactions from Slack,
which is necessary for the native Access Request reviews feature.
Enable Socket Mode setting
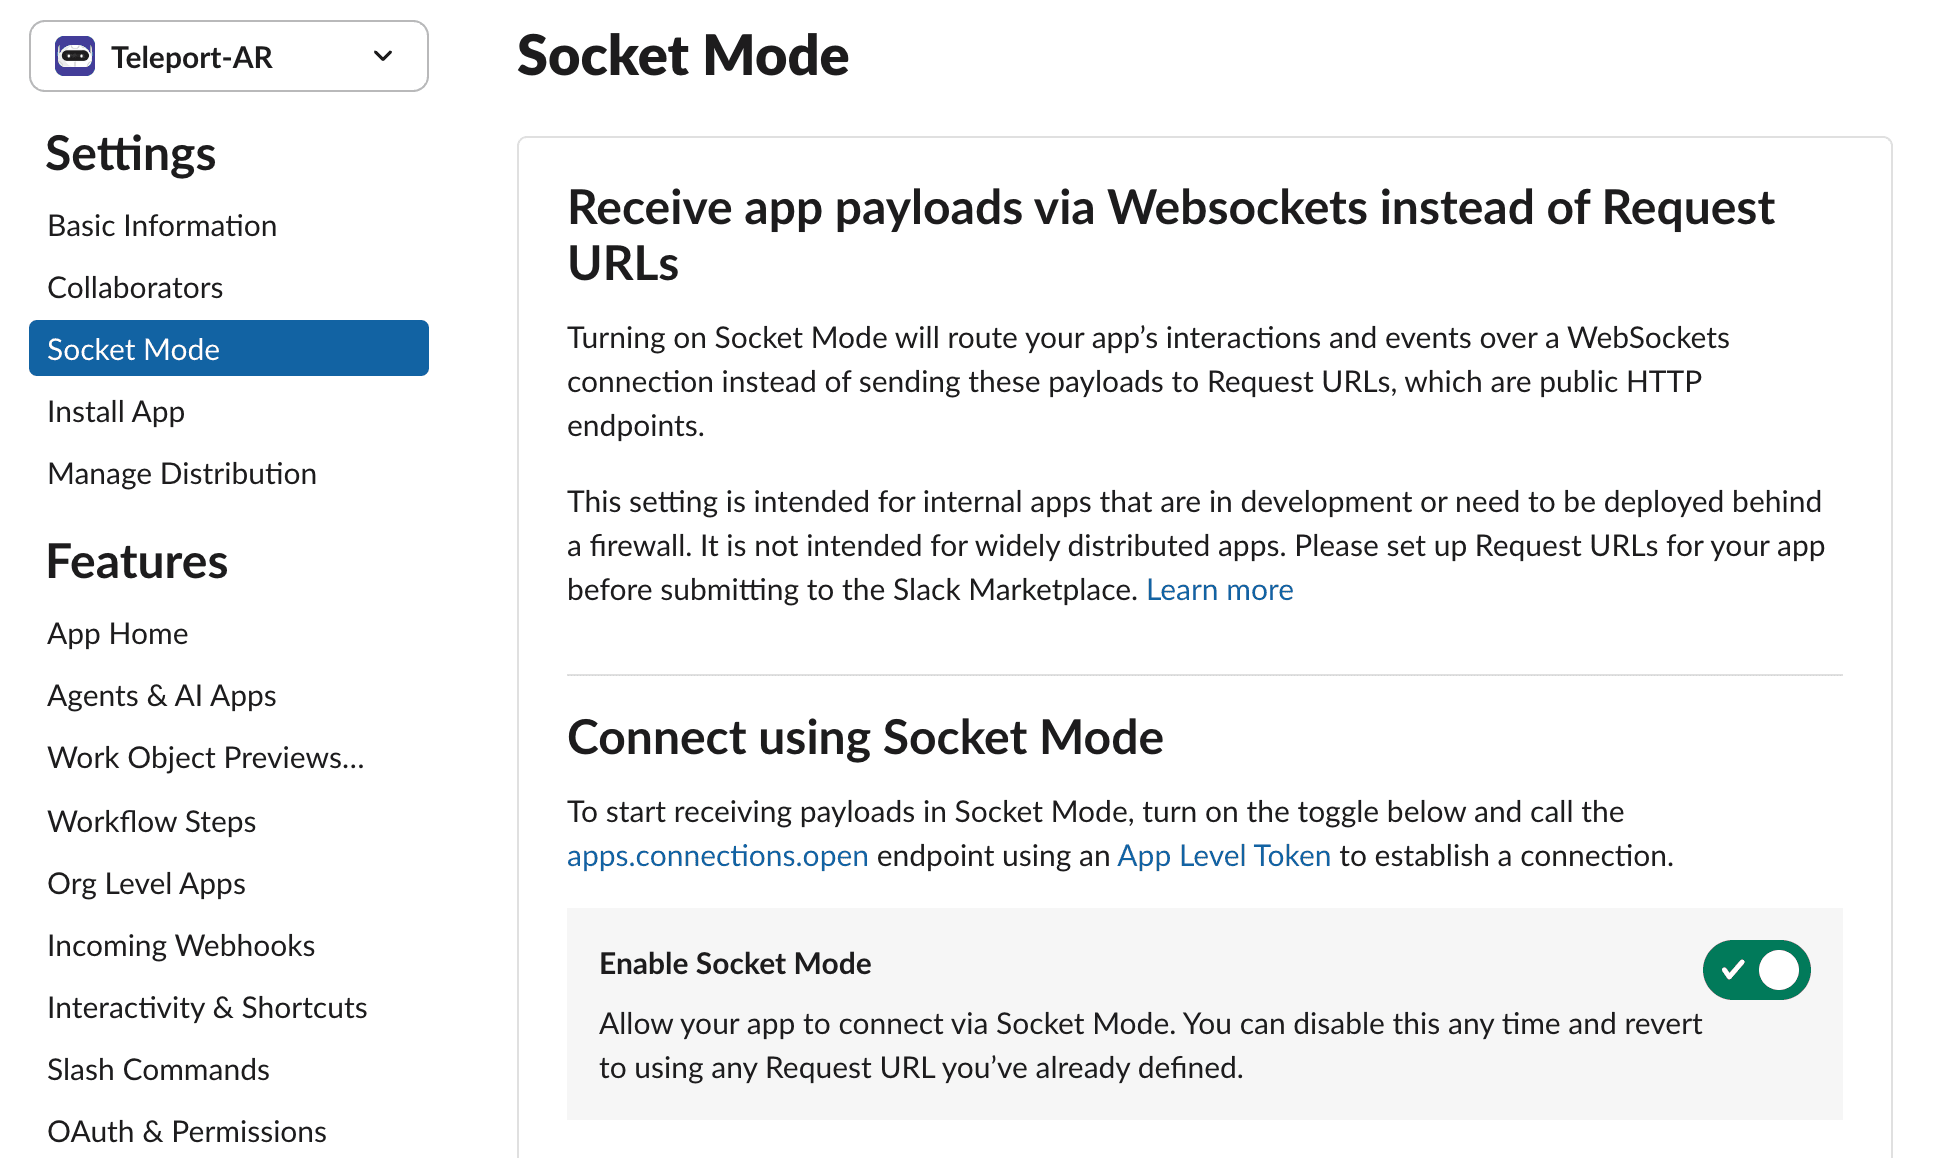
Head to the Socket Mode tab and enable Socket Mode. This will allow the Teleport Slack plugin to build a WebSocket connection with the Slack server in order to process Access Request reviews from Slack.
Step 2/7. Define requester and reviewer users
For the purpose of this guide, we will define an access-requester role that
can request the built-in access role, and an access-reviewer role that can
review requests for the access role.
Create a file called access-request-rbac.yaml with the following content:
kind: role
version: v8
metadata:
  name: access-reviewer
spec:
  allow:
    review_requests:
      roles: ['access']
---
kind: role
version: v8
metadata:
  name: access-requester
spec:
  allow:
    request:
      roles: ['access']
      thresholds:
        - approve: 1
          deny: 1
Create the roles you defined:
tctl create -f access-request-rbac.yamlrole 'access-reviewer' has been createdrole 'access-requester' has been created
You can also create and edit roles using the Web UI. Go to Access -> Roles and click Create New Role or pick an existing role to edit.
Set up the requester user
Create a user called myuser who has the access-requester role:
tctl users add myuser --roles=access-requester
Visit the invitation URL that is printed and login as myuser for the first time,
registering credentials as configured for your Teleport cluster.
Later in this guide, you will have myuser request the access role so you can
review the request using the Teleport Slack plugin.
Set up the reviewer user
Next, we will set up a user that can review Access Requests directly within Slack.
All users performing Access Request reviews within Slack must be linked to a persistent Teleport user. When using an external Identity Provider, users should be imported using the User Sync feature from the Teleport Okta integration or the Teleport Entra ID integration. SSO-only users are represented by temporary users in Teleport and they will be able to submit reviews until their temporary Teleport user expires, after which they must re-login to Teleport again.
There are two identity binding models for Slack reviewers:
- binding based on Teleport username and Slack email
- binding based on Teleport trait and Slack user ID
The binding based on Teleport trait is stronger, but requires a Teleport user to be given a trait with their Slack user ID, often coming from the Identity Provider/SSO connector.
You can set up both types of identity bindings if some users are imported from an Identity Provider/SSO connector while others are local Teleport users.
- Teleport trait binding
- Teleport username binding
Create a Teleport user with a username set as [email protected]
and assigned the role access-reviewer.
We will assign this reviewer user with a Teleport trait named slack_uid that holds the value of the Slack user's ID: U123456789. The trait name can also be configured in the plugin configuration step.
- Local users
- SSO users
Create a local user:
tctl users add [email protected] --roles=access-reviewer
Visit the invitation URL that is printed and login as [email protected] for the first time, registering credentials as configured for your Teleport cluster.
Create a file called user-traits.yaml with the following content:
kind: user
version: v2
metadata:
  name: [email protected]
spec:
  roles: ['access-reviewer']
  traits:
    slack_uid: ['U123456789']
Update the newly created user:
tctl create -f user-traits.yaml
When using a single sign-on user, the Teleport trait should be configured in the Identity Provider.
To get started integrating your Identity Provider with Teleport, read Integrate your Identity Provider.
Prepare a Slack user with an email address.
Create a Teleport user with a username set to the Slack user's email [email protected]
and assigned the role access-reviewer.
tctl users add [email protected] --roles=access-reviewer
Visit the invitation URL that is printed and login as [email protected] for the first time, registering credentials as configured for your Teleport cluster.
The Slack user will now be able to review Access Requests for the access role within Slack
once we set up the Teleport Slack plugin.
Step 3/7. Install the Teleport Slack plugin
- Download
- Docker Image
- From Source
- Helm Chart
Access Request Plugins are available as amd64 and arm64 Linux binaries for downloading.
Replace ARCH with your required version.
curl -L -O https://cdn.teleport.dev/teleport-access-slack-v13.3.7-linux-ARCH-bin.tar.gztar -xzf teleport-access-slack-v13.3.7-linux-ARCH-bin.tar.gzcd teleport-access-slacksudo ./install
Make sure the binary is installed:
teleport-slack versionteleport-slack v13.3.7 git:teleport-slack-v13.3.7-fffffffff go1.27.3
docker pull public.ecr.aws/gravitational/teleport-plugin-slack:13.3.7
Make sure the plugin is installed by running the following command:
docker run public.ecr.aws/gravitational/teleport-plugin-slack:13.3.7 versionteleport-slack v13.3.7 1.27.3
For a list of available tags, visit Amazon ECR Public Gallery.
To install from source you need git and go installed. If you do not have Go
installed, visit the Go downloads page.
git clone https://github.com/gravitational/teleport -b branch/v19cd teleport/integrations/access/slackgit checkout v13.3.7make build/teleport-slack
Move the teleport-slack binary into your PATH.
Make sure the binary is installed:
teleport-slack versionteleport-slack v13.3.7 git:teleport-slack-v13.3.7-fffffffff go1.27.3
Allow Helm to install charts that are hosted in the Teleport Helm repository:
helm repo add teleport https://charts.releases.teleport.dev
Update the cache of charts from the remote repository:
helm repo update
Step 4/7. Set up the Teleport Slack plugin
In this section, you will set up the Teleport Slack plugin and generate credentials that the plugin will use for authentication.
Enable issuing of credentials for the plugin user
The required permissions for the plugin are configured in the preset access-plugin-with-review
role. To generate credentials for the plugin, define either a Machine ID bot user
or a regular Teleport user.
- Machine & Workload Identity
- Long-lived identity files
If you haven't set up a Machine ID bot yet, refer to the
deployment guide
to run the tbot binary on your infrastructure.
Next, allow the Machine ID bot to generate credentials for the access-plugin-with-review
role. You can do this using tctl, replacing my-bot with the name of your bot:
tctl bots update my-bot --add-roles access-plugin-with-review
As with all Teleport users, the Teleport Auth Service authenticates the
access-plugin-with-review user by issuing short-lived TLS credentials. In this case, we
will need to request the credentials manually by impersonating the
access-plugin-with-review role and user.
If you are running a self-hosted Teleport Enterprise deployment and are using
tctl from the Auth Service host, you will already have impersonation
privileges.
To grant your user impersonation privileges for access-plugin-with-review, define a user
named access-plugin-with-review and a role named access-plugin-with-review-impersonator by adding
the following YAML document into a file called access-plugin-with-review-impersonator.yaml:
kind: user
metadata:
  name: access-plugin-with-review
spec:
  roles: ['access-plugin-with-review']
version: v2
---
kind: role
version: v7
metadata:
  name: access-plugin-with-review-impersonator
spec:
  allow:
    impersonate:
      roles:
      - access-plugin-with-review
      users:
      - access-plugin-with-review
Create the user and role:
tctl create -f access-plugin-with-review-impersonator.yamluser "access-plugin-with-review" has been createdrole "access-plugin-with-review-impersonator" has been created
You can also create and edit roles using the Web UI. Go to Access -> Roles and click Create New Role or pick an existing role to edit.
Assign this role to the user you plan to use to generate credentials for the
access-plugin-with-review role and user:
Assign the access-plugin-with-review-impersonator role to your Teleport user. The commands to run depend on how
you authenticate to Teleport, that is, whether you have a local Teleport user, a
single sign-on authentication connector, or a non-interactive user:
- Local User
- GitHub
- SAML
- OIDC
- Non-Interactive
-
Retrieve your local user's roles as a comma-separated list:
ROLES=$(tsh status -f json | jq -r '.active.roles | join(",")') -
Edit your local user to add the new role:
tctl users update $(tsh status -f json | jq -r '.active.username') \ --set-roles "${ROLES?},access-plugin-with-review-impersonator" -
Sign out of the Teleport cluster and sign in again to assume the new role.
-
Open your
githubauthentication connector in a text editor:tctl edit github/github -
Edit the
githubconnector, addingaccess-plugin-with-review-impersonatorto theteams_to_rolessection.The team you should map to this role depends on how you have designed your organization's role-based access controls (RBAC). However, the team must include your user account and should be the smallest team possible within your organization.
Here is an example:
teams_to_roles: - organization: octocats team: admins roles: - access + - access-plugin-with-review-impersonator -
Apply your changes by saving and closing the file in your editor.
-
Sign out of the Teleport cluster and sign in again to assume the new role.
-
Retrieve your
samlconfiguration resource:tctl get --with-secrets saml/mysaml > saml.yamlNote that the
--with-secretsflag adds the value ofspec.signing_key_pair.private_keyto thesaml.yamlfile. Because this key contains a sensitive value, you should remove the saml.yaml file immediately after updating the resource. -
Edit
saml.yaml, addingaccess-plugin-with-review-impersonatorto theattributes_to_rolessection.The attribute you should map to this role depends on how you have designed your organization's role-based access controls (RBAC). However, the group must include your user account and should be the smallest group possible within your organization.
Here is an example:
attributes_to_roles: - name: "groups" value: "my-group" roles: - access + - access-plugin-with-review-impersonator -
Apply your changes:
tctl create -f saml.yaml -
Sign out of the Teleport cluster and sign in again to assume the new role.
-
Retrieve your
oidcconfiguration resource:tctl get oidc/myoidc --with-secrets > oidc.yamlNote that the
--with-secretsflag adds the value ofspec.signing_key_pair.private_keyto theoidc.yamlfile. Because this key contains a sensitive value, you should remove the oidc.yaml file immediately after updating the resource. -
Edit
oidc.yaml, addingaccess-plugin-with-review-impersonatorto theclaims_to_rolessection.The claim you should map to this role depends on how you have designed your organization's role-based access controls (RBAC). However, the group must include your user account and should be the smallest group possible within your organization.
Here is an example:
claims_to_roles: - name: "groups" value: "my-group" roles: - access + - access-plugin-with-review-impersonator -
Apply your changes:
tctl create -f oidc.yaml -
Sign out of the Teleport cluster and sign in again to assume the new role.
For non-interactive users such as AI agents and CI/CD runners, follow these steps.
If you are using Machine ID to issue identity files to your user:
-
Add the new role to your bot. Assign mybot to the name of the Machine ID bot that issues your certificate:
tctl bots update mybot --add-roles access-plugin-with-review-impersonator -
Force
tbotto regenerate the certificate:pkill -HUP tbotThe bot will also generate a certificate with the new role on its next renewal.
Otherwise, update your user and regenerate your identity file:
-
Retrieve your local user's roles as a comma-separated list. Make sure username is the Teleport user you want to assign the new role to.
ROLES=$(tctl get user/username --format=json | jq -r '.[].spec.roles | join(",")') -
Edit your local user to add the new role:
tctl users update username \ --set-roles "${ROLES?},access-plugin-with-review-impersonator" -
Regenerate the identity file. Make sure path/to/identity/file corresponds to the correct output path:
tctl auth sign \ --user=username \ --out=path/to/identity/file \ --overwrite
You will now be able to generate signed certificates for the access-plugin-with-review
role and user.
Export an identity file for the plugin user
Give the plugin access to a Teleport identity file. We recommend using Machine
ID for this in order to produce short-lived identity files that are less
dangerous if exfiltrated, though in demo deployments, you can generate
longer-lived identity files with tctl:
- Machine & Workload Identity
- Long-lived identity files
Configure tbot with an output that will produce the credentials needed by
the plugin. As the plugin will be accessing the Teleport API, the correct
output type to use is identity.
For this guide, the directory destination will be used. This will write these
credentials to a specified directory on disk. Ensure that this directory can
be written to by the Linux user that tbot runs as, and that it can be read by
the Linux user that the plugin will run as.
Modify your tbot configuration to add an identity output.
If running tbot on a Linux server, use the directory output to write
identity files to the /opt/machine-id directory:
services:
- type: identity
  destination:
    type: directory
    # For this guide, /opt/machine-id is used as the destination directory.
    # You may wish to customize this. Multiple outputs cannot share the same
    # destination.
    path: /opt/machine-id
If running tbot on Kubernetes, write the identity file to Kubernetes secret
instead:
services:
  - type: identity
    destination:
      type: kubernetes_secret
      name: teleport-plugin-slack-identity
If operating tbot as a background service, restart it. If running tbot in
one-shot mode, execute it now.
You should now see an identity file under /opt/machine-id or a Kubernetes
secret named teleport-plugin-slack-identity. This contains the private key and signed
certificates needed by the plugin to authenticate with the Teleport Auth
Service.
Like all Teleport users, access-plugin-with-review needs signed credentials in order to
connect to your Teleport cluster. You will use the tctl auth sign command to
request these credentials.
The following tctl auth sign command impersonates the access-plugin-with-review user,
generates signed credentials, and writes an identity file to the local
directory:
tctl auth sign --user=access-plugin-with-review --out=identity
The plugin connects to the Teleport Auth Service's gRPC endpoint over TLS.
The identity file, identity, includes both TLS and SSH credentials. The
plugin uses the SSH credentials to connect to the Proxy Service, which
establishes a reverse tunnel connection to the Auth Service. The plugin
uses this reverse tunnel, along with your TLS credentials, to connect to the
Auth Service's gRPC endpoint.
Certificate Lifetime
By default, tctl auth sign produces certificates with a relatively short
lifetime. For production deployments, we suggest using Machine
& Workload Identity to programmatically issue and renew
certificates for your plugin. See our Machine & Workload Identity getting started
guide to learn more.
Note that you cannot issue certificates that are valid longer than your existing credentials.
For example, to issue certificates with a 1000-hour TTL, you must be logged in with a session that is
valid for at least 1000 hours. This means your user must have a role allowing
a max_session_ttl of at least 1000 hours (60000 minutes), and you must specify a --ttl
when logging in:
tsh login --proxy=teleport.example.com --ttl=60060
If you are running the plugin on a Linux server, create a data directory to hold certificate files for the plugin:
sudo mkdir -p /var/lib/teleport/plugins/slacksudo mv identity /var/lib/teleport/plugins/slack
If you are running the plugin on Kubernetes, create a Kubernetes secret that contains the Teleport identity file:
kubectl -n teleport create secret generic --from-file=identity teleport-plugin-slack-identity
Once the Teleport credentials expire, you will need to renew them by running the
tctl auth sign command again.
Step 5/7. Run the Teleport Slack plugin
At this point, the Teleport Slack plugin has the credentials it needs to communicate with your Teleport cluster and the Slack API. In this step, you will configure the Slack plugin to use these credentials. You will also configure the plugin to notify the right Slack channels when it receives an Access Request update.
Lastly, you will configure the plugin to enable reviews of Access Requests directly within Slack.
Configure the plugin
- Executable
- Helm Chart
On your local workstation, create a file called teleport-slack.toml
based on the following example:
[teleport]
# Teleport Proxy/Auth Service address.
#
# Should be port 443 or 3080 for Proxy Service and port 3025 for Auth Service.
# For Teleport Cloud, should be in the form "your-account.teleport.sh:443".
addr = "teleport.example.com:443"

# Path to exported identity file.
#
# If providing credentials using `tbot` running on a Linux server,
# set this to `/opt/machine-id/identity`.
identity = "/var/lib/teleport/plugins/slack/identity"

# Refresh identity file on a periodic basis.
refresh_identity = true

[slack]
# Slack Bot OAuth token.
#
# Provides the plugin permissions to read Slack user info and write to channels.
# Set this up under "OAuth & Permissions" in your Slack app settings:
# https://api.slack.com/apps
#
# You can also use an absolute path to a token file, e.g.,
# "/var/lib/teleport/plugins/slack/token"
token = "xoxb-your-bot-token"

[review]
# Toggles native review feature. Default is false.
enabled = true

# Slack App-level token.
#
# Provides the plugin permissions to receive user interactions from Slack.
# This is different from the Bot OAuth token, and must be set up separately.
# Set this up under "Basic Information" in your Slack app settings:
# https://api.slack.com/apps
#
# You can also use an absolute path to a token file, e.g.,
# "/var/lib/teleport/plugins/slack/app-token"
app_token = "xapp-your-app-token"

# Allows binding between Teleport username and Slack email.
#
# This should only be set to true if `review.slack_user_id_trait` is not configured in Teleport.
# We recommend configuring a trait for stronger identity binding. Default is false.
allow_email_username_match = false

# Name of the Teleport trait to bind Teleport user and Slack user.
#
# The trait should hold value of Slack user ID.
# If no trait is set up in Teleport, this should remain empty.
slack_user_id_trait = "slack_uid"

[role_to_recipients]
# Map roles to recipients.
#
# Provide slack user_email/channel recipients for access requests for specific roles.
# role.suggested_reviewers will automatically be treated as additional email recipients.
# "*" must be provided to match non-specified roles.
"*" = "access-requests"
"access" = ["[email protected]"]

[log]
# Logger output. Could be "stdout", "stderr" or "/var/lib/teleport/slack.log"
output = "stdout"

# Logger severity. Could be "INFO", "ERROR", "DEBUG" or "WARN".
severity = "INFO"
On your local workstation, create a file called teleport-plugin-slack-values.yaml
based on the following example:
teleport:
  # Teleport Proxy/Auth Service address.
  #
  # Should be port 443 or 3080 for Proxy Service and port 3025 for Auth Service.
  # For Teleport Cloud, should be in the form "your-account.teleport.sh:443".
  address: teleport.example.com:443
  # Name of the Kubernetes secret that contains the credentials for the connection
  # to your Teleport cluster.
  identitySecretName: teleport-plugin-slack-identity
  identitySecretPath: identity

slack:
  # Slack Bot OAuth token.
  #
  # Provides the plugin permissions to read Slack user info and write to channels.
  # Set this up under "OAuth & Permissions" in your Slack app settings:
  # https://api.slack.com/apps
  token: "xoxb-your-bot-token"

review:
  # Toggles native review feature. Default is false.
  enabled: true
  # Slack App-level token.
  #
  # Provides the plugin permissions to receive user interactions from Slack.
  # This is different from the Bot OAuth token, and must be set up separately.
  # Set this up under "Basic Information" in your Slack app settings:
  # https://api.slack.com/apps
  appToken: "xapp-your-app-token"
  # Allows binding between Teleport username and Slack email.
  #
  # This should only be set to true if `review.slackUserIdTrait` is not configured in Teleport.
  # We recommend configuring a trait for stronger identity binding. Default is false.
  allowEmailUsernameMatch: slackEmailUsernameBind
  # Name of the Teleport trait to bind Teleport user and Slack user.
  #
  # The trait should hold value of Slack user ID.
  # If no trait is set up in Teleport, this should remain empty.
  slackUserIdTrait: slack_uid

# Map roles to recipients.
#
# Provide slack user_email/channel recipients for access requests for specific roles.
# role.suggested_reviewers will automatically be treated as additional email recipients.
# "*" must be provided to match non-specified roles.
roleToRecipients:
  "*": "access-requests"
  "access": ["[email protected]"]

log:
  # Logger output. Could be "stdout", "stderr" or "/var/lib/teleport/slack.log"
  output: stdout
  # Logger severity. Could be "INFO", "ERROR", "DEBUG" or "WARN".
  severity: INFO
Invite the plugin to your Slack app
Once you have configured the channels that the Slack plugin will notify when it receives an Access Request, you will need to ensure that the plugin can post in those channels.
You have already configured the plugin to send direct messages as Slackbot. For
any other channel you mention in your role_to_recipients map, you will need
to invite the plugin to that channel. Navigate to each channel and enter /invite @teleport in the message box.
Suggested reviewers
Users can suggest reviewers when they create an Access Request, e.g.:
tsh request create --roles=dbadmin [email protected],[email protected]
If an Access Request includes suggested reviewers, the Slack plugin will add these to the list of channels to notify. If a suggested reviewer is an email address, the plugin will look up the direct message channel for that address and post a message in that channel.
Start the plugin
Start the plugin by following the instructions below.
- Executable
- Docker
- Helm Chart
teleport-slack start --config teleport-slack.toml
docker run \ -v $(pwd)/teleport-slack.toml:/etc/teleport-slack.toml \ -v /var/lib/teleport/plugins/slack:/var/lib/teleport/plugins/slack \ public.ecr.aws/gravitational/teleport-plugin-slack:19.0.0-dev start
helm upgrade --install teleport-plugin-slack teleport/teleport-plugin-slack --values teleport-plugin-slack-values.yaml
To inspect the plugin's logs, use the following command:
kubectl logs deploy/teleport-plugin-slack
Debug logs can be enabled by setting log.severity to DEBUG in
teleport-plugin-slack-values.yaml and executing the helm upgrade ... command
above again. Then you can restart the plugin with the following command:
kubectl rollout restart deployment teleport-plugin-slack
Step 6/7. Test your Slack app
Once you've created the Slack app and the Teleport Slack plugin is running, you can now test the workflow.
Create an Access Request
- As an Admin
- As a User
- From the Web UI
A Teleport admin can create an Access Request for another user with tctl:
tctl request create myuser --roles=access
Users can use tsh to create an Access Request and log in with approved roles:
tsh request create --roles=accessSeeking request approval... (id: 8f77d2d1-2bbf-4031-a300-58926237a807)
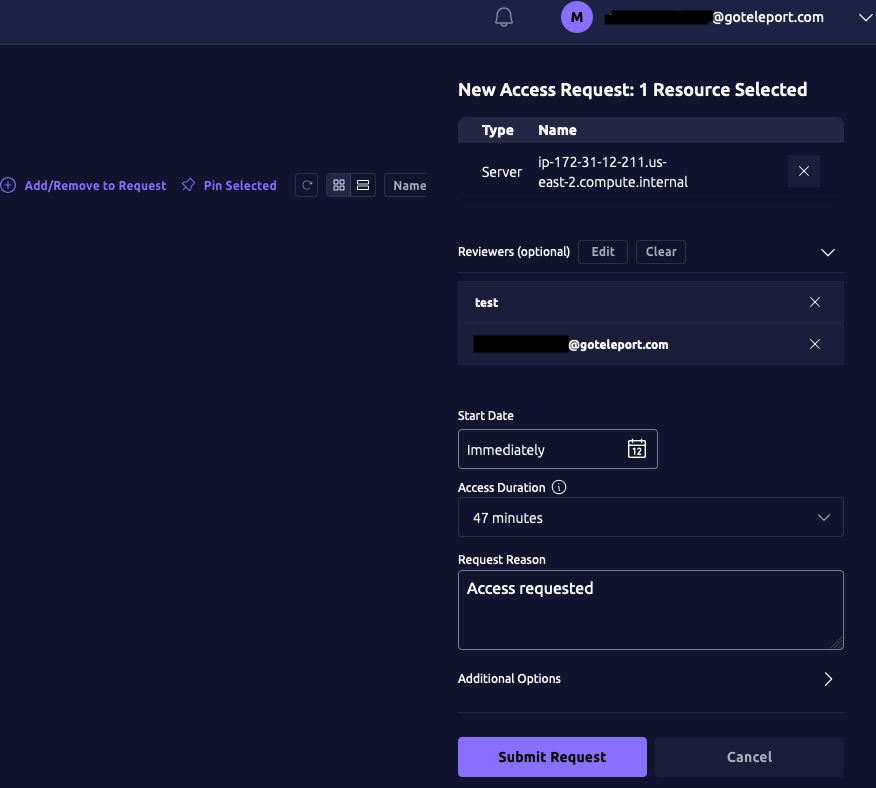
Users can request access using the Web UI by visiting "Identity", clicking "Access Requests" and then "New Request":
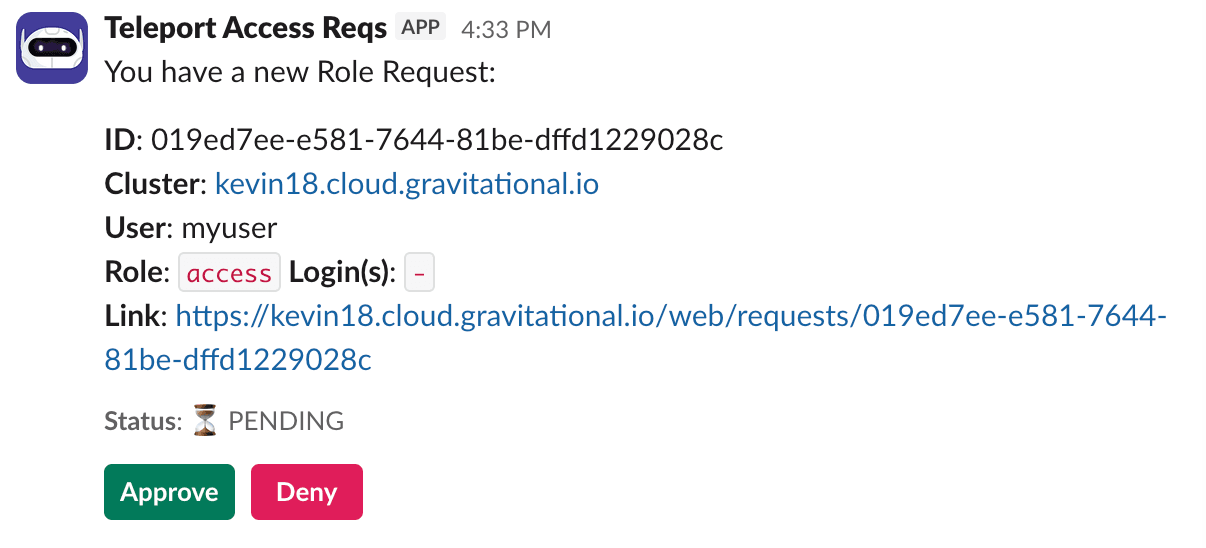
The user you configured earlier to review the request should receive a direct message from "Teleport" in Slack with Access Request details. This message will contain “Approve” and “Deny” buttons for the user to either approve or deny the request.
Resolve the request
As the Slack user you set as an Access Request reviewer, click the "Approve" button, and the plugin will send a reply to the original message with the review response.
Once the request is resolved, the Slack bot will add an emoji reaction of ✅ or ❌ to the Slack message for the Access Request, depending on whether the request was approved or denied.
The Web UI will also reflect the resolved Access Request.
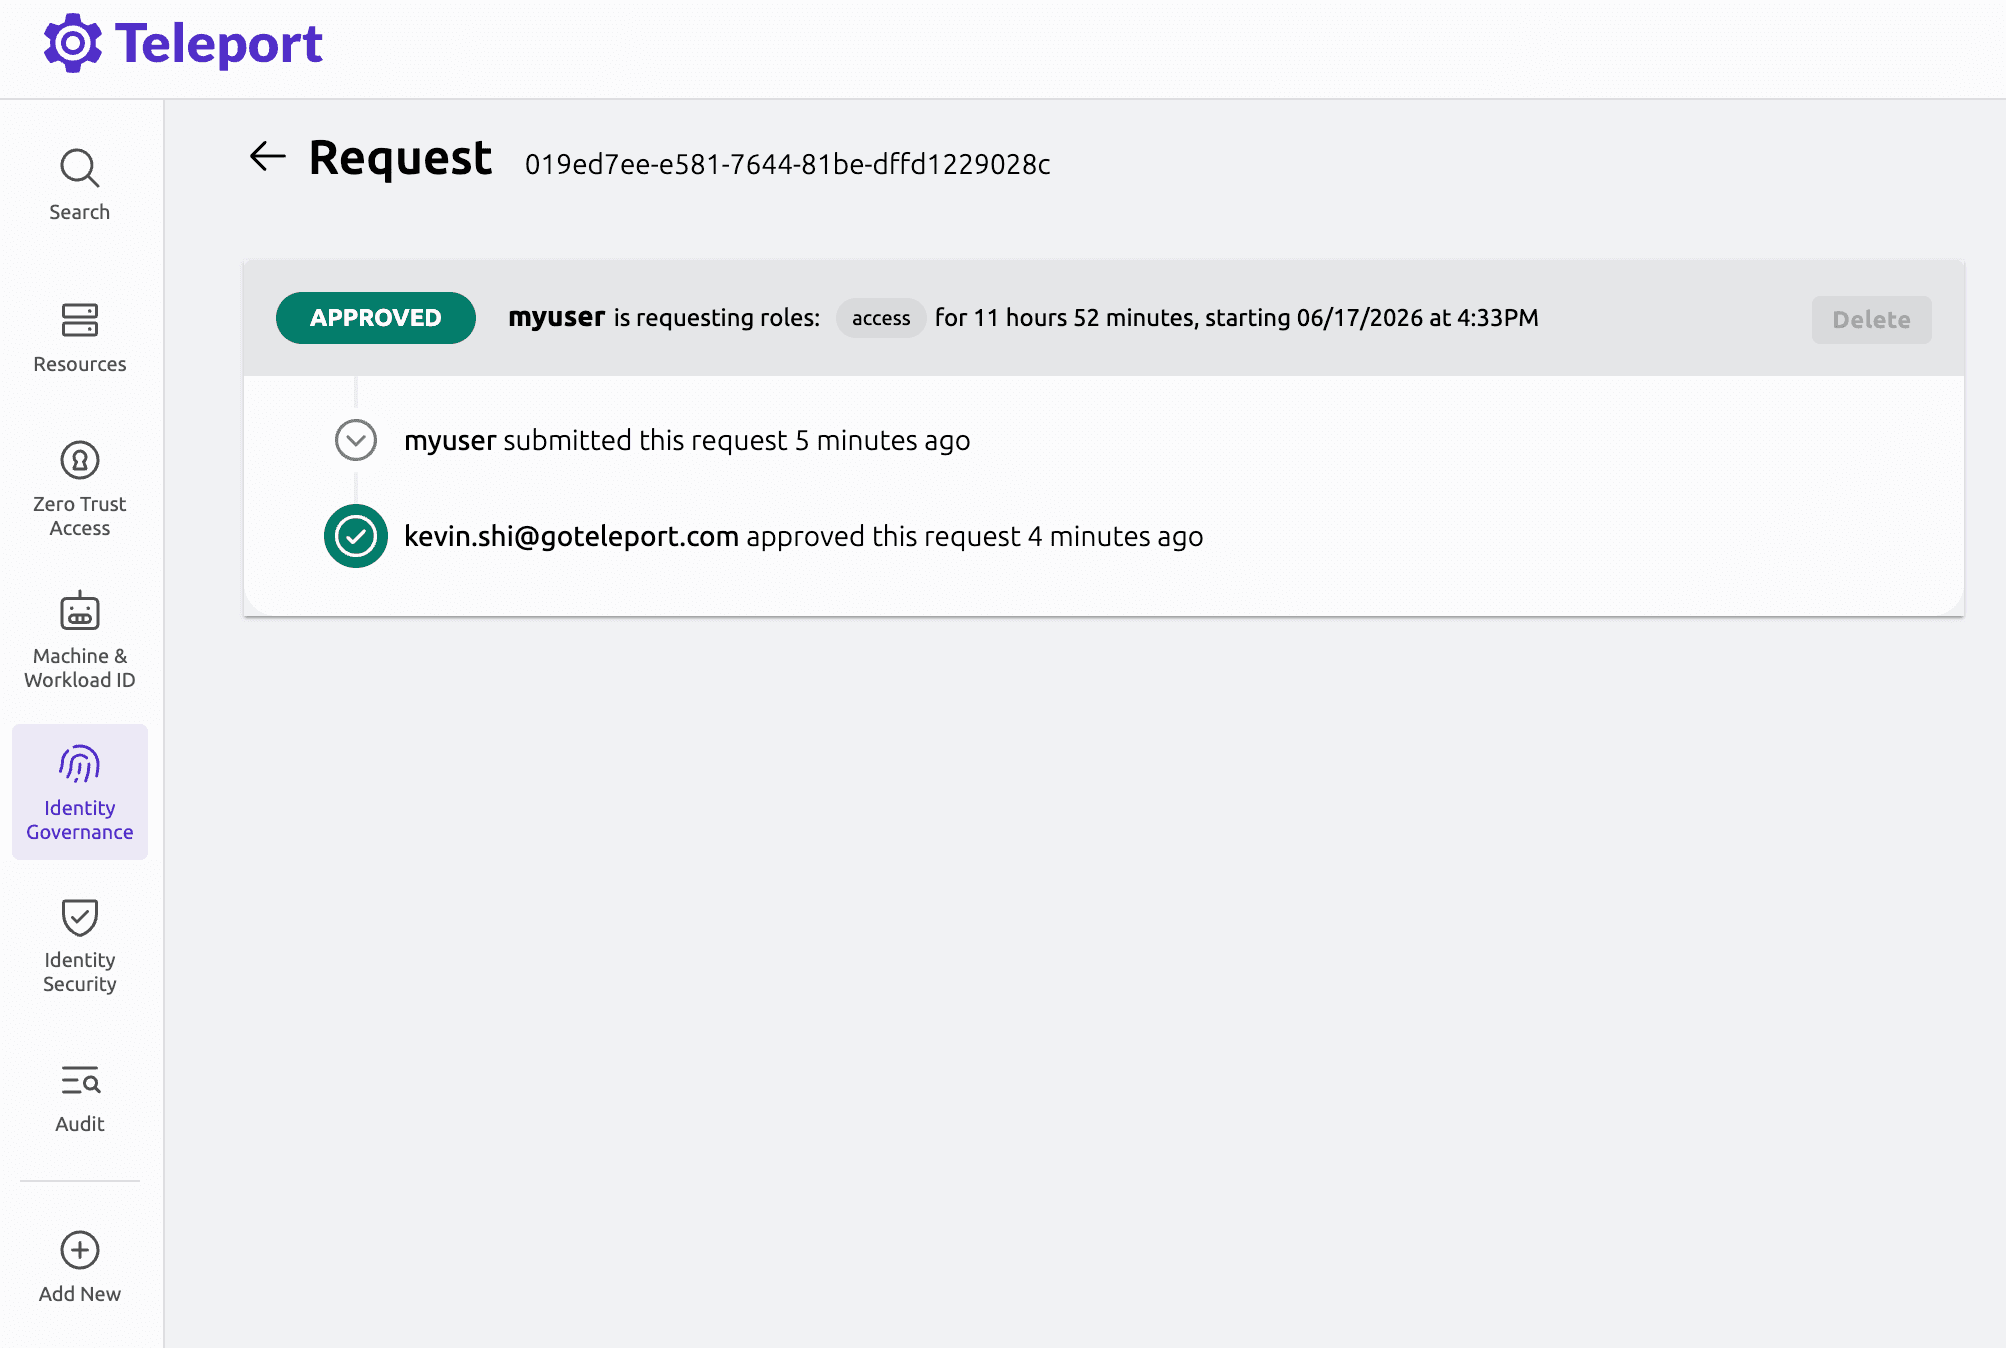
The Teleport audit log will report the Access Request as submitted by the Teleport Slack plugin identity.
The submitted_by field represents the plugin identity that submitted on behalf of the reviewer user.
Audit log
{
  "RequestedResourceAccessIDs": null,
  "cluster_name": "kevin18.cloud.gravitational.io",
  "code": "T5002I",
  "ei": 0,
  "event": "access_request.review",
  "expires": "2026-06-18T11:26:07Z",
  "id": "019ed7ee-e581-7644-81be-dffd1229028c",
  "max_duration": "2026-06-18T11:26:07Z",
  "proposed_state": "APPROVED",
  "reviewer": "[email protected]",
  "state": "APPROVED",
  "submitted_by": "access-plugin-with-review",
  "time": "2026-06-17T23:34:06.274Z",
  "uid": "8912fd42-d1f4-4847-9621-fb7313e0ef08"
}
When the Slack plugin posts an Access Request notification to a channel, anyone with access to the channel can view the notification and follow the link. While users must be authorized via their Teleport roles to review Access Requests, you should still check the Teleport audit log to ensure that the right users are reviewing the right requests.
When auditing Access Request reviews, check for events with the type Access Request Reviewed in the Teleport Web UI.
Step 7/7. Set up systemd
This section is only relevant if you are running the Teleport Slack plugin on a Linux host.
Copy the teleport-slack.toml file to /etc on your Linux server:
sudo mv teleport-slack.toml /etc
In production, we recommend starting the Teleport plugin daemon via an init system like systemd. Here's the recommended Teleport plugin service unit file for systemd:
[Unit]
Description=Teleport Slack Plugin
After=network.target

[Service]
Type=simple
Restart=on-failure
ExecStart=/usr/local/bin/teleport-slack start --config=/etc/teleport-slack.toml
ExecReload=/bin/kill -HUP $MAINPID
PIDFile=/run/teleport-slack.pid

[Install]
WantedBy=multi-user.target
Save this as teleport-slack.service in either /usr/lib/systemd/system/ or
another unit file load
path
supported by systemd.
Enable and start the plugin:
sudo systemctl enable teleport-slacksudo systemctl start teleport-slack
Troubleshooting
- Ensure Socket Mode is turned on in your Slack app’s settings.
- Ensure the Slack app-level token is provided for the plugin configuration field
review.app_token. This is different from the Slack bot OAuth token. - If you receive an Access Request review reply with the following error:
Insufficient permissions to review request, ensure the Slack reviewer is properly bound with a local Teleport user, and that Teleport user has sufficient review permissions. Also ensure that the Slack plugin is using the preset Teleport roleaccess-plugin-with-reviewwhich provides proper RBAC permissions for the Slack plugin. - A Slack plugin using a long-lived identity file will not work with a Teleport cluster with admin-action MFA enabled. If admin-action MFA is enabled, use a Slack plugin with a Machine ID bot.
Next steps
- Read our guides to configuring Resource Access Requests and Role Access Requests so you can get the most out of your Access Request plugins.
- To see all of the options you can set in the values file for the
teleport-plugin-slackHelm chart, consult our reference guide.