How to Use Teleport and GitHub Actions to Deploy to Kubernetes Without Shared Secrets
Read this article to learn:
- How to replace long-lived Kubernetes credentials with short-lived identities in GitHub Actions
- How to set up Kubernetes RBAC, a Teleport role, and a join token for secretless CI/CD
- How to extend the same secretless approach to database connections and internal APIs beyond Kubernetes deploys
We live in the era of Kubernetes. And if you are using Kubernetes, you are probably using CI/CD to deploy your applications into it. However, as CI/CD and Kubernetes have grown in popularity, the number of bad actors looking to exploit weaknesses in them has also grown. It is critical that modern security techniques keep your Kubernetes clusters, and the sensitive data and services within them, safe from attack.
In this post, we will look at why CI/CD pipelines are such appealing targets, the vulnerabilities that bad actors try to exploit in CI/CD pipelines, and how tools like Teleport can be used to prevent and detect exploitation.
The problems with CI/CD and Kubernetes
Before we can look at how to strengthen the security of CI/CD pipelines deploying to Kubernetes, we first need to understand why they are an attractive target and why they pose a significant risk.
To deploy to a Kubernetes cluster, the CI/CD system needs some kind of credential. To be effective, these credentials require a high-level of privilege — the ability to create, read, update, and delete resources within your Kubernetes cluster. This is often a higher level of privilege than might be afforded to your engineers on a day-to-day basis.
In the wrong hands, this level of privilege can be used to wreak havoc. Not only could this privilege be used to extract secrets from your cluster, it could be used to deploy malicious services into your cluster intended to disrupt operations or intercept sensitive customer information. It is easy to see why this would be so appealing to a bad actor!
To make the credential available to the CI/CD system, it could be locked away in some type of secret manager. This is certainly better than committing the credential unencrypted into a git repository, but still has flaws. Even with the best secrets manager, there are still plenty of opportunities for this secret to be stolen:
- The laptop of the engineer who first generated the credential could have been riddled with spyware — meaning the secret was exfiltrated before it was even put into the secrets manager.
- A tool used in your CI pipeline could suffer a supply chain attack. This isn’t hypothetical; in 2021, CodeCov suffered an attack that inserted malicious code into the tooling they provided for customers to run in their CI/CD pipelines. This code uploaded the environment variables within the pipeline to a server controlled by a bad actor, exfiltrating the secrets of thousands of organisations.
- An attacker could infiltrate your logging system, where the secret has been unknowingly included as part of the CI run logs.
You can mitigate these risks in several ways, but ultimately, the core of the problem is the long-lived and shared nature of the secret. Even if these secrets are rotated on a weekly or monthly basis, an attacker has plenty of time to make use of them before they expire.
Fortunately, there’s a solution. Many modern CI providers have begun to issue short-lived identities to the workloads that they run. These identities are typically represented with JWTs that include claims that identify the CI run itself, including details such as the branch it is running against and which user triggered it. The tokens are signed by the CI provider, allowing third parties to verify they are legitimate and trust the details contained within. This provides a foundation for an authentication strategy based on public key cryptography rather than long-lived shared secrets.
Securing CI/CD pipelines with Teleport Machine & Workload Identity
Let’s look at how Machine & Workload Identity can be used to securely access a Kubernetes cluster from GitHub Actions. We will see how the implementation removes the use of long-lived secrets and provides additional benefits in terms of auditing capabilities and fine-grained access control.
For our example, we will use a GitHub repository with a basic set of Kubernetes manifests in it. Our goal will be to apply these to our Kubernetes cluster on each push to the main branch.
Before we start, you need to enroll the Kubernetes cluster into your Teleport cluster. This can be done using the Teleport UI through the “Enroll New Resource” wizard or by following the steps in our documentation.
Configuring Kubernetes RBAC
Before configuring Teleport, we need to configure our Kubernetes cluster itself.
First, we will create a Role which will be used to grant our CI/CD the ability to create and update resources within the cluster. We will follow the principle of least privilege and ensure that this Role only grants access to modify the kinds of resource that we expect it to need to modify, and use a Role rather than a ClusterRole to scope these permissions to a specific namespace.
Create ci-role.yaml and apply it using kubectl apply -f ./ci-role.yaml:
apiVersion: rbac.authorization.k8s.io/v1
kind: Role
metadata:
  namespace: github-actions-blog-demo
  name: github-ci-deploy
rules:
  - apiGroups:
      - apps
	  # Restrict the role to Pods and Deployments, since that's what our CI
	  # system is updating. If your CI needs to create and modify other kinds,
	  # then this list should be expanded.
    resources:
      - pods
      - deployments
    verbs:
      - get
      - list
      - watch
      - create
      - update
      - patch
      - delete
Note that delete is included for both pods and deployments. A rollout that needs to remove a previous version or clean up failed pods requires it, but if your workflow only ever applies manifests and never explicitly tears resources down, you can drop it. When in doubt, remove access and add it back when the pipeline needs it.
Next, we will need to grant this Role to our CI/CD workflow. Later, we will be configuring Teleport to impersonate the github-ci group when forwarding requests from our CI/CD workflow. We can use a RoleBinding to configure Kubernetes to grant the Role to this Group.
Create ci-role-binding.yaml and apply it using kubectl apply -f ./ci-role-binding.yaml:
apiVersion: rbac.authorization.k8s.io/v1
kind: RoleBinding
metadata:
  name: github-ci-deploy
  namespace: github-actions-blog-demo
subjects:
  - kind: Group
    # This will match the `kubernetes_groups` in the Teleport role
    # we will create later.
    name: github-ci
    apiGroup: rbac.authorization.k8s.io
roleRef:
  kind: Role
  # This should match the name of the Role we just created.
  name: github-ci-deploy
  apiGroup: rbac.authorization.k8s.io
Creating a Teleport Role
Now we will create a role within Teleport. This will be used to grant our CI job access to specific Kubernetes clusters within Teleport, and to specify which groups will be impersonated when proxying requests to the Kubernetes API.
Teleport also allows you to further restrict access to Kubernetes kinds, namespaces or even a resource with a specific name. This restriction is applied on top of the grants made in the Kubernetes Role. Whilst we aren’t using this feature in our example, this can be useful for applying a policy to a group of Kubernetes clusters without needing to manage the RBAC within each of those individual clusters.
Create role.yaml and apply it using tctl create -f ./role.yaml:
kind: role
version: v7
metadata:
  name: github-actions-blog-demo
spec:
  allow:
    # Grant access to all the Kubernetes clusters enrolled into
    # the Teleport cluster.
    kubernetes_labels:
      '*': '*'
	  # Specify which group should be impersonated when proxying requests
	  # to the Kubernetes cluster. This should match our RoleBinding configured
	  # inside Kubernetes.
    kubernetes_groups:
      - github-ci
    # Specify which resources can be accessed through Teleport. In this example,
    # we're using wildcards, but this can be used to apply additional restrictions
    # on the resources granted by the Kubernetes Role.
    kubernetes_resources:
      - kind: "*"
        namespace: "*"
        name: "*"
Creating a Bot and Join Token
Next, we will create the Bot and Join Token in Teleport that will be used by our CI job.
A Bot is a special kind of user intended to represent a machine’s identity within Teleport. Bots authenticate differently from how human users do. Humans typically log in using something like a Passkey or an SSO provider with SAML. However, these methods are not well suited to machines, as they require some degree of interaction.
Instead, machines authenticate to Teleport using the joining process. This allows them to exchange a short-lived identity document signed by the platform they are running on for a Teleport certificate. These identity documents contain a variety of claims that specifically identify the workload, and since the document is signed, Teleport is able to trust these claims. This process eliminates the need for the problematic long-lived shared secrets we discussed in the introduction.
For example, a GitHub Actions ID Token includes information including which CI job is running, the repository it is running in, and the branch it is running against. This information can then be used to determine whether or not the CI job should be allowed to authenticate and included in audit logs to allow actions to be traced back to a specific CI run.
The Join Token resource specifies rules for the joining process and the bot it should grant access to. In our case, let us allow a GitHub Actions Workflow running in our repository and against the main branch to join.
Create token.yaml (see the full list of available GitHub Actions join rules) and apply it using tctl create -f ./token.yaml:
kind: token
version: v2
metadata:
  name: github-actions-blog-demo
spec:
  roles: [Bot]
  join_method: github
  # This is the name of the Bot that the join token will grant access to.
  bot_name: github-actions-blog-demo
  github:
    allow:
      # Access will only be granted to a GitHub Actions workflow
      # running in the `strideynet/machine-id-github-actions-kubernetes-demo`
      # repository.
      - repository: strideynet/machine-id-github-actions-kubernetes-demo
        ref_type: branch
        # Limit authentication only to GitHub Actions runs against the main
        # branch.
        ref: refs/heads/main
Now we can create our Bot. Instead of using the CLI shorthand, we'll use declarative YAML files.
Create bot.yaml and apply it with tctl create -f ./bot.yaml:
kind: bot
version: v1
metadata:
  name: github-actions-blog-demo
spec:
  roles:
    - github-actions-blog-demo
Creating a GitHub Actions workflow
Finally, we can create our GitHub Actions workflow. We want this to run on each push to our main branch and deploy the Kubernetes manifest that is located in manifests/deployment.yaml.
Teleport provides several off-the-shelf GitHub Actions to simplify using it in GitHub Actions workflows.
The first action we will use will be teleport-actions/setup@v1, which installs the Teleport binaries within the environment of the CI run, allowing them to be invoked by later steps. Setting version: auto tells the action to query your Teleport proxy and install a matching client version automatically, so you won’t need to update this value each time your cluster upgrades.
The second action we use will be teleport-actions/auth-k8s@v2. This action uses the Machine ID agent, tbot, to authenticate to Teleport and generate a kubectl configuration file. This configuration file will use the short-lived credentials produced by tbot to connect to Kubernetes clusters protected by Teleport.
Create .github/workflows/deploy.yaml:
name: "Deploy!"
on:
  push:
    branches:
      - main

jobs:
  deploy-to-kubernetes:
    name: Deploy Kubernetes manifests using Teleport Machine ID and Kubectl
    runs-on: ubuntu-latest
    permissions:
      id-token: write
      contents: read
    steps:
      - uses: actions/checkout@v4
      - name: Install Kubectl
        uses: azure/setup-kubectl@v4
      - name: Install Teleport
        uses: teleport-actions/setup@v1
        with:
          version: auto
		proxy: example.teleport.sh:443
      - name: Authenticate with Teleport
        # https://github.com/teleport-actions/auth-k8s
        uses: teleport-actions/auth-k8s@v2
        with:
          # Specify the publically accessible address of your Teleport proxy.
          proxy: example.teleport.sh:443
          # Specify the name of the join token for your bot.
          token: github-actions-blog-demo
          # Specify the length of time that the generated credentials should be
          # valid for. This is optional and defaults to "1h".
          # Here we've limited it to 10m as this CI job doesn't need longer.
          certificate-ttl: 10m
          # Specify the name of the Kubernetes cluster the credentials will be
          # generated for.
          kubernetes-cluster: my-cluster
          # Enable submission of anonymous usage telemetry to Teleport.
          # See https://goteleport.com/docs/reference/machine-workload-identity/telemetry/ for
          # more information.
          anonymous-telemetry: 1
      - run: kubectl apply -f ./manifests/deployment.yaml
It is a security-first best practice to pin every third-party action to a specific commit SHA rather than a version tag. A SHA-pinned reference looks like this:
- uses: actions/checkout@11bd71901bbe5b1630ceea73d27597364c9af683 # v4
The hash cannot be repointed. You can leave a comment with the human-readable version for maintainability. Tools like Dependabot or Renovate can automatically open PRs to update the pinned SHA when a new version is released.
Testing it out
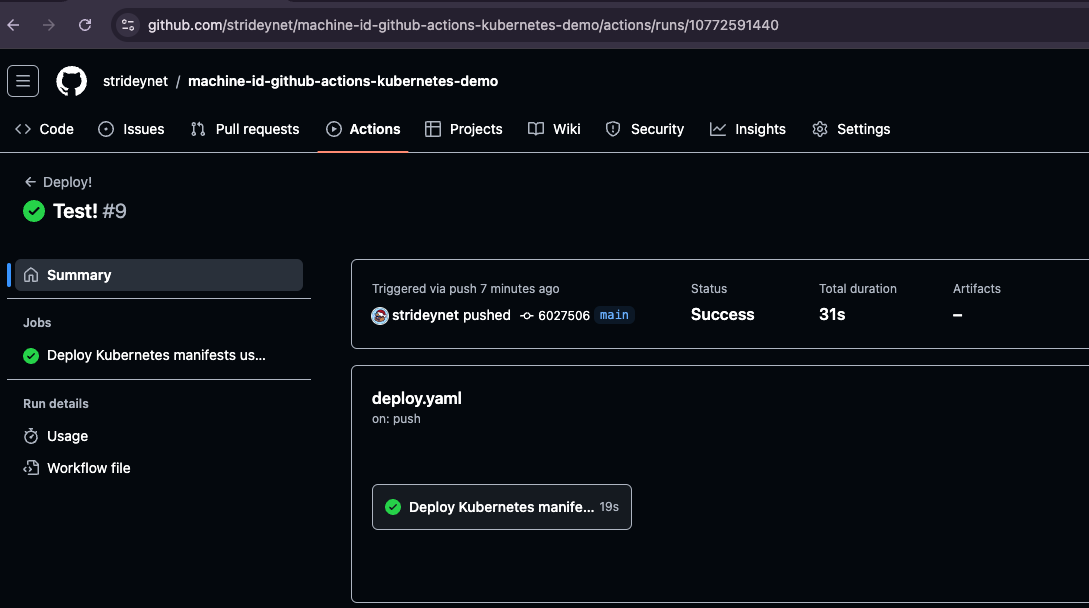
With everything in place, we can now test that our workflow functions correctly. Commit your changes to the main branch and push it to GitHub. This should trigger the workflow to run.
Check the Actions tab in your repository to see the status of your deployment — with any luck, it should succeed! It is worth also checking your Kubernetes cluster to verify that the manifests deployed by the workflow are correct.
One of the other advantages of using Teleport is the audit log. Access to resources is recorded to the Teleport audit log, which can then be shipped to your log management or SIEM tool to detect and alert on unusual or suspicious activity. This plays a vital role in quickly reacting to any potential breach.
Now we can look at the audit log entries for the deployment. Log into Teleport and browse to Access Management, then Audit Log.
You should see multiple audit log events related to the CI/CD deployment that just occurred. For example, you will see the “Bot Joined” event that relates to the bot’s initial authentication, and you will see “Kubernetes Request” events for each of the requests sent to the Kubernetes API.
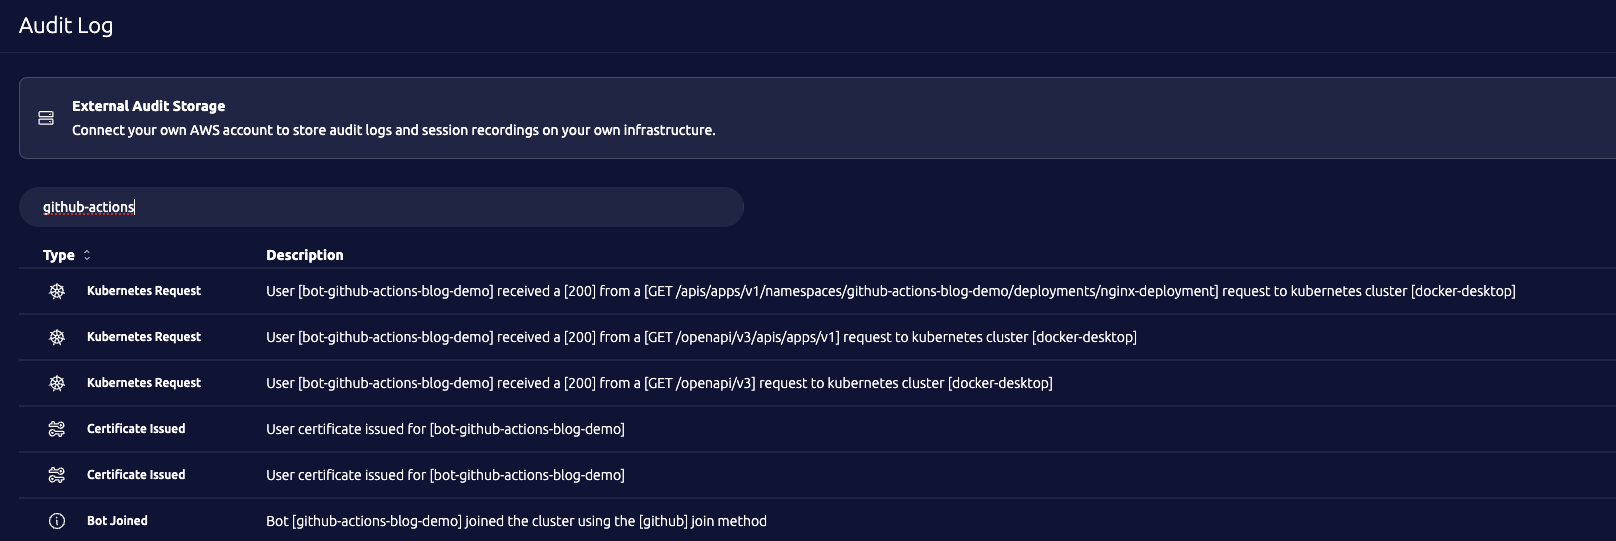
Clicking the “details” button will reveal the JSON body of the audit event. This contains all the details that Teleport has captured. Now we can look at the “Bot Joined” event.
{
  "addr.remote": "4.227.115.136",
  "attributes": {
    "actor": "strideynet",
    "actor_id": "16336790",
    "base_ref": "",
    "environment": "",
    "event_name": "push",
    "head_ref": "",
    "job_workflow_ref": "strideynet/machine-id-github-actions-kubernetes-demo/.github/workflows/deploy.yaml@refs/heads/main",
    "ref": "refs/heads/main",
    "ref_type": "branch",
    "repository": "strideynet/machine-id-github-actions-kubernetes-demo",
    "repository_id": "851158547",
    "repository_owner": "strideynet",
    "repository_owner_id": "16336790",
    "repository_visibility": "public",
    "run_attempt": "1",
    "run_id": "10772591440",
    "run_number": "9",
    "sha": "6027506141d4b441b05ef3c99ffcee74f1ad4365",
    "sub": "repo:strideynet/machine-id-github-actions-kubernetes-demo:ref:refs/heads/main",
    "workflow": "Deploy!"
  },
  "bot_instance_id": "615788b8-fc2b-4de9-ac0b-b34ebc64e7dc",
  "bot_name": "github-actions-blog-demo",
  "cluster_name": "noah.teleport.sh",
  "code": "TJ001I",
  "ei": 0,
  "event": "bot.join",
  "method": "github",
  "success": true,
  "time": "2024-09-09T11:51:33.582Z",
  "token_name": "github-actions-blog-demo",
  "uid": "b653642e-0123-4996-a1c5-b73b605c326a",
  "user_name": "bot-github-actions-blog-demo"
}
Several key pieces of information here allow us to track this back to a specific run of our CI/CD pipeline. We can see which commit it ran against, the user who triggered the run, and the run ID. GitHub has also added immutable numeric identifiers — actor_id, repository_id, and repository_owner_id — as standard claims in the token. Where repository and actor names are mutable (such as a renamed repo or GitHub account), these IDs are not. If you're shipping audit events to a SIEM and correlating across time, the numeric IDs are the more durable identifiers to index on. This gives us the information we need to analyse any unexpected behaviour, whether caused by a bad actor or merely a misconfiguration.
How it works
Now that we’ve set up the workflow, let’s explore why it works and how it replaces long-lived secrets.
As discussed earlier, the GitHub Actions issues short-lived OpenID Connect (OIDC tokens), to each CI/CD run. These are JWTs that contain claims that identify the specific run, such as which repository it resides in, which branch it is running against, and which workflow is running.
Public-key cryptography is used to then produce a signature over these claims. This allows any third-party with knowledge of the public key used by the issuer to validate that the JWT, and the claims within, is legitimate.
It is common practice for the issuers to publish their public keys. In the case of GitHub Actions, they are published to https://token.actions.githubusercontent.com/.well-known/jwks.
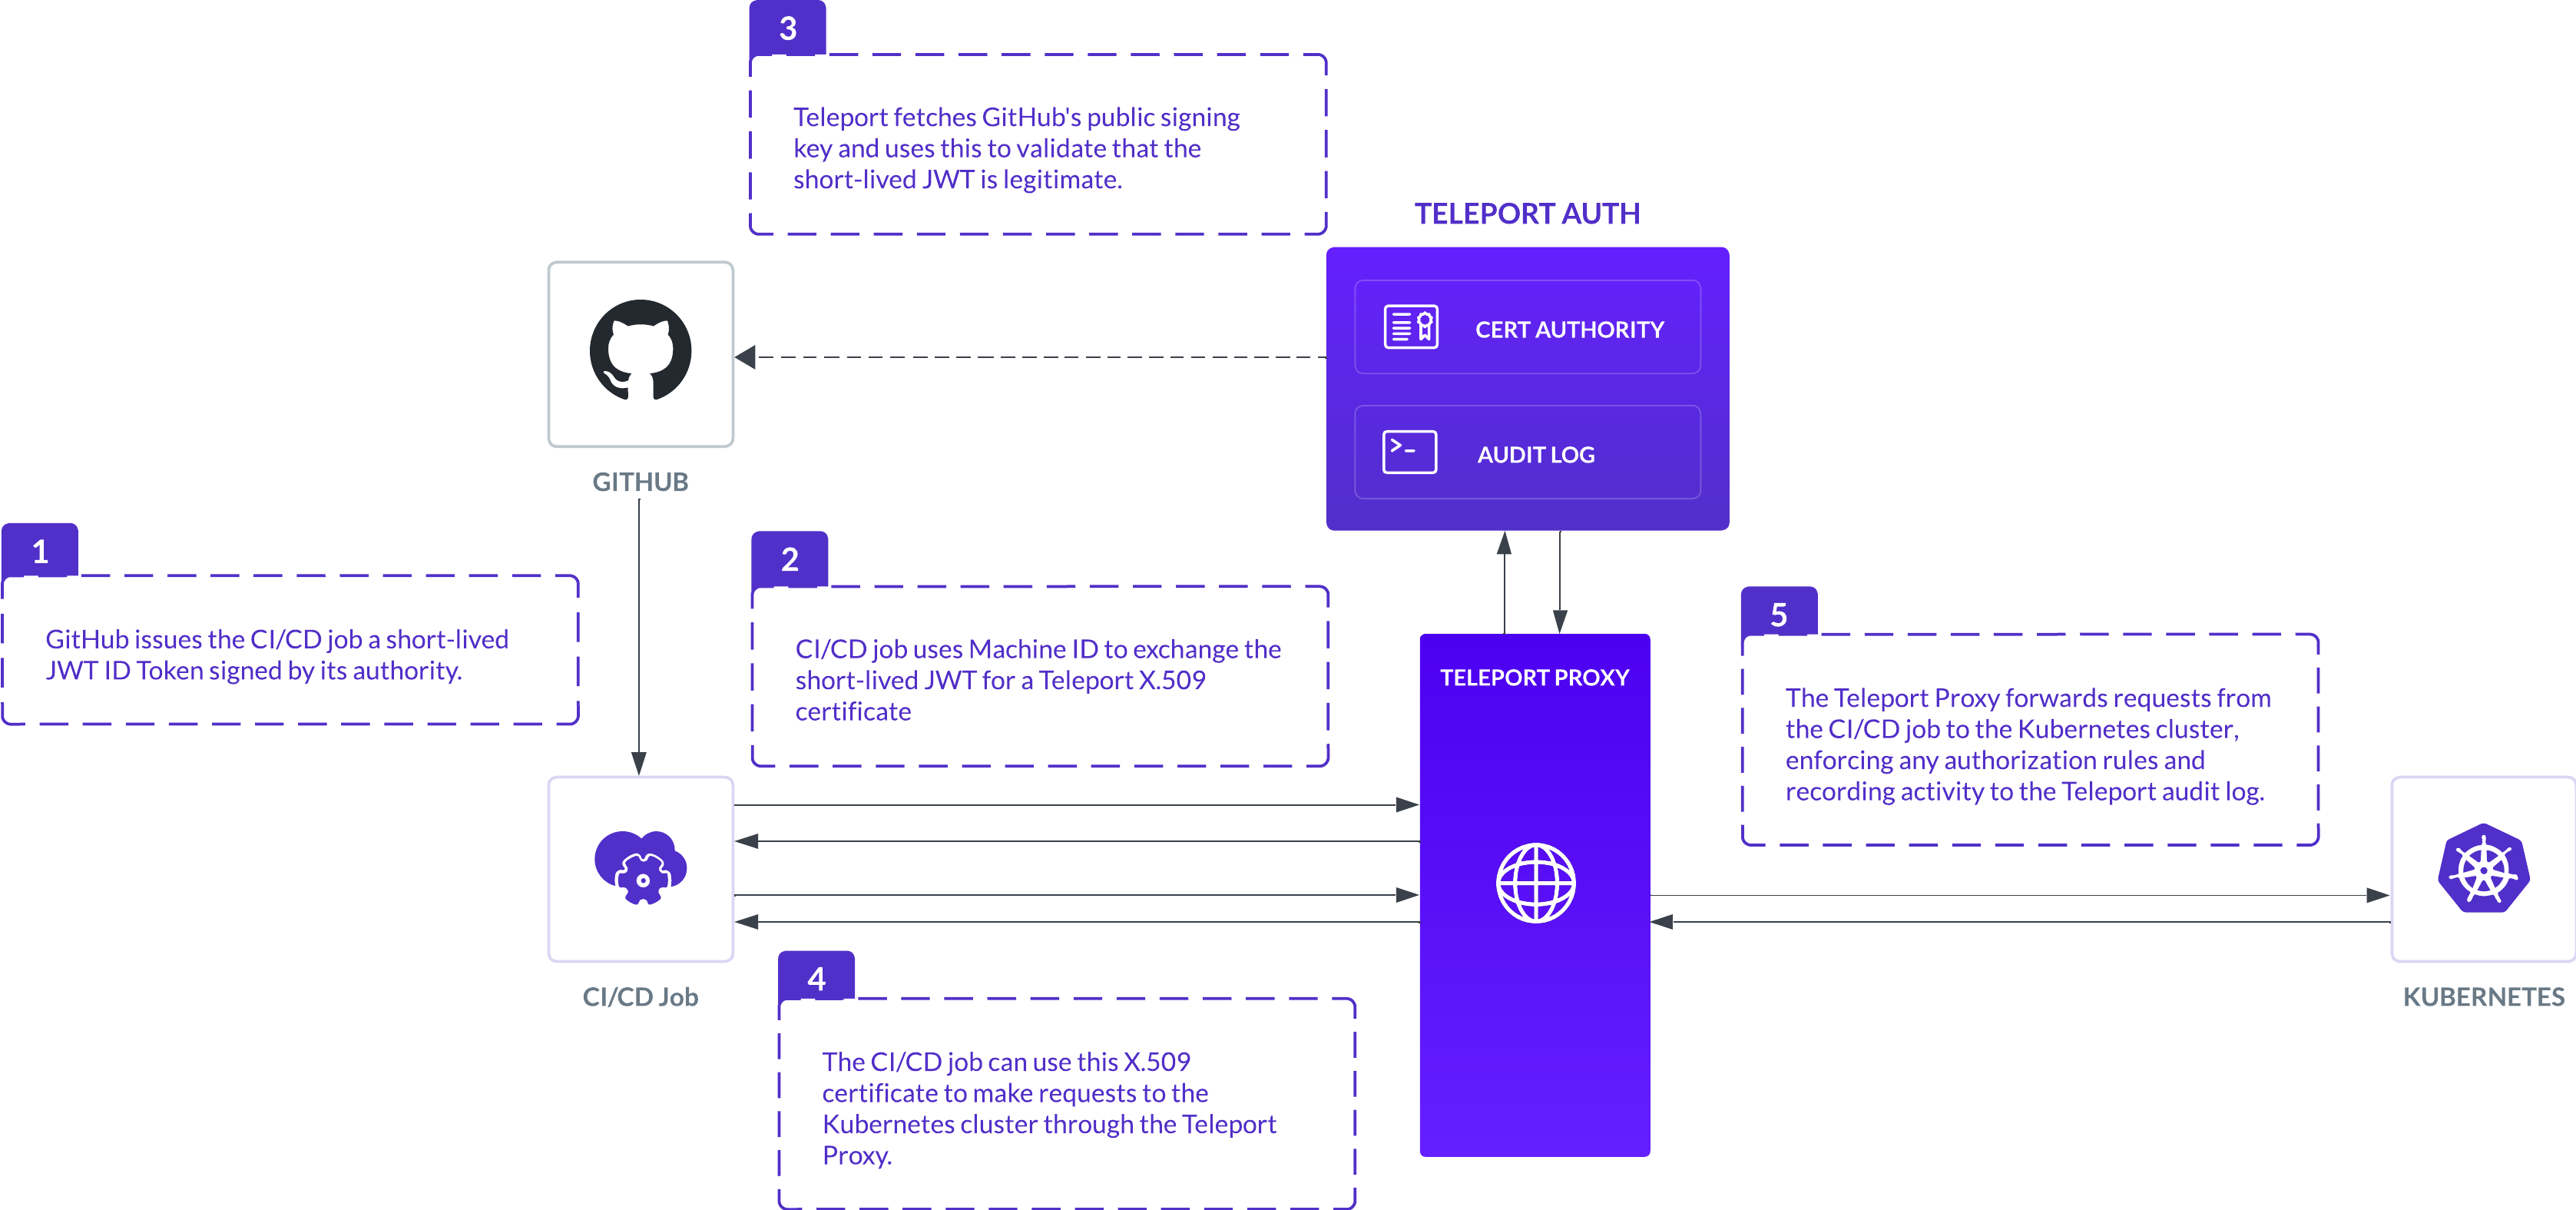
Teleport can be configured via a join token to allow authentication using one of these GitHub Actions ID tokens. During the join process, the Bot submits its ID token. The Teleport Auth Service can then verify this ID token using the public key published by GitHub, and then validate the claims within the token against the rules configured within a join token. If the token passes the rules, then a Teleport X.509 certificate is issued to the bot.
A Teleport X.509 certificate allows connections to protected resources through the Proxy Service. This directs the connection to the Teleport Agent responsible for that resource via a Reverse Tunnel, which enables connectivity in situations where the client is not able to directly connect to the resource (for example, the firewall rules do not allow ingress traffic).
The Teleport Agent verifies that the X.509 certificate was issued by the Auth Service, then ensures that it contains an identity that has been granted access to the resource. As the Agent manages the connection, it is also able to record sessions and submit audit events for actions taken using Teleport.
The case against long-lived secrets
Long-lived secrets are a critical weakness in CI/CD pipelines. In an era of more sophisticated attacks, alternatives like short-lived OIDC ID tokens and federation of trust should be explored. In this post, we’ve walked through how Machine & Workload Identity can help you leverage these new techniques and earn additional benefits, such as detailed audit logging and fine-grained access control.
Since the first version of this post was written, Teleport has also published teleport-actions/database-tunnel, teleport-actions/application-tunnel, and teleport-actions/application-proxy — actions that extend the same secretless pattern to database connections and HTTP applications from within a GitHub Actions workflow. If your CI pipeline does more than deploy Kubernetes manifests (running migrations, hitting internal APIs, seeding data), those actions are worth investigating.
You can view the full source code for the example given in this blog on GitHub.
Learn how to use Teleport to scale Kubernetes role-based access controls (RBAC) across mixed infrastructure and multi-cloud.

Noah Stride
Noah Stride leads the Machine & Workload Identity team at Teleport, where he has been a key contributor for the past three years. With a strong background in platforms and infrastructure engineering at various startups, Noah brings a wealth of experience to his role. He is actively involved in the SPIFFE community, contributing to the development of open-source standards for workload identity. Noah has delivered webinars on Machine & Workload Identity and has spoken at Teleport's conferences, sharing his insights on workload identity management in cloud-native and heterogenous environments.
Table Of Contents
Teleport Newsletter
Stay up-to-date with the newest Teleport releases by subscribing to our monthly updates.
Tags
Tags
Teleport Newsletter
Stay up-to-date with the newest Teleport releases by subscribing to our monthly updates.
Related Articles
Kubernetes for Agentic AI: Best Practices for Security and Observability
Discover 18 Kubernetes security, observability, and availability best practices for container-based agentic workloads.
How to Extend SPIFFE Beyond Kubernetes: Bring Zero Trust Identity to Your VMs
Discover how Envoy + SDS and Teleport Workload Identity let off-cluster workloads securely call Istio services without distributing certificates.
How to Eliminate Shared Database Passwords: MySQL, PostgreSQL, and More
Learn how to access MySQL, PostgreSQL, and other databases using short-lived certificates instead of shared passwords.