MCP Access Getting Started Guide
Teleport can provide secure connections to your MCP (Model Context Protocol) servers while improving both access control and visibility.
This guide shows you how to:
- Enroll the Teleport demo MCP server in your Teleport cluster.
- Connect to the MCP server via Teleport.
How it works
The Teleport Application Service includes a built-in demo MCP server designed to showcase how MCP access works.
Users can configure their MCP clients such as Claude Desktop to start an MCP
server using tsh. Once successfully authorized, tsh establishes a session
with the Application Service.
Once the session is established, the Application Service starts the in-memory demo MCP server. Teleport then proxies the connection between the client and the remote MCP server, applying additional role-based access controls such as filtering which tools are available to the user. While proxying, Teleport also logs MCP protocol requests as audit events, providing visibility into user activity.
Prerequisites
-
A running Teleport (v18.1.0 or higher) cluster accessible at a hostname with a valid TLS certificate. If you want to get started with Teleport, sign up for a free trial or set up a demo environment.
-
The
tctlandtshclients.Installing
tctlandtshclients-
Determine the version of your Teleport cluster. The
tctlandtshclients must be at most one major version behind your Teleport cluster version. Send a GET request to the Proxy Service at/v1/webapi/findand use a JSON query tool to obtain your cluster version. Replace teleport.example.com:443 with the web address of your Teleport Proxy Service:- Mac/Linux
- Windows - Powershell
TELEPORT_DOMAIN=teleport.example.com:443TELEPORT_VERSION="$(curl -s https://$TELEPORT_DOMAIN/v1/webapi/find | jq -r '.server_version')"$TELEPORT_DOMAIN = "teleport.example.com:443"$TELEPORT_VERSION = (Invoke-RestMethod -Uri "https://${TELEPORT_DOMAIN}/v1/webapi/find").server_version -
Follow the instructions for your platform to install
tctlandtshclients:- Mac
- Windows - Powershell
- Linux
Download the signed macOS .pkg installer for Teleport, which includes the
tctlandtshclients:curl -O https://cdn.teleport.dev/teleport-${TELEPORT_VERSION?}.pkgIn Finder double-click the
pkgfile to begin installation.dangerUsing Homebrew to install Teleport is not supported. The Teleport package in Homebrew is not maintained by Teleport and we can't guarantee its reliability or security.
curl.exe -O https://cdn.teleport.dev/teleport-v$TELEPORT_VERSION-windows-amd64-bin.zipUnzip the archive and move the `tctl` and `tsh` clients to your %PATH%
NOTE: Do not place the `tctl` and `tsh` clients in the System32 directory, as this can cause issues when using WinSCP.
Use %SystemRoot% (C:\Windows) or %USERPROFILE% (C:\Users\<username>) instead.
All of the Teleport binaries in Linux installations include the
tctlandtshclients. For more options (including RPM/DEB packages and downloads for i386/ARM/ARM64) see our installation page.curl -O https://cdn.teleport.dev/teleport-v${TELEPORT_VERSION?}-linux-amd64-bin.tar.gztar -xzf teleport-v${TELEPORT_VERSION?}-linux-amd64-bin.tar.gzcd teleportsudo ./installTeleport binaries have been copied to /usr/local/bin
Connecting with TLS routing disabled
This guide's commands assume your Teleport cluster uses TLS routing (
proxy_listener_mode: multiplex), where thetctlandtshclients reach every Teleport service through the Proxy Service's web address on port443. If you're not sure whether this applies to your cluster, check with whoever manages it.If your cluster uses separate listener ports instead, adjust ports as follows:
-
tshcommands (e.g.,tsh login --proxy=...): continue using the Proxy Service web address on port3080(or443if behind a load balancer). Do not change these to port3025. -
Direct
tctlor Auth Service API commands: use port3025for the Auth Service gRPC listener:tctl status --auth-server=teleport.example.com:3025
-
- A host, e.g., an EC2 instance, where you will run the Teleport Applications Service.
- Check that you can connect to your Teleport cluster and verify that you can run
tctlandtshcommands using your current credentials.-
Assign teleport.example.com to the domain name of the Teleport Proxy Service in your cluster and [email protected] to your Teleport username.
-
Authenticate to your Teleport cluster. This depends on whether your shell is interactive or not.
In an interactive shell: Run the following command. By default, this triggers a multi-factor authentication prompt:
tsh login --proxy=teleport.example.com --user=[email protected]tctl statusCluster teleport.example.com
Version 19.0.0-dev
CA pin sha256:abdc1245efgh5678abdc1245efgh5678abdc1245efgh5678abdc1245efgh5678
On non-interactive environments: If you are running
tshandtctlas an AI agent, in a CI/CD environment, or similar, make sure theTELEPORT_IDENTITY_FILEenvironment variable is assigned to a valid file path with credentials for your cluster.tshandtctlread the file path from the environment variable and do not require a separate authentication step. If there is no identity file available, we recommend that you set up Machine ID to provision one automatically.When executing
tctlcommands with an identity file, you must pass the--auth-serverflag to provide the Teleport Auth Service address, which is not included in the identity file. If you provide the Proxy Service address,tctlconnects to the Proxy Service, which forwards traffic to and from the Teleport Auth Service. Update 443 to3025if you are contacting the Auth Service directly withtctl:tctl status --auth-server=teleport.example.com:443For
tshcommands that read an identity file, you must pass the--proxyflag, which pointstshto the address of the Teleport Proxy Service:tsh status --proxy=teleport.example.comEnsure client commands can access your identity file. Replace path/to/identity/file with the path to your identity file:
export TELEPORT_IDENTITY_FILE="${TELEPORT_IDENTITY_FILE:-path/to/identity/file}"Add the
--auth-serveror--proxyflags to all subsequenttctlandtshcommands.
tctl statuscommand, you can use your current credentials to run subsequenttctlcommands from your workstation. If you host your own Teleport cluster, you can also runtctlcommands on the computer that hosts the Teleport Auth Service for full permissions. -
Step 1/3. Configure the Teleport Application Service
You can update an existing Application Service or create a new one to enable the demo MCP server.
Update an existing service
If you already have an existing Application Service instance running, you can enable the demo MCP server by adding the following in your YAML configuration:
app_service:
  enabled: true
+  mcp_demo_server: true
...
After saving the configuration file, restart Teleport to apply the change.
If your host uses systemd, run:
sudo systemctl restart teleport
If your host doesn't use systemd, restart the Teleport process using the same method you used to start it initially.
The MCP demo server will not appear in tctl apps ls until the service restarts.
Skip to Step 2.
Create a new service
If you have not deployed the Teleport Application Service, you will need to run it on the host you prepared before following this guide.
Get a join token
The Application Service requires a valid join token to join your Teleport cluster.
Run the following tctl command and save the token output in /tmp/token
on the server that will run the Application Service:
tctl tokens add --type=app --format=textabcd123-insecure-do-not-use-this
Alternative methods
For users with a lot of infrastructure in AWS, or who might create or recreate many instances, consider alternative methods for joining new EC2 instances running Teleport:
Install the Teleport Application Service
Install Teleport on the host where you will run the Teleport Application Service:
To install Teleport binaries on your Linux server, the recommended installation method is the cluster install script. This script is served by your Teleport cluster's Proxy Service and automatically selects the correct version, edition, and installation mode to match your cluster.
-
Remove any existing Teleport binaries on your system:
sudo rm -f /usr/local/bin/{tsh,teleport,tctl,tbot,fdpass-teleport,teleport-update} -
Assign teleport.example.com:443 to your Teleport cluster hostname and port, but not the scheme (https://).
-
Run your cluster's install script:
curl "https://teleport.example.com:443/scripts/install.sh" | sudo bash
Configure the Teleport Application service
On the host where you will run the Teleport Application Service, create a configuration file:
sudo teleport configure \ -o file \ --roles=app \ --proxy=teleport.example.com:443 \ --token=/tmp/token \ --mcp-demo-server
The command will generate an Application Service configuration to proxy the demo
MCP server and save the configuration to /etc/teleport.yaml.
Start the Teleport Application Service
Start the Application Service. The instructions depend on how you installed the Application Service and whether your system supports systemd:
- Package Manager
- TAR Archive
- No systemd
Configure the Application Service to start automatically when the host boots up by creating a systemd service for it. On the host where you will run the Application Service, enable and start Teleport:
sudo systemctl enable teleportsudo systemctl start teleport
You can check the status of the Application Service with systemctl status teleport
and view its logs with journalctl -fu teleport.
Configure the Application Service to start automatically when the host boots up by creating a systemd service for it. On the host where you will run the Application Service, create a systemd service configuration for Teleport, enable the Teleport service, and start Teleport:
sudo teleport install systemd -o /etc/systemd/system/teleport.servicesudo systemctl enable teleportsudo systemctl start teleport
You can check the status of the Application Service with systemctl status teleport
and view its logs with journalctl -fu teleport.
On the host where you will run the Application Service, start Teleport:
sudo teleport start --config=/etc/teleport.yaml
Teleport runs in the foreground and outputs logs for the services it is running.
Step 2/3. Configure your Teleport user
In this step, you will grant your Teleport user access to all MCP servers and their MCP tools.
- Configure an existing user
- Create a new user
If you have an existing Teleport user, assign the preset role mcp-user to
that user. The mcp-user role allows access to all MCP servers and their tools:
kind: role
version: v8
metadata:
  description: Access to MCP servers
  labels:
    teleport.internal/resource-type: preset
  name: mcp-user
spec:
  allow:
    app_labels:
      'teleport.internal/app-sub-kind': 'mcp'
    mcp:
      tools:
      - '*'
Alternatively, add the above allow permissions to an existing Teleport role.
Create a new local user called my_user with MCP access:
tctl users add my_user --roles=mcp-user
You can also create and edit roles using the Web UI. Go to Access -> Roles and click Create New Role or pick an existing role to edit.
Step 3/3. Connect
Log in to Teleport with the user we've just created, my_user:
tsh login --proxy=teleport.example.com:443 --user=my_user
Now we can inspect available MCP servers:
tsh mcp lsName Description Type Labels----------------- ----------------------------------------------------------------- ----- ------teleport-mcp-demo A demo MCP server that shows current user and session information stdio
To show configurations for your MCP client to connect:
tsh mcp config teleport-mcp-demoFound MCP servers:everything
Here is a sample JSON configuration for launching Teleport MCP servers:{  "mcpServers": {    "teleport-mcp-teleport-mcp-demo": {      "command": "/path/to/tsh",      "args": ["mcp", "connect", "teleport-mcp-demo"]    }  }}
Tip: You can use this command to update your MCP servers configuration file automatically.- For Claude Desktop, use --client-config=claude to update the default configuration.- For Cursor, use --client-config=cursor to update the global MCP servers configuration.In addition, you can use --client-config=<path> to specify a config file location that is compatible with the "mcpServers" mapping.For example, you can update a Cursor project using --client-config=<path-to-project>/.cursor/mcp.json
Once your MCP client configuration is updated, you will see
teleport-mcp-teleport-mcp-demo MCP server with allowed tools appear in your MCP client.
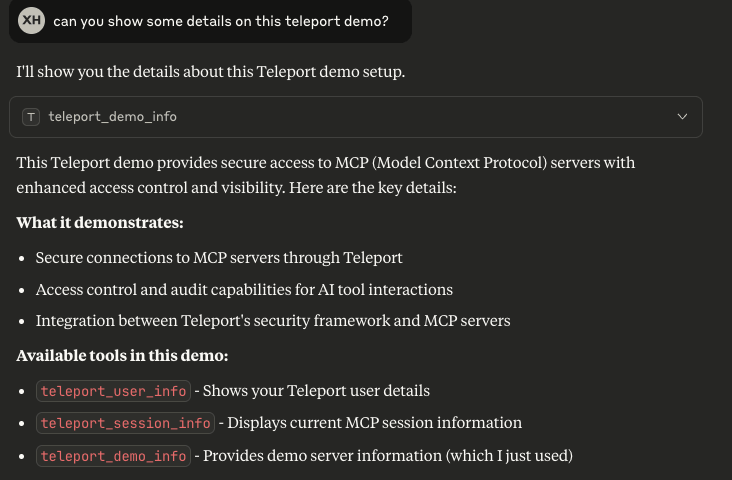
The demo MCP server consists of several tools:
teleport_user_info: Shows basic information about your Teleport user.teleport_session_info: Shows information about this MCP session.teleport_demo_info: Shows information about this Teleport Demo MCP server.
You can interact with it using sample questions like "can you show some details on this Teleport demo?":
Next Steps
Learn more about protecting MCP servers with Teleport in the following topics:
- MCP Access Control.
- Configuration and CLI reference.
- Audit events reference.