SCIM SailPoint Integration
SailPoint provides a SCIM identity management connector that allows you to manage Teleport Access List membership through SailPoint IdentityNow or SailPoint IdentityIQ.
Prerequisites
- Teleport SCIM plugin setup: SCIM Plugin Installation
Step 1/2: Configure a SCIM 2.0 Teleport connector in SailPoint
To integrate Teleport with SailPoint using SCIM, you need to configure a SCIM connector in SailPoint IdentityNow or SailPoint IdentityIQ. The exact configuration steps may vary slightly depending on your version of SailPoint, but the general process is as follows.
Configure SCIM in SailPoint
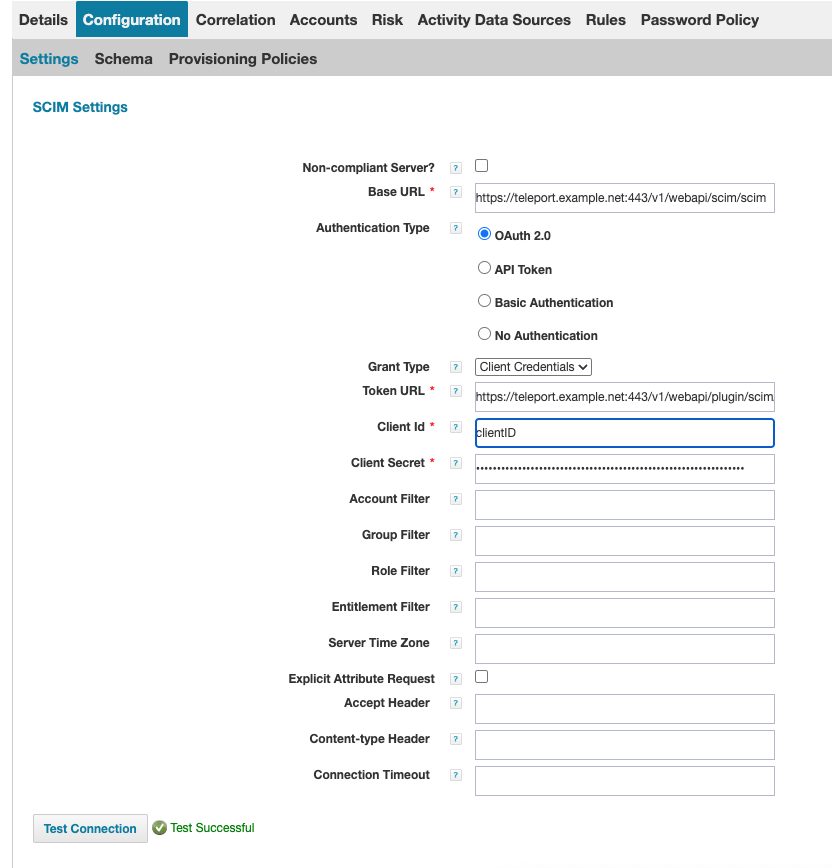
Create a new SCIM connector in SailPoint at: Applications > Application Definition > Add New Application. Select SCIM 2.0 as the application type and provide the required configuration details:
Navigate to the Teleport SCIM Integration page and copy the OAuth 2.0 details and the SCIM base URL.
If the Teleport SCIM integration has not been set up, follow the SCIM Plugin Installation guide before proceeding.
In the SailPoint SCIM application configuration view, populate the configuration settings using the values obtained from the Teleport SCIM integration:
- SCIM Base URL: Paste the SCIM Base URL copied from SCIM Teleport Integration page
- Authentication Type: Pick "OAuth 2.0"
- Token URL: Paste the Token UR copied from SCIM Teleport Integration page
- Grant Type: Pick "Client Credentials"
- Client ID: The Client ID copied from SCIM Teleport Integration page
Click Test Connection to verify that the connection is successful:
Configure SCIM schema discovery
Under Configuration -> Schema, click Discover Schema Attributes on both the Accounts and Groups tabs to retrieve the schema attributes:
Go to the Provisioning Policy section, and create a Create Policy that maps the userName SCIM attribute to the user’s email address:
Save all changes.
Configure SCIM group aggregation in SailPoint
SailPoint group aggregation enables the retrieval of SCIM-type Access Lists into SailPoint as Application Group Entitlements. This allows you to import Teleport Access Lists into SailPoint and manage membership directly through SailPoint with the changes being reflected in Teleport Access Lists.
Navigate to Setup > Tasks -> New Task -> Group Aggregation in SailPoint.
Select the Teleport SCIM Connector, then click Save and Execute to run the aggregation task.
If the aggregation completes successfully,
you should see the imported Access Lists type: "scim" from Teleport in SailPoint under: Applications > Entitlement Catalog
Step 2/2: Submit Access Requests to SailPoint Group Entitlement (Optional)
Go to Manage > Manage User Access > Manage User Access in SailPoint. Submit an Access Request for a mapped Access List (as represented by a group entitlement in SailPoint). Once the request is approved, the user will be added to the appropriate Access List in Teleport.