
Teleport
Using Teleport Connect
- Version 16.x
- Version 15.x
- Version 14.x
- Version 13.x
- Older Versions
Teleport Connect provides easy and secure access to SSH servers, databases, applications, and Kubernetes clusters.
Installation & upgrade
Head over to the Downloads page to download the most recent version. Teleport Connect supports macOS, Linux, and Windows.
Double-click the downloaded .dmg file and drag the Teleport Connect icon to the Applications folder.
To upgrade Teleport Connect to a newer version, drag the new version to the Applications folder.
Download the DEB (Debian-based distros) or RPM (RHEL-based distros) package and install it using your package manager. Repeat the process for in-place upgrades.
You can also download the project as a tar.gz file to extract and run it in place:
tar -xf teleport-connect-15.2.2-linux-*.tar.gz
Download and run the installer .exe file. It will install and open Teleport Connect without
further user input.
Repeat the process with newer versions to upgrade.
A silent installation can be performed by running the installer with the /S flag. This will hide
the progress bar and skip the launch of the app after the installation is complete.
"Teleport Connect Setup-15.2.2.exe" /S
User interface
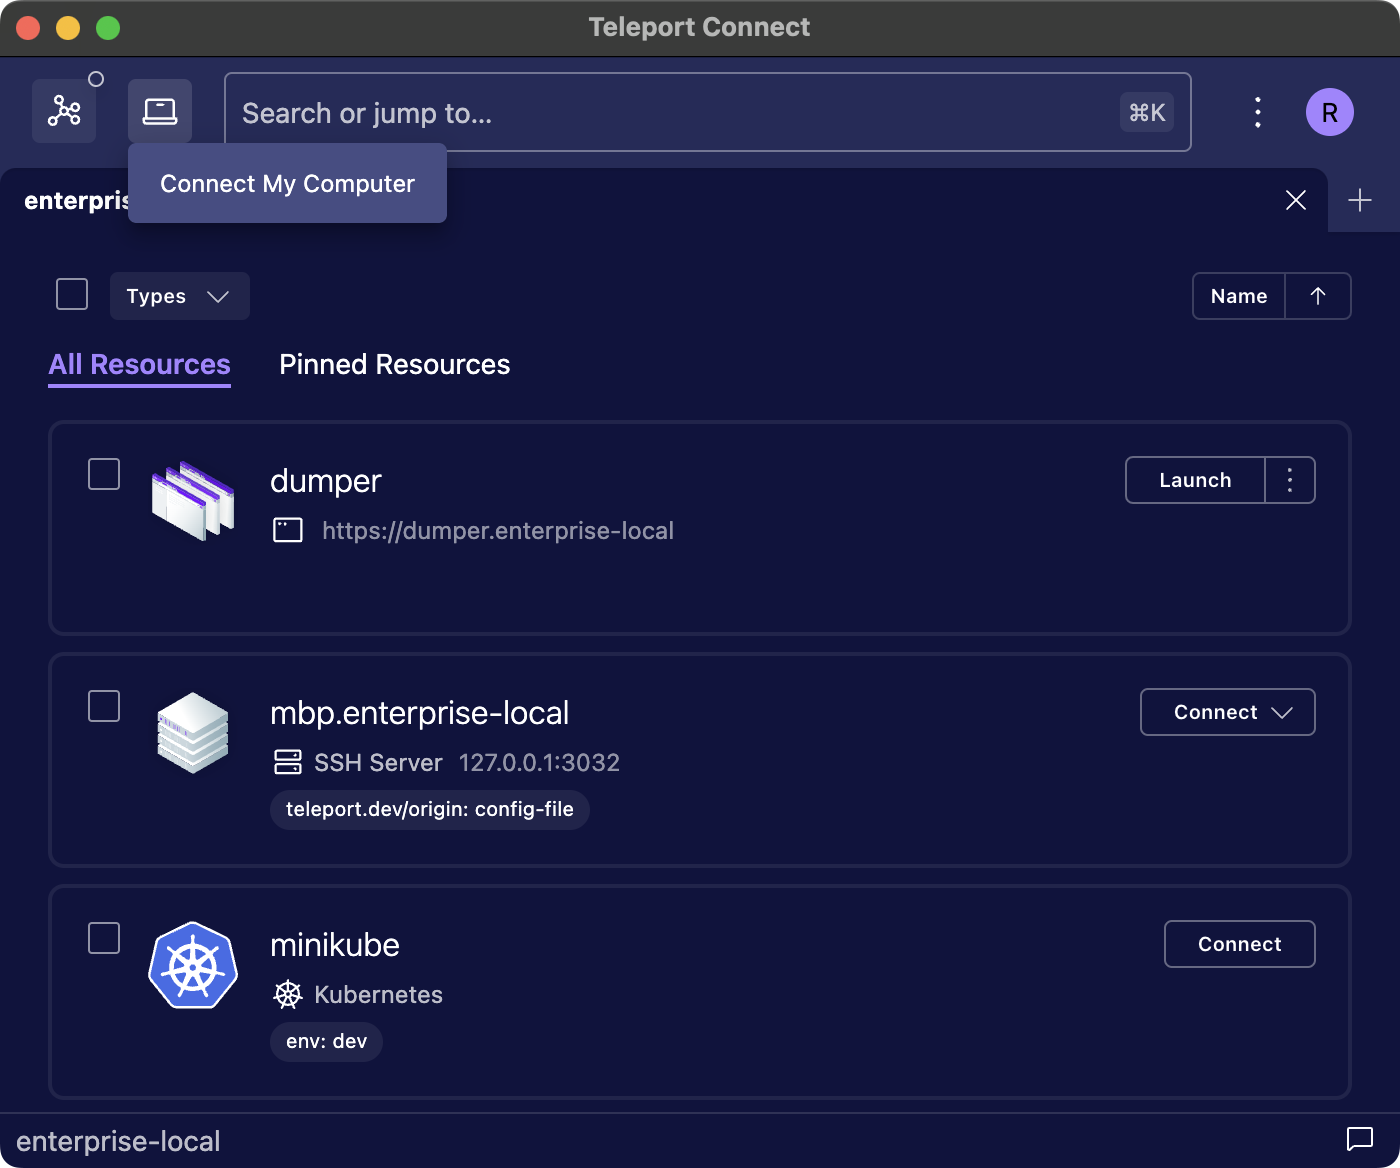
The top bar of Teleport Connect consists of:
- The profile selector (the top right), which allows you to switch between profiles on different Teleport clusters as well as log in or out of the clusters.
- The connection list (the top left) showing recent connections, allowing you to seamlessly switch between them.
- The search bar (in the middle), which allows you to search for resources across clusters.
- The cluster selector (to the left of the search bar), which shows up only if you have set up trusted clusters and there are leaf clusters connected to the root cluster. It lets you browse leaf cluster resources. Also, the "Open new terminal" action will bind new terminal tabs to the selected cluster.
- The additional actions menu (to the left of the profile selector), containing options such as opening a config file or creating an access request in an Enterprise cluster.
The status bar at the bottom displays cluster breadcrumbs in the bottom left, indicating which cluster the current tab is bound to, and the Share Feedback button in the bottom right.
Connecting to an SSH server
- Open a tab with cluster resources by clicking on the plus symbol at the right end of the tab bar.
You can also press
Ctrl/Cmd + Tto achieve the same result. - Look for the SSH server you want to connect to and click the Connect button.
- Select or enter the SSH user you wish to log in as and press
Enter.
A new tab will open with a shell session on the chosen server.
Alternatively, you can look for the server in the search bar and press Enter to connect to it.
Opening a local terminal
To open a terminal with a local shell session, either select "Open new terminal" from the additional
actions menu or press Ctrl/Cmd + Shift + T.
Any tsh command executed within the tab targets the current cluster. Teleport Connect accomplishes
this by setting the environment variables TELEPORT_PROXY and TELEPORT_CLUSTER for the session.
Additionally, Teleport Connect prepends the PATH/Path environment variable in the session with the
directory containing the tsh binary, even if tsh is not globally available.
When using trusted clusters, the cluster selector allows you to determine which cluster the shell session will be bound to. The selected cluster will be reflected in both the tab title and the status bar.
Connecting to a Kubernetes cluster
- Open a tab with cluster resources by clicking on the plus symbol at the right end of the tab bar.
You can also press
Ctrl/Cmd + Tto achieve the same result. - Look for the cluster you wish to connect to and click the Connect button.
Alternatively, you can look for the cluster in the search bar and press Enter
to connect to it.
A new local terminal tab will open which is preconfigured with the KUBECONFIG
environment variable pointing to a configuration for the specified cluster. Any
tools that respect the KUBECONFIG environment variable (kubectl, helm,
etc.) will work without additional configuration. To identify the path to this
config for use in other tools, inspect the value of the KUBECONFIG
environment variable.
The value of the KUBECONFIG environment variable will persist between app
restarts, but this configuration file will not be available or usable when the
Kubernetes cluster is removed from the connection list in the top left, or when
Teleport Connect is closed.
Connecting to a database
- Open a tab with cluster resources by clicking on the plus symbol at the end of the tab bar. You
can also press
Ctrl/Cmd + Tto achieve the same result. - Look for the database server you wish to connect to and click the Connect button.
- Select or enter the database user you wish to use and press
Enter.
A new tab will open with a new connection established between your device and the database server.
Alternatively, you can look for the database in the search bar and press Enter to connect to it.
This connection will remain active until you click the Close Connection button or close Teleport Connect. The port number will persist between app restarts—you can set up your favorite client without worrying about the port suddenly changing.
With a GUI client
To connect with a GUI client, follow the instructions in the database connection tab under the Connect with GUI section.
With a CLI client
The database connection tab shows the command that can be used to connect to the database. You can modify the database name of the connection and then click the Run button to open a new terminal tab with that command executed.
Connecting to an application
Teleport Connect supports launching applications in the browser, as well as creating authenticated tunnels for web and TCP applications.
When it comes to cloud APIs secured with Application Access, Teleport Connect supports launching the AWS console in the browser, but all other CLI applications can be used only through tsh in a local terminal tab.
Launching an application in the browser
- Open a tab with cluster resources by clicking on the plus symbol at the end of the tab bar. You
can also press
Ctrl/Cmd + Tto achieve the same result. - Look for the application you wish to open and click the Launch button (web apps and AWS console) or the Login button (SAML apps).
Alternatively, you can look for the application in the search bar and press Enter to launch it in
the browser.
Creating an authenticated tunnel
- Open a tab with cluster resources by clicking on the plus symbol at the end of the tab bar. You
can also press
Ctrl/Cmd + Tto achieve the same result. - Look for the application you wish to connect to.
- For TCP applications, click the Connect button.
- For web applications, click the three dots next to the Launch button and select Set up connection.
Alternatively, you can look for a TCP application in the search bar and press Enter to set up a
connection to it.
A new tab will open with a new connection established between your device and the application.
This connection will remain active until you click the Close Connection button or close Teleport Connect. The port number will persist between app restarts—you can set up your favorite client without worrying about the port suddenly changing.
The application connection tab shows an example command that can be used to query the application. Requests sent under the displayed address will be proxied through an authenticated tunnel to the application.
Connecting to multiple clusters
Teleport Connect allows you to log in to multiple clusters at the same time. After logging in to your first cluster, open the profile selector at the top right and click the +Add another cluster button. You can switch between active profiles in multiple ways:
- Click at the profile selector button at the top right.
- Open the profile selector with a shortcut (
Ctrl/Cmd + I). - Select a connection from the connection list at the top to automatically switch to the right profile.
At the moment Teleport Connect supports only one user per cluster. To log in as a different user, log out of the cluster first.
Restarting and reconnecting
Before closing, Teleport Connect will remember the tabs that you had open at the end of the session. Next time you open the app, Connect will ask you if you want to reopen those tabs. If you agree, Connect will restore connections to all resources that were active before you closed the app.
When restoring terminal tabs, Teleport Connect doesn't attempt to re-execute commands that were in progress when the app was closed. It will only restore the working directory for those tabs.
Connect My Computer
Connect My Computer makes it possible to add your personal machine to a Teleport cluster in just a couple of clicks.
It is the easiest way to add a computer to the cluster, whether you're exploring the capabilities of Teleport or want your computer to be available in a Teleport-powered home lab.
Connect My Computer sets up a Teleport agent managed completely by Teleport Connect, without having
to use the terminal to get the job done and without the need for tools like systemctl to control
the lifecycle of the agent.
Prerequisites
- A macOS or Linux device.
- Teleport Connect v14.1+, on the same major version or one version behind the Teleport Proxy Service version. See version compatibility.
- A local Teleport user: you must authenticate using credentials or passwordless login, and not with SSO.
- Permissions to create join tokens (verb
createfor thetokenresource).
- Permissions to read and update user objects in the backend (verbs
readandupdatefor theuserresource). - Permissions to read, update, and create roles in the backend (verbs
read,update, andcreatefor theroleresource).
The agent runs as the current system user, not as root. Some features are thus not available, such as logging in as other system users or host user creation.
Setup and usage
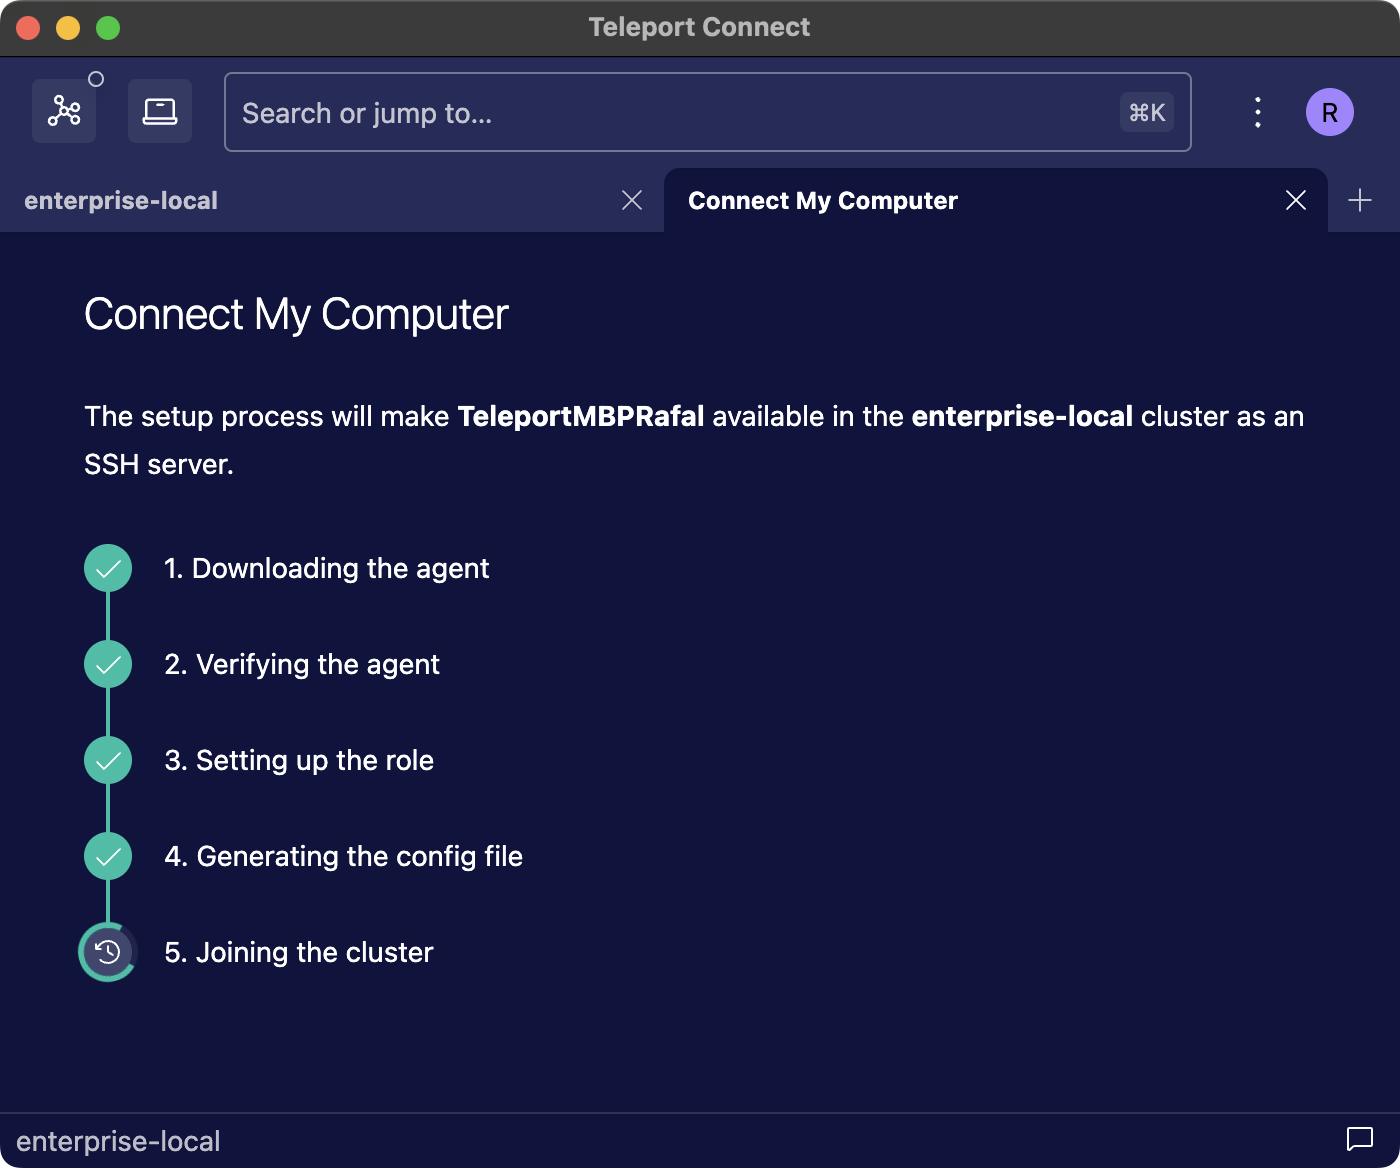
To begin the setup, click on the laptop icon in the top left and select "Connect My Computer". The new tab will guide you through an interaction-free setup. Click "Connect" to start the setup.
The setup creates a new role in the cluster which grants access to your device as the current system user. The role is then added to your user object.
The role is responsible merely for granting SSH access as your system user to the node managed by Connect My Computer. The node is subject to RBAC like any other SSH node in the cluster.
In practice it means that users with administrative privileges can craft another role which grants access to the node or simply assign the Connect My Computer role to themselves.
We recommend using Connect My Computer only in scenarios where no other user could plausibly gain access to the node, such as when exploring a Teleport cluster as its only user or in a home lab.
Next, the setup downloads a Teleport agent for your platform and runs teleport node configure
pointed at the current cluster. Once that is done, Connect My Computer starts the agent and waits
for it to show up in the cluster as an SSH node.
After the agent joins the cluster, the tab transitions to showing the status of the agent. From here, you can connect to the node made available by the agent, stop and start the agent, as well as completely remove it. Manually logging out of the cluster will remove the agent as well.
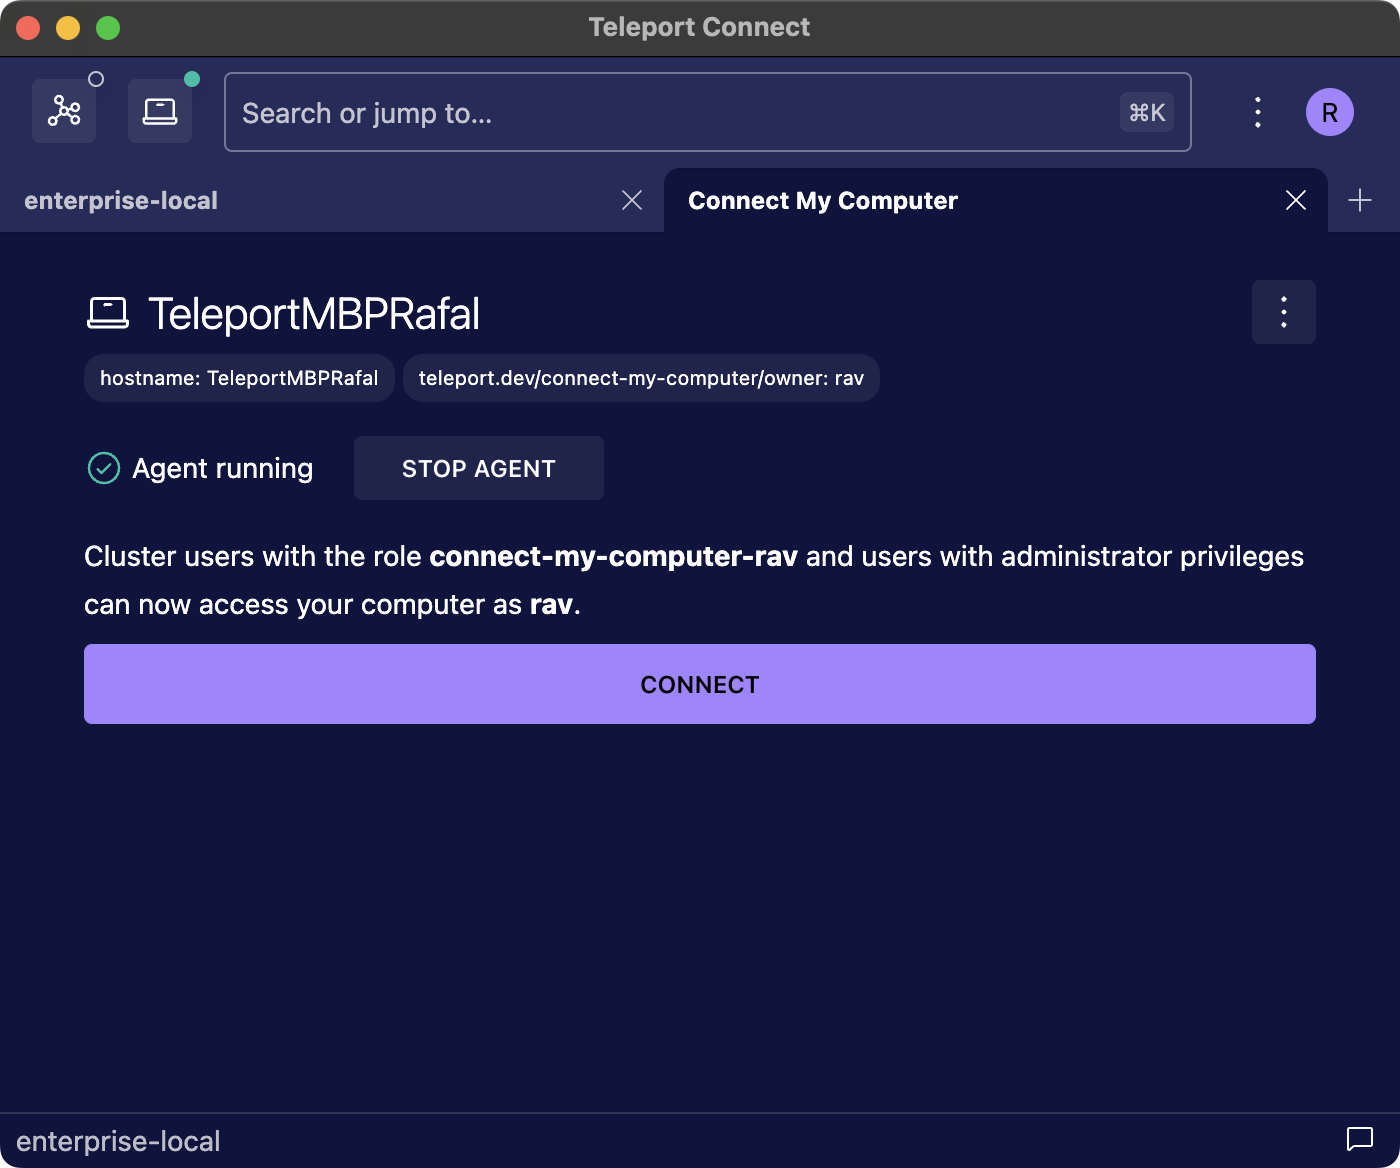
Your computer will be shared while Teleport Connect is open. To stop sharing, close Teleport Connect or stop the agent through the Connect My Computer tab. Sharing will resume on app restart, unless you stop the agent before exiting. The agent stops immediately if Teleport Connect unexpectedly crashes.
Agent maintenance
The version of the agent downloaded by Teleport Connect always matches the version of Teleport Connect. After upgrading Teleport Connect, Connect My Computer is going to automatically attempt to download a matching agent version before launching the agent.
Connect My Computer always stores just a single version of the agent on disk.
The agent is stored at ~/Library/Caches/Teleport Connect/teleport/teleport.
The agent is stored at ~/.cache/Teleport Connect/teleport/teleport by default. The path respects
$XDG_CACHE_HOME.
Troubleshooting Connect My Computer
Accessing agent logs
After the setup is done, open the Connect My Computer tab and from the three dots menu within the tab choose "Open agent logs directory".
The logs are stored at ~/Library/Application Support/Teleport Connect/agents/<cluster>/logs.
The logs are stored at ~/.config/Teleport Connect/agents/<cluster>/logs.
The Connect My Computer icon is not visible in the top bar
The icon is visible only if your setup satisfies the following requirements:
- A macOS or Linux device.
- Teleport Connect v14.1+, on the same major version or one version behind the Teleport Proxy Service version. See version compatibility.
- A local Teleport user: you must authenticate using credentials or passwordless login, and not with SSO.
- Permissions to create join tokens (verb
createfor thetokenresource).
The Connect My Computer tab says that the agent is running, but the computer is not visible in the cluster
Click "Connect" in the Connect My Computer tab. If the error message in the new tab says "access
denied", it likely means that there's a role assigned to your cluster user which denies access to
the Connect My Computer node, either by denying the specific login or access to the node itself
through fields like node_labels. To resolve this problem, inspect the role list in the Management
section of the Web UI. First, check what roles are assigned to your user object and then inspect
each role. Look for a role with broad deny rules.
If the error message mentions a node or a tunnel not being found, it means that while the cluster has a cached view of the agent, the agent did not join the cluster just yet. Wait for a couple of seconds and try connecting to the node again. If the problem persists, check the agent logs.
Connect My Computer does not work after changing system username
The system username that was in use at the time of configuring Connect My Computer is persisted in
the Connect My Computer role for the given cluster user. To regain access to the Connect My Computer
node, add the new system username under the logins section of the role. The role can be identified
by its name following the format connect-my-computer-<name of cluster user>.
Another solution is to restart the setup.
The agent cannot join the cluster and the logs say the token has expired or was not found
In that scenario, the agent emits logs like these when starting up:
INFO [PROC:1]    Joining the cluster with a secure token. pid:54364.1 service/connect.go:460
INFO [AUTH]      Attempting registration via proxy server. auth/register.go:279
ERRO [PROC:1]    Can not join the cluster as node, the token expired or not found. Regenerate the token and try again. pid:54364.1 service/connect.go:106
During the setup, Connect My Computer creates a join token that is valid for up to five minutes. If the logs say that the token has expired, it most likely means that the initial attempt to join the cluster has failed and you started another one after more than five minutes.
To resolve this problem, remove the agent and perform the setup again.
Restarting the setup
Since Teleport nodes are completely stateless, in case of problems with starting the agent or joining the cluster you may attempt to run the setup again. Either click "Retry" if the setup has failed or choose "Remove agent" from the three dots menu within the Connect My Computer tab after the agent was successfully configured.
Preventing user access to Connect My Computer
If you wish to prevent cluster users from using Connect My Computer, make sure they don't have
permissions to create new join tokens. This is controlled by the create verb for the token
resource. Either deny this permission explicitly or do not grant it in the first place. See Access
Controls Reference Documentation for more
details. Denying this permission will hide the icon in the top bar.
Users who already set up agents will still be able to manage those agents, even after the denying them permissions to create join tokens. This is to ensure that a malicious admin is not able to make a user set up an agent and then lock the user out of removing the agent.
To instantly revoke access to agents that have already joined the cluster, look for nodes labeled
with the teleport.dev/connect-my-computer/owner label and then place
locks on those nodes.
tctl nodes ls -v --query='labels["teleport.dev/connect-my-computer/owner"] != ""'tctl lock --server-id=Node UUID --message="Using Connect My Computer is forbidden"
Using tsh outside of Teleport Connect
Teleport Connect ships with its own bundled version of tsh. Teleport Connect will always use this version of tsh for any actions performed within the app.
Teleport Connect makes tsh available to use in your terminal of choice as well. Please note that at
the moment tsh and Teleport Connect operate on different sets of profiles, as Teleport Connect sets
a custom home location through the TELEPORT_HOME environment
variable. For example, logging in to a new cluster
through tsh will not make that cluster show up in Teleport Connect.
To add tsh to PATH, open the additional actions menu and select "Install tsh in PATH". This will
symlink tsh to /usr/local/bin. You can remove the symlink by selecting "Remove tsh from PATH".
If you used the tsh macOS .pkg installer before, this will overwrite the symlink made by that installer.
During installation, Teleport Connect automatically adds a symlink to tsh under
/usr/local/bin/tsh, unless you have already installed the teleport package, which also creates
that symlink.
During installation, Teleport Connect automatically adds the resources\bin folder from the
installation directory to the Path user environment variable.
Configuration
Teleport Connect can be configured by editing the app_config.json file, which it creates on first launch.
To open the config file, select "Open config file" from the additional actions menu.
The file will open in your default editor.
Any changes to the config file will take effect at the next launch.
Below is the list of the supported config properties.
| Property | Default | Description |
|---|---|---|
theme | system | Color theme for the app. Available modes: light, dark, system. |
terminal.fontFamily | Menlo, Monaco, monospace on macOSConsolas, monospace on Windows'Droid Sans Mono', monospace on Linux | Font family for the terminal. |
terminal.fontSize | 15 | Font size for the terminal. |
usageReporting.enabled | false | Enables collecting anonymous usage data (see Telemetry). |
keymap.tab1 - keymap.tab9 | Command+1 - Command+9 on macOS Ctrl+1 - Ctrl+9 on WindowsAlt+1 - Alt+9 on Linux | Shortcut to open tab 1–9. |
keymap.closeTab | Command+W on macOSCtrl+W on Windows/Linux | Shortcut to close a tab. |
keymap.newTab | Command+T on macOSCtrl+T on Windows/Linux | Shortcut to open a new tab. |
keymap.newTerminalTab | Shift+Command+T on macOSCtrl+Shift+T on Windows/Linux | Shortcut to open a new terminal tab. |
keymap.previousTab | Shift+Command+Tab on macOSCtrl+Shift+Tab on Windows/Linux | Shortcut to go to the previous tab. |
keymap.nextTab | Command+Tab on macOSCtrl+Tab on Windows/Linux | Shortcut to go to the next tab. |
keymap.openConnections | Command+P on macOSCtrl+P on Windows/Linux | Shortcut to open the connection list. |
keymap.openClusters | Command+E on macOSCtrl+E on Windows/Linux | Shortcut to open the cluster selector. |
keymap.openProfiles | Command+I on macOSCtrl+I on Windows/Linux | Shortcut to open the profile selector. |
keymap.openSearchBar | Command+K on macOSCtrl+K on Windows/Linux | Shortcut to open the search bar. |
headless.skipConfirm | false | Skips the confirmation prompt for Headless WebAuthn approval and instead prompts for WebAuthn immediately. |
The additional $schema property present in the config file allows text editors to provide autocompletion.
It should not be modified.
Configuring keyboard shortcuts
A valid shortcut contains at least one modifier and a single key code, for example Shift+Tab.
Function keys such as F1 do not require a modifier.
Modifiers and a key code must be combined by the + character.
Available modifiers:
Control,Option,Shift,Commandon macOS.Ctrl,Alt,Shifton Windows and Linux.
Available key codes:
0to9AtoZF1toF24,,.,/,\,`,-,=,;,',[,]Space,Tab,CapsLock,NumLock,ScrollLock,Backspace,Delete,Insert,Enter,Up,Down,Left,Right,Home,End,PageUp,PageDown,Escape,IntlBackslash
Telemetry
When you first start the app, Teleport Connect asks for permission to collect and send telemetry data. This includes tracking events such as:
- Logging in to a cluster
- Starting an SSH, database, application, or Kubernetes session
- File transfer during an SSH session
- Creating an Access Request
- Reviewing an Access Request
- Assuming an Access Request
On login, we also collect some device-related data:
- Operating system and its version
- App version
- Processor architecture
Additionally, we ask for a job role (the answer is optional).
The full list of events and collected data is defined as protocol buffer messages in the Teleport source. We do not track the details of those events but merely that the given event took place. Each event includes the cluster name and user name anonymized with HMAC using the cluster's internal random UUID as the key. It is infeasible to associate this back to a specific cluster or user without access to the cluster's internal datastore.
Disabling telemetry
If you initially agreed to share telemetry data, but now want to opt out, you need to set usageReporting.enabled in the config to false (see Configuration):
"usageReporting.enabled": false
The changes will take effect at the next launch.
Troubleshooting
Resetting the app state might help with UI crashes caused by Teleport Connect getting into an abnormal state. This might happen after downgrading Teleport Connect or performing substantial server-side changes. Those UI crashes typically manifest as a blank window or an Internal Error alert.
To reset the state related to a particular cluster:
- Log out of the cluster.
- Close Teleport Connect.
- Open Teleport Connect, then log back in to the cluster.
To completely wipe all app state:
- Close Teleport Connect.
- Remove the internal
tshfolder and theapp_state.jsonfile to log out of all clusters and clear all remembered tabs and connections.
rm -rf ~/Library/Application\ Support/Teleport\ Connect/{tsh,app_state.json}
rm -rf ~/.config/Teleport\ Connect/{tsh,app_state.json}
rmdir /s /q C:\Users\%UserName%\AppData\Roaming\"Teleport Connect"\tshdel C:\Users\%UserName%\AppData\Roaming\"Teleport Connect"\app_state.json
Submitting an issue
To submit an issue, click the Submit Feedback button at the bottom right (the speech bubble symbol) and follow the Submit a Bug link.
Be sure to attach logs, which can be found in the app menu under Help -> Open Logs Directory. The
logs are stored in ~/Library/Application Support/Teleport Connect/logs.
The app version can be found in the app menu under Teleport Connect -> About Teleport Connect.
To get more detailed logs, run Teleport Connect with the --connect-debug flag:
Using macOS open utility:
open -a "Teleport Connect" --args --connect-debugRunning the executable directly:
/Applications/Teleport\ Connect.app/Contents/MacOS/Teleport\ Connect --connect-debug
Be sure to attach logs, which can be found by pressing Alt to access the app menu, then Help ->
Open Logs Directory. The logs are stored in ~/.config/Teleport Connect/logs.
The app version can be found under Help -> About Teleport Connect.
To get more detailed logs, run Teleport Connect with the --connect-debug flag:
teleport-connect --connect-debug
Be sure to attach logs, which can be found by pressing Alt to access the app menu, then Help ->
Open Logs Directory. The logs are stored in C:\Users\%UserName%\AppData\Roaming\Teleport Connect\logs.
You may need to adjust File Explorer to view hidden files and folders.
The app version can be found under Help -> About Teleport Connect.
To get more detailed logs, open Teleport Connect from the Command Prompt with the --connect-debug flag:
"%LocalAppData%\Programs\teleport-connect\Teleport Connect.exe" --connect-debug
Updating local shell environment
Teleport Connect updates and caches the local shell environment on app restart and not when starting a new shell session. If you add new environment variables to your shell startup files, Connect will see them only after you restart the app.
Skipping TLS certificate verification
You can open Teleport Connect in insecure mode, which skips TLS certificate verification when talking to a Teleport Proxy Service. This is useful in test environments with self-signed certificates or for demo purposes. We do not recommend using this mode in production.
To launch the app in insecure mode, open a terminal first. From there you can launch the app in one of two ways:
Using macOS open utility:
open -a "Teleport Connect" --args --insecureRunning the executable directly:
/Applications/Teleport\ Connect.app/Contents/MacOS/Teleport\ Connect --insecure
From a terminal, open Teleport Connect with the --insecure flag:
teleport-connect --insecure
From the Command Prompt, open Teleport Connect with the --insecure flag:
"%LocalAppData%\Programs\teleport-connect\Teleport Connect.exe" --insecure
Uninstalling Teleport Connect
Remove Teleport Connect for MacOS from the Applications directory with this command:
sudo rm -rf /Applications/Teleport\ Connect.app
To remove the local user data directory:
rm -rf ~/Library/Application\ Support/Teleport\ Connect
You can uninstall Teleport Connect from the "Apps and Features" section of the Control Panel.
For reference, Teleport Connect binaries are installed to %LOCALAPPDATA%\Programs\teleport-connect.
To remove the local user data directory:
$ rmdir /s /q "%APPDATA%\Teleport Connect"
For DEB installations uninstall Teleport Connect using APT:
sudo apt remove teleport-connect
For RPM installations uninstall Teleport Connect using YUM:
sudo yum remove teleport-connect
Installs based on a tarball should remove the
teleport-connect directory and any copied/linked executables.