# Deploying tbot on GitHub Actions
GitHub Actions is a popular CI/CD platform that works as a part of the larger GitHub ecosystem. Teleport Machine & Workload Identity allows GitHub Actions to securely interact with Teleport protected resources without the need for long-lived credentials.
Teleport supports secure joining on both GitHub-hosted and self-hosted GitHub Actions runners as well as GitHub Enterprise Server.
---
GUIDED INTEGRATION AVAILABLE
Get up and running quickly using one of the guided integrations available via the Teleport Web UI.
The guides walk you through connecting your GitHub Actions workflow to Teleport and granting the permissions needed to access your enrolled resources.
Find the guides in the Web UI;
**Add New** > **Integration** > Search "**GitHub Actions**"
---
## Prerequisites
- A running Teleport cluster. If you want to get started with Teleport, [sign up](https://goteleport.com/signup) for a free trial or [set up a demo environment](https://goteleport.com/docs/get-started/deploy-community.md).
- The `tctl` and `tsh` clients.
Installing `tctl` and `tsh` clients
1. Determine the version of your Teleport cluster. The `tctl` and `tsh` clients must be at most one major version behind your Teleport cluster version. Send a GET request to the Proxy Service at `/v1/webapi/find` and use a JSON query tool to obtain your cluster version. Replace teleport.example.com:443 with the web address of your Teleport Proxy Service:
```
$ TELEPORT_DOMAIN=teleport.example.com:443
$ TELEPORT_VERSION="$(curl -s https://$TELEPORT_DOMAIN/v1/webapi/find | jq -r '.server_version')"
```
2. Follow the instructions for your platform to install `tctl` and `tsh` clients:
**Mac**
Download the signed macOS .pkg installer for Teleport, which includes the `tctl` and `tsh` clients:
```
$ curl -O https://cdn.teleport.dev/teleport-${TELEPORT_VERSION?}.pkg
```
In Finder double-click the `pkg` file to begin installation.
---
DANGER
Using Homebrew to install Teleport is not supported. The Teleport package in Homebrew is not maintained by Teleport and we can't guarantee its reliability or security.
---
**Windows - Powershell**
```
$ curl.exe -O https://cdn.teleport.dev/teleport-v${TELEPORT_VERSION?}-windows-amd64-bin.zip
Unzip the archive and move the `tctl` and `tsh` clients to your %PATH%
NOTE: Do not place the `tctl` and `tsh` clients in the System32 directory, as this can cause issues when using WinSCP.
Use %SystemRoot% (C:\Windows) or %USERPROFILE% (C:\Users\) instead.
```
**Linux**
All of the Teleport binaries in Linux installations include the `tctl` and `tsh` clients. For more options (including RPM/DEB packages and downloads for i386/ARM/ARM64) see our [installation page](https://goteleport.com/docs/installation.md).
```
$ curl -O https://cdn.teleport.dev/teleport-v${TELEPORT_VERSION?}-linux-amd64-bin.tar.gz
$ tar -xzf teleport-v${TELEPORT_VERSION?}-linux-amd64-bin.tar.gz
$ cd teleport
$ sudo ./install
Teleport binaries have been copied to /usr/local/bin
```
* To check that you can connect to your Teleport cluster, sign in with `tsh login`, then verify that you can run `tctl` commands using your current credentials. For example, run the following command, assigning teleport.example.com to the domain name of the Teleport Proxy Service in your cluster and email\@example.com to your Teleport username:
```
$ tsh login --proxy=teleport.example.com --user=email@example.com
$ tctl status
Cluster teleport.example.com
Version 18.7.3
CA pin sha256:abdc1245efgh5678abdc1245efgh5678abdc1245efgh5678abdc1245efgh5678
```
If you can connect to the cluster and run the `tctl status` command, you can use your current credentials to run subsequent `tctl` commands from your workstation. If you host your own Teleport cluster, you can also run `tctl` commands on the computer that hosts the Teleport Auth Service for full permissions.
* Your user should have the privileges to create token resources.
* A GitHub repository with GitHub Actions enabled. This guide uses the example `gravitational/example` repo, however this value should be replaced with your own unique repo.
## Step 1/3. Create a Bot
Next, you need to create a Bot. A Bot is a Teleport identity for a machine or group of machines. Like users, bots have a set of roles and traits which define what they can access.
Create `bot.yaml`:
```
kind: bot
version: v1
metadata:
# name is a unique identifier for the Bot in the cluster.
name: example
spec:
# roles is a list of roles to grant to the Bot. Don't worry if you don't know
# what roles you need to specify here, the Access Guides will walk you through
# creating and assigning roles to the already created Bot.
roles: []
```
Make sure you replace `example` with a unique, descriptive name for your Bot.
Use `tctl` to apply this file:
```
$ tctl create bot.yaml
```
## Step 2/3. Create a join token for GitHub Actions
In order to allow your GitHub Actions workflow to authenticate with your Teleport cluster, you'll first need to create a join token. These tokens set out criteria by which the Auth Service decides whether to allow a bot or node to join.
In this example, you will create a join token that grants access to any GitHub Actions run within a specific GitHub repository. In production, you may wish to further restrict these rules to ensure that access can only occur when CI is running against a specific branch. You can find a full list of the available rules on the [join token reference page.](https://goteleport.com/docs/reference/deployment/join-methods.md#github-actions-github)
Create a file named `bot-token.yaml`:
```
kind: token
version: v2
metadata:
name: example-bot
spec:
# The Bot role indicates that this token grants access to a bot user, rather
# than allowing a node to join. This role is built in to Teleport.
roles: [Bot]
join_method: github
# The bot_name indicates which bot user this token grants access to. This
# should match the name of the bot that you created in the previous step.
bot_name: example
github:
# allow specifies rules that control which GitHub Actions runs will be
# granted access. Those not matching any allow rule will be denied.
allow:
# repository should include the name of the owner of the repository.
- repository: gravitational/example
```
Replace `gravitational/example` with the name of the repository that `tbot` will run within. You may also choose to change the name of the bot and token to more accurately describe your use-case.
---
USING GITHUB ENTERPRISE?
**Enterprise Server**
If you are using self-hosted Teleport Enterprise you are able to permit workflows within GitHub Enterprise Server instances to authenticate using the GitHub join method.
The Teleport Auth Service must be able to connect to the GitHub Enterprise Server.
To configure this, set `spec.github.enterprise_server_host` to the hostname of the GHES instance.
For example:
```
spec:
github:
enterprise_server_host: ghes.example.com
```
**Enterprise Cloud**
If you have enabled `include_enterprise_slug` in your GitHub Enterprise Cloud configuration, you will need to set `spec.github.enterprise_slug` to the slug of your GitHub Enterprise organization.
For example:
```
spec:
github:
enterprise_slug: my-enterprise
```
Read more about `include_enterprise_slug` on the GitHub guide to [customizing the issuer value for an enterprise](https://docs.github.com/en/enterprise-cloud@latest/actions/deployment/security-hardening-your-deployments/about-security-hardening-with-openid-connect#customizing-the-issuer-value-for-an-enterprise).
---
Once the resource file has been written, create the token with `tctl`:
```
$ tctl create -f bot-token.yaml
```
Check that token `example-bot` has been created with the following command:
```
$ tctl tokens ls
Token Type Labels Expiry Time (UTC)
----------- ---- ------ ----------------------------------------------
example-bot Bot 01 Jan 00 00:00 UTC (2562047h47m16.854775807s)
```
## Step 3/3. Configure a GitHub Actions Workflow
Now that the bot has been successfully created, you need to configure your GitHub Action's workflow to authenticate as this bot and then use the credentials produced by `tbot`. To help with this, Teleport publishes several easy-to-use GitHub Actions that can be used within your workflow.
It is also possible to manually configure `tbot` rather than using one of the Teleport GitHub Actions. This involves more configuration but allows for precise control of `tbot` and allows for implementations that are not possible with the actions.
What follows is examples demonstrating two of the GitHub Actions available as well as showing how to manually configure `tbot` for use with GitHub Actions.
### Example: `teleport-actions/auth`
The `teleport-actions/auth` action generates a versatile identity output that can be used for SSH and for administrative actions against a Teleport cluster. Environment variables are configured by this action and these automatically configure `tsh` and `tctl` to use this identity.
---
GUIDED INTEGRATION AVAILABLE
You can use the GitHub Action + SSH integration guide via the Teleport Web UI?
The guide walks you through connecting your GitHub Actions workflow to Teleport and giving it the permissions it needs to access your enrolled SSH nodes.
Find the guide in the Web UI:
**Add New** > **Integration** > **MWI: GitHub Actions + SSH**
---
This example shows using the credentials to:
- List the SSH nodes available using `tsh`
- List the SSH nodes available using `tctl`
- Connect to an SSH node using `tsh`
- Connect to an SSH node using OpenSSH's `ssh`
First, you'll need to adjust the role you assigned to the bot to grant it access to SSH. This example grants access to root on all nodes. In a production setup, it would be a good idea to restrict this to only the nodes that the bot would need.
Use `tctl edit role/example-bot` to add the following to the role:
```
spec:
allow:
# Allow login to the Linux user 'root'.
logins: ['root']
# Allow connection to any node. Adjust these labels to match only nodes
# that needed to access.
node_labels:
'*': '*'
```
With those privileges granted, you can now create the GitHub Actions workflow. Create `.github/workflows/example.yaml`:
```
# This is a basic workflow to help you get started.
# It will take the following action whenever a push is made to the "main" branch.
on:
push:
branches:
- main
jobs:
demo:
permissions:
# The "id-token: write" permission is required or tbot will not be able to
# authenticate with the cluster.
id-token: write
contents: read
# The name of the workflow, and the Linux distro to be used to perform the
# required steps.
name: example
runs-on: ubuntu-latest
steps:
- name: Checkout repository
uses: actions/checkout@v3
- name: Fetch Teleport binaries
uses: teleport-actions/setup@v1
with:
version: auto
# Replace with the address of your Teleport Proxy Service.
proxy: example.teleport.sh:443
- name: Fetch credentials using Machine & Workload Identity
id: auth
uses: teleport-actions/auth@v2
with:
# Replace with the address of your Teleport Proxy Service.
proxy: example.teleport.sh:443
# Use the name of the join token resource you created in step 1.
token: example-bot
# Specify the length of time that the generated credentials should be
# valid for. This is optional and defaults to "1h"
certificate-ttl: 1h
# Enable the submission of anonymous usage telemetry. This
# helps us shape the future development of `tbot`. You can disable this
# by omitting this.
anonymous-telemetry: 1
- name: List nodes (tsh)
# Enters a command from the cluster, in this case "tsh ls" using Machine
# ID credentials to list remote SSH nodes.
run: tsh ls
- name: List nodes (tctl)
run: tctl nodes ls
- name: Run hostname via SSH (tsh)
# Ensure that `root` matches the username of a remote SSH username, and
# that hostname matches an SSH host name that is a part of the Teleport
# cluster configured for access.
run: tsh ssh root@example-node hostname
- name: Run hostname via SSH (OpenSSH)
run: ssh -F ${{ steps.auth.outputs.ssh-config }} root@example-node.example.teleport.sh hostname
```
Replace:
- `example.teleport.sh:443` with the address of your Teleport Proxy or cloud tenant.
- `example-bot` with the name of the token you created in a previous step.
- `example-node` with the name of a Teleport SSH node that you wish to connect to.
- `root` with the name of a user on the node that you are connecting to and that you have granted the bot access to.
Add, commit, and push your changes to the `main` branch of the repository.
Navigate to the **Actions** tab of your GitHub repository in your web browser. Select the **Workflow** that has now been created and triggered by the change, and select the `example` job. The GitHub Actions workflow may take some time to complete, and will resemble the following once successful.
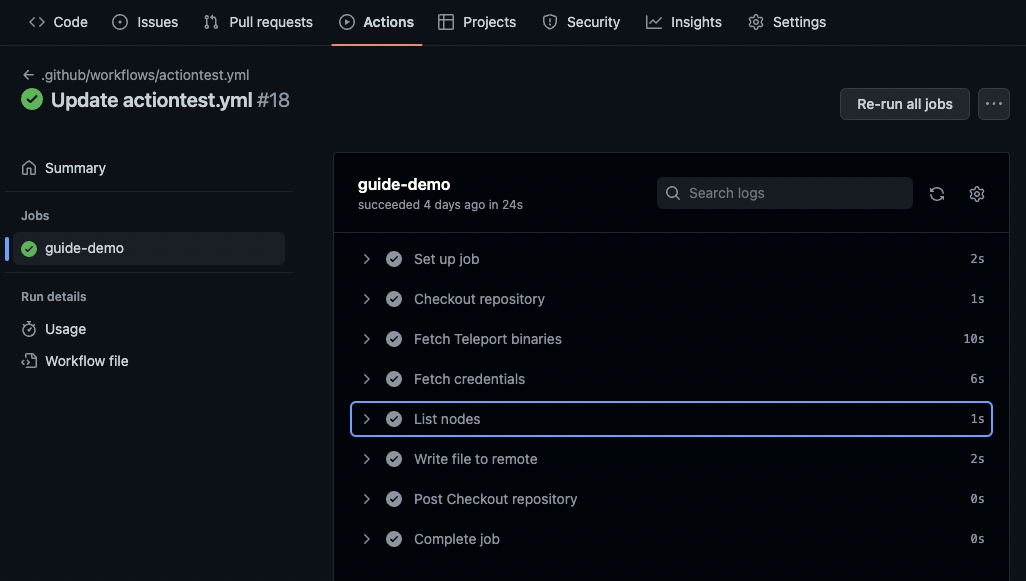
Expand the **List nodes** step of the action, and the output will list all nodes in the cluster, from the perspective of the Machine & Workload Identity bot using the command `tsh ls`.
### Example: `teleport-actions/auth-k8s`
The `teleport-actions/auth-k8s` action generates a Kubernetes output service that contains the necessary credentials and config for a Kubernetes client to connect to a Kubernetes cluster enrolled in Teleport. The action emits the necessary environment variable to automatically configure these clients.
In this example, the `teleport-actions/auth-k8s` action will be used to list all the pods contained within the cluster, but this could just as easily be modified to deploy to a Kubernetes cluster with `kubectl` or `helm`.
---
GUIDED INTEGRATION AVAILABLE
You can use the GitHub Action + Kubernetes integration guide via the Teleport Web UI?
The guide walks you through connecting your GitHub Actions workflow to Teleport and giving it the permissions it needs to access your enrolled Kubernetes clusters.
Find the guide in the Web UI:
**Add New** > **Integration** > **MWI: GitHub Actions + Kubernetes**
---
First, you'll need to adjust the role you assigned to the bot to grant it access to the Kubernetes cluster. This example will grant the bot access to all clusters with the group `editor`. For more detailed instructions on setting up Kubernetes RBAC, see the Kubernetes access guide.
Use `tctl edit role/example-bot` to add the following rule to the Teleport role:
```
spec:
allow:
kubernetes_labels:
'*': '*'
kubernetes_resources:
- kind: pod
namespace: "*"
name: "*"
kubernetes_groups:
- editor
```
---
NOTE
This example assumes the role is version `v6`. If you are using a `v7`+ role you will need to include `verbs: ["get", "list"]` for the `kind: pod` section in `kubernetes_resources`. Otherwise the example `kubectl get pods -A` execution will be denied.
---
With those privileges granted, you can now create the GitHub Actions workflow. Create `.github/workflows/example.yaml`:
```
# This is a basic workflow to help you get started, modify it for your needs.
on:
push:
branches:
- main
jobs:
demo:
permissions:
# The "id-token: write" permission is required or tbot will not be able to
# authenticate with the cluster.
id-token: write
contents: read
name: example
runs-on: ubuntu-latest
steps:
- name: Checkout repository
uses: actions/checkout@v3
- name: Fetch kubectl
uses: azure/setup-kubectl@v3
- name: Fetch Teleport binaries
uses: teleport-actions/setup@v1
with:
version: auto
# Replace with the address of your Teleport Proxy Service.
proxy: example.teleport.sh:443
- name: Fetch credentials using Machine ID
uses: teleport-actions/auth-k8s@v2
with:
# Replace with the address of your Teleport Proxy Service.
proxy: example.teleport.sh:443
# Use the name of the join token resource you created in step 1.
token: example-bot
# Use the name of your Kubernetes cluster
kubernetes-cluster: my-kubernetes-cluster
# Enable the submission of anonymous usage telemetry. This helps us
# shape the future development of `tbot`. You can disable this by
# omitting this.
anonymous-telemetry: 1
- name: List pods
run: kubectl get pods -A
```
Replace:
- `example.teleport.sh:443` with the address of your Teleport Proxy Service.
- `example-bot` with the name of the token you created in a previous step.
- `my-kubernetes-cluster` with the name of your Kubernetes cluster.
The `auth-k8s` action sets the `KUBECONFIG` for future steps to the credentials it has fetched from Teleport. This means that most existing tooling for Kubernetes (e.g. `kubectl` and `helm`) can use your cluster with no additional configuration.
Add, commit, and push this new workflow file to the default branch of your repository.
Navigate to the **Actions** tab of your GitHub repository in your web browser. Select the **Workflow** that has now been created and triggered by the change, and select the `example` job.
Expand the **List pods** step of the action, where you can then confirm that the output shows a list of all the pods within your Kubernetes cluster.
### Example: `teleport-actions/database-tunnel`
---
REQUIRED VERSION
This requires use of version 18.6.4 or later of the `tbot` client.
---
The `teleport-actions/database-tunnel` action runs a background `tbot` client that provides a tunnel to a database protected by Teleport using Machine & Workload ID's [`database-tunnel` service](https://goteleport.com/docs/reference/machine-workload-identity/configuration.md#database-tunnel).
In this example, the `psql` client will be used to run a simple query on a Postgres database, but you may use any supported database type with any compatible client. Refer to our [generic database guide](https://goteleport.com/docs/machine-workload-identity/access-guides/databases.md) for more information on accessing databases protected by Teleport in your apps.
Use `tctl edit role/example-bot` to add the following to the role:
```
spec:
allow:
db_labels:
'*': '*'
db_names: [demo-db]
db_users: [demo-user]
rules:
- resources: [db_server, db]
verbs: [read, list]
```
Make sure to adjust the labels, names, and users as necessary to match your desired databases.
With database privileges granted, you can now create the GitHub Actions workflow. Create `.github/workflows/example.yaml`:
```
# This is a basic workflow to help you get started, modify it for your needs.
on:
push:
branches:
- main
jobs:
demo:
permissions:
# The "id-token: write" permission is required or tbot will not be able to
# authenticate with the cluster.
id-token: write
contents: read
name: example
runs-on: ubuntu-latest
steps:
- name: Checkout repository
uses: actions/checkout@v3
- name: Fetch Teleport binaries
uses: teleport-actions/setup@v1
with:
version: auto
# Replace with the address of your Teleport Proxy Service.
proxy: example.teleport.sh:443
- name: Fetch credentials using Machine ID
uses: teleport-actions/database-tunnel@v1
with:
# Replace with the address of your Teleport Proxy Service.
proxy: example.teleport.sh:443
# Use the name of the join token resource you created in step 1.
token: example-bot
# Configure the listener address for the tunnel. Your native database
# client (e.g. `psql`) will connect using this socket address.
listen: tcp://localhost:5432
# The database service name, usually the name of the database server as
# shown in `tsh db ls`
service: postgres
# The name of the specific database to connect to.
database: demo-db
# The username of the database user to connect as.
username: demo-user
# Configure the port for tbot's diagnostics service, used to coordinate
# with the bot in the background. If running multiple background bots
# (app tunnel/proxy, database tunnel, etc), make sure to give each a
# unique port. If unset, the default shown below is used.
diag-port: 57263
# Enable the submission of anonymous usage telemetry. This helps us
# shape the future development of `tbot`. You can disable this by
# omitting this.
anonymous-telemetry: 1
- name: Run a database command
run: |
psql postgres://demo-user@localhost:5432/demo-db -c 'select 1;'
```
Replace:
- `example.teleport.sh:443` with the address of your Teleport Proxy Service.
- `example-bot` with the name of the token you created in a previous step.
- `postgres` with the name of your database server as configured in Teleport.
- `demo-db` with the database name to access.
- `demo-user` with the database username to connect as.
Once the `teleport-actions/database-tunnel` action completes, a database tunnel will be running at the configured port (in this case, `localhost:5432`). You may then access that using `psql` or any other compatible client, depending on your database.
Add, commit, and push this new workflow file to the default branch of your repository.
Navigate to the **Actions** tab of your GitHub repository in your web browser. Select the **Workflow** that has now been created and triggered by the change, and select the `example` job.
Expand the **Run a database command** step of the action, where you can then confirm that the database command was run successfully.
### Example: `teleport-actions/application-tunnel`
---
REQUIRED VERSION
This requires use of version 18.6.4 or later of the `tbot` client.
---
The `teleport-actions/application-tunnel` action runs a background `tbot` client that provides a tunnel to an HTTP or TCP app protected by Teleport using Machine & Workload ID's [`application-tunnel` service](https://goteleport.com/docs/reference/machine-workload-identity/configuration.md#application-tunnel).
Use `tctl edit role/example-bot` to add the following to the role:
```
spec:
allow:
# Grants access to apps with the `env=dev` label.
app_labels:
env: dev
```
Make sure to adjust the label selector in the role to restrict which applications the bot will be allowed to access. For more information, refer to our [dedicated application access guide](https://goteleport.com/docs/machine-workload-identity/access-guides/applications.md).
Once privileges have been granted, you can now create the GitHub Actions workflow. Create `.github/workflows/example.yaml`:
```
# This is a basic workflow to help you get started, modify it for your needs.
on:
push:
branches:
- main
jobs:
demo:
permissions:
# The "id-token: write" permission is required or tbot will not be able to
# authenticate with the cluster.
id-token: write
contents: read
name: example
runs-on: ubuntu-latest
steps:
- name: Checkout repository
uses: actions/checkout@v3
- name: Fetch Teleport binaries
uses: teleport-actions/setup@v1
with:
version: auto
# Replace with the address of your Teleport Proxy Service.
proxy: example.teleport.sh:443
- name: Fetch credentials using Machine ID
uses: teleport-actions/application-tunnel@v1
with:
# Replace with the address of your Teleport Proxy Service.
proxy: example.teleport.sh:443
# Use the name of the join token resource you created in step 1.
token: example-bot
# The name of the app to access.
app: my-application
# Configure the listener address for the app tunnel.
listen: tcp://localhost:1234
# Enable the submission of anonymous usage telemetry. This helps us
# shape the future development of `tbot`. You can disable this by
# omitting this.
anonymous-telemetry: 1
- name: Access the app
run: curl http://localhost:1234
```
Replace:
- `example.teleport.sh:443` with the address of your Teleport Proxy Service.
- `example-bot` with the name of the token you created in a previous step.
- `my-application` with the name of your app as configured in Teleport.
Once run, the `application-tunnel` action opens a tunnel to the selected application on the configured host and port (in this case, `localhost:1234`).
Add, commit, and push this new workflow file to the default branch of your repository.
Navigate to the **Actions** tab of your GitHub repository in your web browser. Select the **Workflow** that has now been created and triggered by the change, and select the `example` job.
Expand the **Access the app** step of the action and confirm that the output shows a valid response from your application.
### Example: `teleport-actions/application-proxy`
---
REQUIRED VERSION
This requires use of version 18.6.4 or later of the `tbot` client.
---
The `teleport-actions/application-proxy` action runs a background `tbot` client that provides a local HTTP proxy server that can be used to access to arbitrary HTTP apps protected by Teleport using Machine & Workload ID's [`application-proxy` service](https://goteleport.com/docs/reference/machine-workload-identity/configuration.md#application-proxy).
While this action only supports HTTP applications, you can access arbitrary apps so long as your bot has been granted appropriate RBAC permissions, so long as your client app can use HTTP proxies (e.g. the `$HTTP_PROXY` environment variable).
Use `tctl edit role/example-bot` to add the following to the role:
```
spec:
allow:
# Grants access to apps with the `env=dev` label.
app_labels:
env: dev
```
Make sure to adjust the label selector in the role to restrict which applications the bot will be allowed to access. For more information, refer to our [dedicated application access guide](https://goteleport.com/docs/machine-workload-identity/access-guides/applications.md).
Once privileges have been granted, you can now create the GitHub Actions workflow. Create `.github/workflows/example.yaml`:
```
# This is a basic workflow to help you get started, modify it for your needs.
on:
push:
branches:
- main
jobs:
demo:
permissions:
# The "id-token: write" permission is required or tbot will not be able to
# authenticate with the cluster.
id-token: write
contents: read
name: example
runs-on: ubuntu-latest
steps:
- name: Checkout repository
uses: actions/checkout@v3
- name: Fetch Teleport binaries
uses: teleport-actions/setup@v1
with:
version: auto
# Replace with the address of your Teleport Proxy Service.
proxy: example.teleport.sh:443
- name: Fetch credentials using Machine ID
uses: teleport-actions/application-proxy@v1
with:
# Replace with the address of your Teleport Proxy Service.
proxy: example.teleport.sh:443
# Use the name of the join token resource you created in step 1.
token: example-bot
# Configure the listener address for the HTTP proxy server.
listen: tcp://localhost:1235
# Configure the port for tbot's diagnostics service, used to coordinate
# with the bot in the background. If running multiple background bots
# (app tunnel/proxy, database tunnel, etc), make sure to give each a
# unique port. If unset, the default shown below is used.
diag-port: 57263
# Enable the submission of anonymous usage telemetry. This helps us
# shape the future development of `tbot`. You can disable this by
# omitting this.
anonymous-telemetry: 1
- name: Perform a request over the application tunnel
run: |
http_proxy=http://localhost:1235 curl http://httpbin/get
```
Replace:
- `example.teleport.sh:443` with the address of your Teleport Proxy Service.
- `example-bot` with the name of the token you created in a previous step.
No specific app name needs to be configured for the application proxy.
Once the action completes, an HTTP proxy server will be running on the configured port (in this case, `http://localhost:1235`). Any application that can use HTTP proxies can then access any app granted to the bot via its role, at `http://APP_NAME/`.
Add, commit, and push this new workflow file to the default branch of your repository.
Navigate to the **Actions** tab of your GitHub repository in your web browser. Select the **Workflow** that has now been created and triggered by the change, and select the `example` job.
Expand the **Perform a request...** step of the action, where you can then confirm that the output shows a successful `curl` request via the proxy.
### Example: Manual configuration
To configure `tbot` manually, a YAML file will be used. In this example we'll commit this to the repository, but this could be generated or created by the CI pipeline itself.
Note that this example uses `tbot`'s "oneshot" mode to output credentials and exit immediately. If you need to use a long running background service, [see below](#example-manual-configuration-with-a-background-service) for a tailored example.
Create `tbot.yaml` within your repository:
```
version: v2
proxy_server: example.teleport.sh:443
onboarding:
join_method: github
token: example-bot
oneshot: true
storage:
type: memory
# services will be filled in during the completion of an access guide.
services: []
```
Replace:
- `example.teleport.sh:443` with the address of your Teleport Proxy Service.
- `example-bot` with the name of the token you created in the second step.
Now you can define a GitHub Actions workflow that will start `tbot` with this configuration.
Create `.github/workflows/example-action.yaml`:
```
# This is a basic workflow to help you get started.
# It will take the following action whenever a push is made to the "main" branch.
on:
push:
branches:
- main
jobs:
demo:
permissions:
# The "id-token: write" permission is required or tbot will not be able to
# authenticate with the cluster.
id-token: write
contents: read
# The name of the workflow, and the Linux distro to be used to perform the
# required steps.
name: guide-demo
runs-on: ubuntu-latest
steps:
- name: Checkout repository
uses: actions/checkout@v3
- name: Fetch Teleport binaries
uses: teleport-actions/setup@v1
with:
version: auto
# Replace with the address of your Teleport Proxy Service.
proxy: example.teleport.sh:443
- name: Execute Machine ID
env:
# TELEPORT_ANONYMOUS_TELEMETRY enables the submission of anonymous
# usage telemetry. This helps us shape the future development of
# tbot. You can disable this by omitting this.
TELEPORT_ANONYMOUS_TELEMETRY: 1
run: tbot start -c ./tbot.yaml --oneshot
```
Add, commit, and push these two files to the repository. Check the GitHub Actions UI to ensure that the workflow has succeeded.
You have now prepared the base configuration for `tbot`. At this point, it identifies itself to the Teleport cluster and renews its own credentials but does not output any credentials for other applications to use.
Follow one of the [access guides](https://goteleport.com/docs/machine-workload-identity/access-guides.md) to configure a service that meets your access needs.
### Example: Manual configuration with a background service
---
REQUIRED VERSION
This requires use of version 18.6.4 or later of the `tbot` client.
---
If you need to have a `tbot` client running in the background to provide a service not directly supported by a dedicated action, like the [`ssh-multiplexer`](https://goteleport.com/docs/reference/machine-workload-identity/configuration.md#ssh-multiplexer) or [`workload-identity-api`](https://goteleport.com/docs/reference/machine-workload-identity/configuration.md#workload-identity-api) services, or just to continually renew certificates for long-running jobs, it is possible to safely run `tbot` in the background with some additional steps.
As in the standard manual configuration steps, create `tbot.yaml` within your repository:
```
version: v2
proxy_server: example.teleport.sh:443
onboarding:
join_method: github
token: example-bot
storage:
type: memory
# services will be filled in during the completion of an access guide.
services: []
```
Replace:
- `example.teleport.sh:443` with the address of your Teleport Proxy Service.
- `example-bot` with the name of the token you created in the first step.
Now you can define a GitHub Actions workflow that will start `tbot` with this configuration.
Create `.github/workflows/example-action.yaml`:
```
# This is a basic workflow to help you get started.
# It will take the following action whenever a push is made to the "main" branch.
on:
push:
branches:
- main
jobs:
demo:
permissions:
# The "id-token: write" permission is required or tbot will not be able to
# authenticate with the cluster.
id-token: write
contents: read
# The name of the workflow, and the Linux distro to be used to perform the
# required steps.
name: guide-demo
runs-on: ubuntu-latest
steps:
- name: Checkout repository
uses: actions/checkout@v3
- name: Fetch Teleport binaries
uses: teleport-actions/setup@v1
with:
version: auto
# Replace with the address of your Teleport Proxy Service.
proxy: example.teleport.sh:443
- name: Start tbot in the background
env:
# TELEPORT_ANONYMOUS_TELEMETRY enables the submission of anonymous
# usage telemetry. This helps us shape the future development of
# tbot. You can disable this by omitting this.
TELEPORT_ANONYMOUS_TELEMETRY: 1
run: nohup tbot start -c ./tbot.yaml --diag-addr localhost:57264 > ./tbot.log 2>&1 &
- name: Wait for tbot to become ready
run: tbot wait --timeout=30s --diag-addr localhost:57264
# Insert other steps that use tbot credentials or services here.
# At the end of the job, this step prints recorded tbot logs for debugging
# purposes (stored in tbot.log).
- name: Print tbot logs
# Logs should be printed regardless of whether or not other job steps fail.
if: always()
run: |
if [ -f ./tbot.log ]; then
cat ./tbot.log
else
echo "No tbot logs found"
fi
```
Add, commit, and push these two files to the repository. Check the GitHub Actions UI to ensure that the workflow has succeeded.
You have now prepared the base configuration for `tbot`. At this point, it identifies itself to the Teleport cluster and renews its own credentials but does not output any credentials for other applications to use.
Follow one of the [access guides](https://goteleport.com/docs/machine-workload-identity/access-guides.md) to configure a service that meets your access needs.
## A note on security implications and risk
Once `teleport-actions/auth` has been used in a workflow job, all successive steps in that job will have access to the credentials which grant access to your Teleport cluster as the bot. Where possible, run as few steps as necessary after this action has been used. It may be a good idea to break your workflow up into multiple jobs in order to segregate these credentials from other code running in your CI/CD pipeline.
Most importantly, ensure that the role you assign to your GitHub Actions bot has access to only the resources in your Teleport cluster that your CI/CD needs to interact with.
## Next steps
- Check out the GitHub Actions for more usage information:
- [teleport-actions/setup](https://github.com/teleport-actions/setup)
- [teleport-actions/auth](https://github.com/teleport-actions/auth)
- [teleport-actions/auth-k8s](https://github.com/teleport-actions/auth-k8s)
- [teleport-actions/auth-application](https://github.com/teleport-actions/auth-application)
- [teleport-actions/database-tunnel](https://github.com/teleport-actions/database-tunnel)
- [teleport-actions/application-tunnel](https://github.com/teleport-actions/application-tunnel)
- [teleport-actions/application-proxy](https://github.com/teleport-actions/application-proxy)
- For more information about the `github` join method, read the [join token reference page](https://goteleport.com/docs/reference/deployment/join-methods.md#github-actions-github)
- Find out more about GitHub Actions itself, read [their documentation](https://docs.github.com/en/actions).
- [More information about `anonymous-telemetry`.](https://goteleport.com/docs/reference/machine-workload-identity/telemetry.md)