
Teleport
Get Started with Teleport
- Version 16.x
- Version 15.x
- Version 14.x
- Version 13.x
- Older Versions
Set Up Teleport Open Source in 5 Minutes | Step-by-Step
Length: 04:36
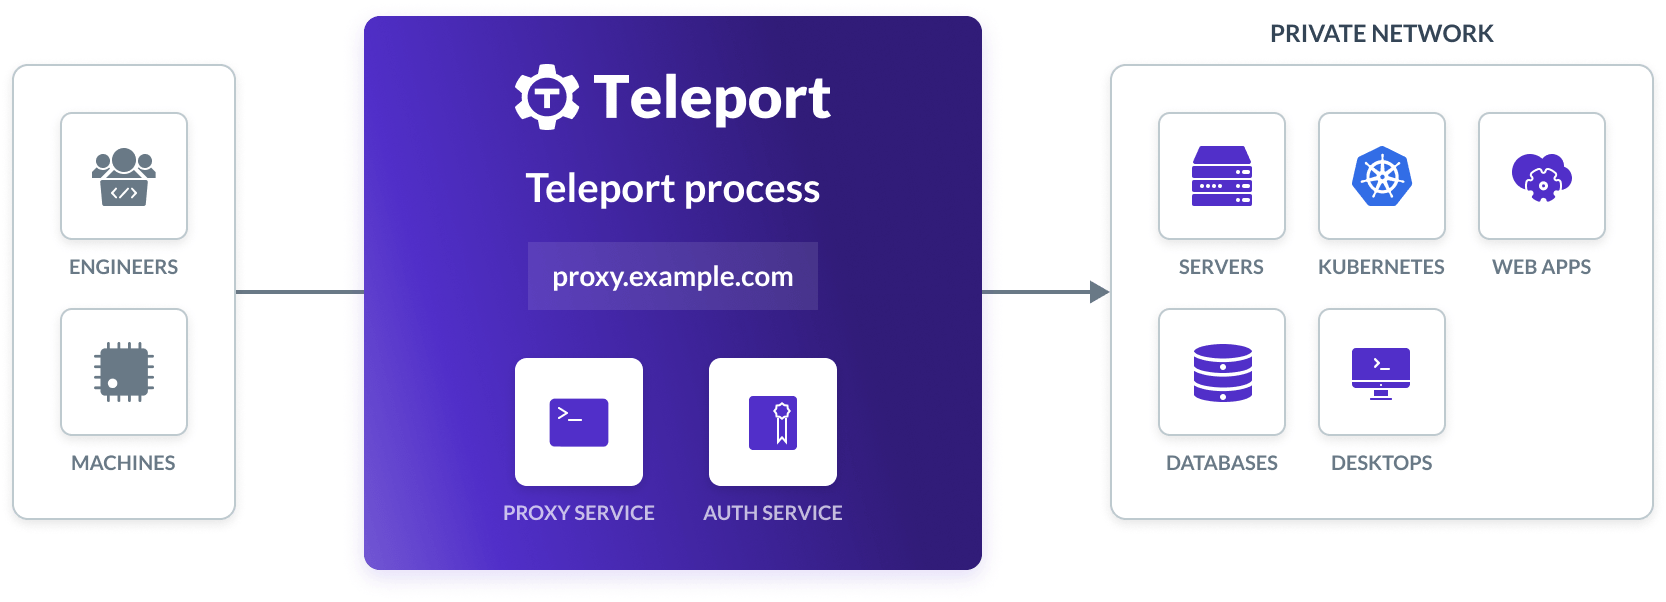
Teleport provides connectivity, authentication, access controls and audit for infrastructure.
It includes an identity-aware access proxy, a CA that issues short-lived certificates, a unified access control system and a tunneling system to access resources behind the firewall.
Teleport understands the SSH, HTTPS, RDP, Kubernetes API, MySQL, MongoDB and PostgreSQL wire protocols, plus many others. It can integrate with Single Sign-On providers and enables you to apply access policies using infrastructure-as-code and GitOps tools.
See how Teleport works by completing the tutorial below. This shows you how to spin up a single-instance Teleport cluster on a Linux server using Teleport Community Edition. Once you deploy the cluster, you can configure RBAC, register resources, and protect your small-scale demo environments or home lab.
You can also get started right away with a production-ready Teleport cluster by signing up for a free trial of Teleport Enterprise Cloud.
Set up a demo cluster
We will run the following Teleport services:
- Teleport Auth Service: The certificate authority for your cluster. It issues certificates and conducts authentication challenges. The Auth Service is typically inaccessible outside your private network.
- Teleport Proxy Service: The cluster frontend, which handles user requests, forwards user credentials to the Auth Service, and communicates with Teleport instances that enable access to specific resources in your infrastructure.
- Teleport SSH Service: An SSH server implementation that takes advantage of Teleport's short-lived certificates, sophisticated RBAC, session recording, and other features.
Prerequisites
You will need the following to deploy a demo Teleport cluster. If your environment doesn't meet the prerequisites, you can get started with Teleport by signing up for a free trial of Teleport Enterprise Cloud.
If you want to get a feel for Teleport commands and capabilities without setting up any infrastructure, take a look at the browser-based Teleport Labs.
-
A Linux host with only port
443open to ingress traffic. You must be able to install and run software on the host. Either configure access to the host via SSH for the initial setup (and open an SSH port in addition port443) or enter the commands in this guide into an Amazon EC2 user data script, Google Compute Engine startup script, or similar.For a quick demo environment you can use to follow this guide, consider installing our DigitalOcean 1-Click droplet. View the installation page on DigitalOcean Marketplace. Once your droplet is ready, SSH into the droplet and follow the configuration wizard.
-
A multi-factor authenticator app such as Authy, Google Authenticator, or 1Password.
You must also have one of the following:
- A registered domain name.
- An authoritative DNS nameserver managed by your organization, plus an existing certificate authority. If using this approach, ensure that your browser is configured to use your organization's nameserver.
Step 1/4. Configure DNS
Teleport uses TLS to provide secure access to its Proxy Service and Auth
Service, and this requires a domain name that clients can use to verify
Teleport's certificate. Set up two DNS A records, each pointing to the IP
address of your Linux host. Assuming teleport.example.com is your domain name,
set up records for:
| Domain | Reason |
|---|---|
teleport.example.com | Traffic to the Proxy Service from users and services. |
*.teleport.example.com | Traffic to web applications registered with Teleport. Teleport issues a subdomain of your cluster's domain name to each application. |
Step 2/4. Set up Teleport on your Linux host
Install Teleport
On your Linux host, run the following command to install the Teleport binary:
curl https://goteleport.com/static/install.sh | bash -s 15.2.2
Configure Teleport
Generate a configuration file for Teleport using the teleport configure command.
This command requires information about a TLS certificate and private key.
If you are running Teleport on the internet, we recommend using Let's Encrypt to receive your key and certificate automatically. For private networks or custom deployments, use your own private key and certificate.
Let's Encrypt verifies that you control the domain name of your Teleport cluster by communicating with the HTTPS server listening on port 443 of your Teleport Proxy Service.
You can configure the Teleport Proxy Service to complete the Let's Encrypt verification process when it starts up.
On the host where you will start the Teleport Auth Service and Proxy Service,
run the following teleport configure command. Assign
tele.example.com to the
domain name of your Teleport cluster and [email protected] to
an email address used for notifications (you can use any domain):
sudo teleport configure -o file \ --acme --acme-email=[email protected] \ --cluster-name=tele.example.com
Port 443 on your Teleport Proxy Service host must allow traffic from all sources.
On your Teleport host, place a valid private key and a certificate chain in /var/lib/teleport/privkey.pem
and /var/lib/teleport/fullchain.pem respectively.
The leaf certificate must have a subject that corresponds to the domain of your Teleport host, e.g., *.teleport.example.com.
On the host where you will start the Teleport Auth Service and Proxy Service,
run the following teleport configure command. Assign tele.example.com to the domain name of your Teleport cluster.
sudo teleport configure -o file \ --cluster-name=tele.example.com \ --public-addr=tele.example.com:443 \ --cert-file=/var/lib/teleport/fullchain.pem \ --key-file=/var/lib/teleport/privkey.pem
Start Teleport
Configure your Teleport instance to start automatically when the host boots up by creating a systemd service for it. The instructions depend on how you installed your Teleport instance.
On the host where you will run your Teleport instance, enable and start Teleport:
sudo systemctl enable teleportsudo systemctl start teleport
On the host where you will run your Teleport instance, create a systemd service configuration for Teleport, enable the Teleport service, and start Teleport:
sudo teleport install systemd -o /etc/systemd/system/teleport.servicesudo systemctl enable teleportsudo systemctl start teleport
You can check the status of your Teleport instance with systemctl status teleport
and view its logs with journalctl -fu teleport.
Access Teleport's Web UI via HTTPS at the domain you created earlier (e.g.,
https://teleport.example.com). You should see a welcome screen similar to the
following:
Step 3/4. Create a Teleport user and set up multi-factor authentication
In this step, we'll create a new Teleport user, teleport-admin, which is
allowed to log into SSH hosts as any of the principals root, ubuntu, or
ec2-user.
On your Linux host, run the following command:
tctl is an administrative tool that is used to configure Teleport's auth service.
sudo tctl users add teleport-admin --roles=editor,access --logins=root,ubuntu,ec2-user
The command prints a message similar to the following:
User "teleport-admin" has been created but requires a password. Share this URL with the user to complete user setup, link is valid for 1h:
https://teleport.example.com:443/web/invite/123abc456def789ghi123abc456def78

NOTE: Make sure teleport.example.com:443 points at a Teleport proxy which users can access.
Visit the provided URL in order to create your Teleport user.
The users that you specify in the logins flag (e.g., root, ubuntu and
ec2-user in our examples) must exist on your Linux host. Otherwise, you
will get authentication errors later in this tutorial.
If a user does not already exist, you can create it with adduser <login> or
use host user creation.
If you do not have the permission to create new users on the Linux host, run
tctl users add teleport $(whoami) to explicitly allow Teleport to
authenticate as the user that you have currently logged in as.
Teleport enforces the use of multi-factor authentication by default. It supports one-time passwords (OTP) and multi-factor authenticators (WebAuthn). In this guide, you will need to enroll an OTP authenticator application using the QR code on the Teleport welcome screen.
In addition to Teleport's Web UI, you can access resources in your
infrastructure via the tsh client tool.
Install tsh on your local workstation:
Download the signed macOS .pkg installer for tsh. In Finder double-click the pkg file to install it:
curl -O https://cdn.teleport.dev/tsh-15.2.2.pkg
brew install teleport
The Teleport package in Homebrew is not maintained by Teleport and we can't guarantee its reliability or security. We recommend the use of our own Teleport packages.
If you choose to use Homebrew, you must verify that the versions of tsh and
tctl are compatible with the versions you run server-side. Homebrew usually
ships the latest release of Teleport, which may be incompatible with older
versions. See our compatibility policy for details.
curl.exe -O https://cdn.teleport.dev/teleport-v15.2.2-windows-amd64-bin.zipUnzip the archive and move `tsh.exe` to your %PATH%
tsh is included with all of the Teleport binaries in Linux installations.
For more options (including RPM/DEB packages and downloads for i386/ARM/ARM64) please see our installation page.
curl -O https://cdn.teleport.dev/teleport-v15.2.2-linux-amd64-bin.tar.gztar -xzf teleport-v15.2.2-linux-amd64-bin.tar.gzcd teleportsudo ./installTeleport binaries have been copied to /usr/local/bin
Log in to receive short-lived certificates from Teleport:
Replace teleport.example.com with your Teleport cluster's public address as configured above.
tsh login --proxy=teleport.example.com --user=teleport-admin> Profile URL: https://teleport.example.com:443 Logged in as: teleport-admin Cluster: teleport.example.com Roles: access, editor Logins: root, ubuntu, ec2-user Kubernetes: enabled Valid until: 2022-04-26 03:04:46 -0400 EDT [valid for 12h0m0s] Extensions: permit-agent-forwarding, permit-port-forwarding, permit-pty
Step 4/4. Enroll your infrastructure
With Teleport, you can protect all of the resources in your infrastructure behind a single identity-aware access proxy, including servers, databases, applications, Kubernetes clusters, Windows desktops, and cloud provider APIs.
To enroll a resource with Teleport, visit the Web UI and click Enroll New Resource. The Web UI will show you the steps you can take to enroll your new resource.
On the home page of the Web UI, you can see that you have already enrolled your Linux server.
Next step: deploy agents
Teleport agents proxy traffic to infrastructure resources like servers, databases, Kubernetes clusters, cloud provider APIs, and Windows desktops.
Step 4 showed you how to install agents manually, and you can also launch agents and enroll resources with them using infrastructure-as-code tools. For example, you can use Terraform to declare a pool of Teleport agents and configure them to proxy your infrastructure. Read Deploy Teleport Agents with Terraform to get started.