
Teleport
Dual Authorization
- Version 16.x
- Version 15.x
- Version 14.x
- Version 13.x
- Older Versions
Teleport Role-based access request
Length: 01:17
You can set up Teleport to require the approval of multiple team members to perform some critical actions. Here are the most common scenarios:
- Improve the security of your system and prevent one successful phishing attack from compromising your system.
- Satisfy FedRAMP AC-3 Dual authorization control that requires approval of two authorized individuals.
In this guide, we will set up Teleport's Just-in-Time Access Requests to require
the approval of two team members for a privileged role dbadmin.
The steps below describe how to use Teleport with Mattermost. You can also integrate with many other providers.
Dual Authorization requires Teleport Enterprise.
Prerequisites
- Mattermost installed.
-
A running Teleport cluster. If you want to get started with Teleport, sign up for a free trial.
-
The Enterprise
tctladmin tool andtshclient tool version >= 15.2.2, which you can download from your Teleport account workspace or the Teleport Enterprise Cloud Downloads page.
docker run --name mattermost-preview -d --publish 8065:8065 --add-host dockerhost:127.0.0.1 mattermost/mattermost-preview
- To check that you can connect to your Teleport cluster, sign in with
tsh login, then verify that you can runtctlcommands using your current credentials.tctlis supported on macOS and Linux machines. For example:If you can connect to the cluster and run thetsh login --proxy=teleport.example.com --user=[email protected]tctl statusCluster teleport.example.com
Version 15.2.2
CA pin sha256:abdc1245efgh5678abdc1245efgh5678abdc1245efgh5678abdc1245efgh5678
tctl statuscommand, you can use your current credentials to run subsequenttctlcommands from your workstation. If you host your own Teleport cluster, you can also runtctlcommands on the computer that hosts the Teleport Auth Service for full permissions.
Step 1/3. Set up a Teleport bot
Create a bot within Mattermost
Enable bot account creation in "System Console -> Integrations".
Toggle Enable Bot Account Creation.
Go back to your team settings, navigate to "Integrations -> Bot Accounts". Press "Add Bot Account".
Add the "Post All" permission on the new account.
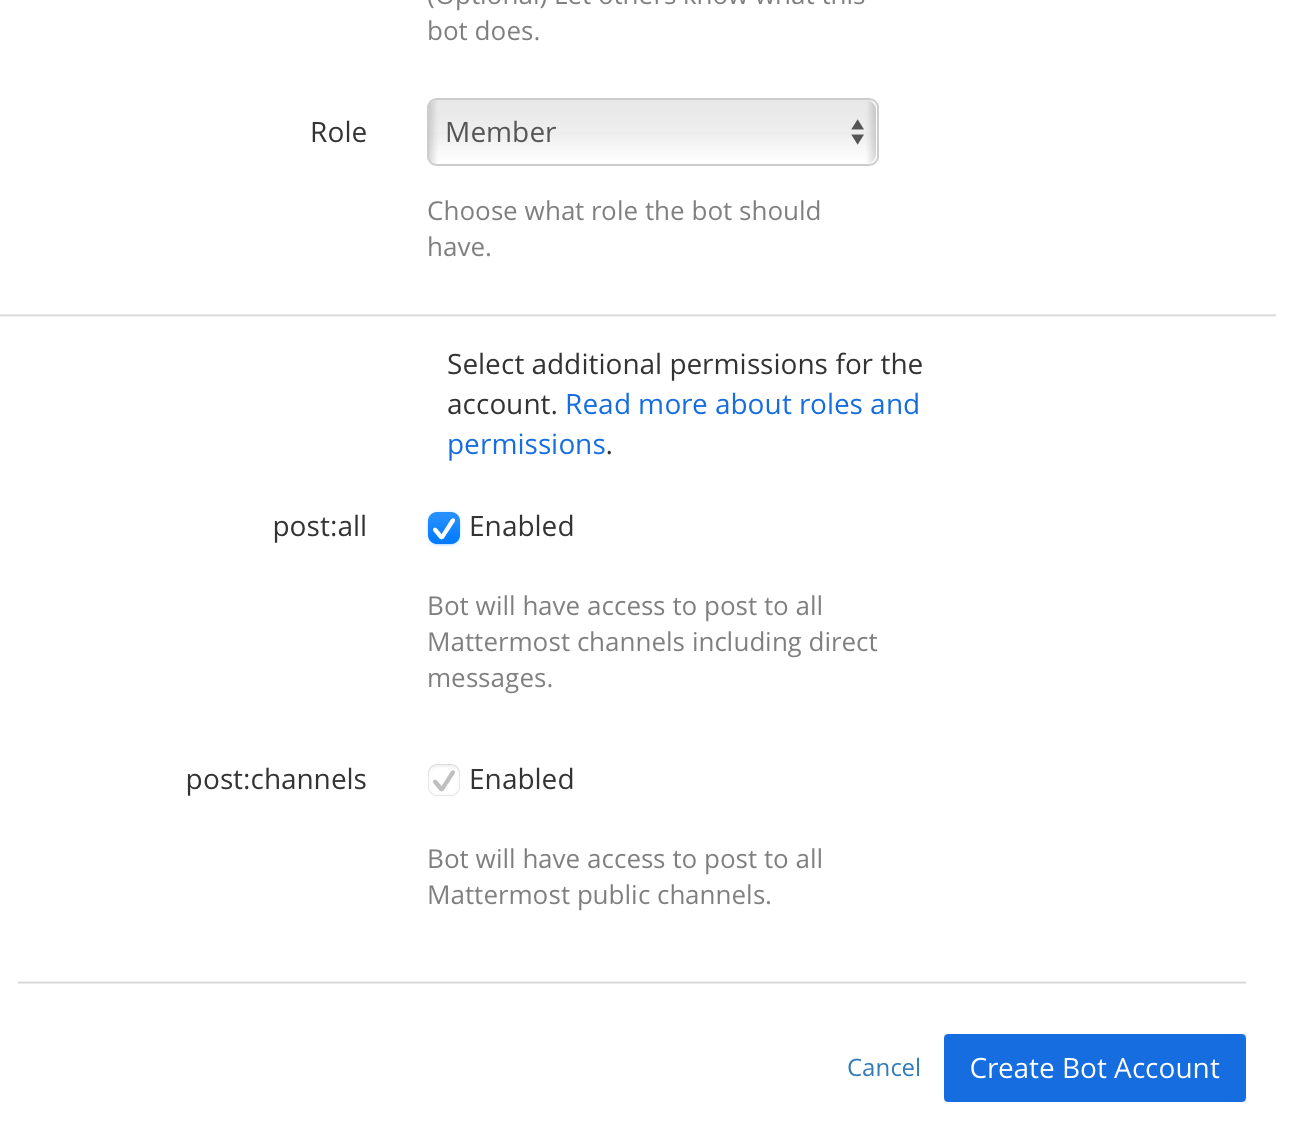
Create the bot and save the access token.
Set up RBAC for the plugin
Teleport's Access Request plugins authenticate to your Teleport cluster as a user with permissions to list and read Access Requests. This way, plugins can retrieve Access Requests from the Teleport Auth Service and present them to reviewers.
Define a user and role called access-plugin by adding the following content to
a file called access-plugin.yaml:
kind: role
version: v5
metadata:
  name: access-plugin
spec:
  allow:
    rules:
      - resources: ['access_request']
        verbs: ['list', 'read']
      - resources: ['access_plugin_data']
        verbs: ['update']
---
kind: user
metadata:
  name: access-plugin
spec:
  roles: ['access-plugin']
version: v2
Create the user and role:
tctl create -f access-plugin.yaml
As with all Teleport users, the Teleport Auth Service authenticates the
access-plugin user by issuing short-lived TLS credentials. In this case, we
will need to request the credentials manually by impersonating the
access-plugin role and user.
If you are running a self-hosted Teleport Enterprise deployment and are using
tctl from the Auth Service host, you will already have impersonation
privileges.
To grant your user impersonation privileges for access-plugin, define a role
called access-plugin-impersonator by pasting the following YAML document into
a file called access-plugin-impersonator.yaml:
kind: role
version: v5
metadata:
  name: access-plugin-impersonator
spec:
  allow:
    impersonate:
      roles:
      - access-plugin
      users:
      - access-plugin
Create the access-plugin-impersonator role:
tctl create -f access-plugin-impersonator.yaml
If you are providing identity files to the plugin with Machine ID, assign the
access-plugin role to the Machine ID bot user. Otherwise, assign this role to
the user you plan to use to generate credentials for the access-plugin role
and user:
Assign the access-plugin-impersonator role to your Teleport user by running the appropriate
commands for your authentication provider:
-
Retrieve your local user's roles as a comma-separated list:
ROLES=$(tsh status -f json | jq -r '.active.roles | join(",")') -
Edit your local user to add the new role:
tctl users update $(tsh status -f json | jq -r '.active.username') \ --set-roles "${ROLES?},access-plugin-impersonator" -
Sign out of the Teleport cluster and sign in again to assume the new role.
-
Retrieve your
githubauthentication connector:tctl get github/github --with-secrets > github.yamlNote that the
--with-secretsflag adds the value ofspec.signing_key_pair.private_keyto thegithub.yamlfile. Because this key contains a sensitive value, you should remove the github.yaml file immediately after updating the resource. -
Edit
github.yaml, addingaccess-plugin-impersonatorto theteams_to_rolessection.The team you should map to this role depends on how you have designed your organization's role-based access controls (RBAC). However, the team must include your user account and should be the smallest team possible within your organization.
Here is an example:
teams_to_roles: - organization: octocats team: admins roles: - access + - access-plugin-impersonator -
Apply your changes:
tctl create -f github.yaml -
Sign out of the Teleport cluster and sign in again to assume the new role.
-
Retrieve your
samlconfiguration resource:tctl get --with-secrets saml/mysaml > saml.yamlNote that the
--with-secretsflag adds the value ofspec.signing_key_pair.private_keyto thesaml.yamlfile. Because this key contains a sensitive value, you should remove the saml.yaml file immediately after updating the resource. -
Edit
saml.yaml, addingaccess-plugin-impersonatorto theattributes_to_rolessection.The attribute you should map to this role depends on how you have designed your organization's role-based access controls (RBAC). However, the group must include your user account and should be the smallest group possible within your organization.
Here is an example:
attributes_to_roles: - name: "groups" value: "my-group" roles: - access + - access-plugin-impersonator -
Apply your changes:
tctl create -f saml.yaml -
Sign out of the Teleport cluster and sign in again to assume the new role.
-
Retrieve your
oidcconfiguration resource:tctl get oidc/myoidc --with-secrets > oidc.yamlNote that the
--with-secretsflag adds the value ofspec.signing_key_pair.private_keyto theoidc.yamlfile. Because this key contains a sensitive value, you should remove the oidc.yaml file immediately after updating the resource. -
Edit
oidc.yaml, addingaccess-plugin-impersonatorto theclaims_to_rolessection.The claim you should map to this role depends on how you have designed your organization's role-based access controls (RBAC). However, the group must include your user account and should be the smallest group possible within your organization.
Here is an example:
claims_to_roles: - name: "groups" value: "my-group" roles: - access + - access-plugin-impersonator -
Apply your changes:
tctl create -f oidc.yaml -
Sign out of the Teleport cluster and sign in again to assume the new role.
You will now be able to generate signed certificates for the access-plugin
role and user.
Export the access-plugin identity files
Like all Teleport users, access-plugin needs signed credentials in order to
connect to your Teleport cluster. You will use the tctl auth sign command to
request these credentials.
The following tctl auth sign command impersonates the access-plugin user,
generates signed credentials, and writes an identity file to the local
directory:
tctl auth sign --user=access-plugin --out=identity
The plugin connects to the Teleport Auth Service's gRPC endpoint over TLS.
The identity file, identity, includes both TLS and SSH credentials. The
plugin uses the SSH credentials to connect to the Proxy Service, which
establishes a reverse tunnel connection to the Auth Service. The plugin
uses this reverse tunnel, along with your TLS credentials, to connect to the
Auth Service's gRPC endpoint.
By default, tctl auth sign produces certificates with a relatively short
lifetime. For production deployments, we suggest using Machine
ID to programmatically issue and renew
certificates for your plugin. See our Machine ID getting started
guide to learn more.
Note that you cannot issue certificates that are valid longer than your existing credentials.
For example, to issue certificates with a 1000-hour TTL, you must be logged in with a session that is
valid for at least 1000 hours. This means your user must have a role allowing
a max_session_ttl of at least 1000 hours (60000 minutes), and you must specify a --ttl
when logging in:
tsh login --proxy=teleport.example.com --ttl=60060
If you are running the plugin on a Linux server, create a data directory to hold certificate files for the plugin:
sudo mkdir -p /var/lib/teleport/api-credentialssudo mv identity /var/lib/teleport/plugins/api-credentials
If you are running the plugin on Kubernetes, Create a Kubernetes secret that contains the Teleport identity file:
kubectl -n teleport create secret generic --from-file=identity plugin-identity
Once the Teleport credentials expire, you will need to renew them by running the
tctl auth sign command again.
We'll reference the exported file(s) later when configuring the plugin.
Install the plugin
curl -L https://get.gravitational.com/teleport-access-mattermost-v15.2.2-linux-amd64-bin.tar.gztar -xzf teleport-access-mattermost-v15.2.2-linux-amd64-bin.tar.gzcd teleport-access-mattermost./install
To install from source you need git and go >= 1.21 installed.
Checkout teleport-plugins
git clone https://github.com/gravitational/teleport-plugins.gitcd teleport-plugins/access/mattermostmake
teleport-mattermost configure > /etc/teleport-mattermost.toml
Update the config with the Teleport address, Mattermost URL, and a bot token:
# example mattermost configuration TOML file
[teleport]
auth_server = "myinstance.teleport.sh:443"                   # Teleport Cloud proxy HTTPS address
identity = "/var/lib/teleport/plugins/mattermost/identity"   # Identity file path
refresh_identity = true                                      # Refresh identity file on a periodic basis.

[mattermost]
url = "https://mattermost.example.com" # Mattermost Server URL
team = "team-name"                     # Mattermost team in which the channel resides.
channel = "channel-name"               # Mattermost Channel name to post requests to
token = "api-token"                    # Mattermost Bot OAuth token
secret = "signing-secret-value"        # Mattermost API signing Secret

[http]
public_addr = "example.com" # URL on which callback server is accessible externally, e.g. [https://]teleport-mattermost.example.com
# listen_addr = ":8081" # Network address in format [addr]:port on which callback server listens, e.g. 0.0.0.0:443
https_key_file = "/var/lib/teleport/plugins/mattermost/server.key"  # TLS private key
https_cert_file = "/var/lib/teleport/plugins/mattermost/server.crt" # TLS certificate

[log]
output = "stderr" # Logger output. Could be "stdout", "stderr" or "/var/lib/teleport/mattermost.log"
severity = "INFO" # Logger severity. Could be "INFO", "ERROR", "DEBUG" or "WARN".
Step 2/3. Configure dual authorization
In this section, we will use an example to show you how to require dual authorization for a user to assume a role.
Require dual authorization for a role
Alice and Ivan are reviewers. They can approve requests for assuming role
dbadmin. Bob is a DevOps engineer and can assume the dbadmin role if two members
of the reviewer role approve the request.
Create the following dbadmin, dbreviewer and devops roles:
kind: role
version: v5
metadata:
  name: dbreviewer
spec:
  allow:
    review_requests:
      roles: ['dbadmin']
---
kind: role
version: v5
metadata:
  name: devops
spec:
  allow:
    request:
      roles: ['dbadmin']
      thresholds:
        - approve: 2
          deny: 1
---
kind: role
version: v5
metadata:
  name: dbadmin
spec:
  allow:
    logins: ['root']
    node_labels:
      'env': 'prod'
      'type': 'db'
The commands below create the local users Bob, Alice, and Ivan.
tctl users add [email protected] --roles=devopstctl users add [email protected] --roles=dbreviewertctl users add [email protected] --roles=dbreviewer
Create an Access Request
Bob does not have a role dbadmin assigned to him, but can create an Access Request for it.
Bob can create an Access Request for the dbadmin role in the Web UI or CLI:
Bob has to set valid emails of Alice and Ivan matching in Mattermost.
tsh request create --roles=dbadmin [email protected],[email protected]
Chatbot will notify both Alice and Ivan:
Alice and Ivan can review and approve request using Web UI or CLI:
tsh request listID User Roles Created (UTC) Status
------------------------------------ --------------- ------- ------------------- -------
9c721e54-b049-4ef8-a7f6-c777aa066764 [email protected] dbadmin 03 Apr 21 03:58 UTC PENDING
tsh request review --approve --reason="hello" 9c721e54-b049-4ef8-a7f6-c777aa066764Successfully submitted review. Request state: APPROVED
If Bob has created a request using CLI, he will assume it once it has been approved. Bob can also assume granted Access Request roles using Web UI:
Troubleshooting
Certificate errors in self-hosted deployments
You may be getting certificate errors if Teleport's Auth Service is missing an address in the server certificate:
authentication handshake failed: x509: cannot validate certificate for 127.0.0.1 because it doesn't contain any IP SANs
x509: certificate is valid for,*.teleport.cluster.local, teleport.cluster.local, not example.com
To fix the problem, update the Auth Service with a public address, and restart Teleport:
auth_service:
  public_addr: ['localhost:3025', 'example.com:3025']