Teleport Blog - Amazon EC2 Just-in-time Access With Teleport and Slack - Apr 13, 2022
Amazon EC2 Just-in-time Access With Teleport and Slack
This blog is part three in a series about identity-based access and management of AWS resources. In Part I, we covered how to use OSS Teleport to access Amazon EC2 instances running in private subnets. Part II explained implementing identity-based access via SSO integration with Okta. In Part III, we will guide you through the steps to configure privilege escalation for just-in-time access requests.
Please visit https://goteleport.com/docs/access-controls/access-request-plugins/ssh-approval-slack/ for the most up-to-date instructions.
Just-in-time privilege escalation with Teleport RBAC and Slack
The just-in-time privilege elevation mechanism limits the time for which privileged access is enabled on a critical system. Admins, users, applications and scripts can only access sensitive information when necessary and only for the length of time necessary to accomplish their tasks.
ChatOps is a term that refers to conversation-driven operations based on instant messaging and notification platforms such as Slack, Jira, and PagerDuty. When DevOps workflows need a human in the loop, ChatOps becomes a valuable approach. It notifies users and teams about potential outages and incidents and even prompts them to approve or deny requests.
By combining just-in-time privilege elevation with ChatOps, administrators are notified allowing them to interactively approve timebound privilege escalation requests.
With Teleport Enterprise, customers can leverage RBAC, access requests and Slack integration to implement highly efficient workflows for temporary privilege escalation.
Let's consider a scenario where an AWS enterprise customer has outsourced DevOps to a third-party managed service provider. The external service providers are managed by a full-time employee (team leader) who is authorized to approve or deny privileged access requests. To avoid unwanted exposure resulting in credential exploitation and misconfiguration, the organization wants to implement just-in-time privilege elevation that should expire after a specified period of time.
For example, a contractor from the service provider’s team will have to request root access to perform DBA operations on a database server once a week. Since these operations can be completed within an hour, the team leader approves the escalation request that’s valid only for an hour. The privilege elevation request is sent to the team leader via a Slack channel through which he can approve or deny the request. After the time window expires, the contractor no longer has root access to the DB server.
We will go through the steps necessary to implement this scenario. The prerequisites are:
- AWS Account
- AWS CLI
- DNS Service
- Slack Account
- Teleport Enterprise (signup for a free trial here)
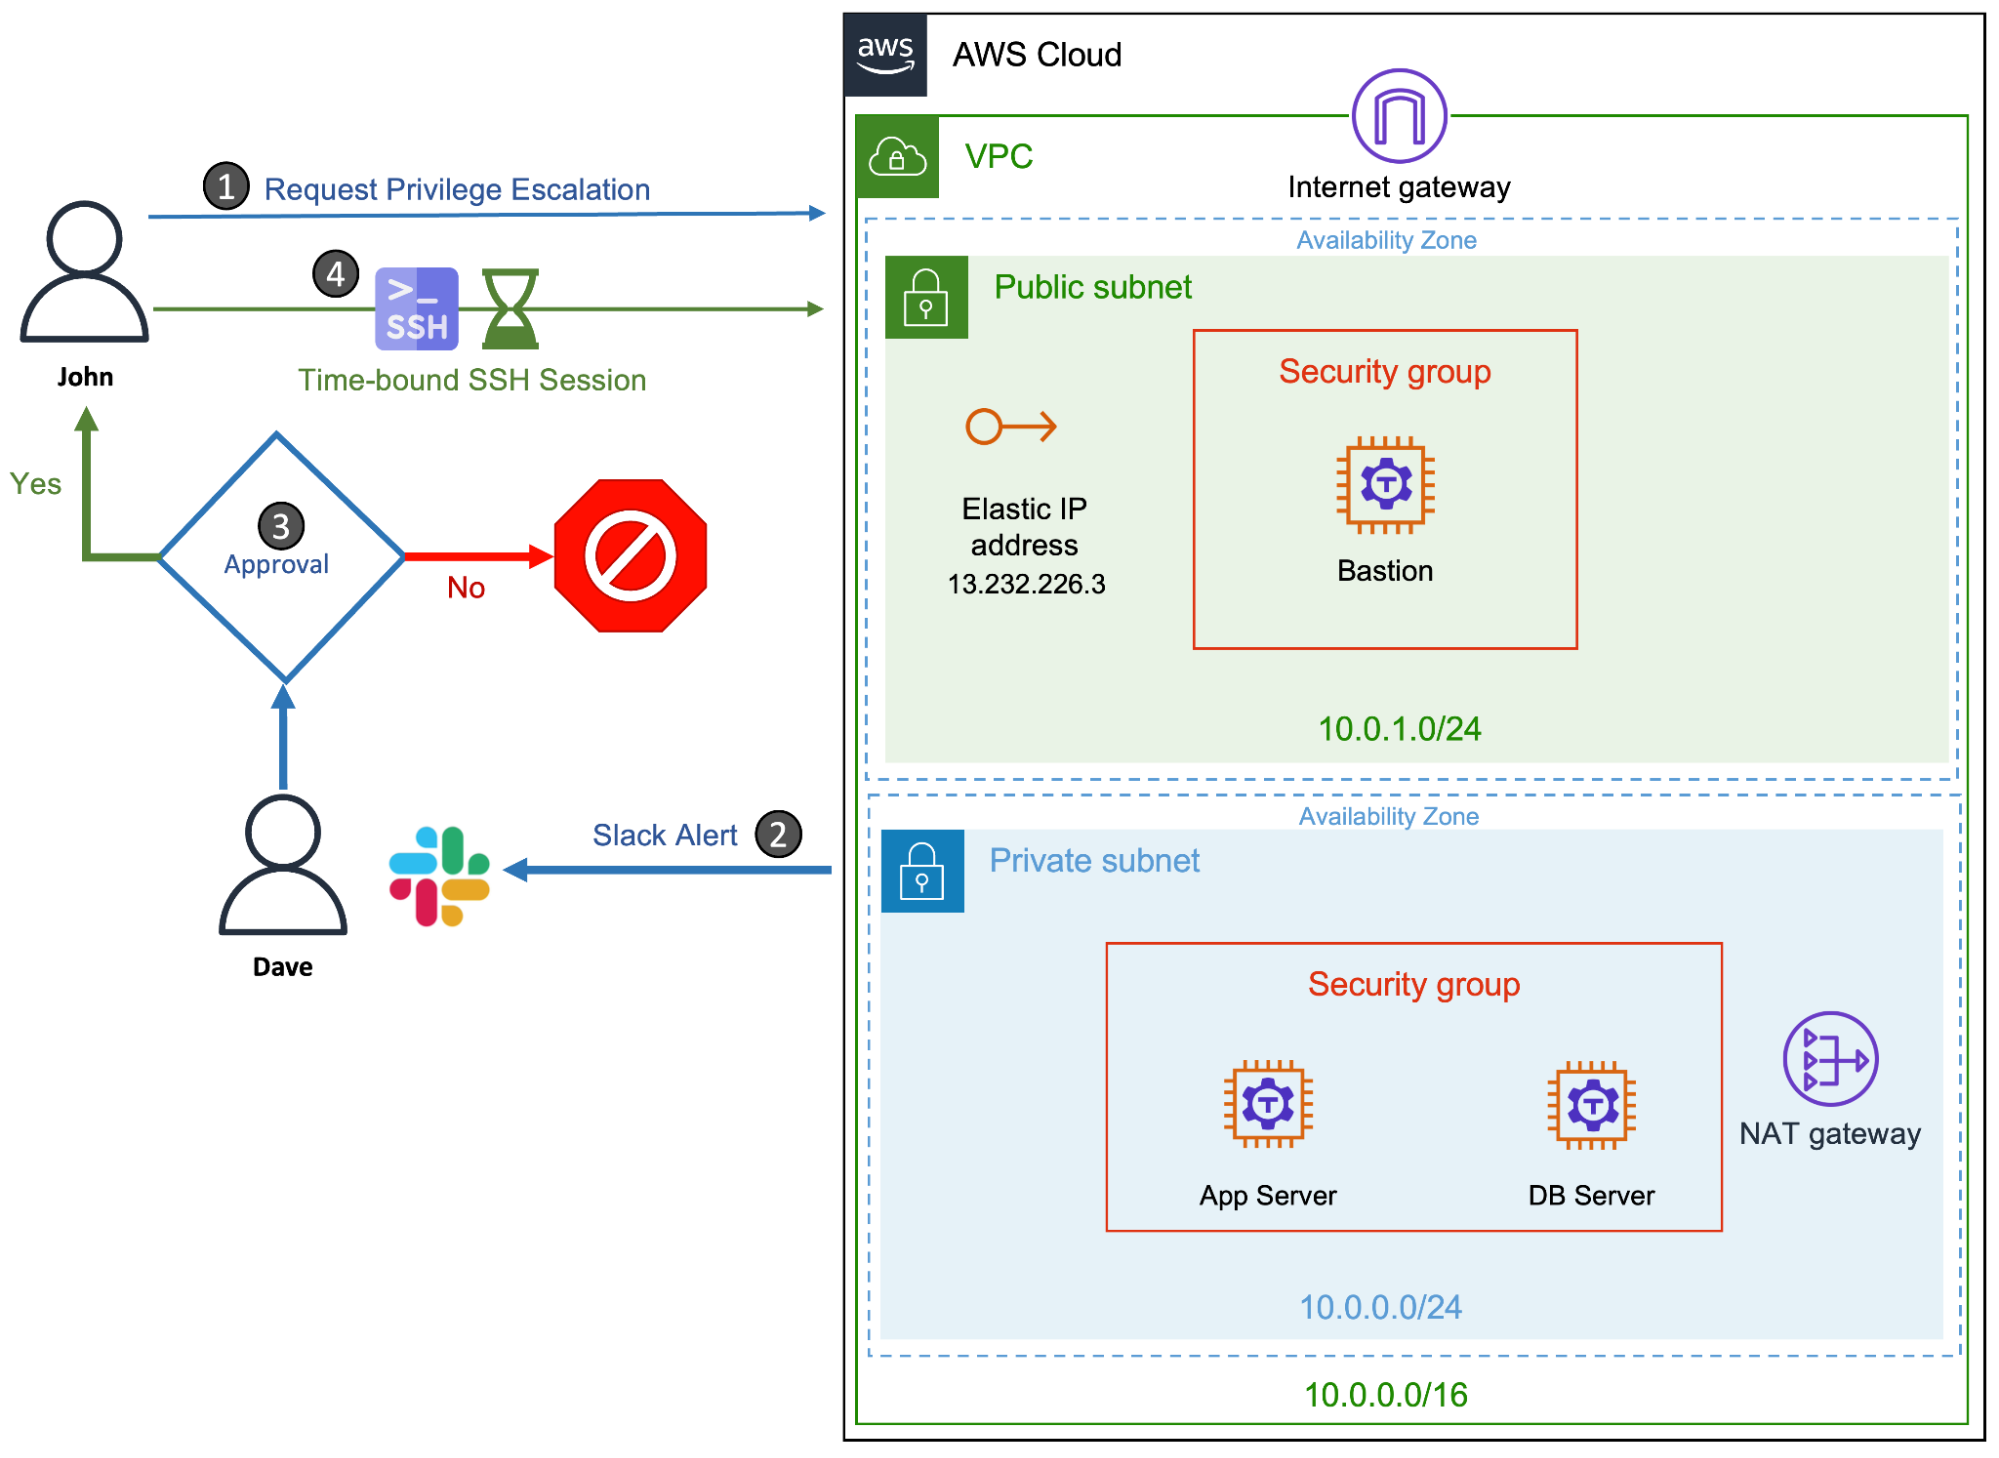
Since this tutorial builds upon the previous scenario of setting up Teleport as an AWS bastion host, please take a look at the steps involved in provisioning the AWS infrastructure including the VPC, security groups, Internet gateway, NAT gateway and routing tables. You also need to provision Amazon EC2 instances and install Teleport Enterprise software. For a detailed walkthrough, refer to the second tutorial of this series.
Before getting started, ensure that you have the below topology:
This tutorial also assumes that you have created a local user account, tele-admin, in Teleport with editor and access roles. Refer to the previous blog for the details on adding the local account to Teleport.
Step 1 - Creating roles and users in Teleport Enterprise
Let's start by creating Linux users, Teleport users and Teleport roles needed for this scenario.
SSH into the EC2 instance representing the database server and create two Linux users - a regular user and a user with sudo privileges.
$ tsh ssh ubuntu@dbserver

$ sudo adduser john

$ sudo adduser dba
$ sudo usermod -aG sudo dba
The account, john, will be used by the contractor to access the database server. Occasionally, the same user may have to SSH as dba - a user with elevated privileges - to perform maintenance activities on the server.
Assuming that you have signed into Teleport proxy as user tele-admin, create three roles in Teleport — contractor, dba and team-lead.
$ vi contractor.yaml
kind: role
version: v5
metadata:
  name: contractor
spec:
  allow:
    logins: ['john']
    node_labels:
      name: dbserver
    request:
      roles: ['dba']
  deny:
    node_labels:
      name: appserver

$ tctl create -f contractor.yaml
The above definition creates a role that explicitly allows access to the dbserver as user john, which we created in the EC2 instance (dbserver). It also lets the user request for privilege escalation by elevating the role to a dba.
Now, let's create the dba role.
$ vi dba.yaml
kind: role
version: v5
metadata:
  name: dba
spec:
  allow:
    logins: ['dba']
    node_labels:
      name: dbserver
  deny:
    node_labels:
      name: appserver
  options:
    max_session_ttl: 1h

$ tctl create -f dba.yaml
This role is similar to the contractor role except that it allows the user to SSH as a dba user. The session is configured to expire in one hour through the setting, max_session_ttl: 1h
Finally, let's create the team-lead role that's critical to implementing just-in-time privilege escalation.
$ vi team-lead.yaml
kind: role
version: v5
metadata:
  name: team-lead
spec:
  allow:
    impersonate:
       users: ['*']
       roles: ['*']
    review_requests:
      roles:
      - 'dba'
    rules:
    - resources:
      - access_request
      verbs:
      - list
      - read
      - update
      - delete

$ tctl create -f team-lead.yaml
The above role will be assigned to a full-time employee who has permission to approve privilege escalation requests. They can list the requests and then decide to approve or reject them.
With the roles in place, let's go ahead and create users in Teleport Enterprise that are assigned to respective roles.
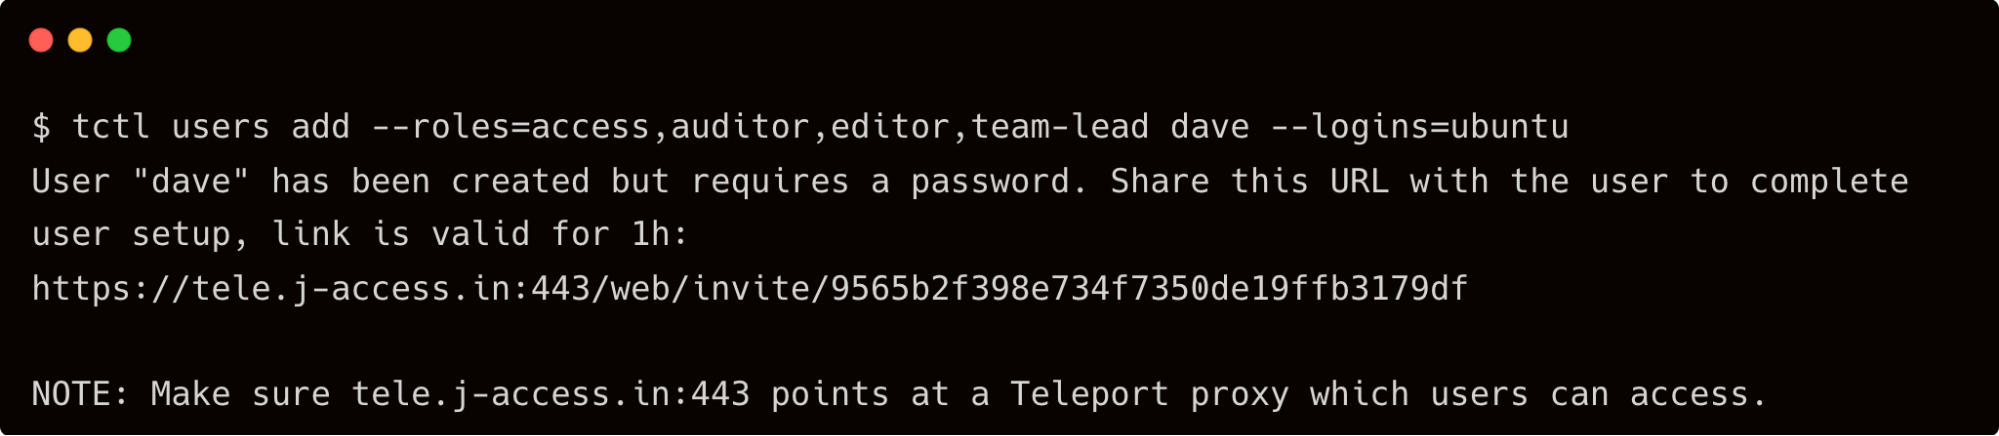
First, let's create a user, dave, who assumes the role of the team lead and Teleport admin.
$ tctl users add --roles=access,auditor,editor,team-lead dave --logins=ubuntu
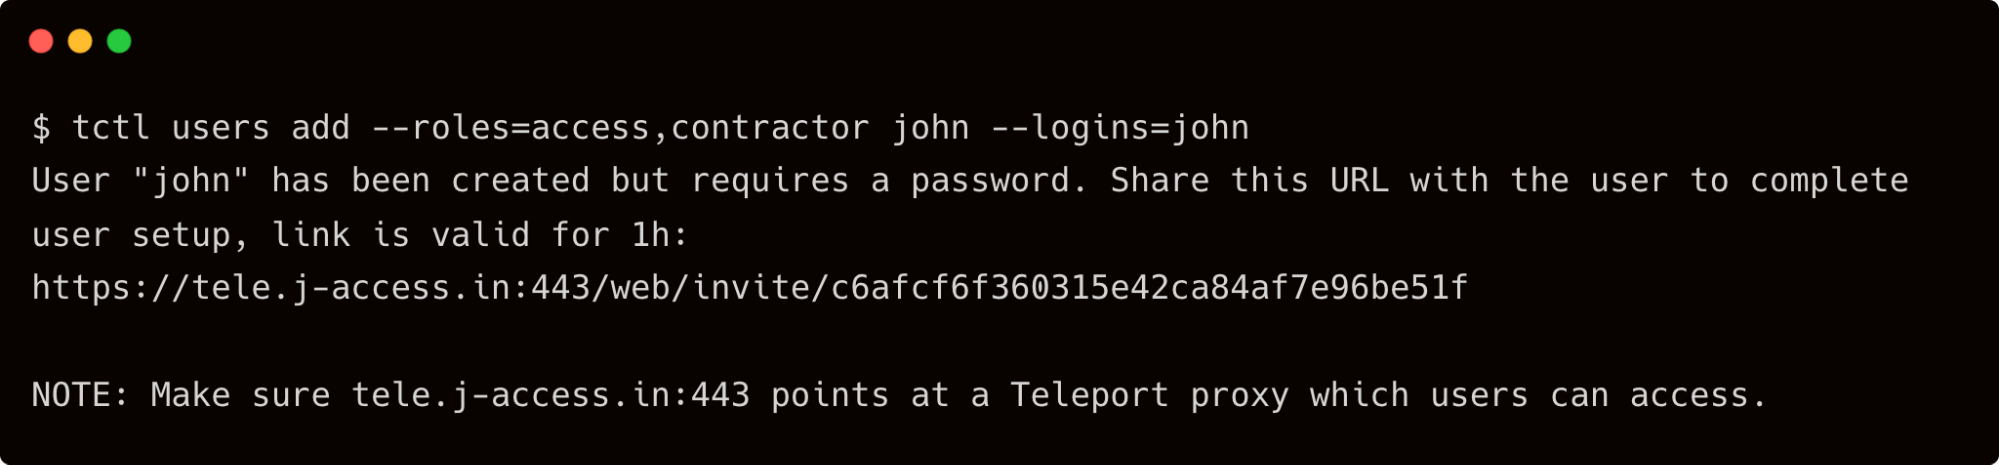
Next, let's create another user — john — who is a contractor but can occasionally become a DBA.
$ tctl users add --roles=access,contractor john --logins=john
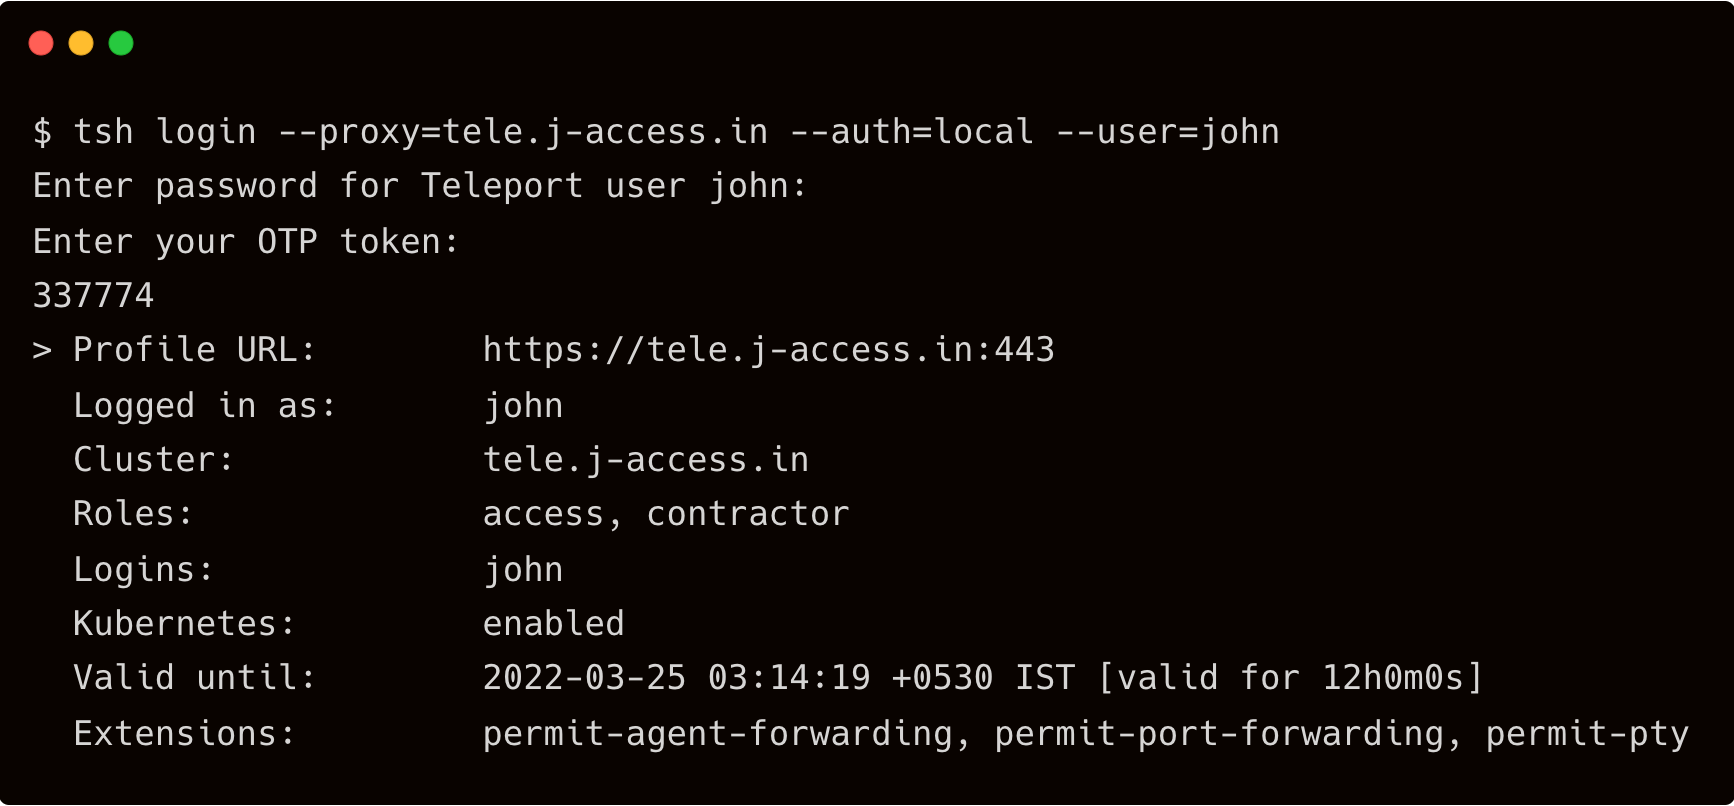
Test if john can SSH into the dbserver with his username and also as a dba.
$ tsh login --proxy=tele.j-access.in --auth=local --user=john
$ tsh ssh john@dbserver
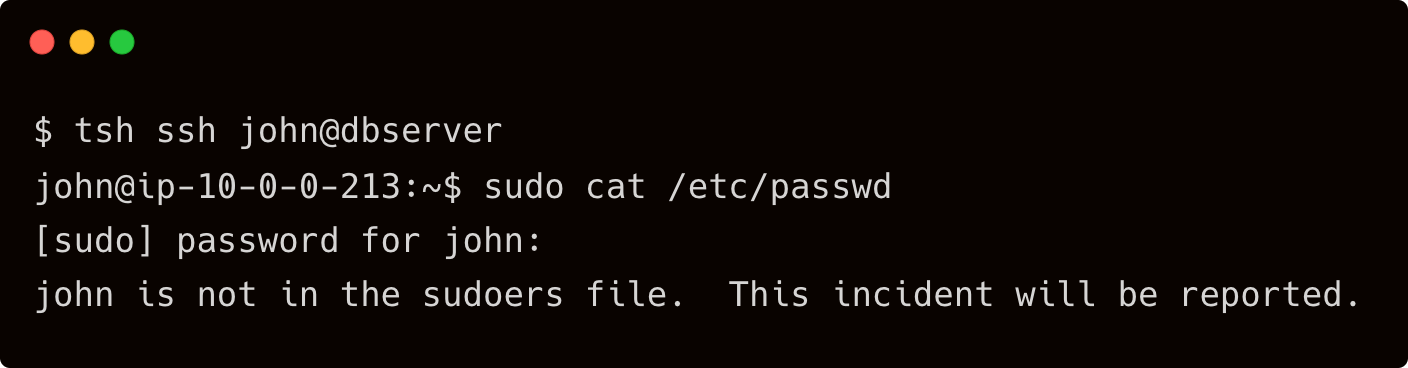
While john is able to SSH into the dbserver, he doesn’t have sudo privileges.
$ tsh ssh dba@dbserver

When john tries to SSH as dba, the Teleport auth server restricts his access due to the enforced RBAC.
Let’s get a quick summary of Linux users, Teleport users and the associated roles.
| Teleport User | Persona | Teleport Roles | Linux User |
|---|---|---|---|
| Dave | Team Leader | access,auditor,editor,team-lead | Ubuntu |
| John | Contractor | access,contractor | john |
| John | DBA* | access,dba | dba |
Note that John will become a DBA for an hour only when Dave approves his request.
Step 2 - Implementing privilege escalation workflow
Since John is allowed to assume the role of a DBA temporarily, he has to raise a request.
Run the below command to initiate the request:
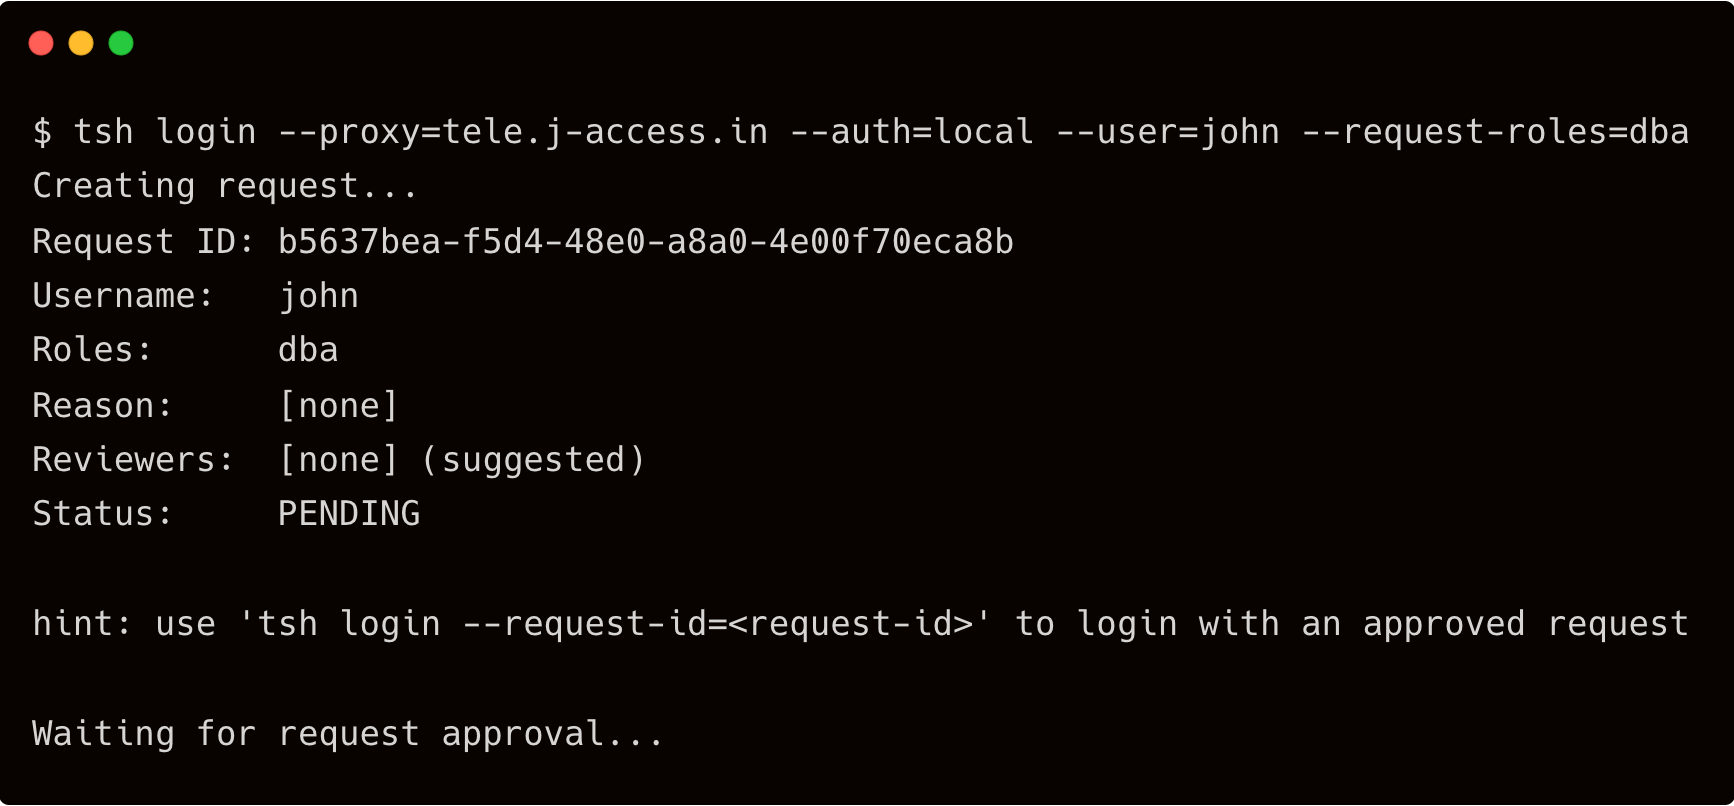
$ tsh login --proxy=tele.j-access.in --auth=local --user=john --request-roles=dba

Open another terminal window, and login into Teleport as user dave, the team leader.
$ tsh login --proxy=tele.j-access.in --auth=local --user=dave
Check the pending requests for privilege escalation with the below command:
$ tctl request ls
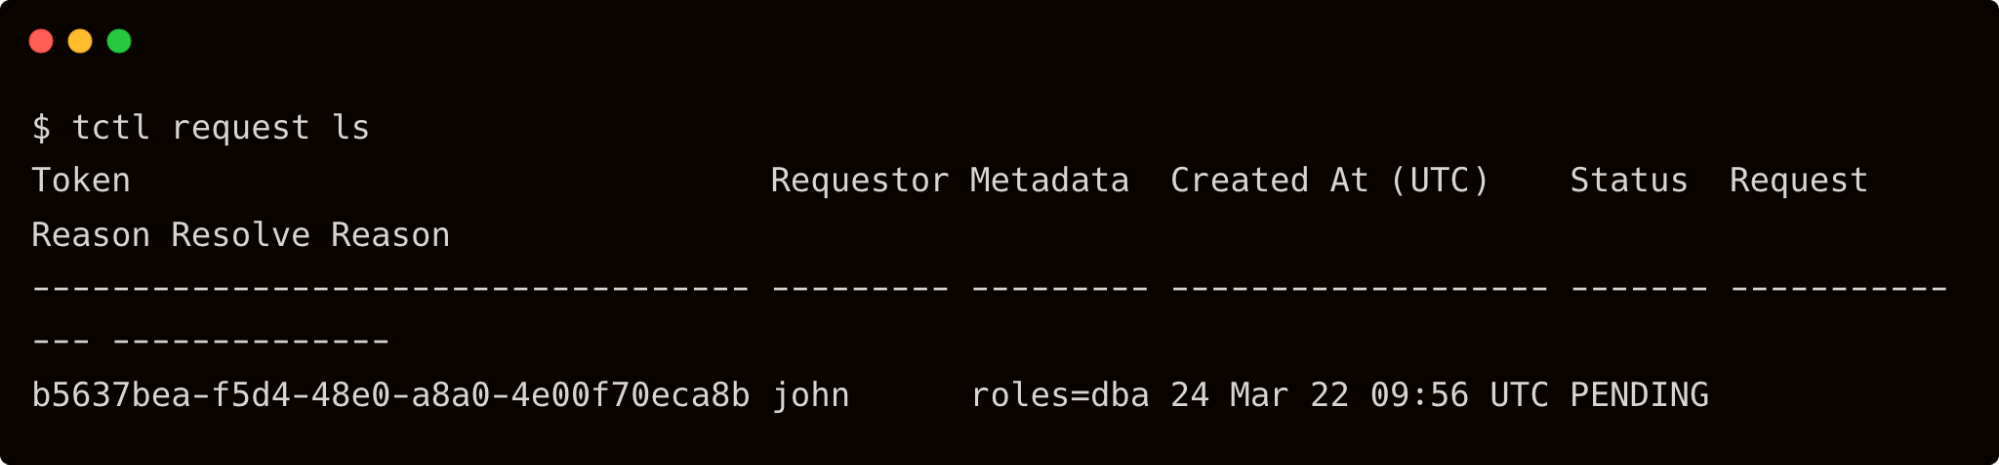
Dave can now approve the request raised by John to become a DBA for one hour.
tctl request approve b5637bea-f5d4-48e0-a8a0-4e00f70eca8b
As soon as the request is approved, John sees the below output on his terminal:
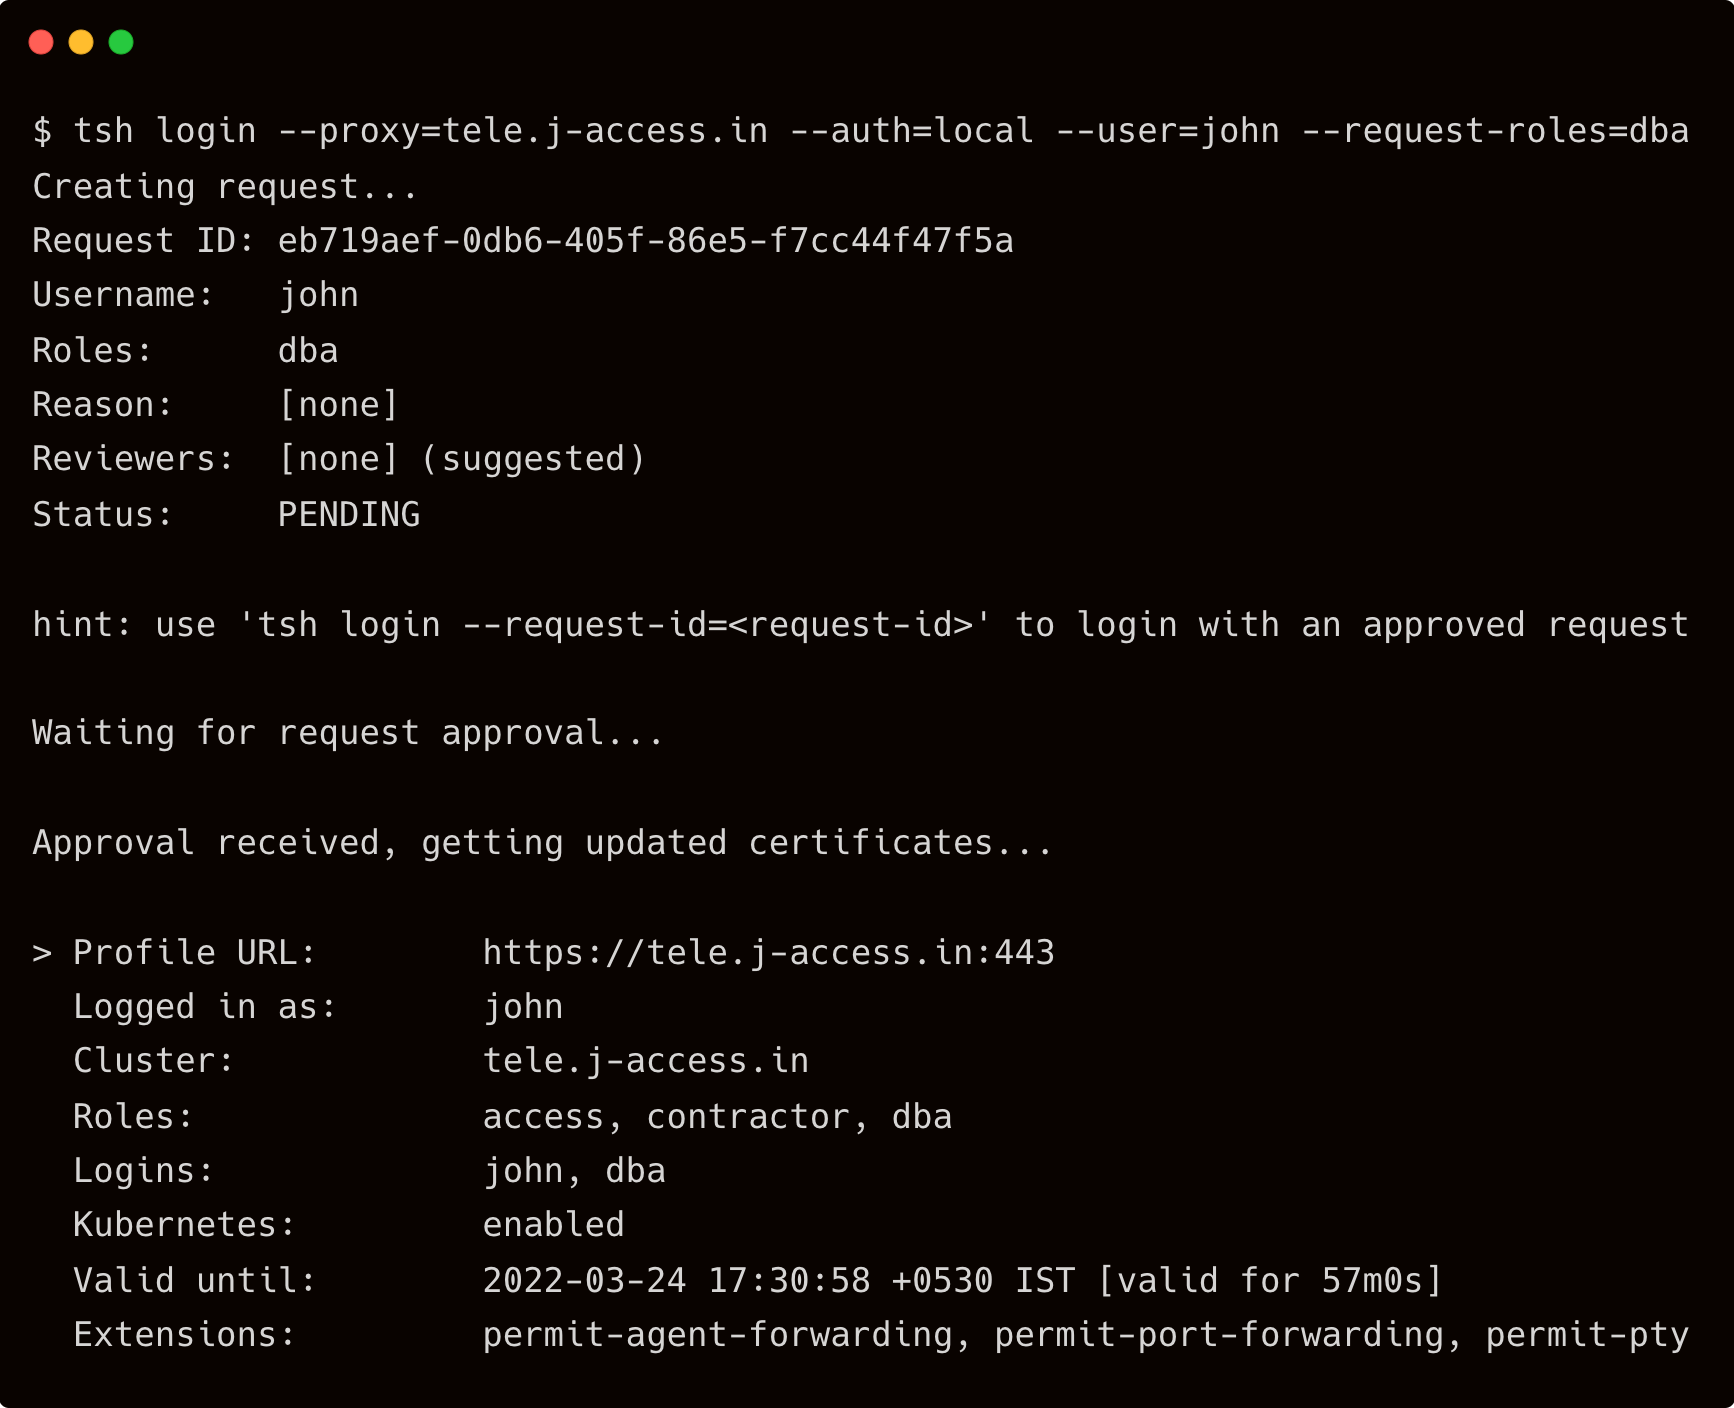
Notice that the dba role is added to the approved roles that’s valid for 57m0s.
Now, let’s check if John can really become a DBA.
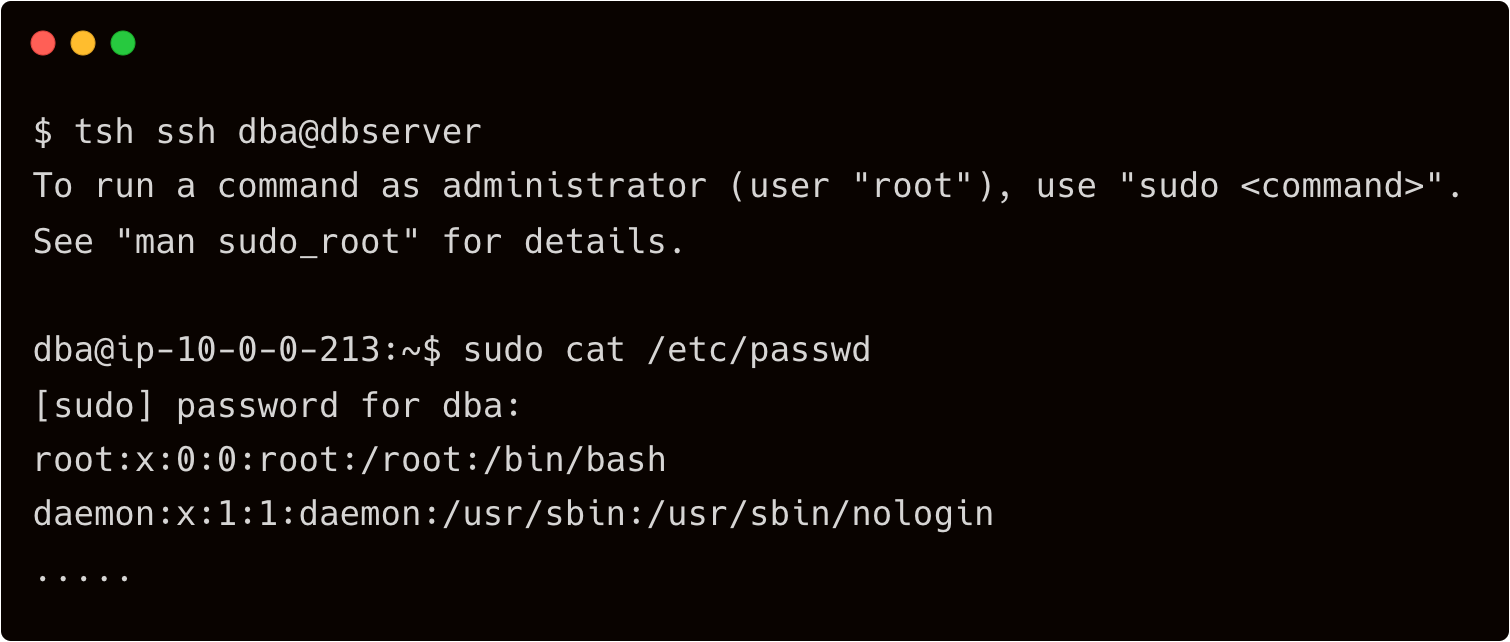
Indeed, John is the DBA with sudo privileges. He can now perform the server maintenance tasks. After the time window expires, he has to request Dave again for a new session with escalated privilege.
When John raises a request, Dave needs to be notified that there is a pending request waiting for his approval. For sending the alert, let’s configure Slack which sends an alert to Dave when his attention is needed.
Step 3 - Configuring Slack to approve or reject access requests
First, we should create a user and a role required by the Slack plugin.
$ vi access-plugin.yaml
kind: user
metadata:
  name: access-plugin
spec:
  roles: ['access-plugin']
version: v2
---
kind: role
version: v5
metadata:
  name: access-plugin
spec:
  allow:
    rules:
      - resources: ['access_request']
        verbs: ['list', 'read']
      - resources: ['access_plugin_data']
        verbs: ['update']

$ tctl create -f access-plugin.yaml
Teleport's plugins use the access-plugin role and user to approve access requests. We export the identity files to this plugin.
Sign into Teleport as Dave to impersonate the access-plugin user to export the identity files.
$ tsh login --proxy=tele.j-access.in --auth=local --user=dave
$ tctl auth sign --format=tls --user=access-plugin --out=auth --ttl=2190h
The above command dumps three files — auth.key, auth.cas, and auth.crt. We will need these files to complete one of the later steps of the tutorial.
Now is the time to configure the Slack application. Visit https://api.slack.com/apps to create a new Slack app.
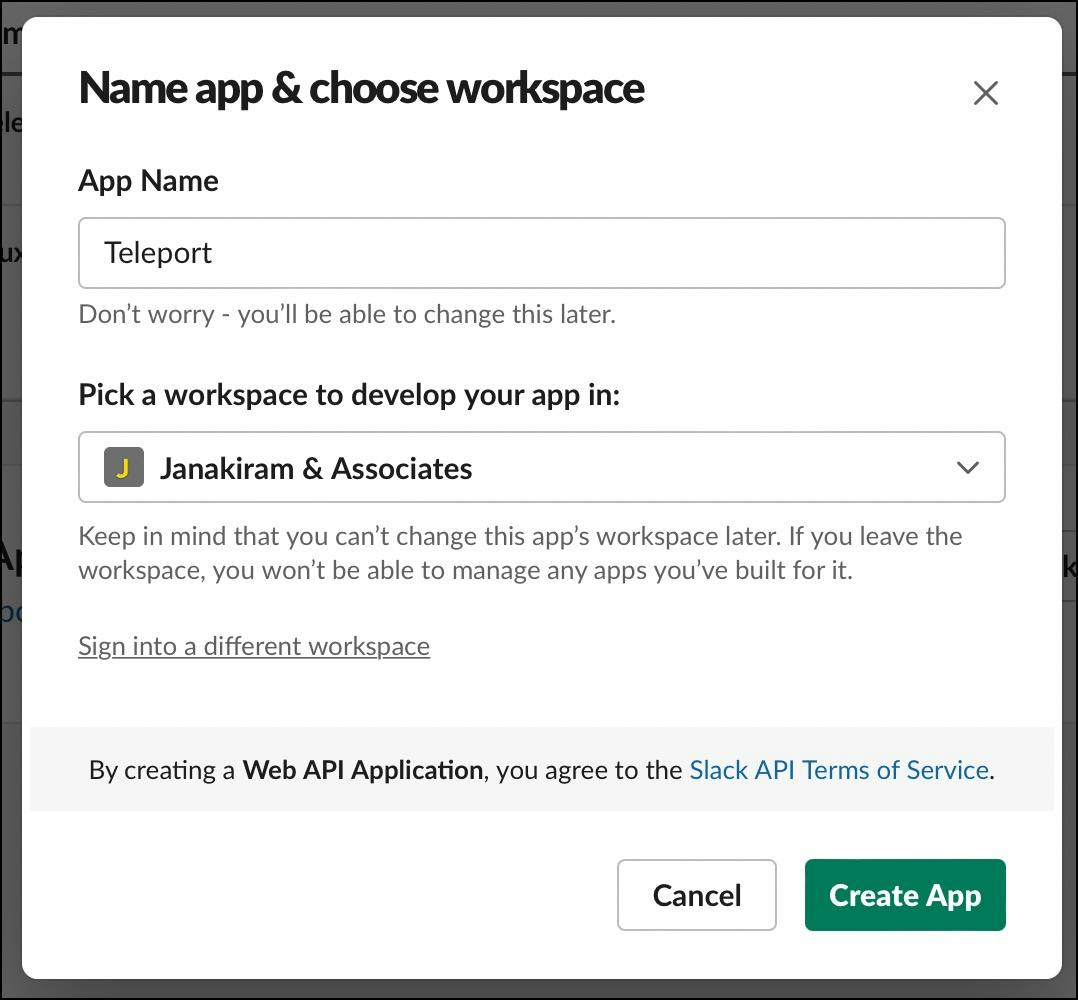
Give the app a name and choose the workplace where you want to get the notification.
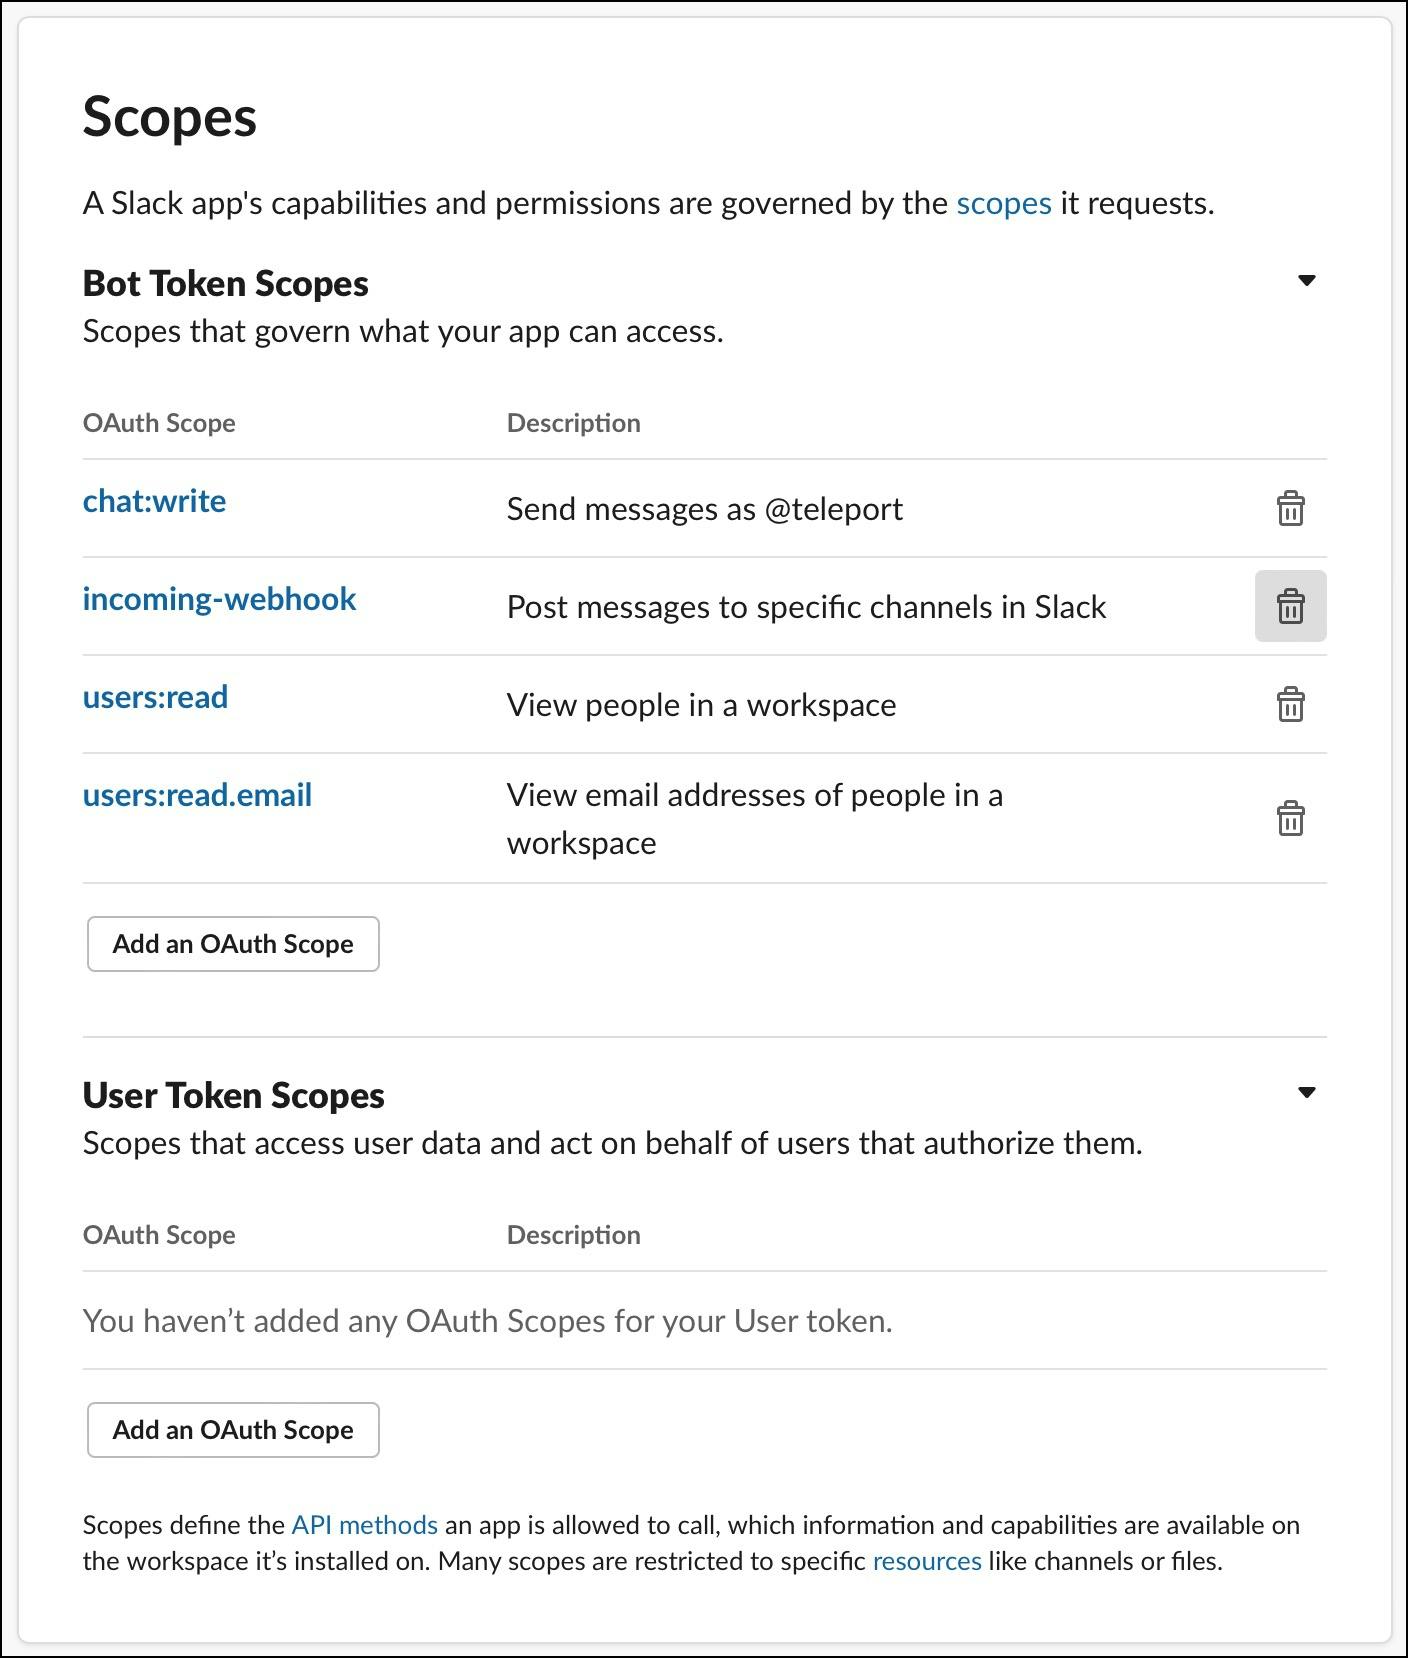
Under the OAuth and Permissions section of the left navigation bar, choose scopes and add chat:write, incoming-webhook, users:read, users:read.email oAuth scopes. This will let the plugin post messages to the Slack channel.
Access the Bot User oAuth token and copy it for later use.
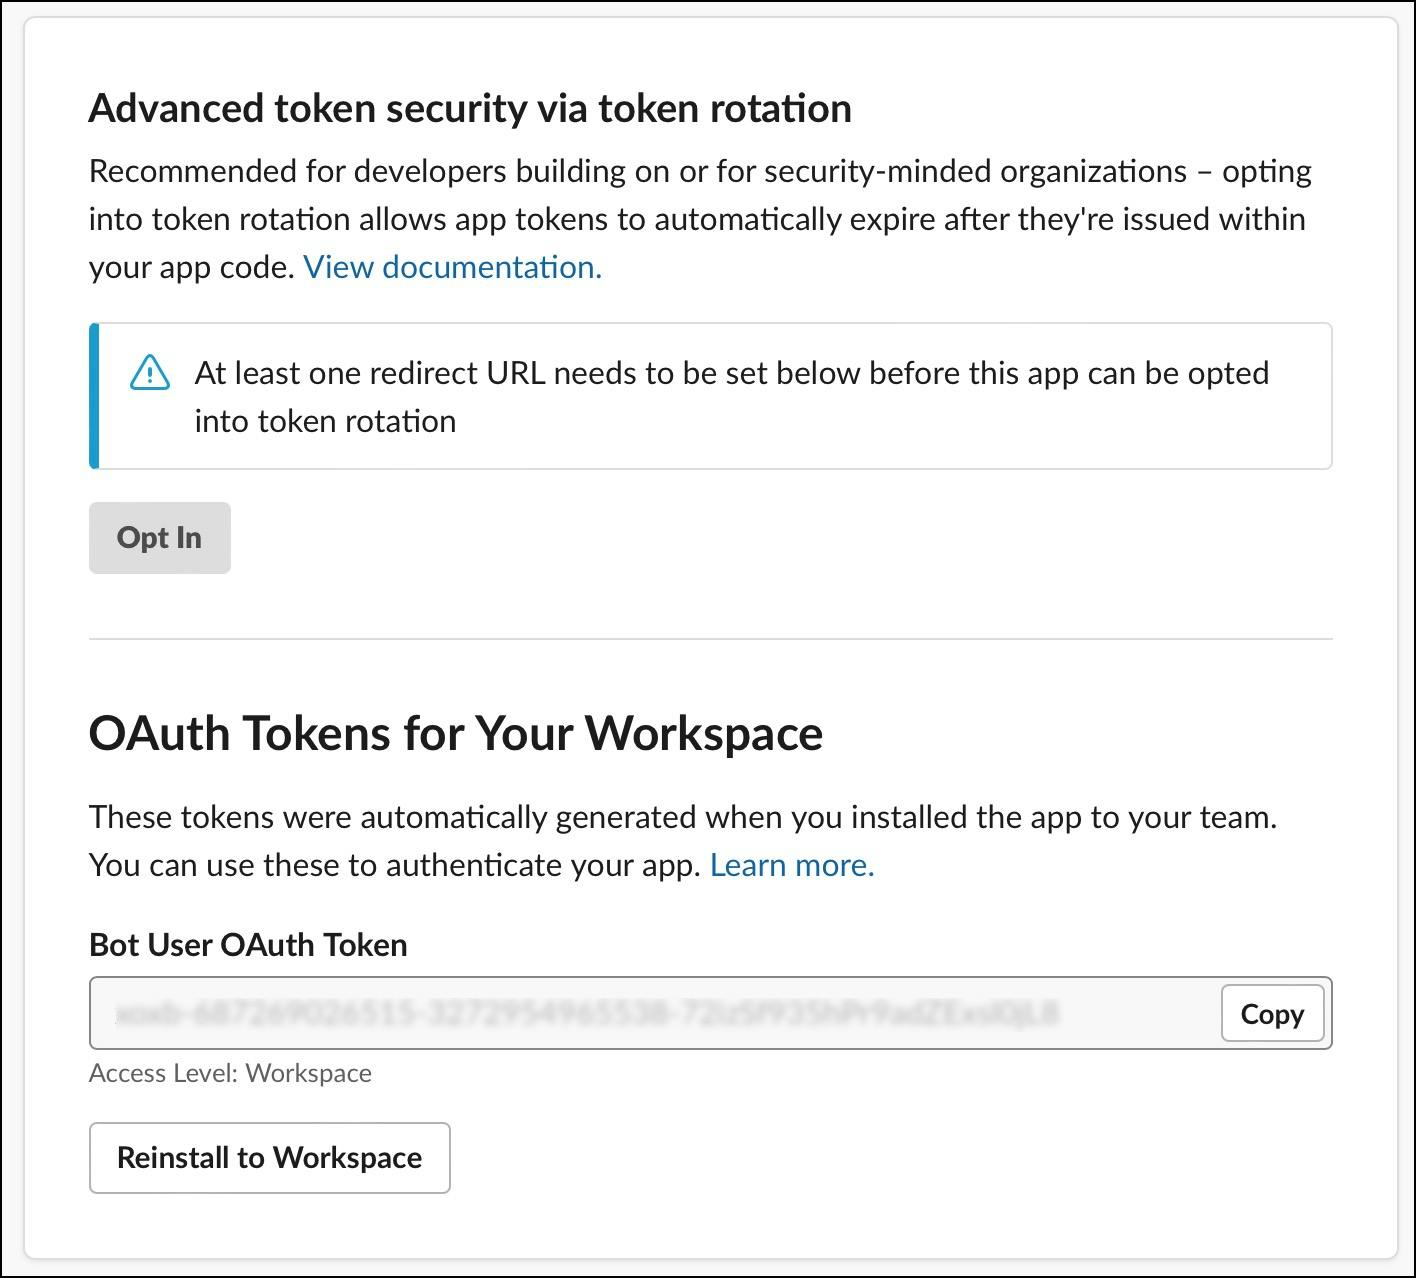
Install the app in your workspace by allowing the bot to access the channel.
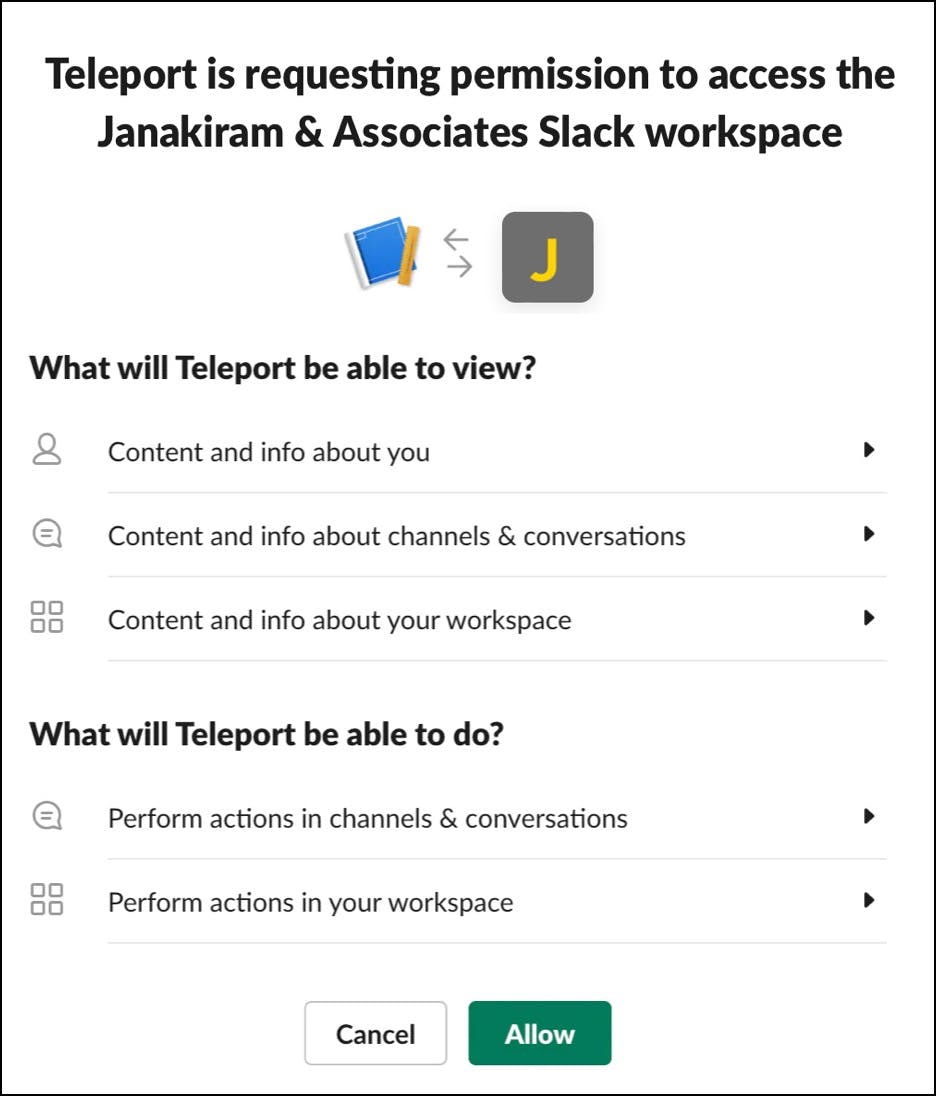
Finally, invite the Teleport bot into the teams channel in your Slack app.

With the Slack bot in place, let’s connect that to Teleport.
SSH into Teleport proxy and run the below commands that download and install the Slack plugin.
# Note: Please replace the version number to be the same major version as your Teleport version.
$ curl -L https://get.gravitational.com/teleport-access-slack-v15.1.9-linux-amd64-bin.tar.gz
$ tar -xzf teleport-access-slack-v15.1.9-linux-amd64-bin.tar.gz
$ cd teleport-access-slack
$ ./install

Copy the auth files — `auth.key`, `auth.cas` and `auth.crt` — generated earlier to the `/var/lib/teleport/plugins/slack/` directory.

Create the file by name teleport-slack.toml under the /etc/ directory with the below content:

```yaml
# Example Slack plugin configuration TOML file

[teleport]

# Teleport Auth/Proxy Server address.
# addr = "example.com:3025"
#
# Should be port 3025 for Auth Server and 3080 or 443 for Proxy.
# For Teleport Cloud, should be in the form "your-account.teleport.sh:443".

# Credentials generated with `tctl auth sign`.
#
# When using --format=file:
# identity = "/var/lib/teleport/plugins/slack/identity"   # Identity file
# refresh_identity = true                                 # Refresh identity file on a periodic basis
#
# When using --format=tls:
# client_key = "/var/lib/teleport/plugins/slack/auth.key" # Teleport TLS secret key
# client_crt = "/var/lib/teleport/plugins/slack/auth.crt" # Teleport TLS certificate
# root_cas = "/var/lib/teleport/plugins/slack/auth.cas"   # Teleport CA certs

[slack]
# Slack Bot OAuth token
# You can also use an absolute path to a token file, e.g.,
# "/var/lib/teleport/token"
token = "xoxb-11xx"

[role_to_recipients]
# Map roles to recipients.
#
# Provide slack user_email/channel recipients for access requests for specific roles.
# role.suggested_reviewers will automatically be treated as additional email recipients.
# "*" must be provided to match non-specified roles.
#
# "dev" = "devs-slack-channel"
# "*" = ["[email protected]", "admin-slack-channel"]

[log]
output = "stderr" # Logger output. Could be "stdout", "stderr" or "/var/lib/teleport/slack.log"
severity = "INFO" # Logger severity. Could be "INFO", "ERROR", "DEBUG" or "WARN".
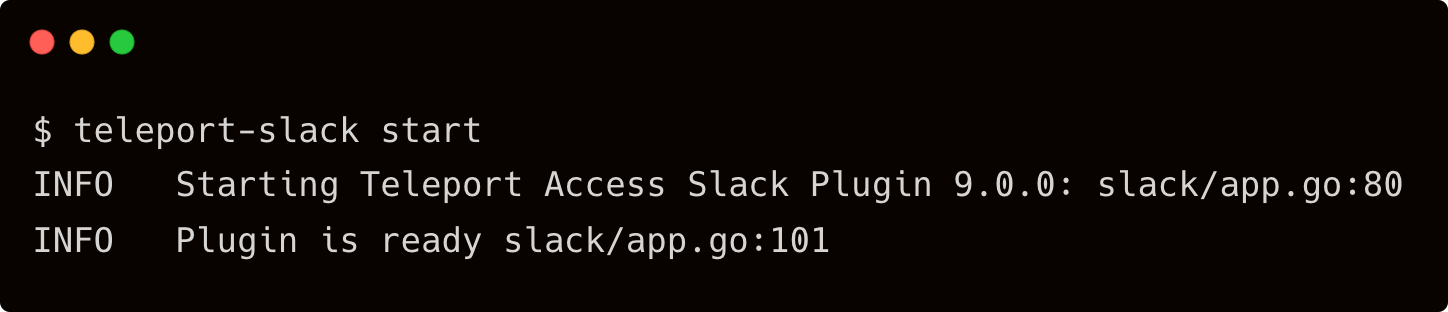
Launch another terminal and SSH into Teleport proxy to start the Slack plugin.
$ teleport-slack start
In your workstation, login to Teleport proxy as user john requesting for privileged access
$ tsh login --proxy=tele.j-access.in --auth=local --user=john --request-roles=dba
Immediately, you will get a Slack notification with the request.
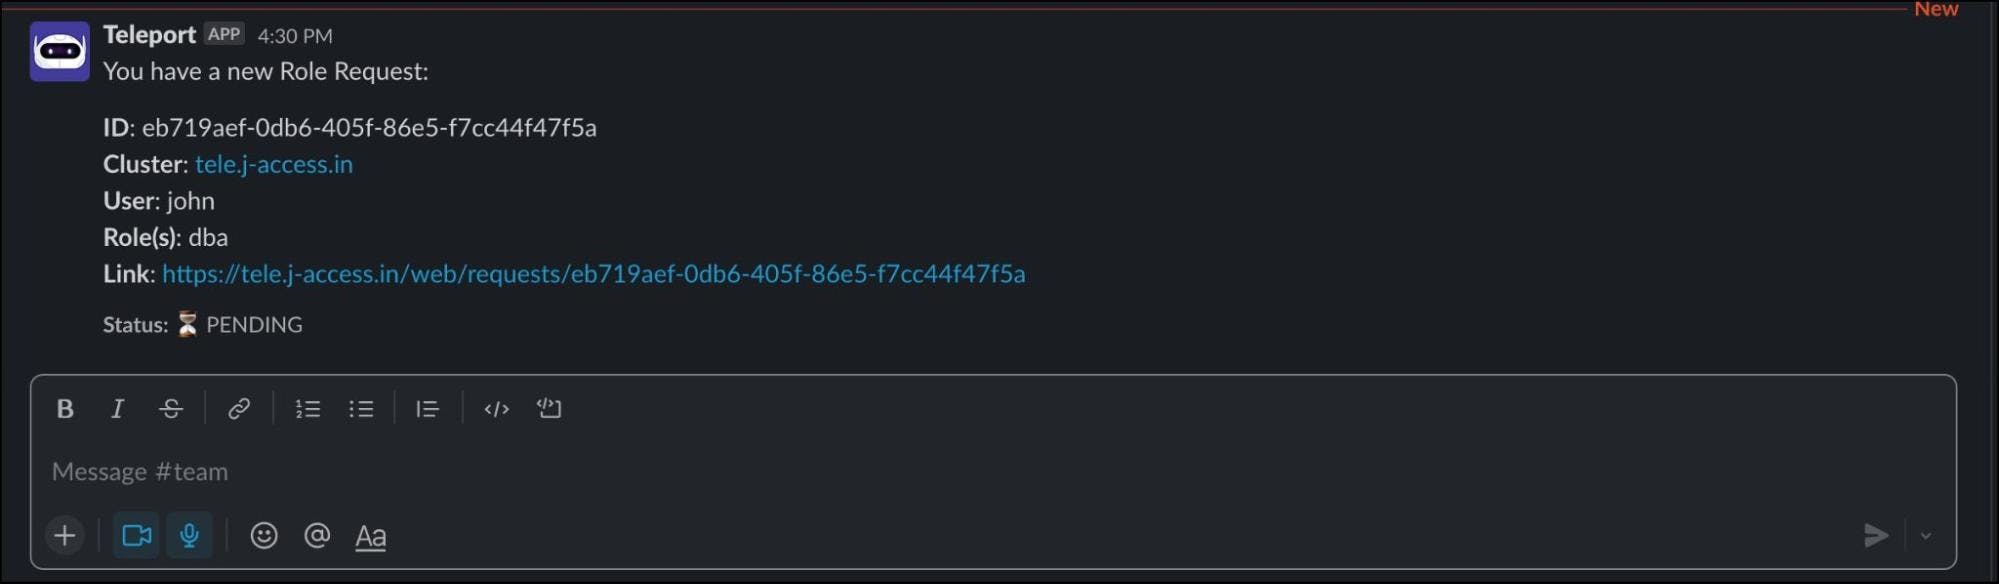
Click the link and login to the web UI as Dave. You should see a request waiting for his approval.

As soon as it is approved, John’s terminal shows that the login request is approved.
Conclusion
This scenario demonstrated integrating Teleport RBAC with Slack to perform a just-in-time privilege escalation based on ChatOps. It highlights the need to configure time-bound SSH sessions to avoid credential exploitation and possible misconfiguration of servers. The integration with Slack brings an intuitive alerting and approval process to the workflow. Teleport's RBAC combined with Slack delivers a simple yet powerful mechanism of just-in-time privilege escalation. Learn more on how Teleport supports advanced authorization use cases using dual authorization, and moderated sessions.
Try Teleport cloud for free today — https://goteleport.com/signup/
Tags
Teleport Newsletter
Stay up-to-date with the newest Teleport releases by subscribing to our monthly updates.


Subscribe to our newsletter
